Introduction
I have been building Agentic AI applications for a couple of years and shared some of the learnings (see previous blogs at the end). In most cases, I used Python with LangChain and LangGraph frameworks because they provide integration with local and cloud based LLM providers. However, the real challenge isn’t building one AI agent. It’s running 10,000 of them reliably, across teams, across nodes, without one team’s runaway model budget crashing another’s pipeline. This post is about the other problem: the infrastructure problem, which is fundamentally a distributed systems problem.
Most AI frameworks don’t even acknowledge that coordinating large scale agents is a distributed systems problem (See FLP theorem and Byzantine Generals Bound). You cannot engineer your way out of these constraints with better prompts or better models. You need explicit coordination protocols, failure detection, and external validation, which is at the heart of distributed systems. This is where the actor model comes in. Actors have been part of core abstractions for distributed computing since 1970s and can be easily used to structure agents. I first learned about actors and Linda memory model back in college during my post-doc research in distributed systems and used them to build frameworks for solving computational problems in HPC at scale. Actors provide the coordination substrate that makes distributed agent systems provably safer:
- Isolated state: means no shared memory corruption and a misinterpreting agent cannot corrupt another agent’s state.
- Message passing: makes coordination explicit and auditable without shared memory/locks.
- Supervision trees: give you crash detection and recovery, e.g., when an agent fails (Byzantine or otherwise), the supervisor restarts it, links can propagate failures, and monitors can trigger compensating actions.
- Durable state: with the
durabilityfacet means consensus progress survives node crashes. - TupleSpace coordination: gives you Linda-model consensus patterns without deadlock: write-once slots, pattern-matched reads, blocking takes, which are the building blocks of coordination protocols.
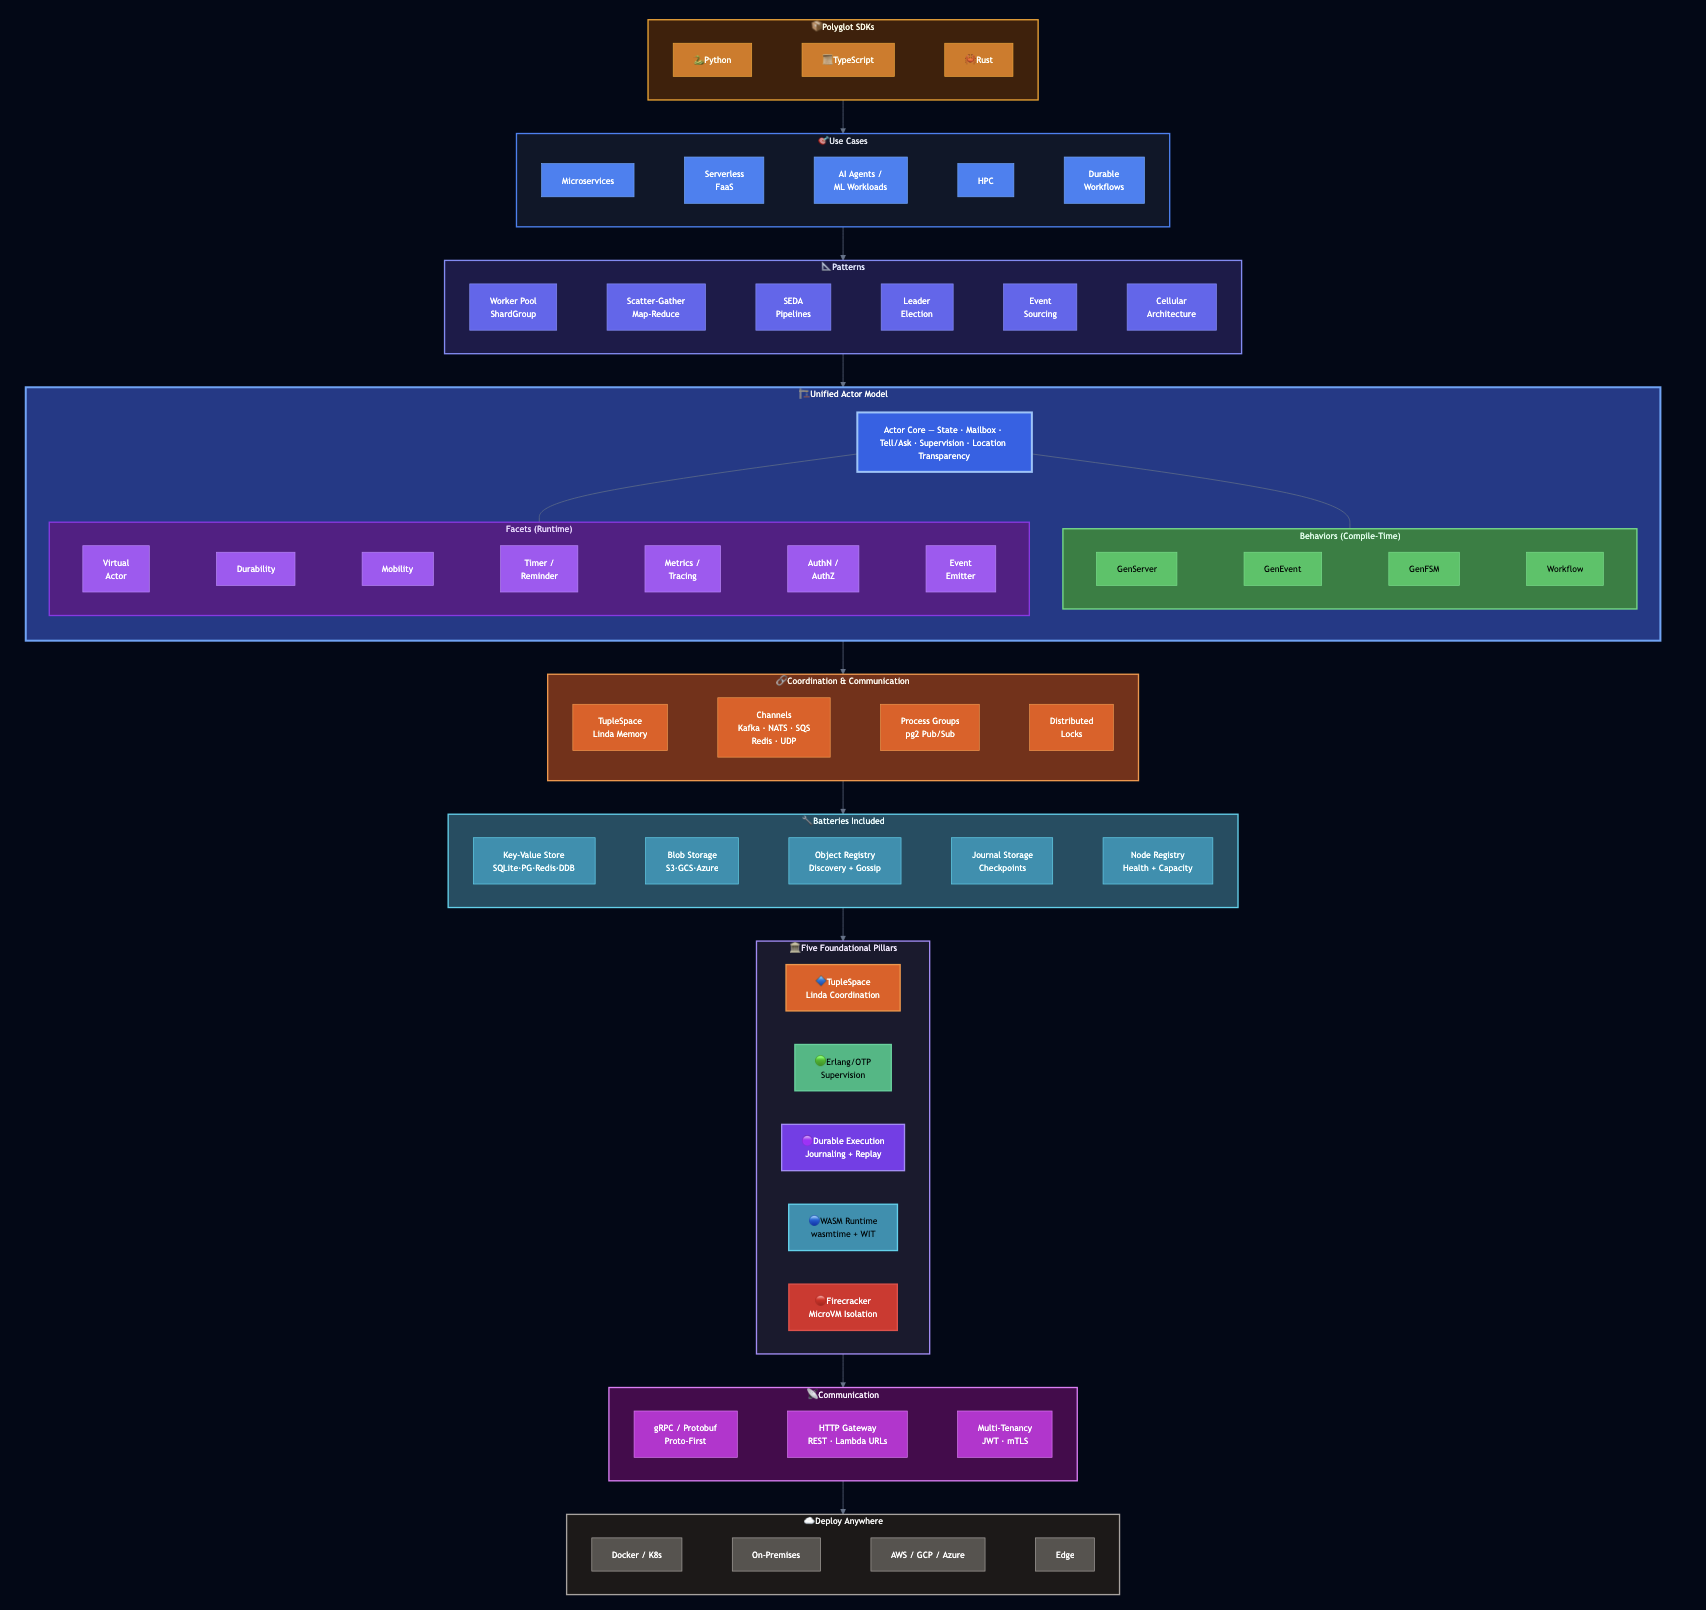
Every major AI framework today picks one problem and solves it well. For example, LangChain gives you chains, AutoGen gives you multi-agent conversations, Ray gives you distributed compute. But when you need all of these like stateful agents, distributed execution, durable pipelines, multi-tenant isolation, MCP tool calling, AllReduce gradient synchronization, AND the coordination substrate that makes distributed agents safe, you have to stitch together five systems. I wrote PlexSpaces actors system to solve scalable computational problems. It can be used to treat each agent as an actor: isolated state, message-driven communication, location-transparent routing, built-in fault tolerance. This framework supports polyglot development where applications can be written in Python, Go, Rust, or TypeScript. This post shows how to implement AI workload patterns concretely. For the theory behind why the actor model fits AI workloads so naturally, see my earlier post on PlexSpaces foundations. For the polyglot WASM runtime that makes four-language deployment possible, see the WebAssembly deep-dive. This post is about AI agent patterns specifically.
Part 1: Why Actors Are the Right Foundation for Distributed Agents
1.1 The Actor-Agent Isomorphism
An LLM agent has four things: state (conversation history, tool results), a processing loop (receive message -> reason -> act), communication (call tools, delegate to other agents), and failure modes (timeouts, hallucinations, rate limits). An actor has exactly the same structure. This isn’t a coincidence. Both actors and agents are inspired by the same computational model: isolated units of stateful computation that communicate by passing messages. Here is a Python research agent in 18 lines:
# examples/python/apps/a2a_multi_agent — ResearchAgent pattern
@actor(facets=["virtual_actor", "durability"])
class ResearchAgent:
"""Each actor IS an agent: isolated state + message-driven + fault-tolerant."""
history: list = state(default_factory=list)
queries_handled: int = state(default=0)
agent_id: str = state(default="")
@init_handler
def on_init(self, config: dict) -> None:
self.agent_id = config.get("actor_id", "")
# Register in service registry — write-once so supervisor instance wins
_ts_register_service("research", self.agent_id)
@handler("research")
def research(self, query: str = "", from_actor: str = "") -> dict:
self.queries_handled += 1
self.history.append({"query": query, "ts": host.now_ms()})
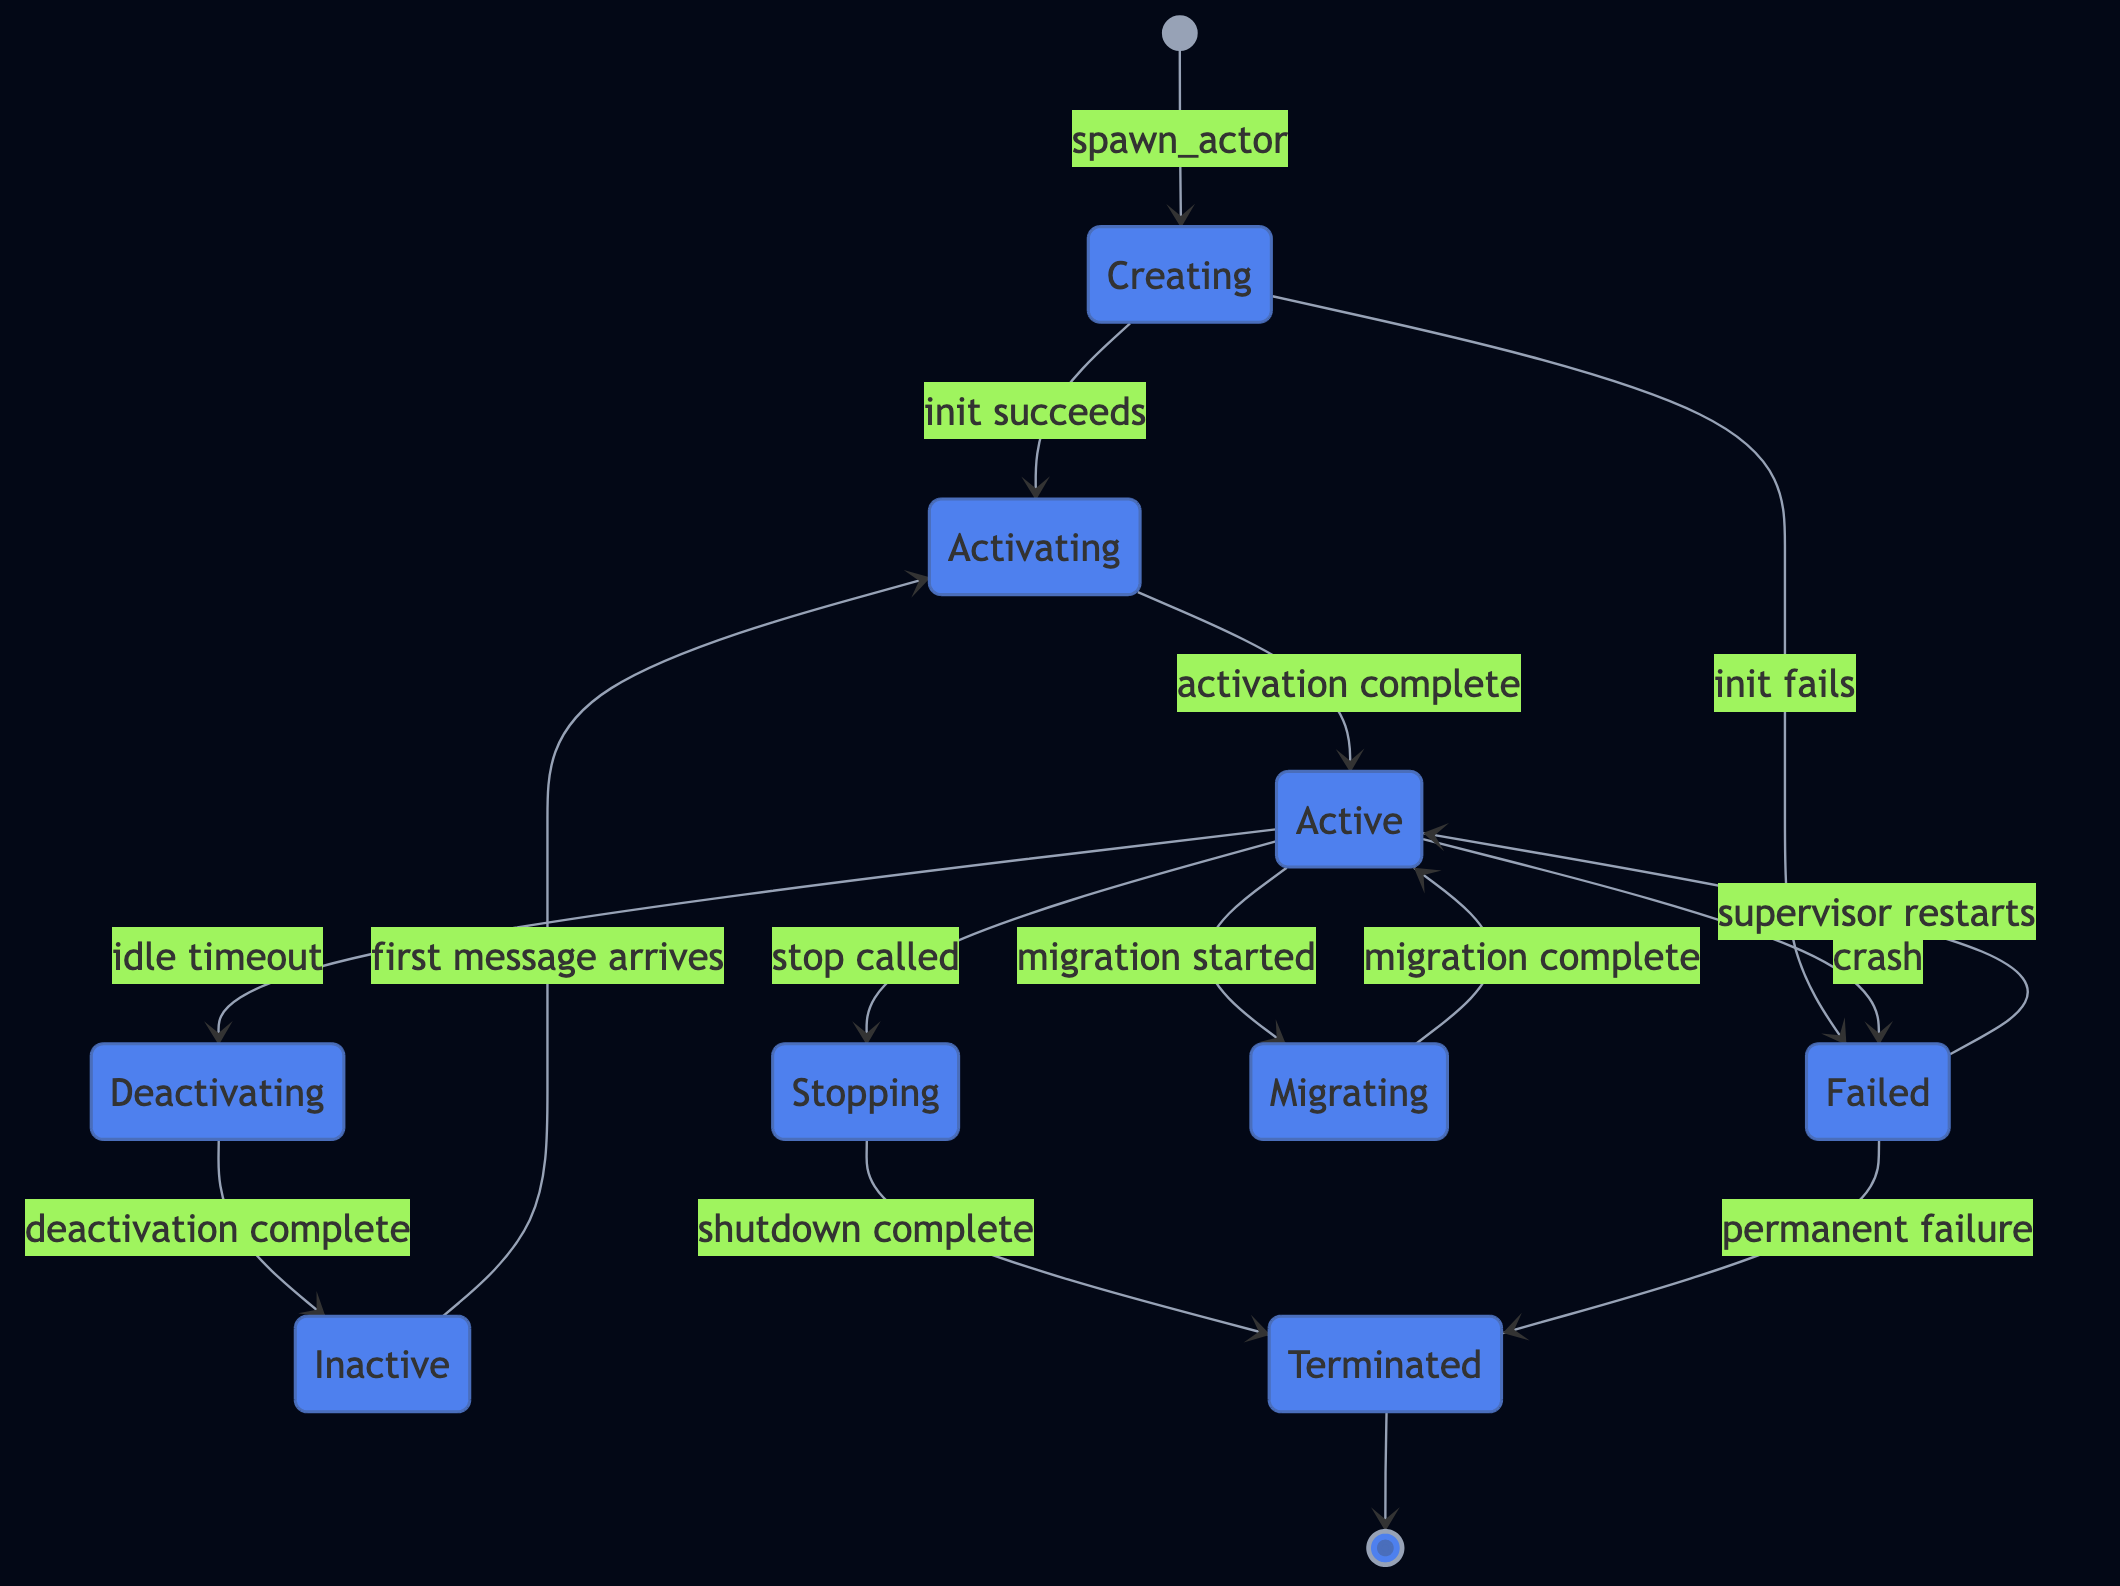
return {"result": f"Research result for: {query}", "agent_id": self.agent_id}The @actor decorator registers this as a GenServer actor. The durability facet checkpoints state automatically if the node crashes mid-query, the agent resumes from the last checkpoint. The virtual_actor facet activates the agent on demand and deactivates it when idle, so you pay nothing at rest.
Notice _ts_register_service("research", self.agent_id): this is the TupleSpace write-once service registry pattern. The first instance to call this writes the slot. Any subsequent instance finds the slot already taken and skips registration. This is how you implement safe service discovery without process groups that generate noisy warnings or risk routing to the wrong instance.
Agentic coding naturally favors small, composable actors. A researcher, an analyzer, a writer, each focused on one capability, composable via message passing. The Go a2a_multi_agent example makes this concrete: four actors (registry, researcher, analyzer, writer) each do one thing and delegate everything else.
1.2 The Distributed Consensus Problem in Multi-Agent Systems
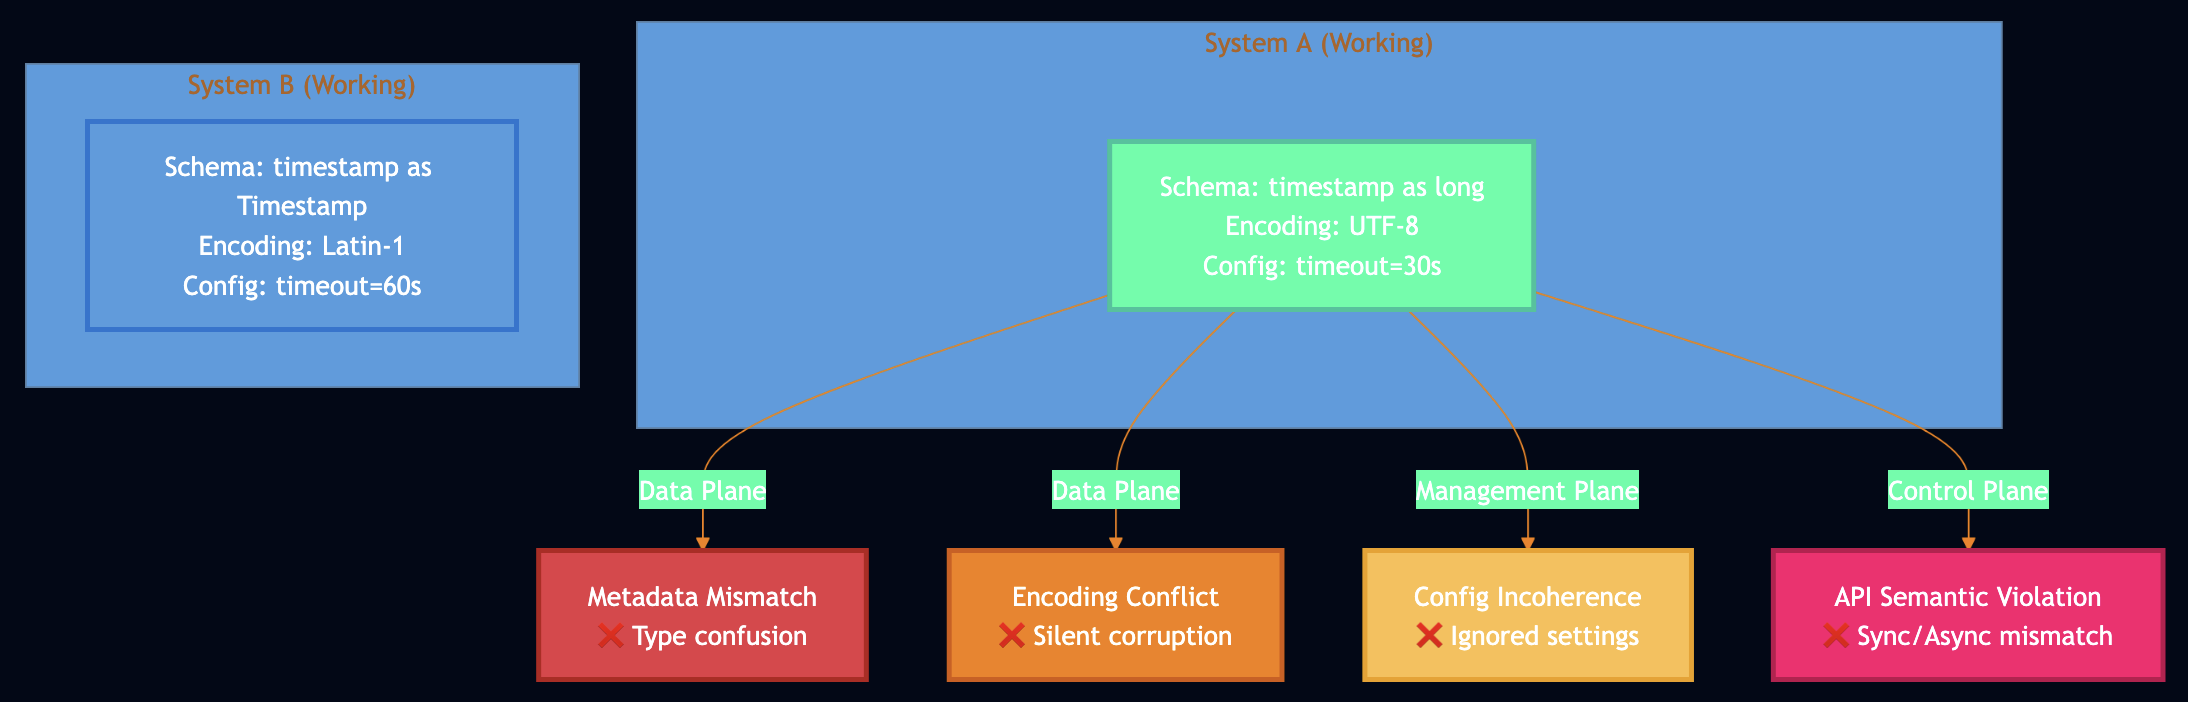
When you run multiple LLM agents in parallel to speed up a complex coding task, to parallelize a RAG pipeline, to run specialist agents for different subtasks, you are building a distributed system. And distributed systems have properties that no amount of LLM capability improvement will change. Consider a prompt: “Build a REST API for user management with authentication.” This prompt is under specified. It admits at least these valid interpretations:
- JWT vs session-based auth
- REST vs GraphQL
- PostgreSQL vs MongoDB
- Monolith vs microservices
If you run four parallel agents on this prompt and each picks a different interpretation, you don’t get a coherent system, instead you get four incompatible subsystems. At ten agents this is a debugging problem. At ten thousand agents running across twenty nodes, this is a production incident at 3 AM. The agents must coordinate their design choices. That coordination is a consensus problem.
- FLP Theorem: If agents communicate asynchronously (messages may be delayed arbitrarily) and any agent can crash (network failure, context limit, rate limiting), then no deterministic protocol can guarantee both safety (all agents agree on correct output) and liveness (the system eventually produces output).
- Byzantine bound: Treat a misinterpreting agent as a Byzantine node, it sends plausible-looking messages but with incorrect content. Correct consensus requires fewer than 1/3 of agents to be Byzantine. If three of your ten agents hallucinate an incompatible API shape, you may not be able to reach correct consensus at all.
What follows from this:
- External validation (tests, type checking, static analysis) converts silent misinterpretations into detectable failures, e.g., Byzantine nodes become crash-detectable nodes, which is a strictly easier problem to solve.
- Explicit coordination protocols (not “talk to each other until you agree”) give you provable properties.
- Liveness requires failure detection. An agent that has crashed must be detected and either recovered or bypassed.
PlexSpaces provides all three, baked into the actor model:
| Distributed Systems Need | PlexSpaces Mechanism |
|---|---|
| Failure detection | host.monitor(actorID): get notified when an actor dies |
| Crash recovery | Supervisor tree: automatic restart with configurable strategy |
| Coordination protocol | TupleSpace write-once slots with explicit, auditable coordination |
| External validation | ValidatorActor pattern with external check before accepting output |
| Byzantine isolation | Per-actor isolated state so that a misinterpreting actor cannot corrupt others |
| Liveness under crashes | durability facet so that progress survives node restarts |
1.3 Failure Detection and Liveness: host.monitor()
Agents need “liveness-checking tools for better fault detection.” In PlexSpaces, this is host.monitor() and host.link() , following Erlang’s location-transparent supervision philosophy.
- Monitor: any actor watches any other. When the monitored actor stops, the monitoring actor receives
__DOWN__in its mailbox and stays alive. Themonitor_refreturned byhost.monitor()lets you cancel the watch withhost.demonitor(). - Link: bidirectional fate-sharing.
__EXIT__is delivered only on abnormal exits (error, kill). Normal shutdown does not cascade. Usehost.unlink()before graceful shutdown to avoid spurious propagation.
The example below is from examples/python/apps/ai_monitor_link_supervision:
# examples/python/apps/ai_monitor_link_supervision/ai_monitor_link_actor.py

@gen_server_actor
class ValidatorAgent:
    """Monitors workers; detects Byzantine faults; applies FLP >= 1/3 alert threshold."""
    monitor_refs: dict = state(default_factory=dict)   # worker_id -> monitor_ref
    down_events: list = state(default_factory=list)
    byzantine_count: int = state(default=0)
    total_validations: int = state(default=0)
    FLP_THRESHOLD = 1.0 / 3.0

    @handler("__DOWN__", "cast")
    def on_down(self, monitor_ref: str = "", down_from: str = "", down_reason: str = "") -> None:
        """Monitored worker stopped — one-way notification. ValidatorAgent stays alive.

        DOWN fires on ANY exit: normal, error, shutdown, kill. The monitoring actor
        decides what to do — this is Akka Death Watch semantics, not Erlang trap_exit.
        """
        self.down_events.append({"down_from": down_from, "down_reason": down_reason})
        # Remove stale watch entry so we don't leak monitor refs
        for wid, ref in list(self.monitor_refs.items()):
            if ref == monitor_ref:
                del self.monitor_refs[wid]
                break

    @handler("monitor_worker")
    def on_monitor_worker(self, worker_id: str = "") -> dict:
        """One-way watch. Returns monitor_ref for future demonitor() call."""
        monitor_ref = host.monitor(worker_id)
        self.monitor_refs[worker_id] = monitor_ref
        return {"status": "ok", "monitor_ref": monitor_ref}

    @handler("demonitor_worker")
    def on_demonitor_worker(self, worker_id: str = "") -> dict:
        """Cancel watch — used when gracefully replacing a worker."""
        ref = self.monitor_refs.pop(worker_id, None)
        if ref:
            host.demonitor(ref)   # idempotent: safe to call multiple times
        return {"status": "ok", "worker_id": worker_id}

    @handler("validate")
    def on_validate(self, result: str = "", worker_id: str = "") -> dict:
        """Apply FLP-inspired Byzantine threshold: >= 1/3 flagged ? alert.

        FLP theorem: no deterministic async protocol can guarantee both safety and
        liveness with even one crash. Monitors give us the failure signal; this
        threshold decides when to escalate.
        """
        self.total_validations += 1
        is_byzantine = any(p in result.lower() for p in ["42 is the answer", "null", "checkpoint corrupted"])
        if is_byzantine:
            self.byzantine_count += 1
        flp_ratio = self.byzantine_count / self.total_validations if self.total_validations else 0.0
        return {"valid": not is_byzantine, "flp_threshold_exceeded": flp_ratio >= self.FLP_THRESHOLD}


@gen_server_actor
class InferenceWorker:
    """LLM inference worker. Uses host.link() for bidirectional fate-sharing with peer workers."""
    linked_peers: list = state(default_factory=list)

    @handler("__EXIT__", "cast")
    def on_exit(self, exit_from: str = "", exit_reason: str = "") -> None:
        """Linked peer died abnormally — clean up and continue.

        __EXIT__ fires ONLY on abnormal exits (error, kill). Normal shutdown does
        NOT propagate — use host.unlink() before graceful shutdown to prevent cascade.
        """
        if exit_from in self.linked_peers:
            self.linked_peers.remove(exit_from)

    @handler("link_with")
    def on_link_with(self, peer_id: str = "") -> dict:
        host.link(peer_id)          # bidirectional: if either dies abnormally, other gets __EXIT__
        self.linked_peers.append(peer_id)
        return {"status": "ok", "peer_id": peer_id}

    @handler("unlink_from")
    def on_unlink_from(self, peer_id: str = "") -> dict:
        host.unlink(peer_id)        # decouple before graceful shutdown — no cascade
        self.linked_peers = [p for p in self.linked_peers if p != peer_id]
        return {"status": "ok", "peer_id": peer_id}
This is liveness management at the actor level. The ValidatorAgent stays alive even when a worker crashes and __DOWN__ is informational, not fatal. The InferenceWorker handles __EXIT__ only from abnormal peer failures; normal shutdowns don’t cascade because the supervisor calls unlink_from first.
The down_from / down_reason header names match the create_down_message wire format used by every PlexSpaces node. The same pattern works identically in Go, TypeScript, and Rust WASM (see examples/*/apps/ai_monitor_link_supervision for all four languages).
1.4 Four Behaviors, Four Agent Archetypes
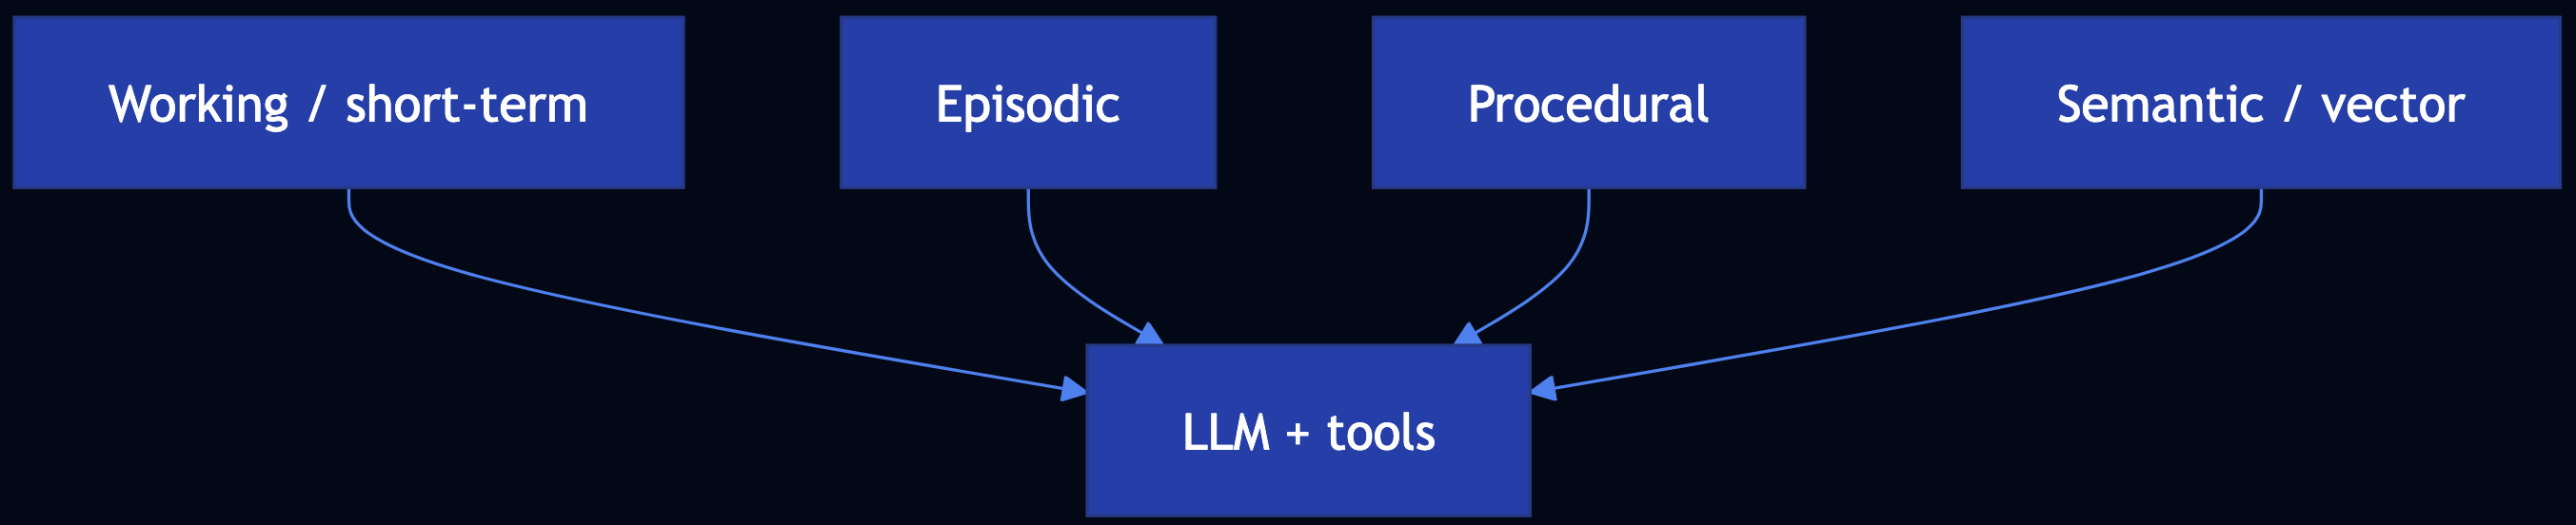
PlexSpaces provides four behavior types, each mapping naturally to a class of AI agent:
| Behavior | Decorator | Agent Archetype | Example |
|---|---|---|---|
| GenServer | @actor | Tool executor, stateful helper | Search agent, RAG retriever |
| GenEvent | @event_actor | Audit logger, event publisher | Usage tracker, metrics collector |
| GenFSM | @fsm_actor | State-machine agent | Circuit breaker, quality gate, budget guard |
| Workflow | @workflow_actor | Orchestrator agent | Multi-step pipeline, RAG workflow, agentic loop |
The TypeScript llm_workflow_orchestrator uses all four. The QualityFSMActor implements a quality gate with five states:
// From llm_workflow_orchestrator_actor.ts
class QualityFSMActor extends PlexSpacesActor<QualityFSMState> {
  getDefaultState(): QualityFSMState {
    return { actorId: "", fsmState: "pending", attempts: 0, lastScore: 0 };
  }

  onEvaluate(payload: Record<string, unknown>): Record<string, unknown> {
    const score = Number(payload.score ?? 0);
    this.state.attempts++;
    this.state.lastScore = score;
    if (score >= 8) {
      this.state.fsmState = "approved";
    } else if (score >= 6) {
      this.state.fsmState = this.state.attempts >= 3 ? "escalated" : "evaluating";
    } else {
      this.state.fsmState = this.state.attempts >= 3 ? "rejected" : "evaluating";
    }
    return { state: this.state.fsmState, score, attempts: this.state.attempts };
  }
}
The PipelineAuditActor uses GenEvent semantics, fire-and-forget, no reply needed:
// Fire-and-forget handler: cast (no return value)
onPipeline_step_completed(payload: Record<string, unknown>): void {
  this.state.eventsReceived++;
  this.state.lastEvent = payload;
  host.applicationMetricsAdd(this.state.actorId || "llm-orchestrator", {
    message_count: 1,
    counter_metrics: { pipeline_events: 1 },
  });
}
These two actors require zero changes to the orchestrator logic. They attach via config.
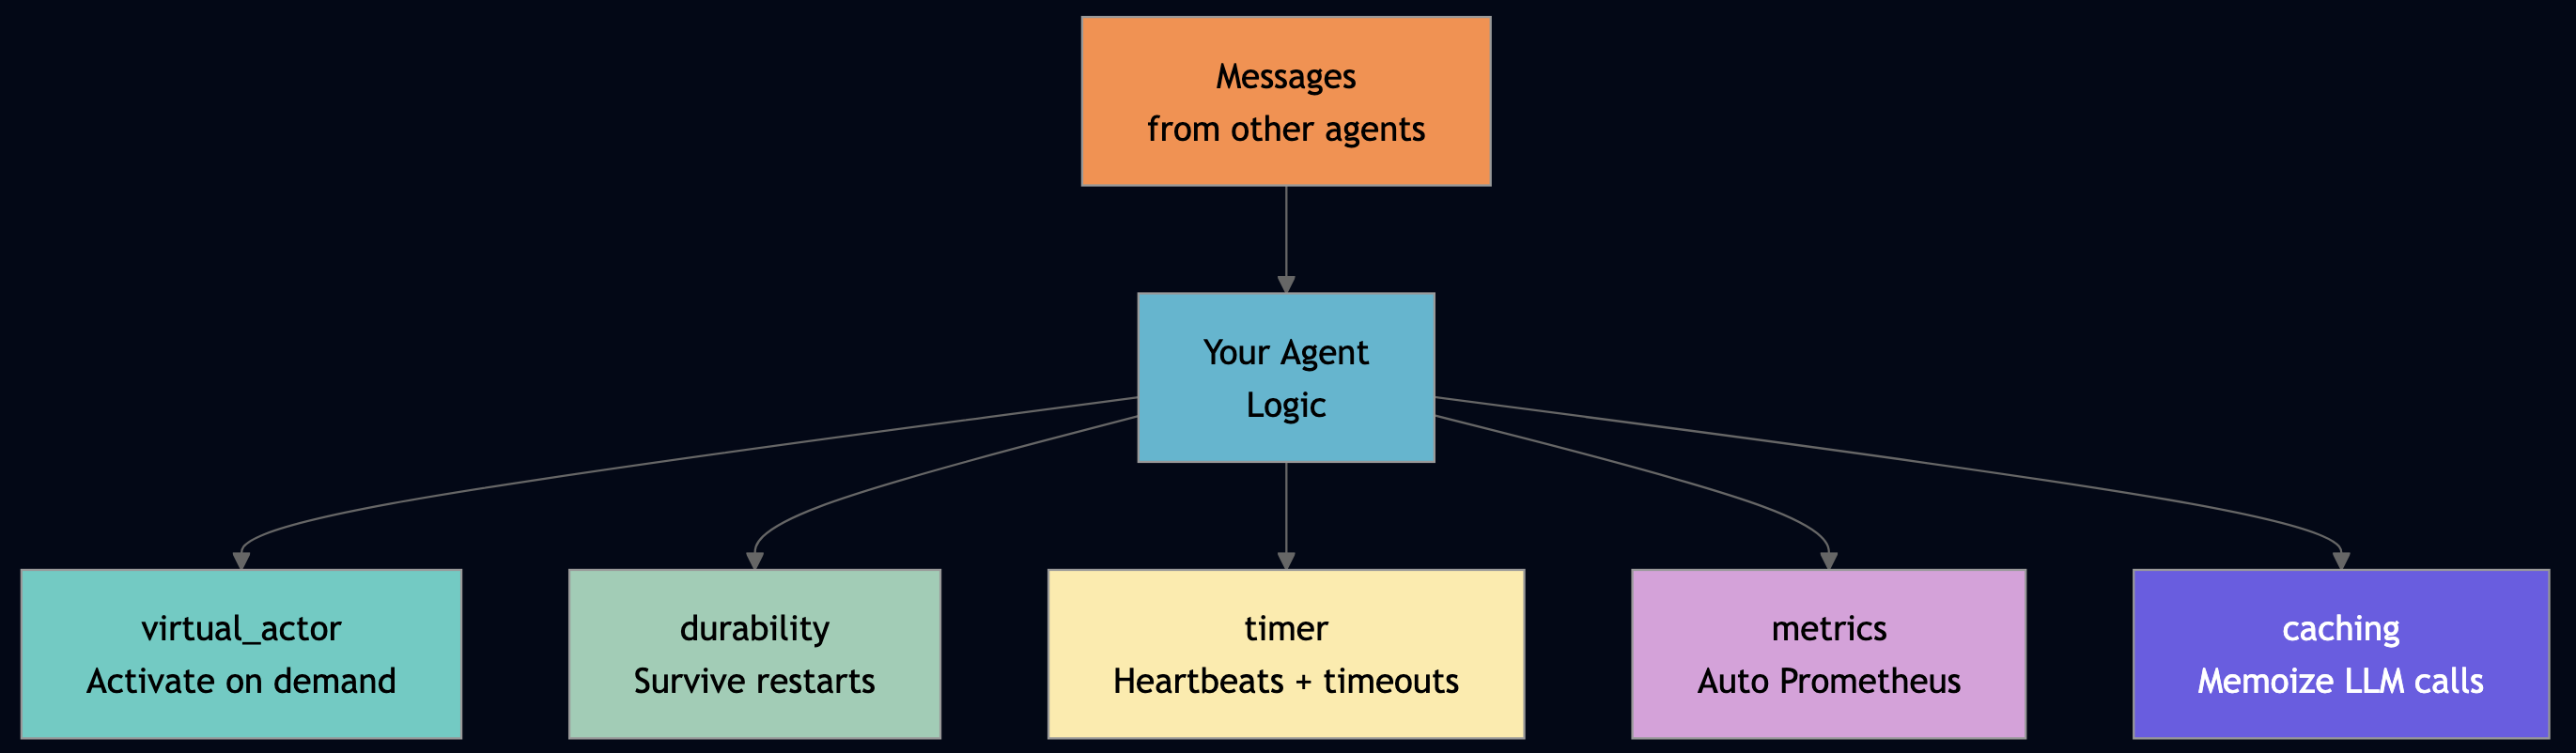
1.5 Facets: Cross-Cutting Agent Capabilities
Facets are the key architectural insight. They are pluggable capabilities that attach to actors at deployment time without code changes in the actor handler logic.
| Facet | Agent Benefit | Distributed Systems Guarantee |
|---|---|---|
virtual_actor | Activates on demand, deactivates when idle | Prevents unbounded resource consumption |
durability | Survives node restarts, state checkpointed automatically | Progress preservation across crashes (liveness) |
timer | Schedules follow-up actions, heartbeats, budget reviews | Timeout detection for hung agents |
metrics | Every interaction auto-instrumented in Prometheus | Observability for failure detection |
caching | Memoize expensive LLM calls, skip redundant computation | Reduces cost of Byzantine retries |
The updated app-config.toml for llm_workflow_orchestrator shows facets composing via config:
[[supervisor.children]]
id = "quality_fsm"
type = "quality_fsm"
behavior_kind = "GenFSM"
facets = [
  { type = "virtual_actor", priority = 100, config = { idle_timeout = "30m", activation_strategy = "lazy" } },
  { type = "durability", priority = 90, config = { checkpoint_interval = 1 } }
]
The quality FSM now checkpoints after every state transition (checkpoint_interval = 1) and deactivates after 30 minutes of inactivity. Zero lines changed in QualityFSMActor. That is the point, the business logic and the operational logic stay separate.
1.6 TupleSpace: Safe Coordination Without Race Conditions
The FLP theorem says you cannot guarantee both safety and liveness in an asynchronous system. But you can get very close by using the right coordination primitive. TupleSpace implements the Linda coordination model: write tuples, read them by pattern match, take them (destructive read). Three operations without locks or mutable state. Write-once slots give you safe service registration across concurrent actor instances:
// Go SDK — TupleSpace write-once service registration
// (from resource_aware_inference_actor.go and a2a_multi_agent_actor.go)
func tsRegisterService(serviceType, actorID string) {
    // Read first — if entry exists, skip (write-once semantics)
    if _, ok := host.TS().Read([]any{"svc", serviceType, nil}); !ok {
        host.TS().Write([]any{"svc", serviceType, actorID})
    }
}

func tsDiscoverService(serviceType string) (string, error) {
    tup, ok := host.TS().Read([]any{"svc", serviceType, nil})
    if !ok || len(tup) < 3 {
        return "", fmt.Errorf("service %q not registered", serviceType)
    }
    return tup[2].(string), nil
}
// TypeScript SDK — same pattern
function tsRegisterService(serviceType: string, actorId: string): void {
const existing = host.ts.read(["svc", serviceType, null]);
if (!existing) {
host.ts.write(["svc", serviceType, actorId]);
}
}
function tsDiscoverService(serviceType: string): string | null {
const tup = host.ts.read(["svc", serviceType, null]);
return (tup && tup.length >= 3) ? String(tup[2]) : null;
}# Python SDK — same pattern
def _ts_register_service(service_type: str, actor_id: str) -> None:
existing = host.ts_read(["svc", service_type, None])
if not existing:
host.ts_write(["svc", service_type, actor_id])
def _ts_discover_service(service_type: str) -> str | None:
tup = host.ts_read(["svc", service_type, None])
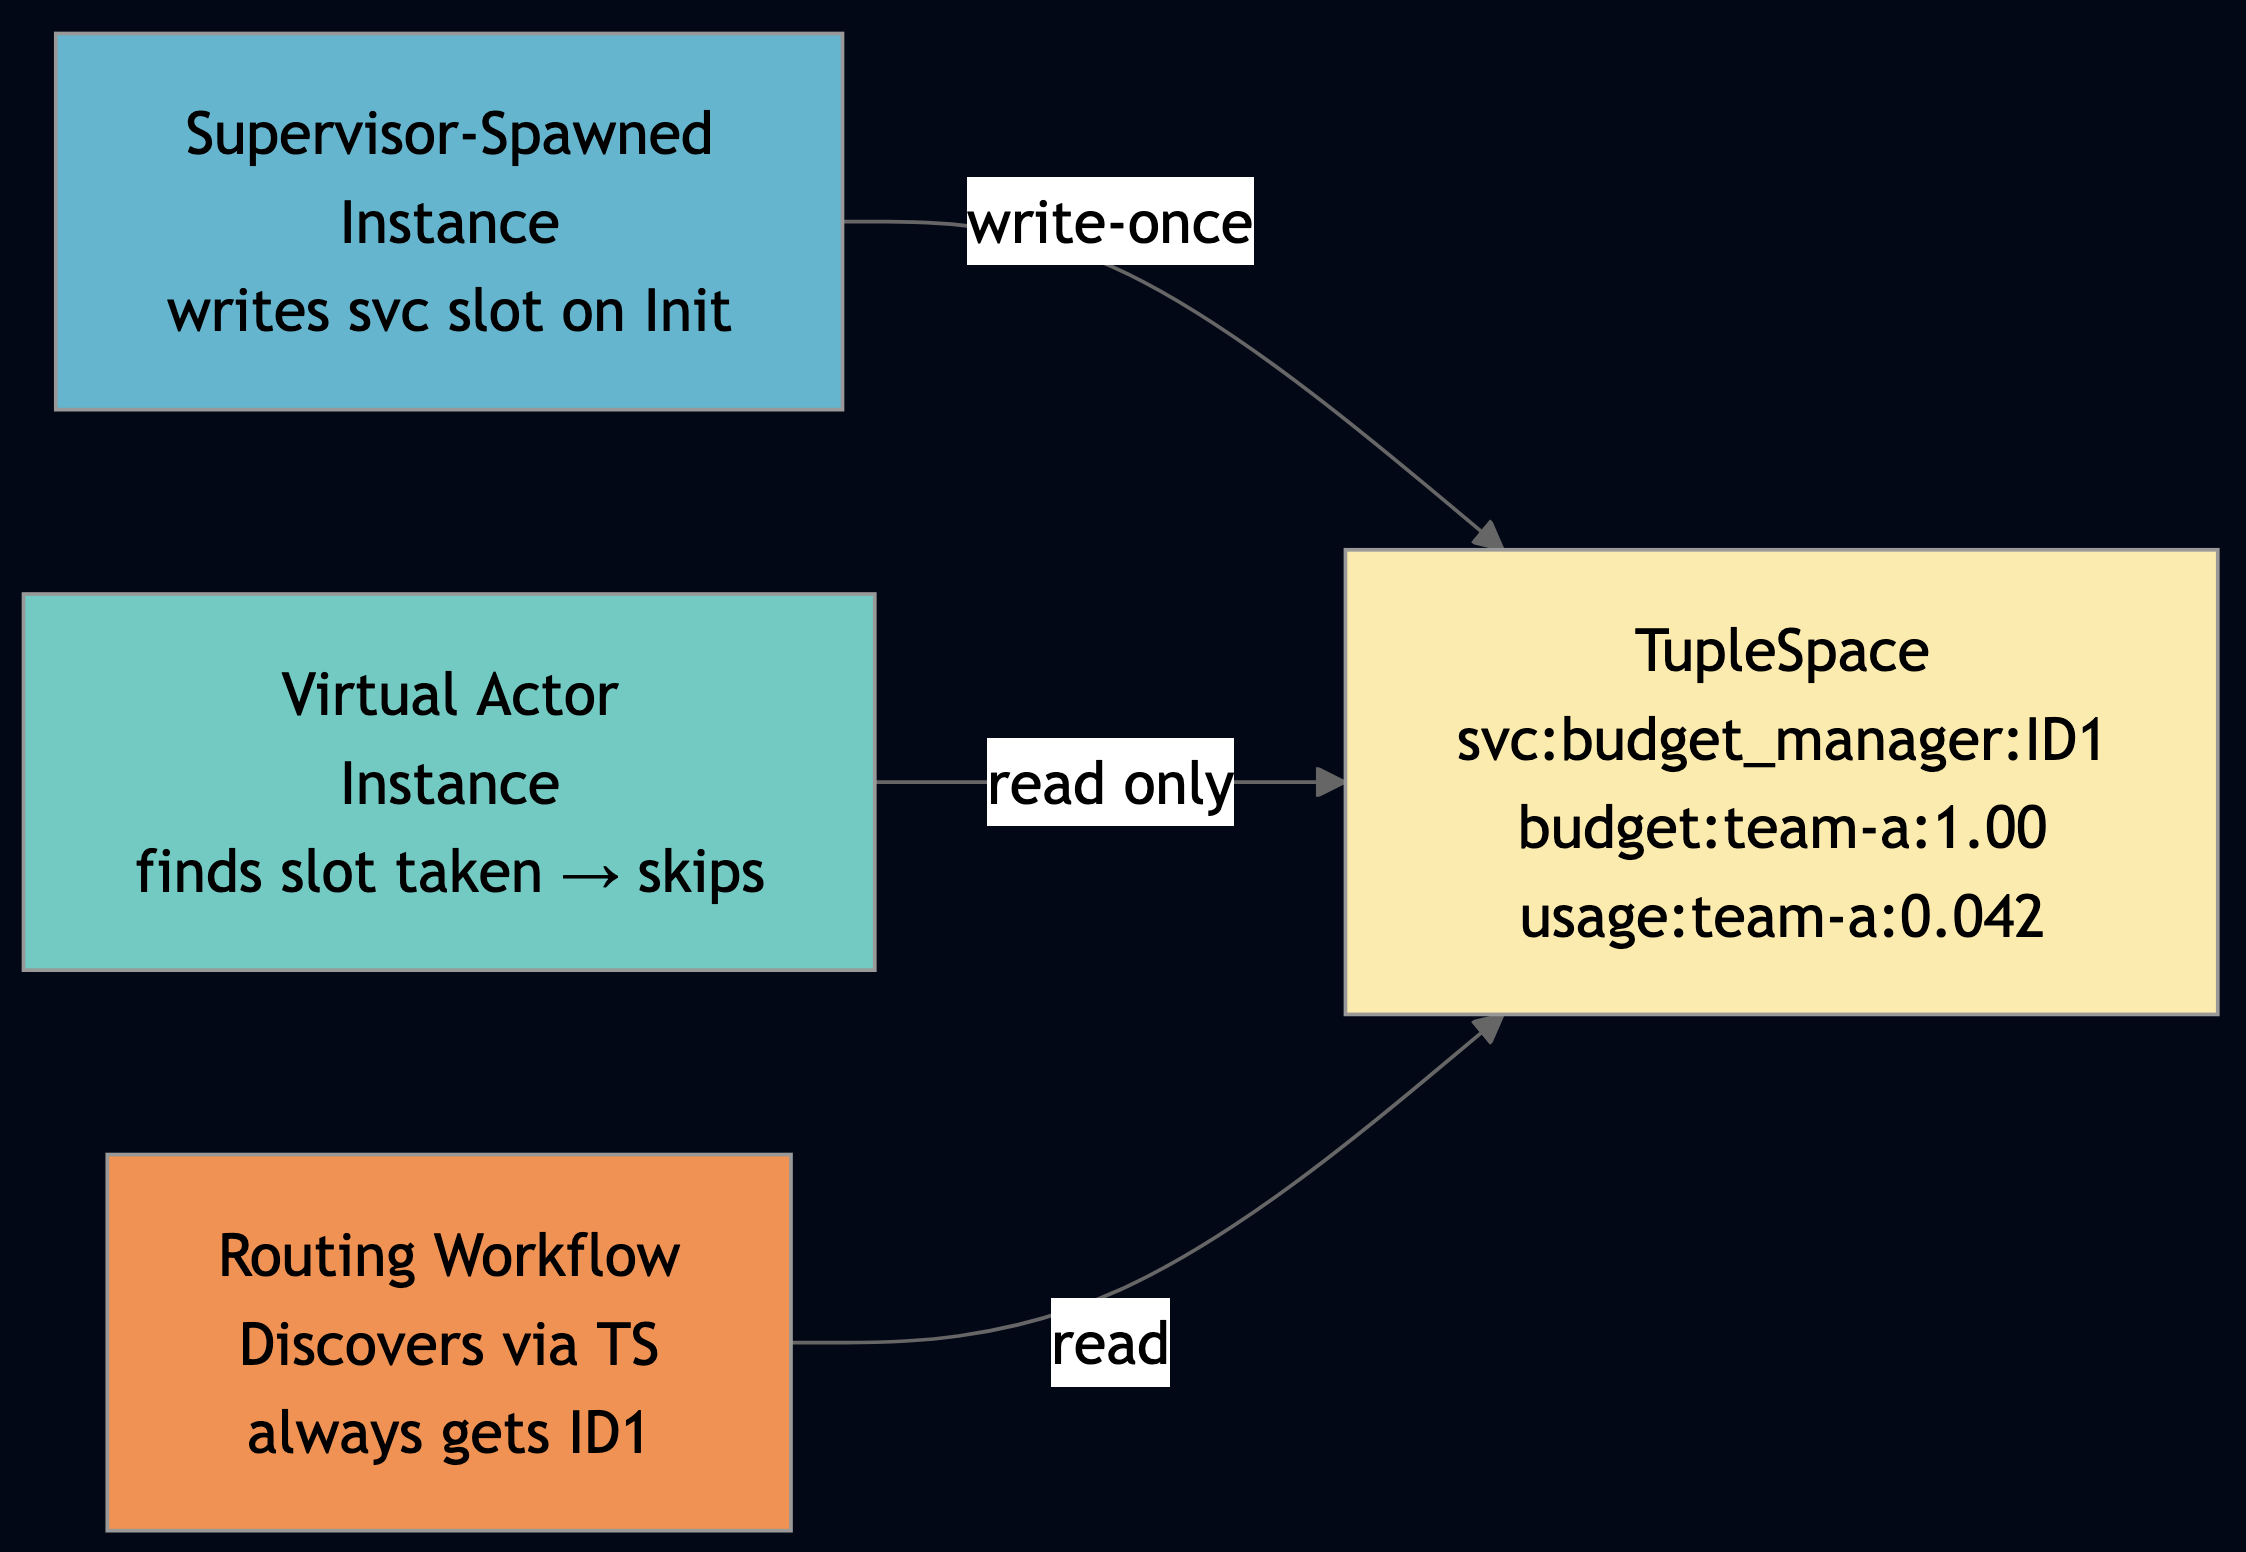
return tup[2] if tup and len(tup) >= 3 else NoneThe framework uses WASM re-instantiation to speed up actor startup (compile once, instantiate from cached binary). During the re-instantiation window, a new HTTP request can activate a second instance of the same actor type via virtual_actor. If both instances join a process group, pgFirst() returns non-deterministically. We saw this cause budget_exceeded errors in resource_aware_inference when the routing workflow asked the budget manager for remaining balance and got the empty virtual_actor instance that had never been initialized with budget data. TupleSpace write-once registration solves this:
- Supervisor-spawned instance calls
tsRegisterService("budget_manager", myID)on Init writes slot. - Virtual_actor instance calls
tsRegisterService("budget_manager", myID2)on Init finds slot taken, skips. - Routing workflow calls
tsDiscoverService("budget_manager")and always gets the supervisor-spawned instance.
For shared state (like budget totals that all instances should see), store the data in TupleSpace too:
// BudgetManagerActor — state in TupleSpace, not per-actor KV
// Both the supervisor-spawned and any virtual_actor instance read the same data
func (b *BudgetManagerActor) tsReadBudgetFloat(prefix, tenantID string) float64 {
    tup, ok := host.TS().Read([]any{prefix, tenantID, nil})
    if !ok || len(tup) < 3 { return 0 }
    var v float64
    fmt.Sscanf(fmt.Sprint(tup[2]), "%f", &v)
    return v
}

func (b *BudgetManagerActor) tsWriteBudgetFloat(prefix, tenantID string, value float64) {
    host.TS().Take([]any{prefix, tenantID, nil}) // remove old value
    host.TS().Write([]any{prefix, tenantID, fmt.Sprintf("%f", value)}) // write new
}
This is the coordination protocol the FLP analysis demands: explicit, auditable, shared state managed through a primitive that has no locks and no deadlock risk.
Part 2: Platform Capabilities
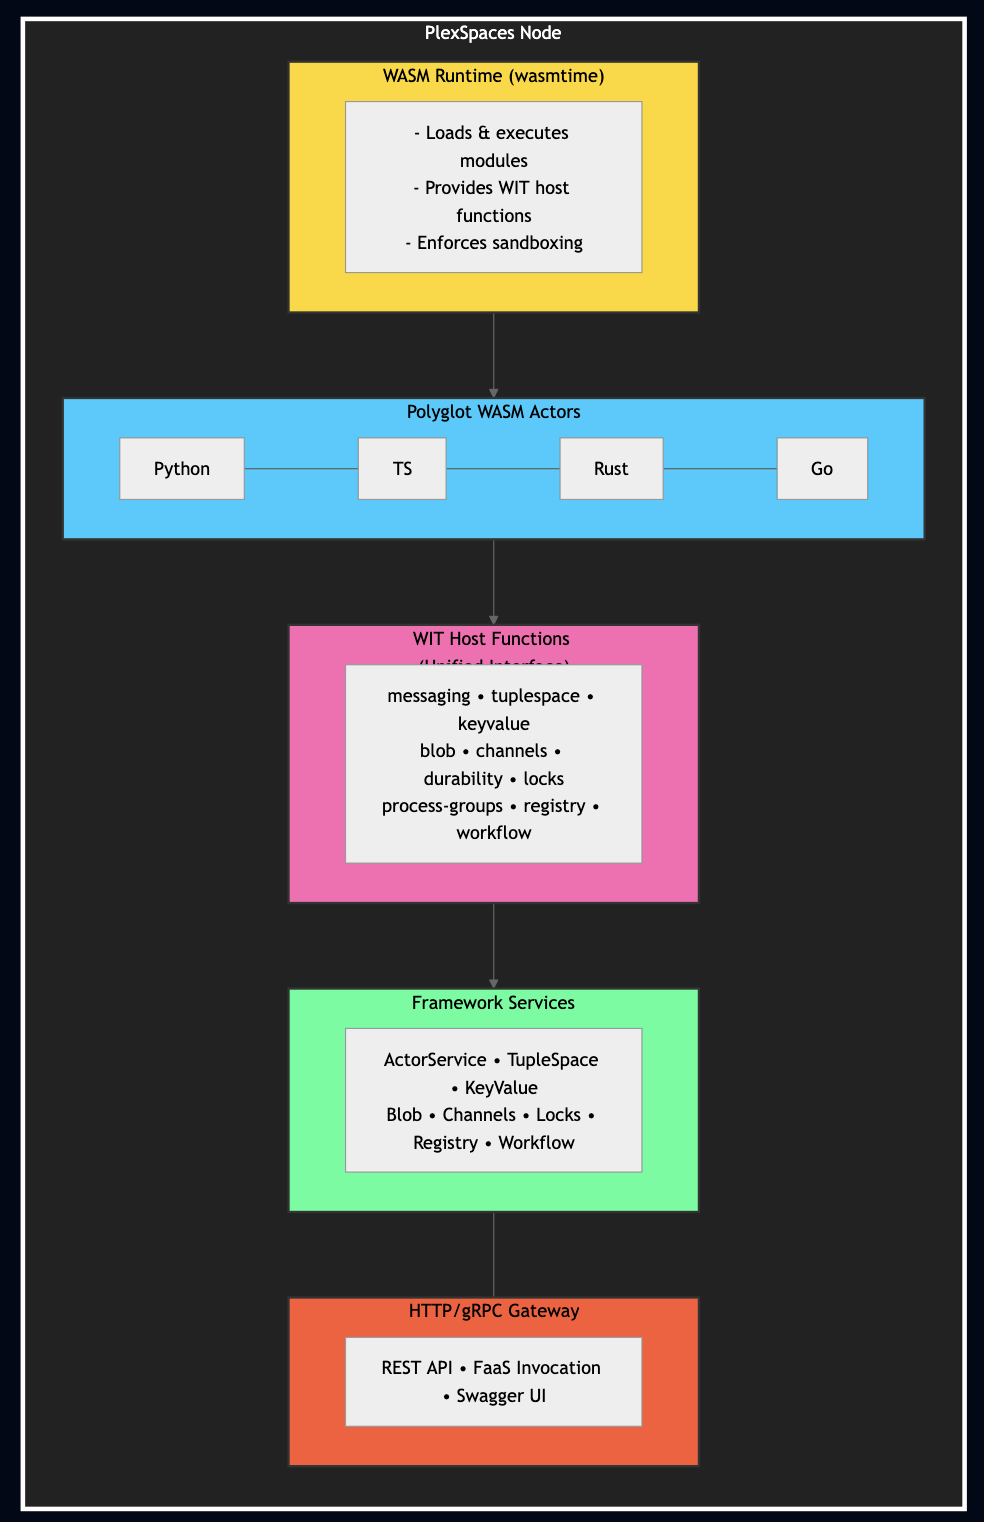
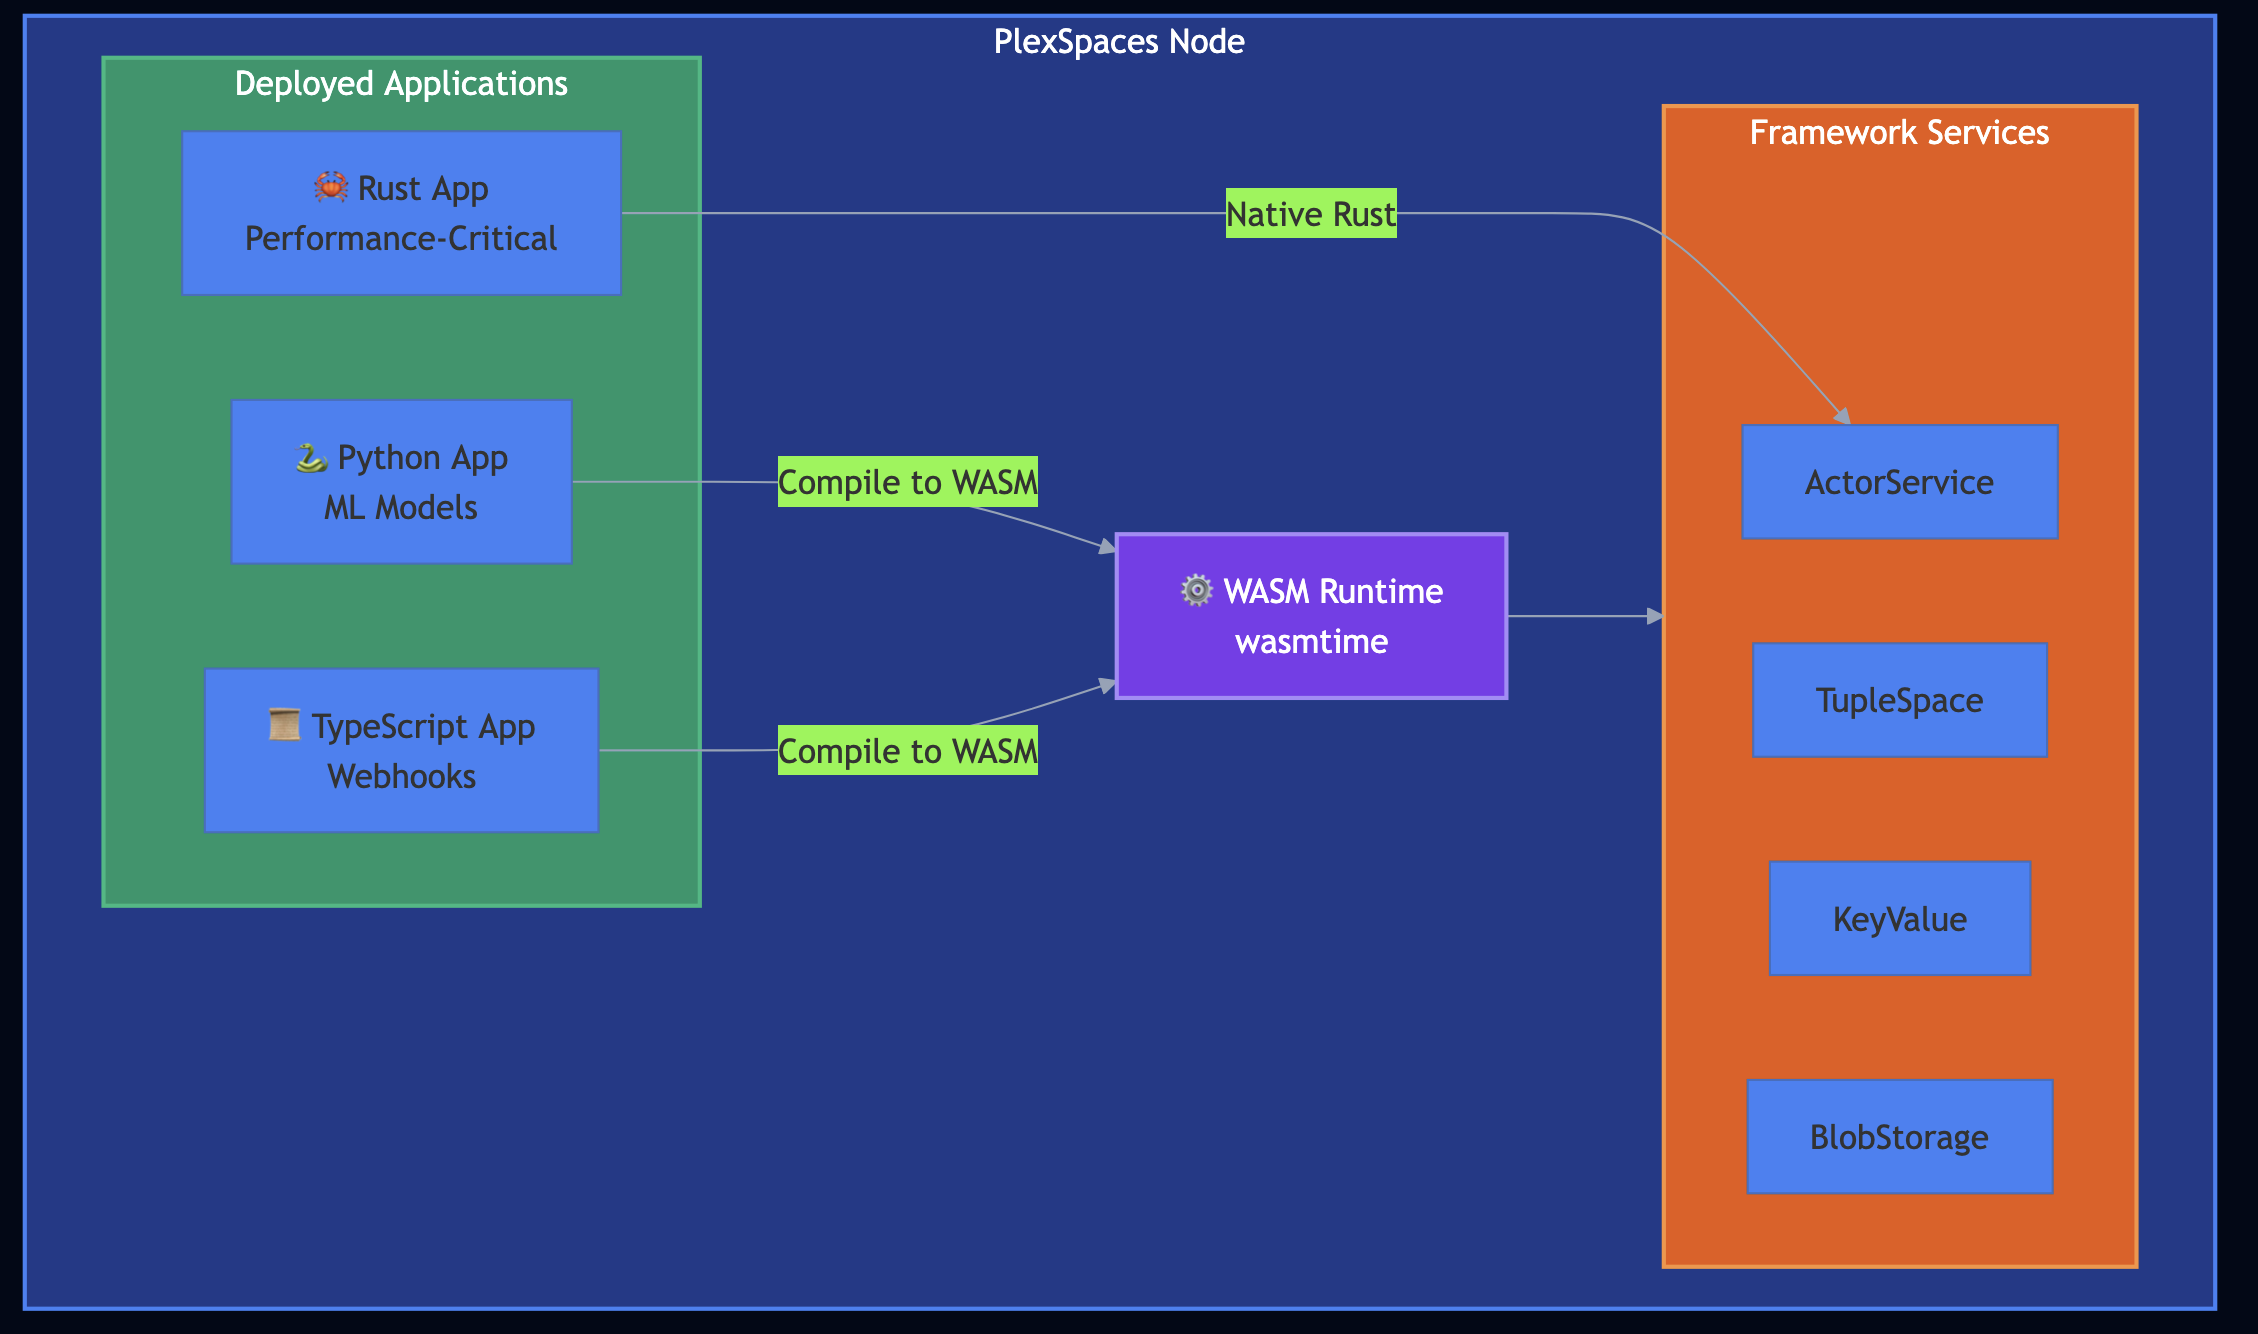
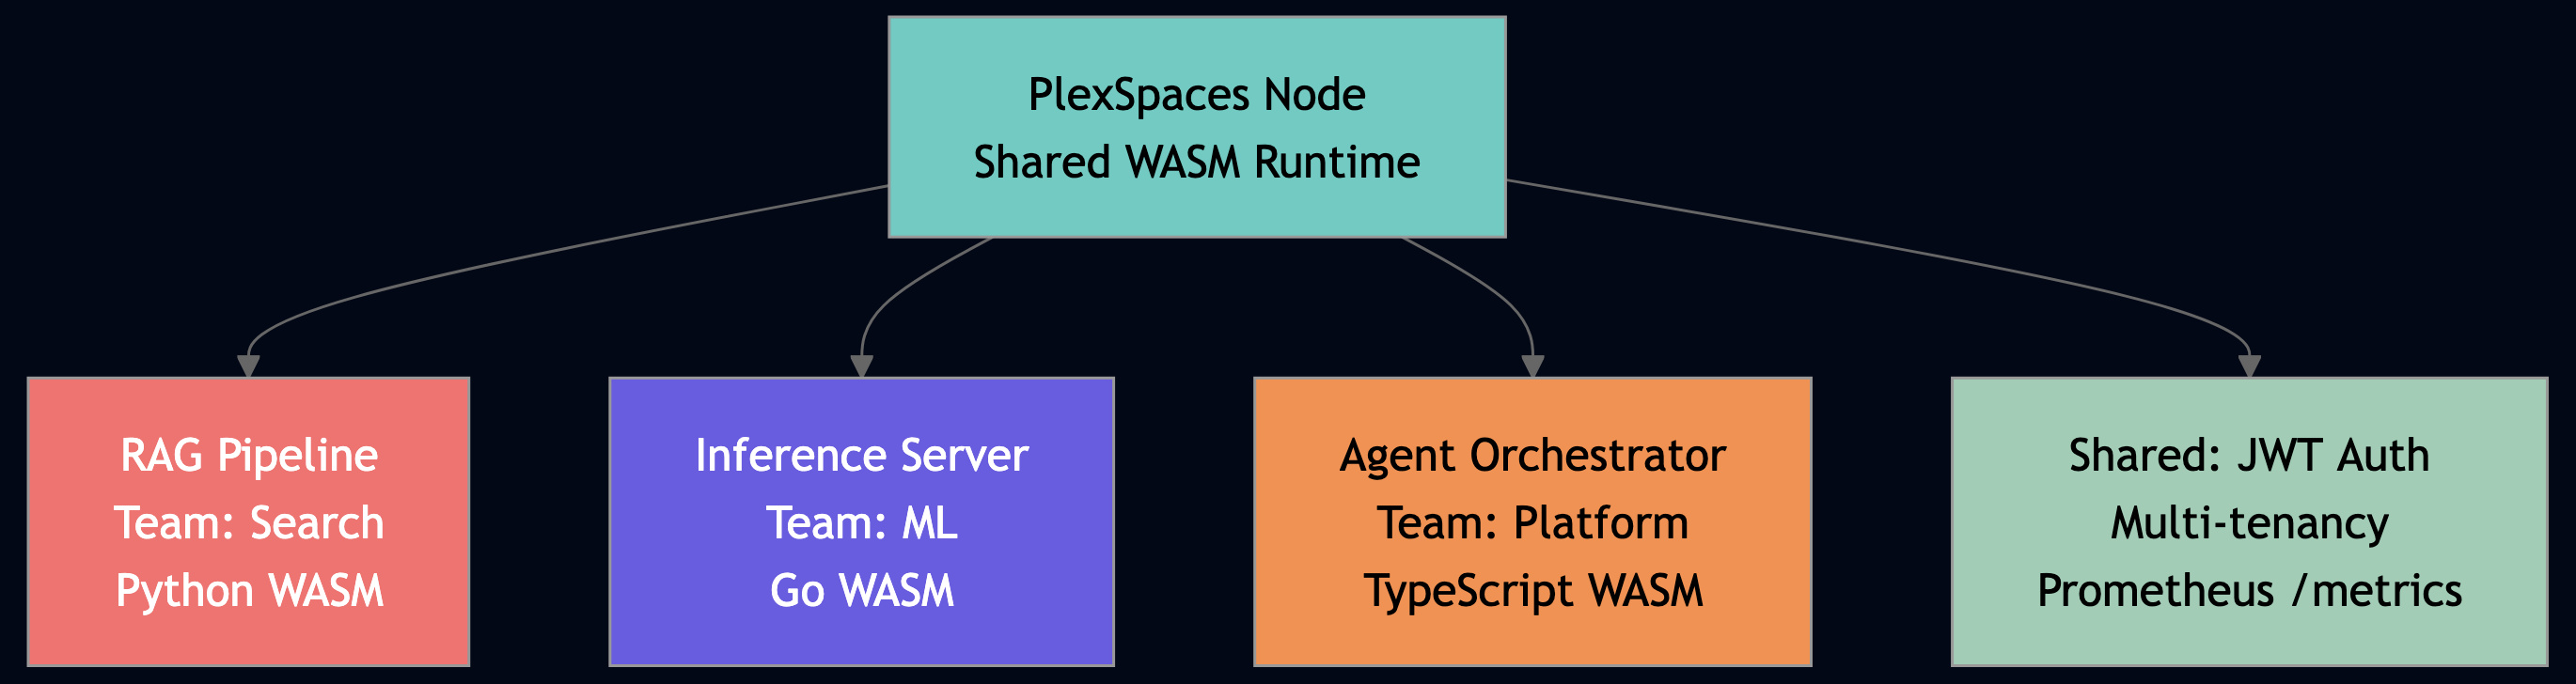
2.1 WAR-File like Deployment: Multiple AI Apps Per Node
PlexSpaces nodes are application servers for WASM actors like JBoss for WAR files, but for AI agents. Each team deploys an independent application (a .wasm binary + a config file) to the same node. Applications share the runtime but have isolated namespaces, actor registries, and tenant contexts.
# Deploy RAG pipeline from Search team
plexspaces deploy --app rag-pipeline --wasm rag.wasm --config rag-config.toml

# Deploy inference server from ML team — same node, independent lifecycle
plexspaces deploy --app inference-server --wasm inference.wasm --config inference-config.toml

# Deploy agent orchestrator from Platform team — same node
plexspaces deploy --app agent-orchestrator --wasm orchestrator.wasm --config orchestrator-config.toml
Each application has its own supervisor tree, its own actor namespace, and its own failure isolation. The ML team’s inference workers crashing doesn’t touch the Search team’s RAG pipeline.
2.2 Node Communication with Location-Transparent Messaging
Actors on different nodes message each other with the same API as local actors. When OrchestratorAgent calls host.Ask(researchAgentID, "research", ...), the framework routes transparently to local mailbox if the target is on the same node, gRPC if it’s on a different node. The calling actor never knows the difference.
// From a2a_multi_agent_actor.go — OrchestratorAgent
// This call works whether researchAgent is local or 3 nodes away.
researchResp, err := host.Ask(researchAgentID, "research", map[string]any{
    "topic": task, "depth": 1,
}, 10000)
// No service discovery config. No DNS lookup. No circuit breaker setup.
// The framework handles routing, retries, and failover.
SWIM gossip propagates node membership in real time. When a new node joins, actors on existing nodes can immediately message actors on the new node. This makes multi-node agent deployments trivial. The a2a_multi_agent example deploys four specialist agents, each potentially on different nodes, and the orchestrator coordinates them with the same host.Ask() calls used for local agents.
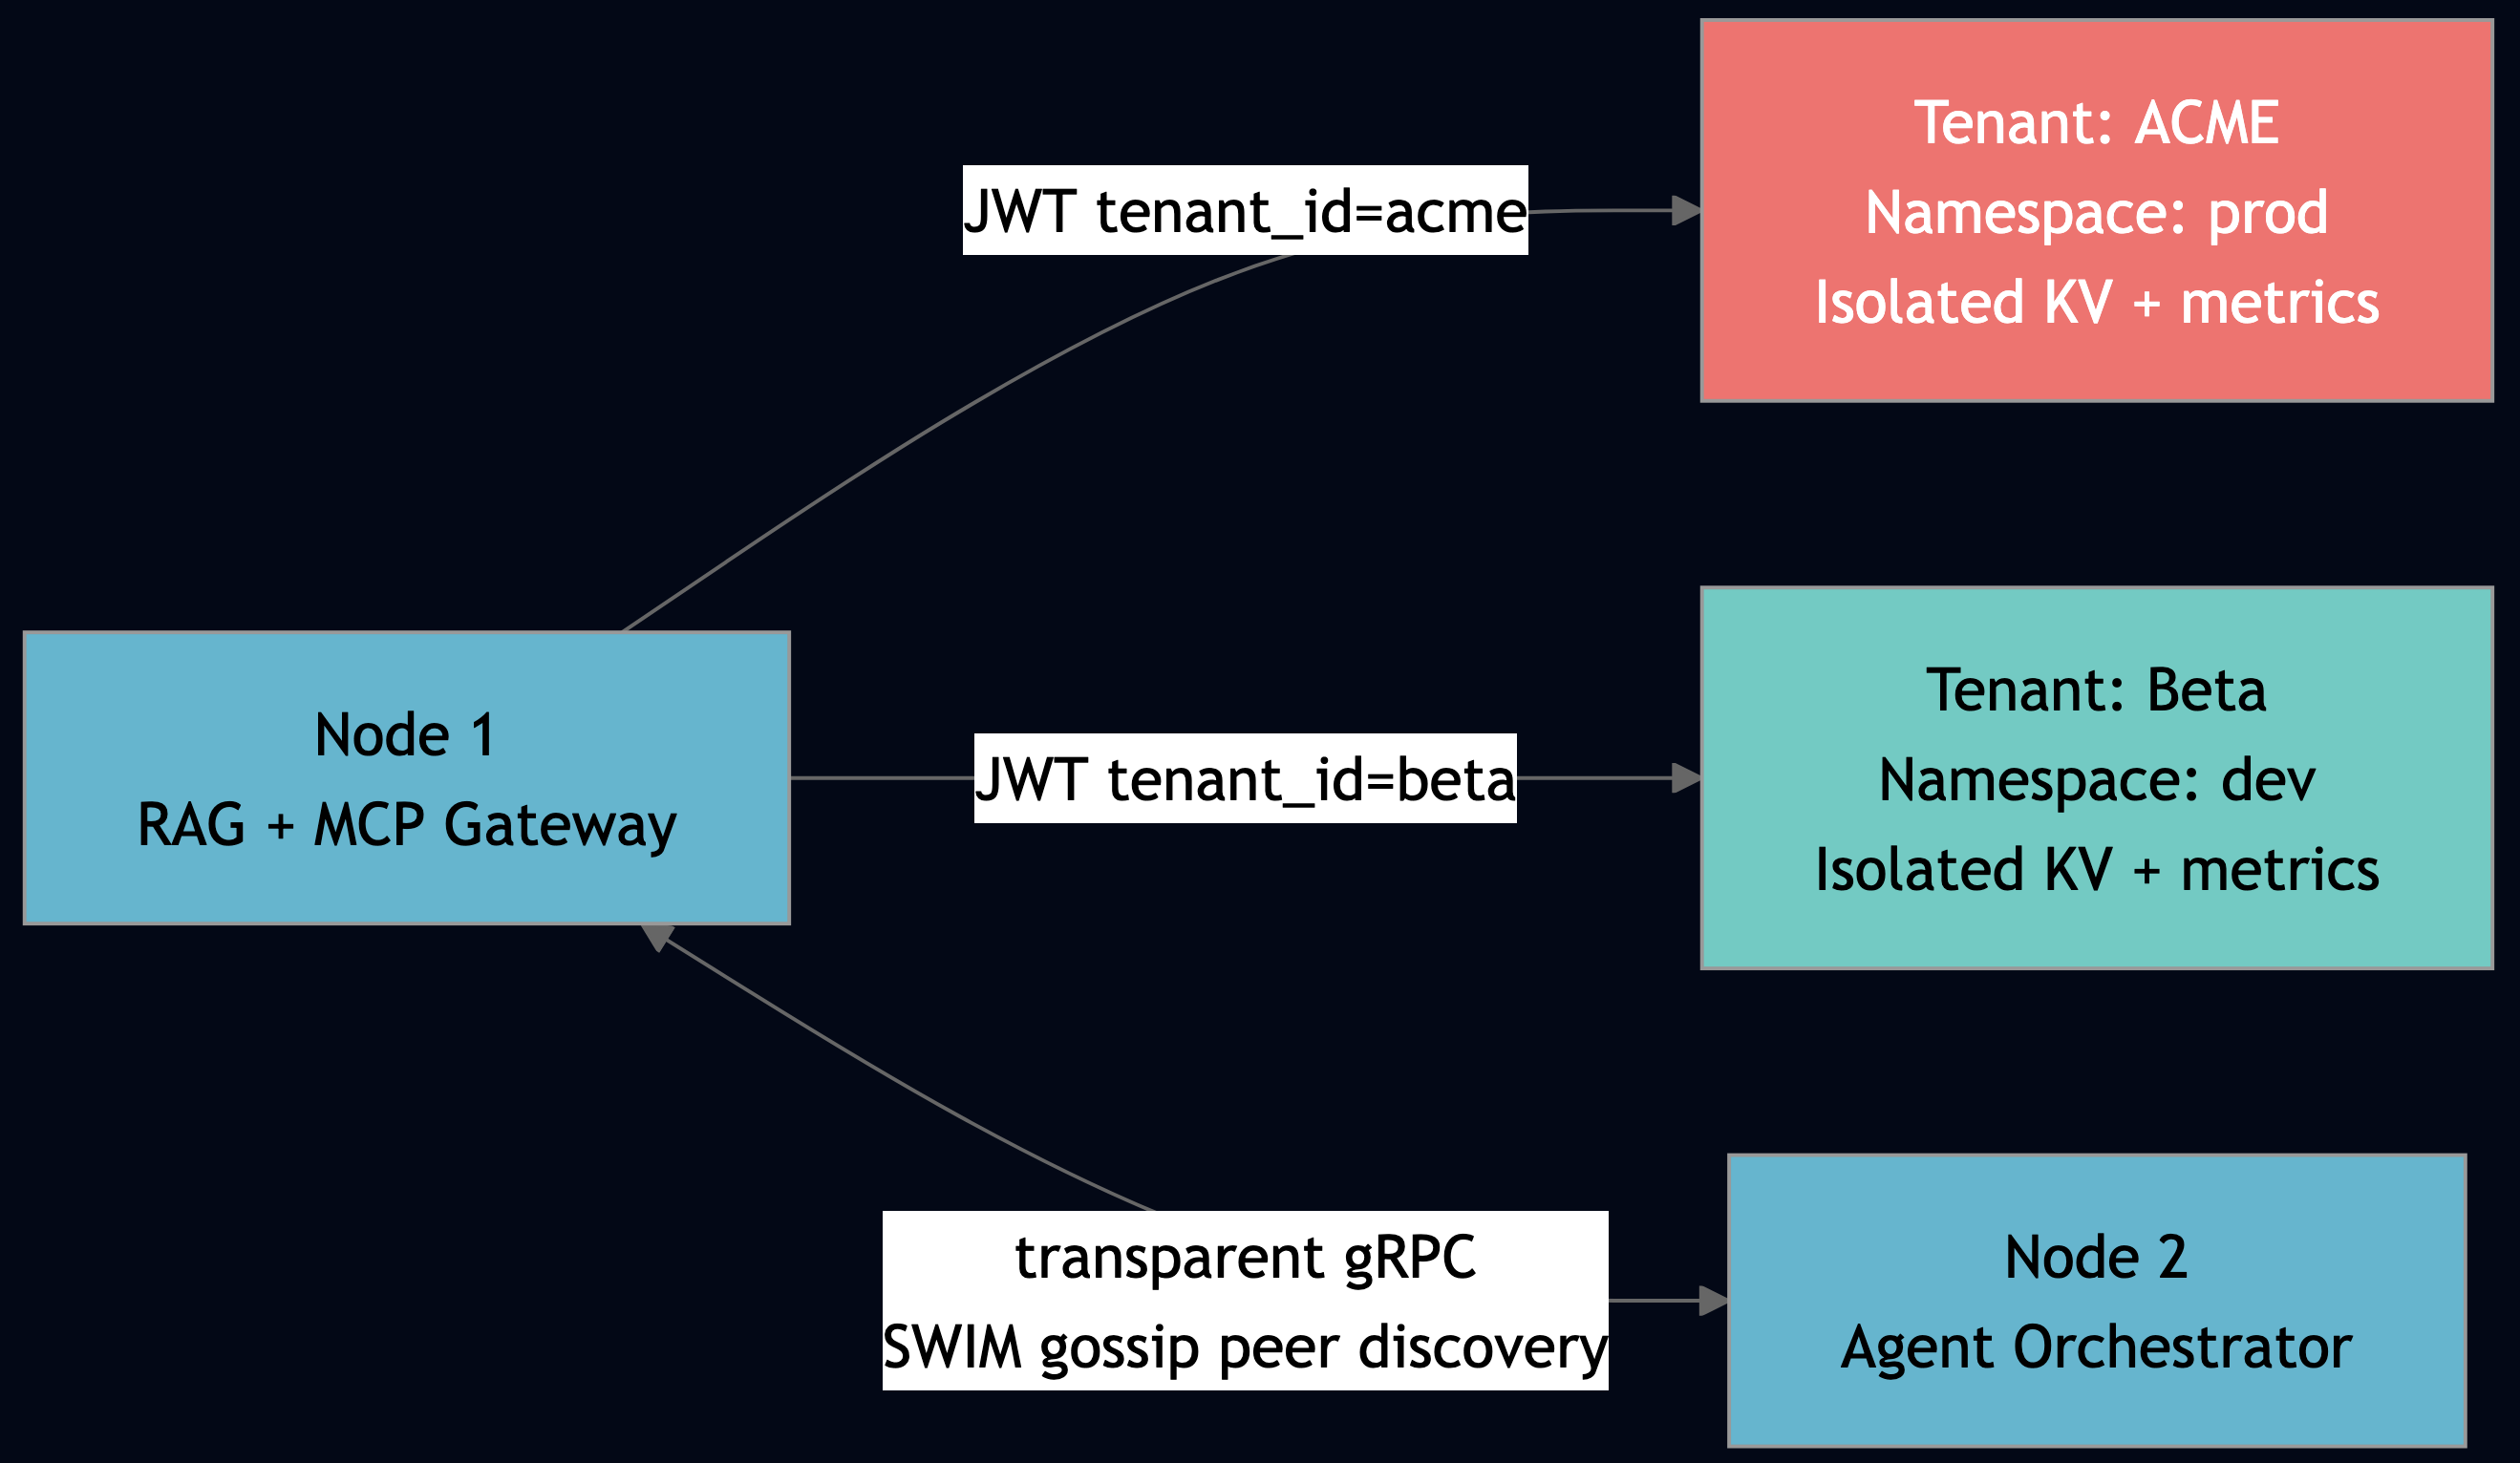
2.3 Multi-Tenancy with AuthN/AuthZ
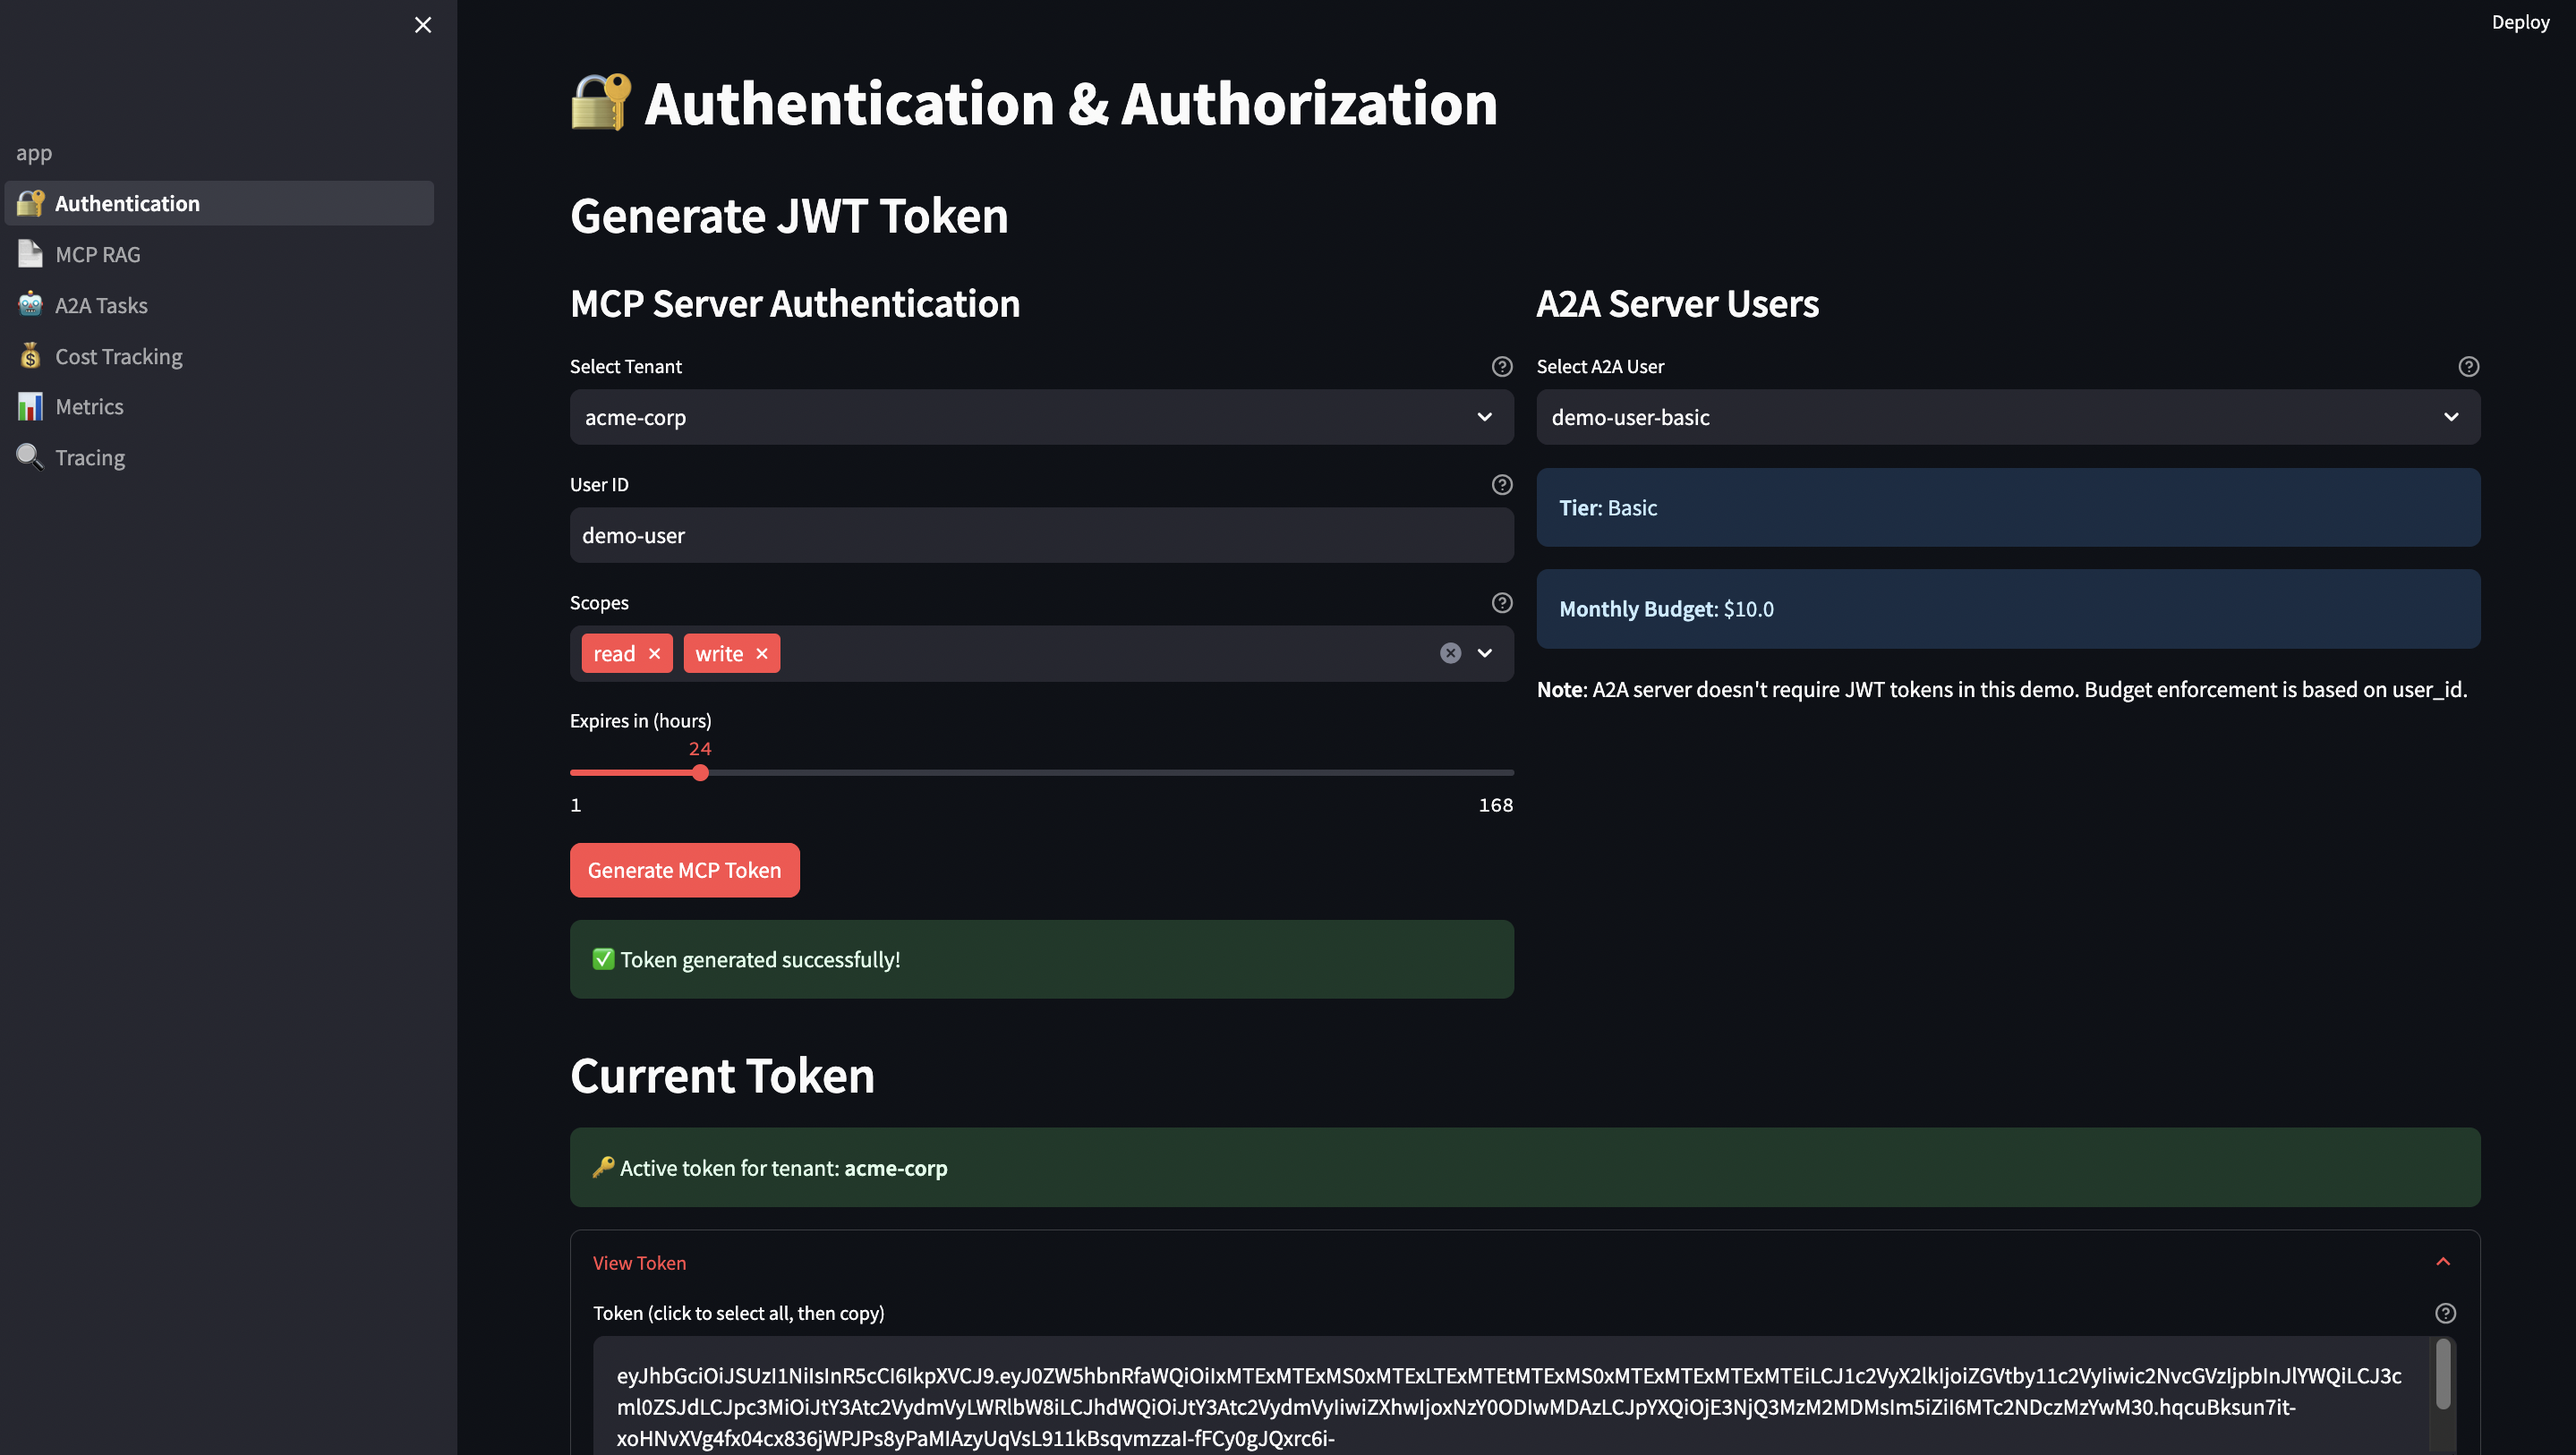
Every host.Ask() call carries a RequestContext with tenant_id and namespace. You cannot bypass it. The Python MCPGatewayWorkflow enforces tenant boundary at the application layer:
# From mcp_tool_server_actor.py — MCPGatewayWorkflow.start()
# JWT carries tenant_id — enforced at every Ask() boundary
tenant = request.get("tenant", "")
if tenant:
    self_ns = actor_application_id(self.actor_id)
    if self_ns and tenant != self_ns:
        return {
            "jsonrpc": "2.0", "id": request_id,
            "error": {"code": -32600,
                      "message": f"Tenant mismatch: '{tenant}' — access denied"},
        }
# Pass tenant context downstream — research agent sees the same tenant_id
result = host.ask("tool_registry", "tools_call", {
    "tool_name": tool_name, "input": params.get("arguments", {}),
    "tenant": tenant,  # propagated through the call chain
}, timeout_ms=15000)
The application_metrics_add() call in every actor automatically tags metrics by actor ID, which includes the application namespace. Prometheus metrics are naturally scoped to tenant. JWT validation, namespace isolation, and metric scoping all happen at the framework level.
2.4 The Primitive Stack — Everything You Need, Nothing You Don’t
Every pattern in this post builds on one or more of these primitives. All are available in every language. All are accessible via the same host.* API from any actor regardless of language or location.
| Primitive | What It Does | AI Agent Use Case | HPC/ML Analog |
|---|---|---|---|
| Shard Group | Partition data across N actors; scatter-gather with aggregation | Parallel RAG retrieval, distributed inference | Ray map_batches(), Spark partitions |
| Worker Pool | Stateless actor pool with load balancing | Burst inference capacity, tool execution | Ray remote functions, Lambda concurrency |
| Process Group | Dynamic membership; broadcast to all members | Config updates to all inference workers | MPI communicator, Gloo process group |
| TupleSpace | Pattern-matched shared memory; Linda-model coordination | Service registry, task result sharing, consensus | MPI ghost cell exchange, barrier sync |
| Channels | Queue-based stage coupling; 6 backends (Kafka, Redis, SQS, PG, …) | Async pipeline stages, event streaming | Kafka, SQS, RabbitMQ |
| Workflow Actor | Multi-step durable orchestration; pause/resume/cancel | RAG pipeline, agent orchestration | Airflow DAG, Temporal workflow |
| Distributed Lock | Lease-based mutual exclusion across actors | Model weight update, index rebuild | ZooKeeper, Redis Redlock |
| Blob Storage | Large binary payloads (embeddings, model weights) | Embedding cache, model artifact store | S3, HDFS |
| Broadcast | Send data to all actors in a process group | Push config updates to all workers | MPI_Bcast |
| Collective Reduce | Sum/min/max across all actors; return to coordinator | Aggregate inference metrics | MPI_Allreduce |
| Scatter/Gather | Fan-out to N workers, fan-in aggregated results | Parallel document search, batch inference | MPI_Scatter + MPI_Gather |
2.5 Custom Services and Components and Full Polyglot Stack
PlexSpaces is not just a runtime for the primitives above. It ships the entire stack needed to build production AI services:
SDKs in all four languages:
# Python: @actor decorator, host.ask(), host.ts_write(), host.monitor()
@actor(facets=["virtual_actor", "durability"])
class MyAgent: ...
// Go: struct embedding, host.Ask(), host.TS().Write(), host.Monitor()
type MyAgent struct { plexspaces.ActorBase }
func (a *MyAgent) HandleMessage(from, msgType, payload string) string { ... }
// TypeScript: class extends PlexSpacesActor, host.ask(), host.ts.write()
class MyAgent extends PlexSpacesActor<MyState> { ... }// Rust: #[gen_server_actor], host::ask(), host::ts_write(), host::monitor()
#[gen_server_actor]
struct MyAgent { state: MyState }Service links for outbound HTTP connect to any external API (OpenAI, Anthropic, your own inference endpoint) via config, not code:
# app-config.toml — service link to LLM provider
[[service_links]]
name = "llm_provider"
base_url = "https://api.openai.com"
timeout_secs = 30
retry_policy = { max_attempts = 3, backoff = "exponential" }
# Python actor using service link — no URL in code, no hardcoded credentials
response = host.http_fetch("llm_provider", "POST", "/v1/chat/completions",
json.dumps({"model": "gpt-4o", "messages": messages}))Custom supervisor strategies — configure how your agent tree recovers from failures:
[supervisor]
id = "rag-supervisor"
strategy = "one_for_one"        # restart only the crashed actor
max_restarts = 10
max_restart_window_secs = 60    # if 10 crashes in 60s, escalate to parent
children = [...]
Alternatively rest_for_one (restart crashed actor + all actors started after it) or one_for_all (restart entire team when any member crashes), the right choice depends on how much your agents share state.
Observability out of the box: every actor reports to Prometheus automatically:
// application_metrics_add() from any actor, any language
host.ApplicationMetricsAdd("rag-pipeline", map[string]any{
    "message_count": 1,
    "counter_metrics": map[string]any{
        "queries_processed": 1,
        "validation_failures": validationFailed,
    },
    "latency_totals_ms": map[string]any{
        "retrieve_ms": retrieveLatency,
        "generate_ms": generateLatency,
    },
})
// Automatically available at /metrics as:
// plexspaces_app_queries_processed{app="rag-pipeline",node="node-1"} 142
// plexspaces_app_retrieve_ms_total{app="rag-pipeline",node="node-1"} 8432
The battery list (all included, zero external deps beyond the binary):
| Battery | What It Includes |
|---|---|
| Runtime | WASM AOT compilation, ~50 microsecond cold start, polyglot actor host |
| Storage | Per-actor SQLite journal, KV store, blob store, TupleSpace |
| Messaging | Local mailbox, remote gRPC, ordered delivery, at-least-once |
| Scheduling | Timers, send_after, cron-style periodic messages |
| Coordination | TupleSpace, distributed locks, process groups, channels |
| Scaling | Shard groups, elastic pools, MPI collectives |
| Security | JWT auth, tenant isolation, namespace scoping, RBAC |
| Observability | Prometheus metrics, per-actor counters, application metrics API |
| Deployment | APP/WAR-file hot deploy/undeploy, multi-app per node, SWIM gossip |
| Networking | Location-transparent routing, gRPC transport, service links |
Part 3: Infrastructure Patterns
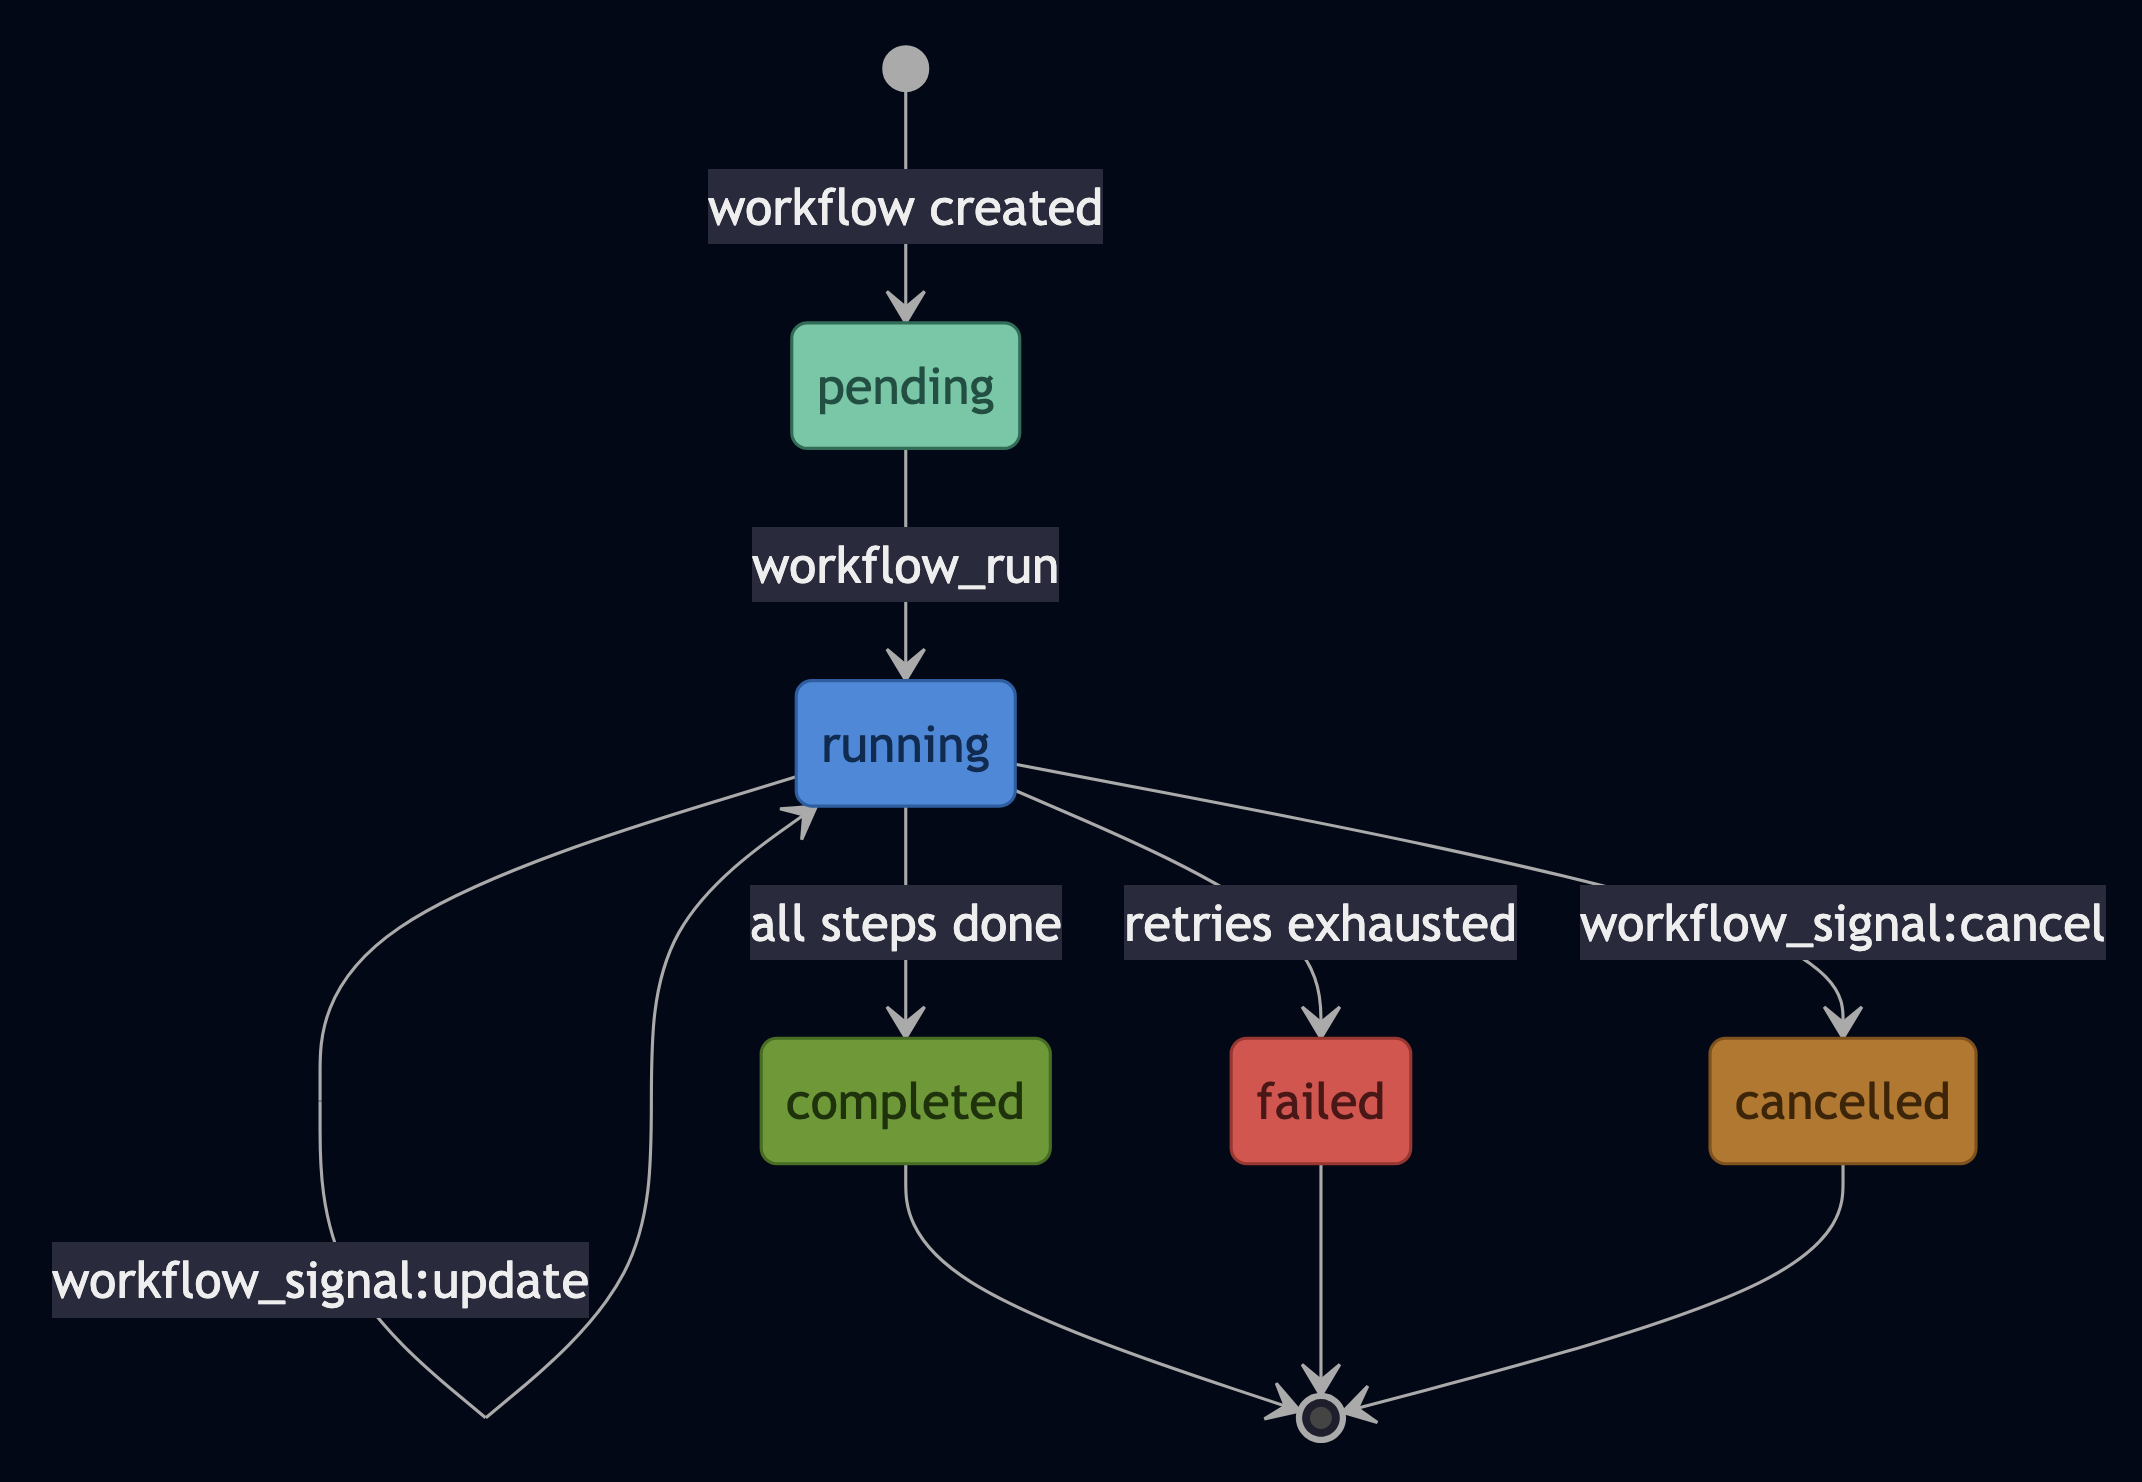
Pattern 1: Durable Workflows with Signals and Queries
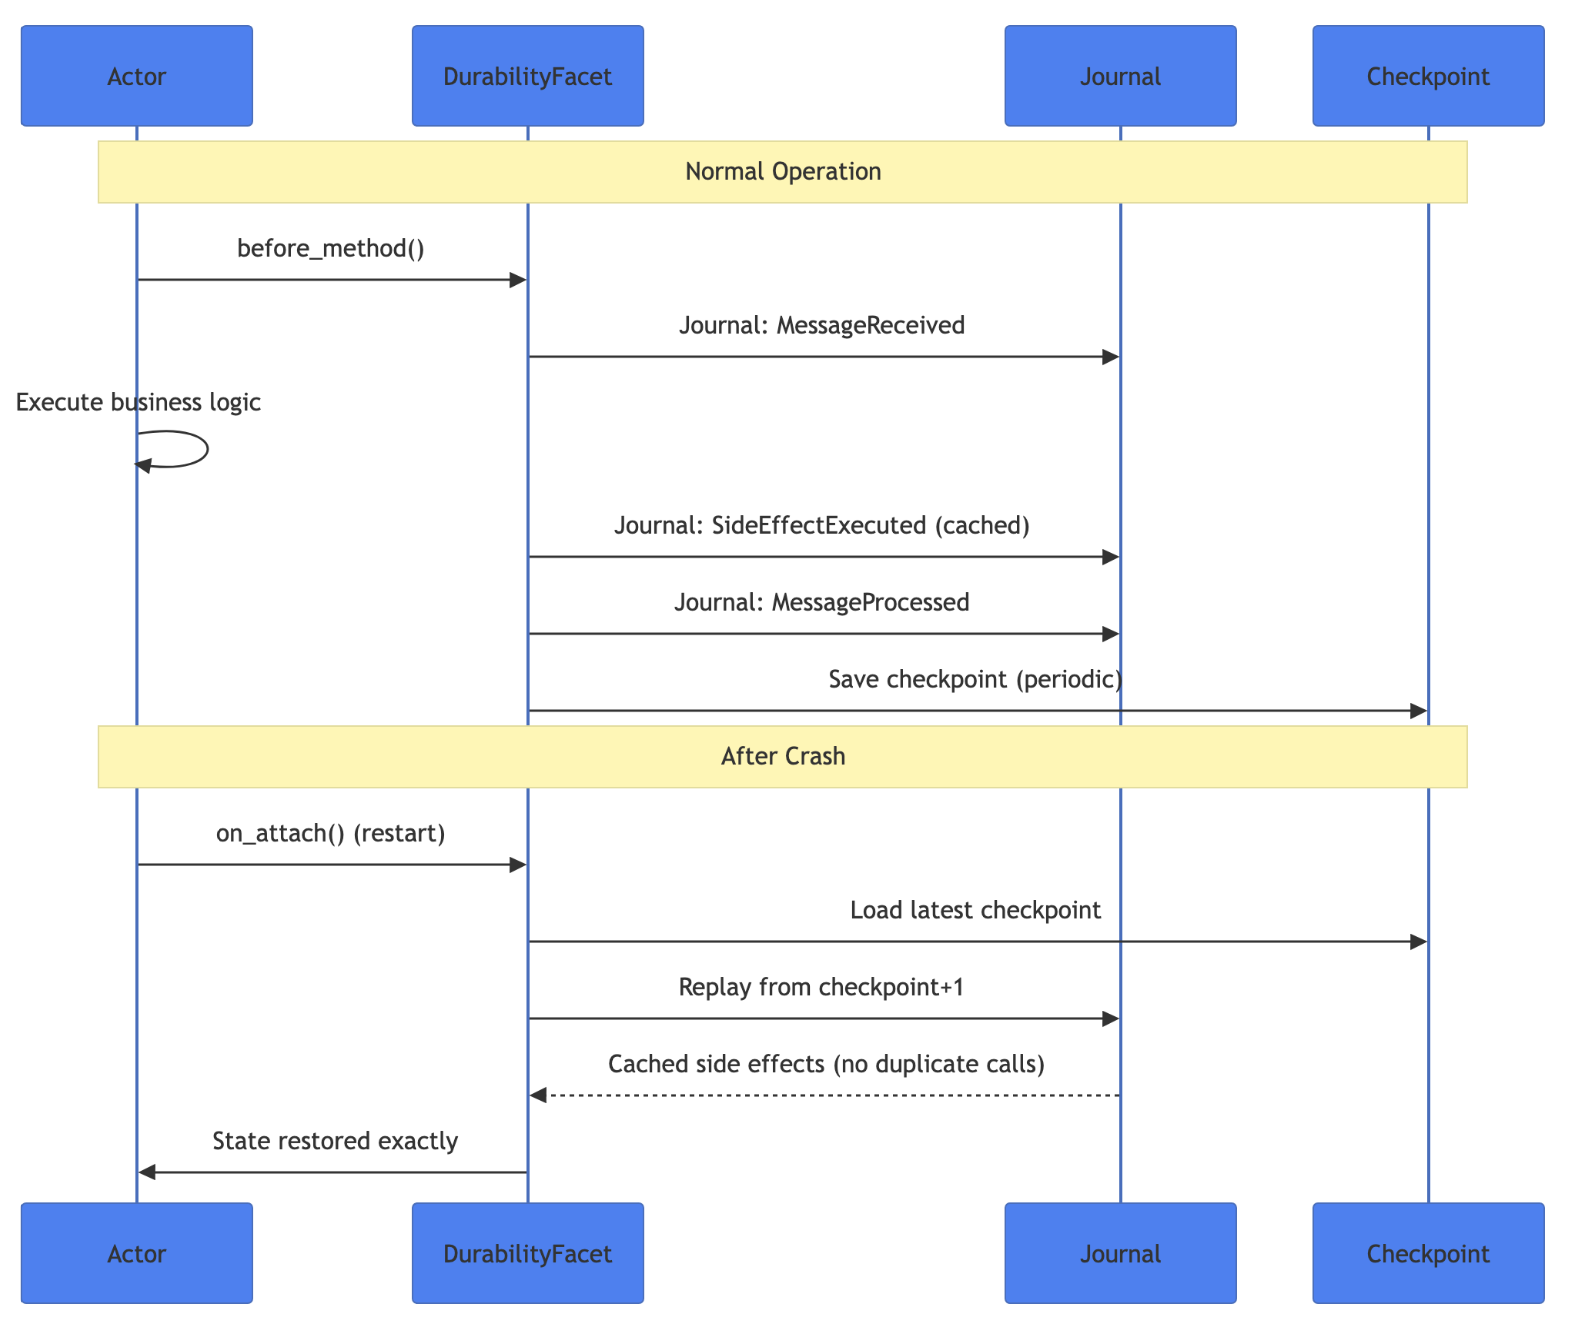
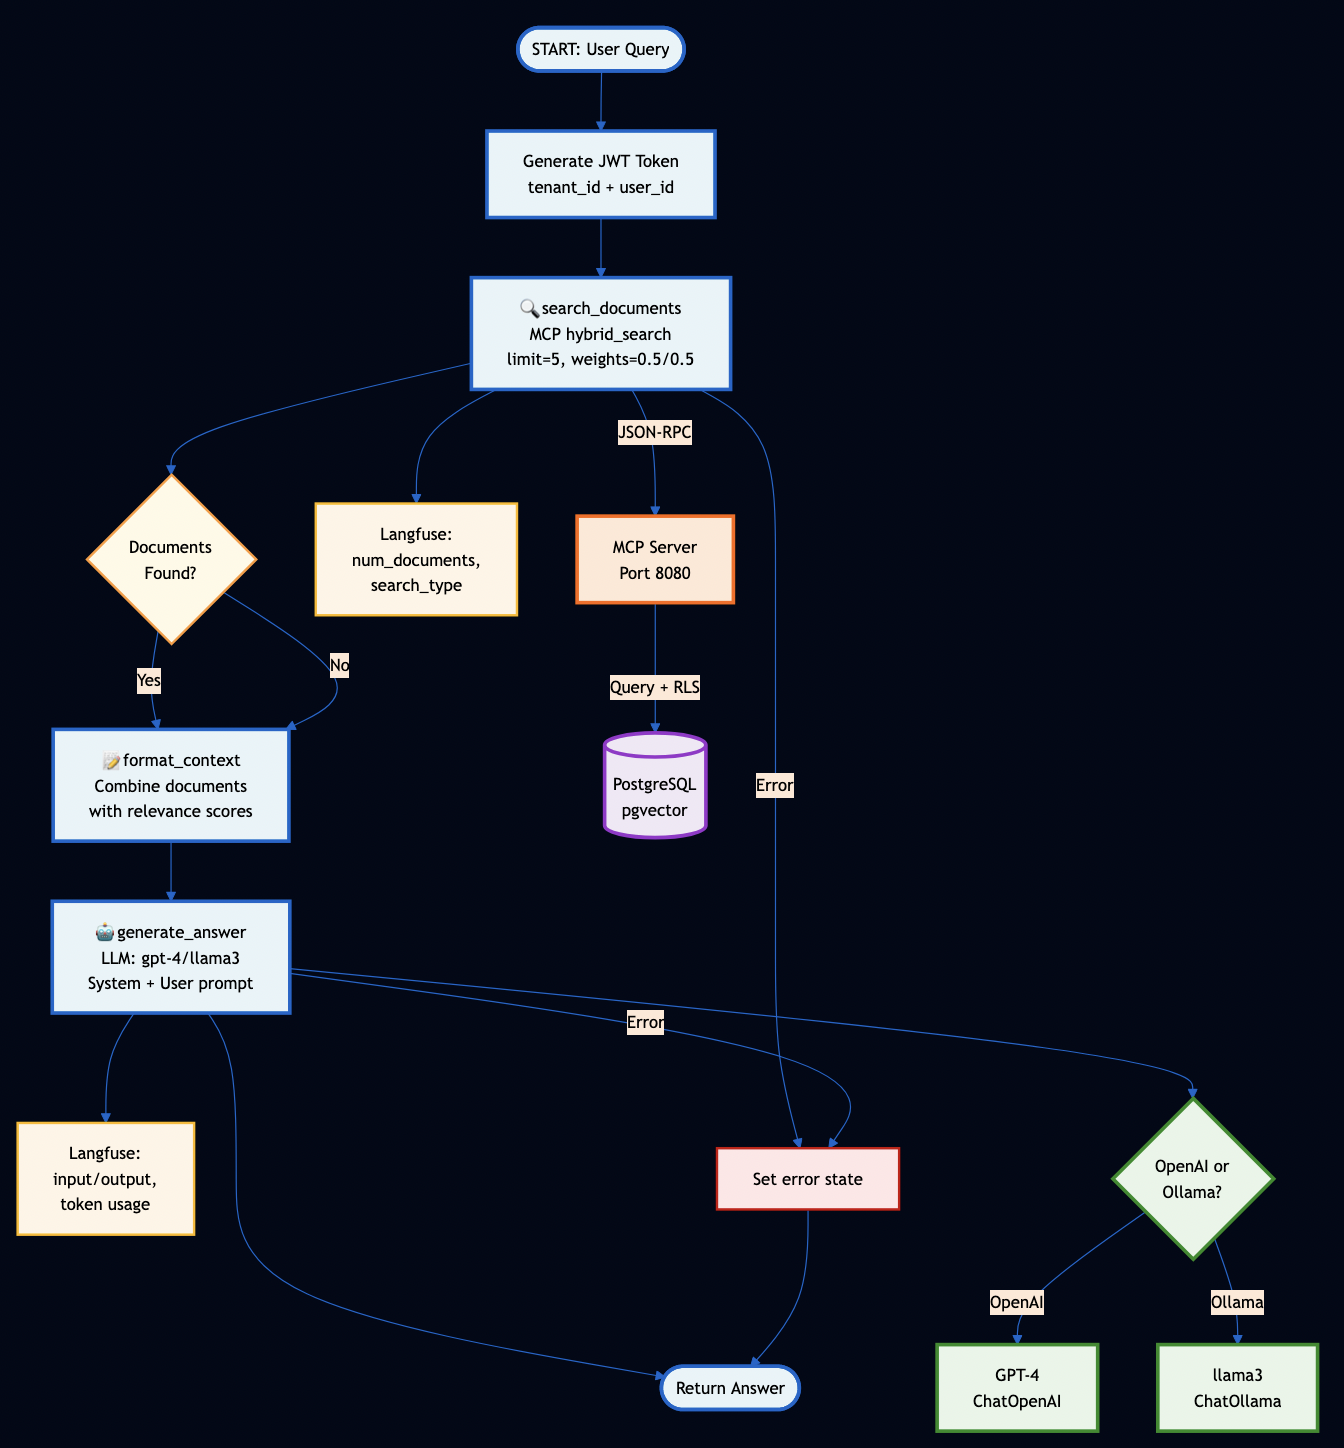
Workflow actors give you the durability that LLM pipelines need but almost never have. Use durability when your pipeline has multiple expensive steps and you cannot afford to restart from scratch on a crash. Each step is checkpointed. Crash at step 3, resume from step 3. No full restart. The Python MCPGatewayWorkflow shows the pattern:
# From mcp_tool_server_actor.py — MCPGatewayWorkflow
@workflow_actor(facets=["virtual_actor", "durability"])
class MCPGatewayWorkflow:
    session_id: str = state(default="")
    requests_processed: int = state(default=0)
    last_error: str = state(default="")

    @run_handler
    def start(self, request: dict = None) -> dict:
        if not self.session_id:
            self.session_id = f"session-{host.now_ms()}"
        method = request.get("method", "")
        # Route to tool registry — state checkpointed before and after
        if method == "tools/list":
            result = host.ask("tool_registry", "tools_list", {}, timeout_ms=10000)
        elif method == "tools/call":
            tool_name = request.get("params", {}).get("name", "")
            result = host.ask("tool_registry", "tools_call",
                              {"tool_name": tool_name, "input": request.get("params", {}).get("arguments", {})},
                              timeout_ms=15000)
        self.requests_processed += 1
        return {"jsonrpc": "2.0", "id": request.get("id", 0), "result": result}

    @signal_handler("reset")
    def reset(self, reason: str = "manual") -> None:
        self.requests_processed = 0
        self.session_id = f"session-{host.now_ms()}"
Temporal requires a separate server and a separate SDK. Airflow restarts the whole DAG. PlexSpaces checkpoints per step inside the actor runtime, using the same SQLite journal that backs all actor state.
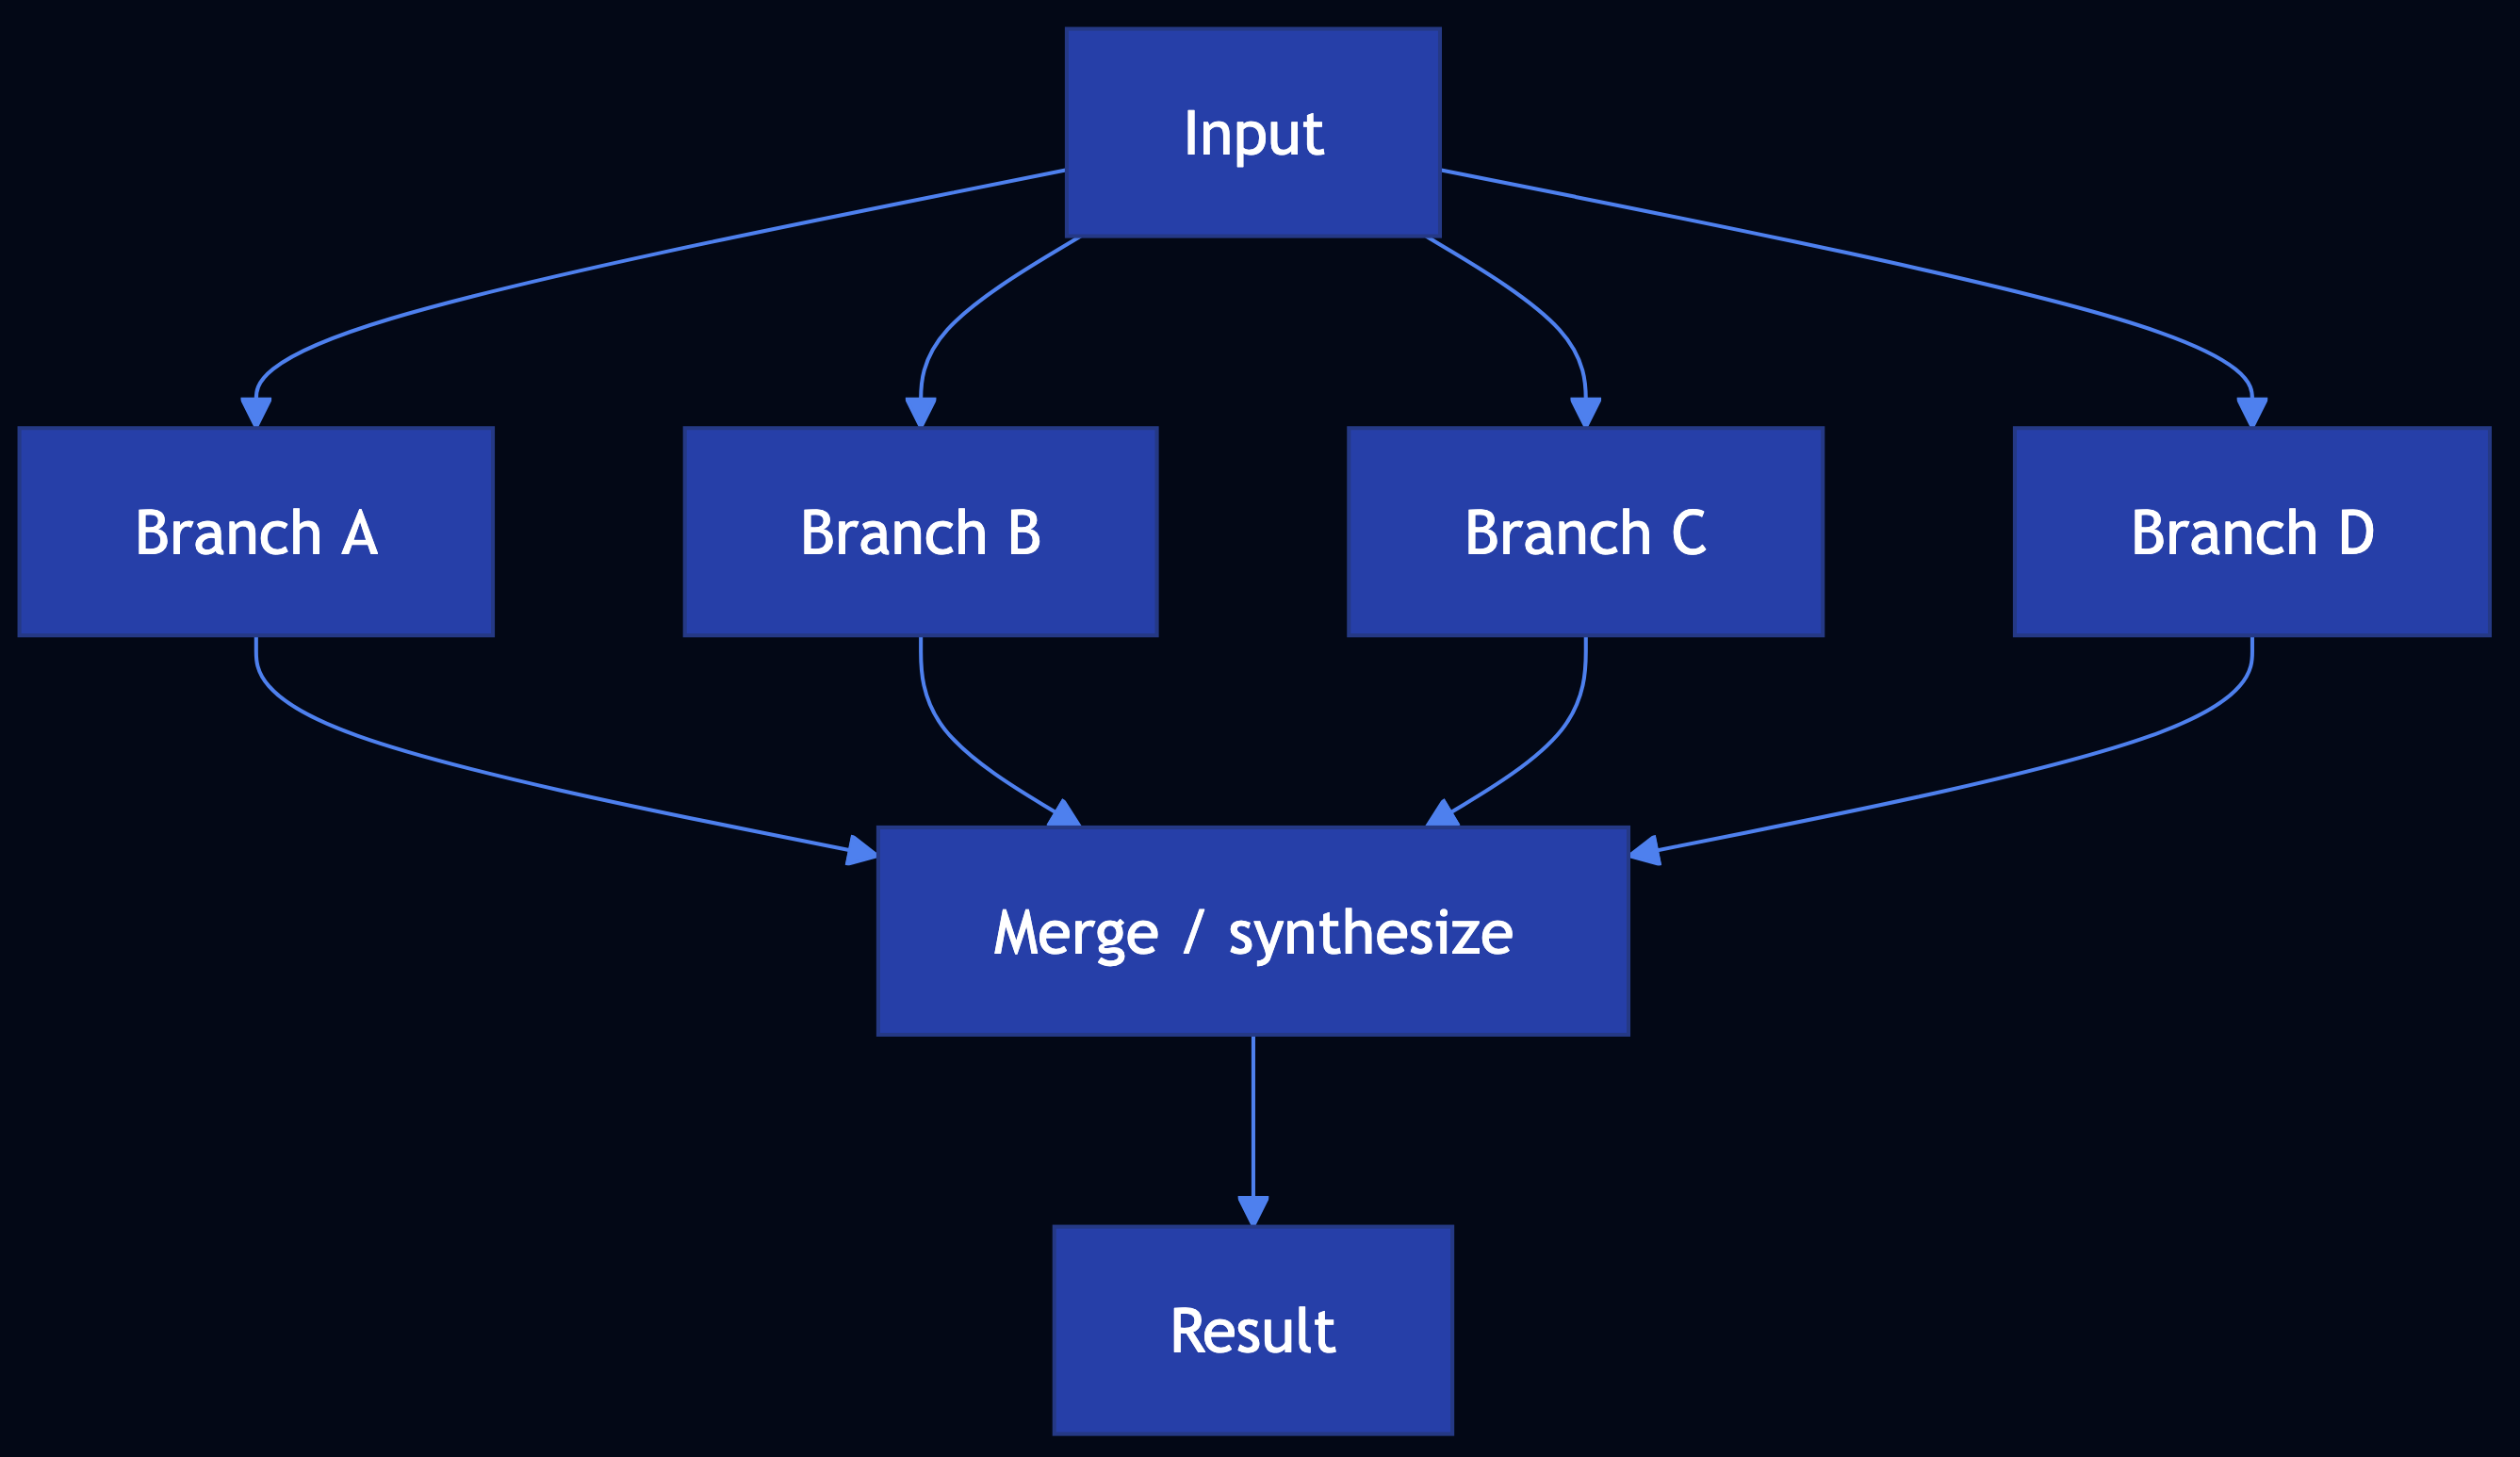
Pattern 2: SEDA (Staged Event-Driven Architecture)
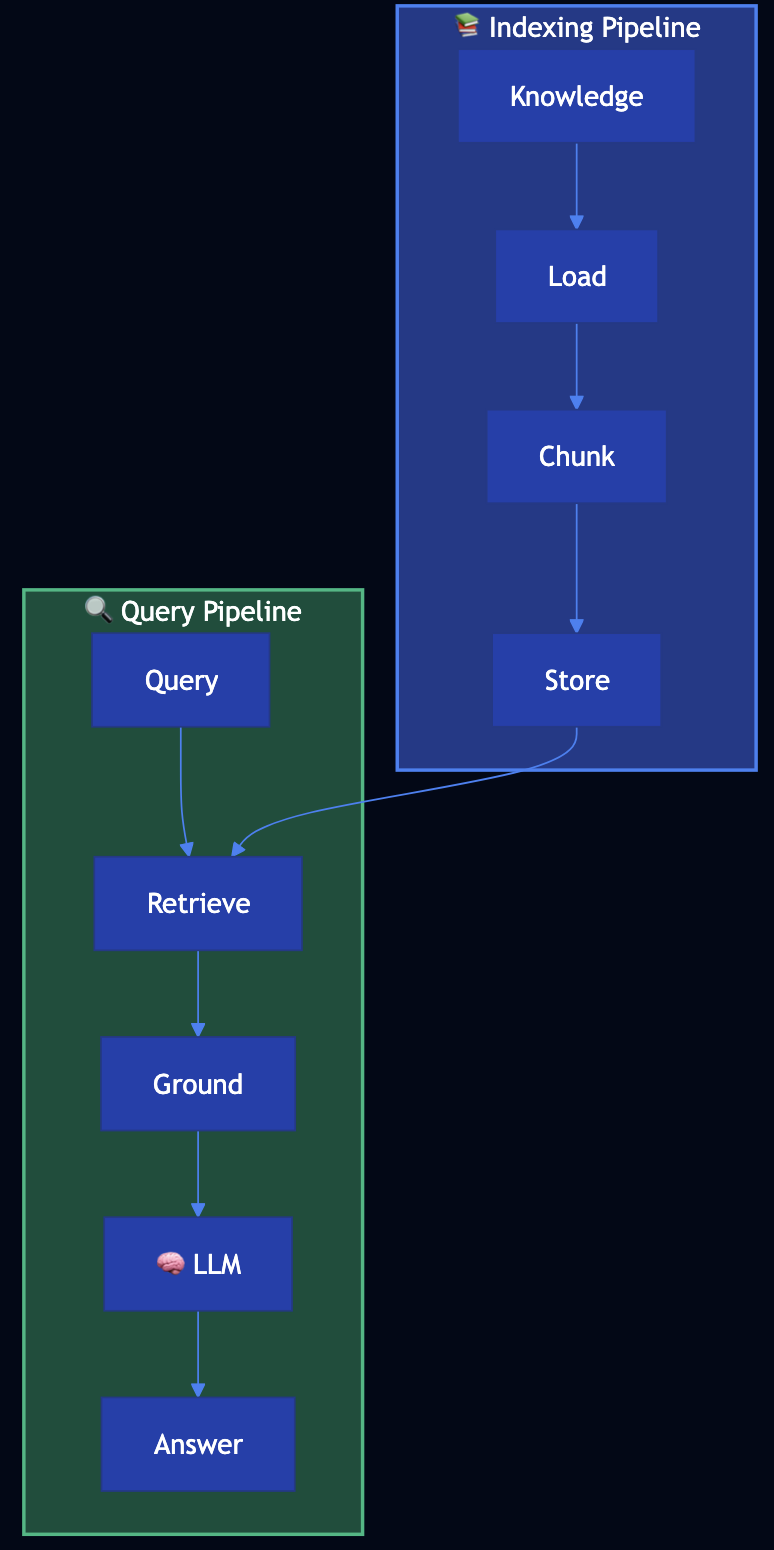
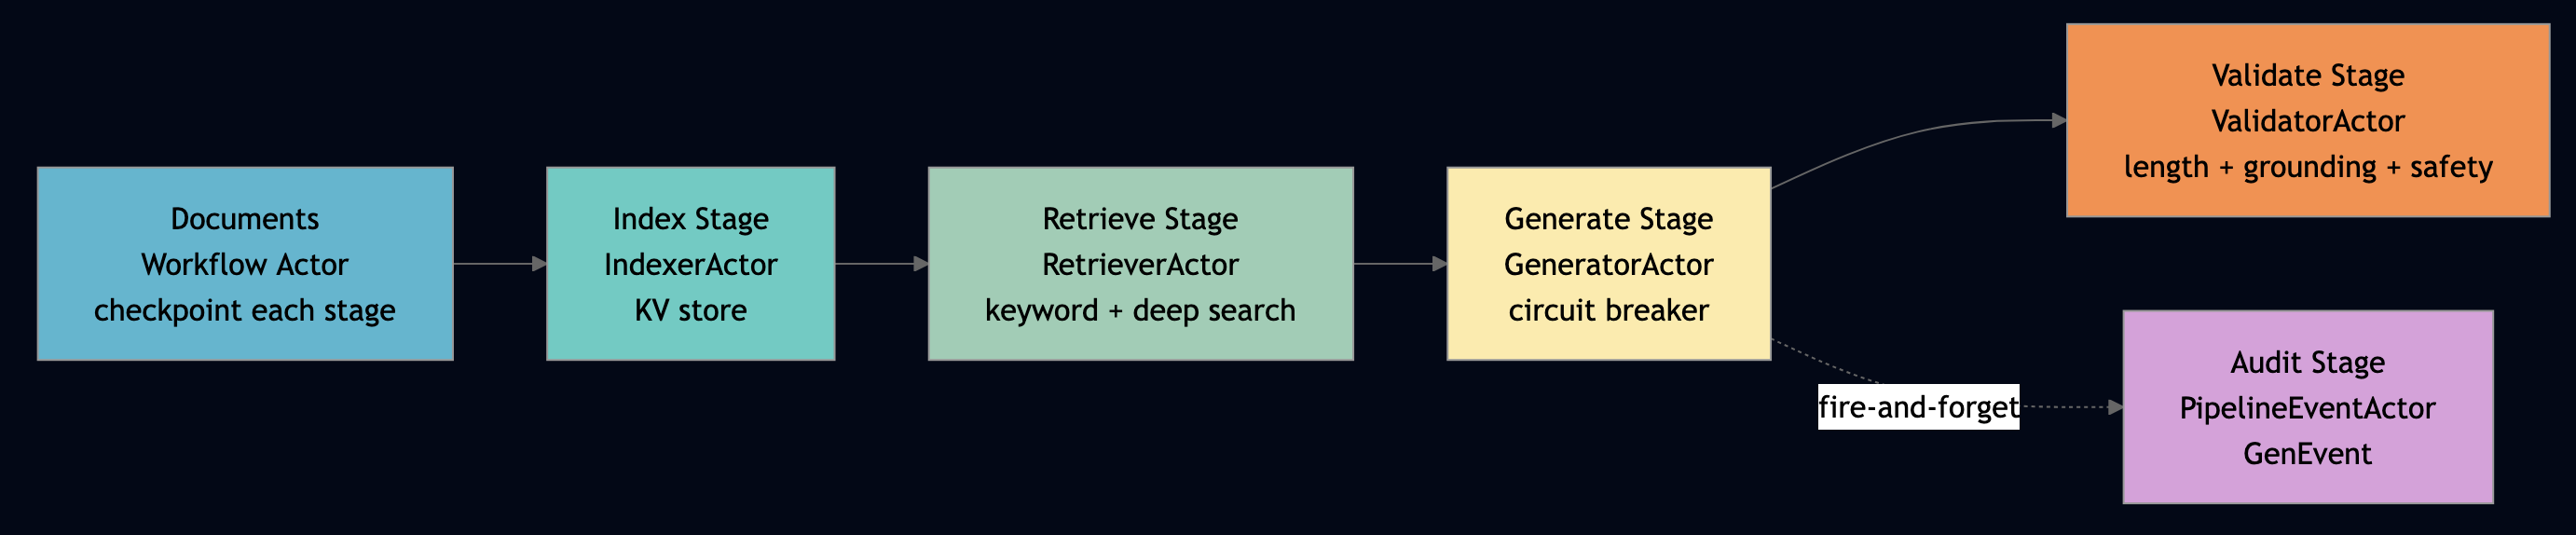
SEDA decouples pipeline stages so a slow embedder doesn’t stall the parser, and a GPU failure at step 3 doesn’t rerun step 1. Every stage is an independent actor (or shard group of actors). Stages communicate by message passing. Each stage has its own queue, its own scaling policy, and its own failure boundary.
Use this pattern when your pipeline stages have meaningfully different latency profiles or resource requirements. For example, a slow GPU-bound generation step should not stall a fast CPU-bound parsing step, and a failure in one stage should not force the others to restart. The agentic_rag_pipeline example in Go shows the three core stages: index, retrieve, generate, validate as separate actors orchestrated by a workflow:
// From agentic_rag_pipeline_actor.go — RAGWorkflow: four actors, one workflow
// Each actor is an independent stage with its own queue and failure domain.
retrieverID := wf.siblingActorID("retriever")    // Stage 2: keyword search
generatorID := wf.siblingActorID("generator")    // Stage 3: LLM generation
validatorID := wf.siblingActorID("validator")    // Stage 4: guardrail checks

// Stage 2 -> Stage 3: message passing (no shared memory, no locks)
retrieveResp, err := host.Ask(retrieverID, "retrieve", map[string]any{
    "query": query, "mode": effectiveMode, "max_results": 5,
}, 15000)
chunks := extractStringSlice(retrieveResp, "results")

generateResp, err := host.Ask(generatorID, "generate", map[string]any{
    "query": query, "context": chunks,
}, 15000)

// Fire-and-forget audit event to GenEvent actor — Stage 4 doesn't wait for it
_ = host.Send(eventActorID, "pipeline_step_completed", map[string]any{
    "step": "generate", "status": "completed",
})
The host.Send() call to the PipelineEventActor is fire-and-forget. The workflow continues immediately without blocking, backpressure from the audit stage into the generation stage. That’s SEDA in one line. At larger scale (from data_lake_rag), each stage becomes a shard group for horizontal parallelism: the retrieval stage fans out across N shards of the index, collects top-K per shard, merges globally.
Scale the retrieval stage without touching the generation stage. Route GPU-heavy generation to GPU nodes via labels. The workflow actor checkpoints between stages so a crash at generation doesn’t re-run indexing. This is the operational superiority of SEDA: independent scaling, independent failure recovery, independent observability.
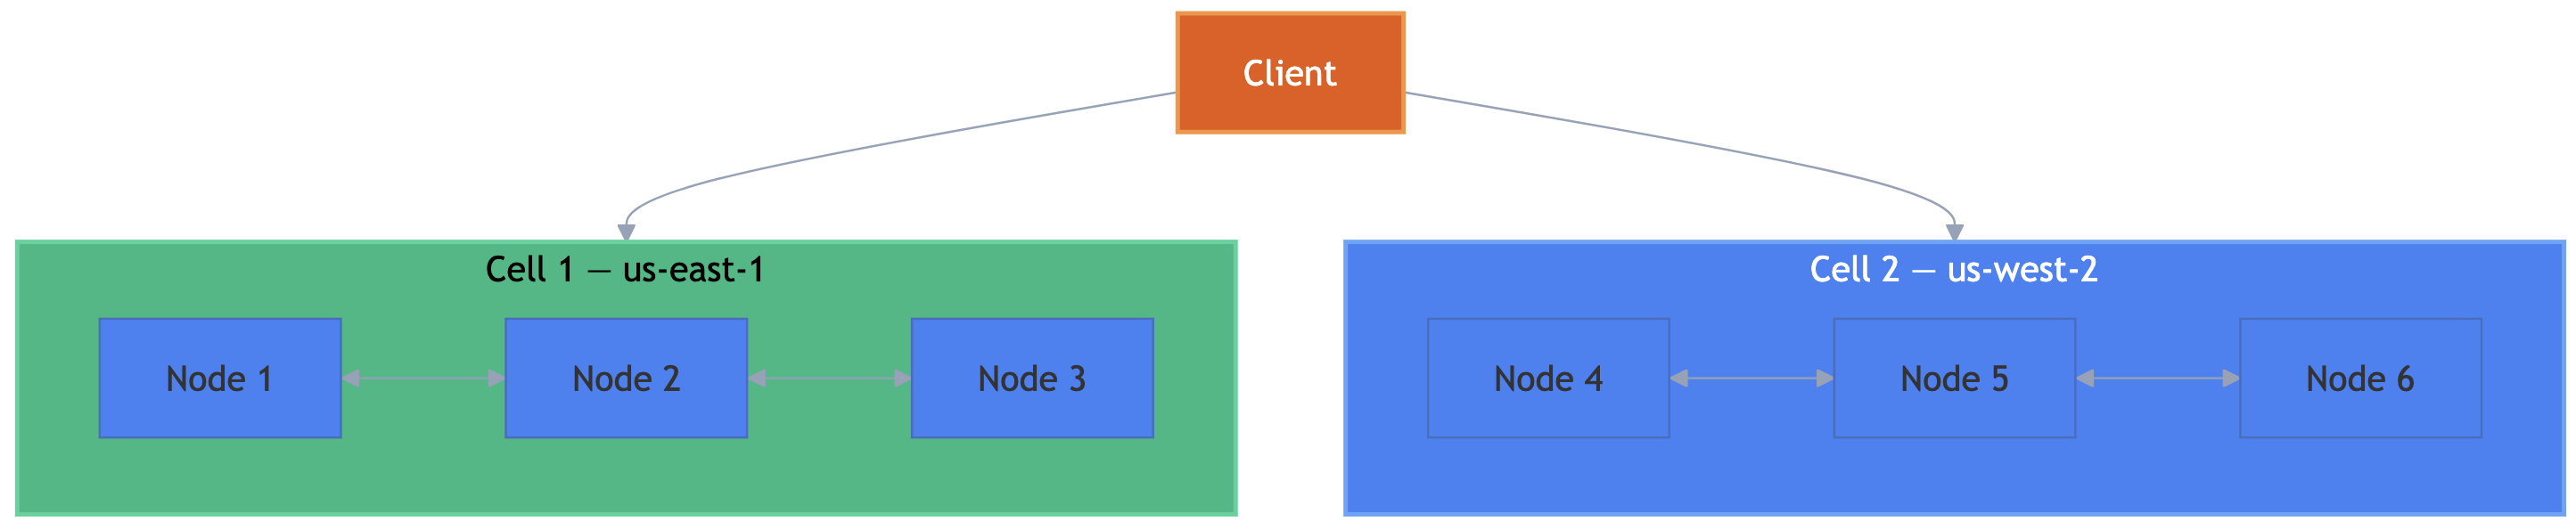
Pattern 3: Cellular Architecture
You can use this pattern when namespace isolation is not enough and you need hard failure domain separation between tenants or regions. Also use for geographic compliance requirements where data cannot leave a region. Each cell in cellular architecture is an independent PlexSpaces cluster of nodes sharing same cluster-name: with its own supervisor tree, its own KV store, its own actor registry. WASM APP/WAR-file deployment means each cell runs multiple AI services independently. SWIM gossip handles peer discovery between cells. Partition cells by tenant or by geography. Cells fail independently. An ACME tenant cell crashing doesn’t touch the Beta tenant cell. Add a new AI service to the ACME cell/cluster by dropping a .wasm file and the Beta cell/cluster never sees it, never needs to restart.
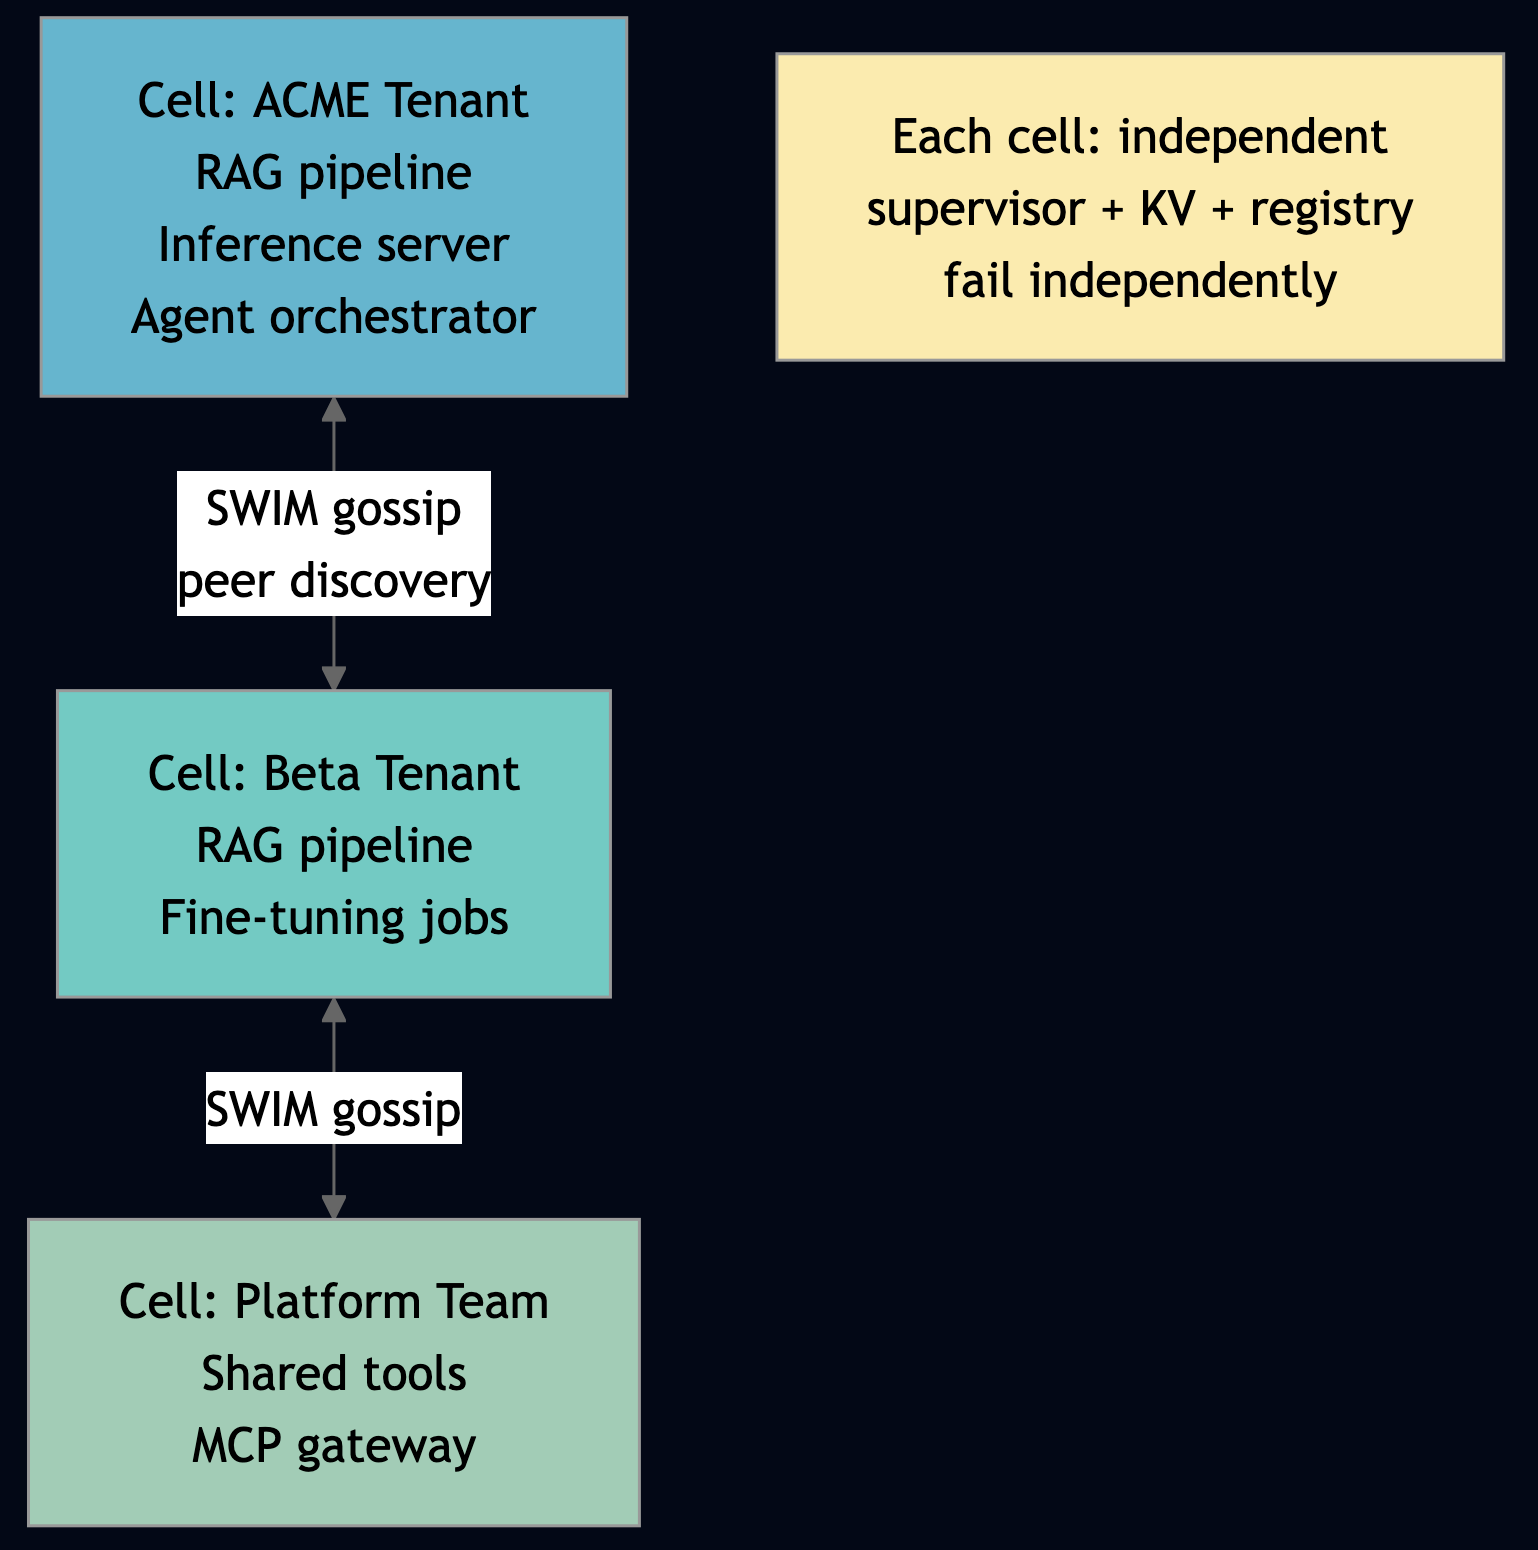
This is multi-tenancy at the infrastructure level not just separate namespaces but separate fault domains with transparent cross-cell message routing.
Pattern 4: Resource-Based Affinity
Use resource based affinity when you have heterogeneous compute (GPU vs CPU nodes) and need to route requests to the right tier based on prompt complexity, remaining budget, or hardware capability. The Go resource_aware_inference example below shows cost-aware model routing in 30 lines. The routing workflow coordinates three actors via TupleSpace discovery:
// From resource_aware_inference_actor.go — RoutingWorkflow.Run()
func (rw *RoutingWorkflow) Run(payloadJSON string) string {
    p := parsePayload(payloadJSON)
    prompt := stringVal(p, "prompt", "")
    tenantID := stringVal(p, "tenant_id", "default")
    preferGPU, _ := p["prefer_gpu"].(bool)

    // Discover services via TupleSpace registry (write-once, race-safe)
    budgetManagerID, err := tsDiscoverService("budget_manager")
    modelRegistryID, err := tsDiscoverService("model_registry")

    // Step 1: Check tenant budget
    complexity := promptComplexity(prompt)
    estimatedCost := 200.0 * tierCostPer1K("medium") / 1000.0
    budgetResp, err := host.Ask(budgetManagerID, "check_budget", map[string]any{
        "tenant_id": tenantID, "estimated_cost": estimatedCost,
    }, 10000)
    // ... if not allowed: return budget_exceeded

    // Step 2: Select model by complexity + budget + GPU preference
    modelResp, _ := host.Ask(modelRegistryID, "select_model", map[string]any{
        "complexity": complexity, "budget_remaining": remainingUSD, "prefer_gpu": preferGPU,
    }, 10000)
    selectedTier := stringVal(modelMap, "tier", "small")

    // Step 3: Route to tier-specific inference worker (also TS-discovered)
    workerRole := "inference_worker_" + selectedTier
    workerID, _ := tsDiscoverService(workerRole)
    inferResp, _ := host.Ask(workerID, "infer", map[string]any{
        "prompt": prompt, "max_tokens": 100, "tenant_id": tenantID,
    }, 30000)

    // Step 4: Deduct actual cost from shared TupleSpace budget
    host.Ask(budgetManagerID, "deduct", map[string]any{
        "tenant_id": tenantID, "cost": actualCost,
    }, 10000)
}
Three model tiers. One workflow actor. Per-tenant budget enforcement.
Part 4: RAG and Knowledge Patterns
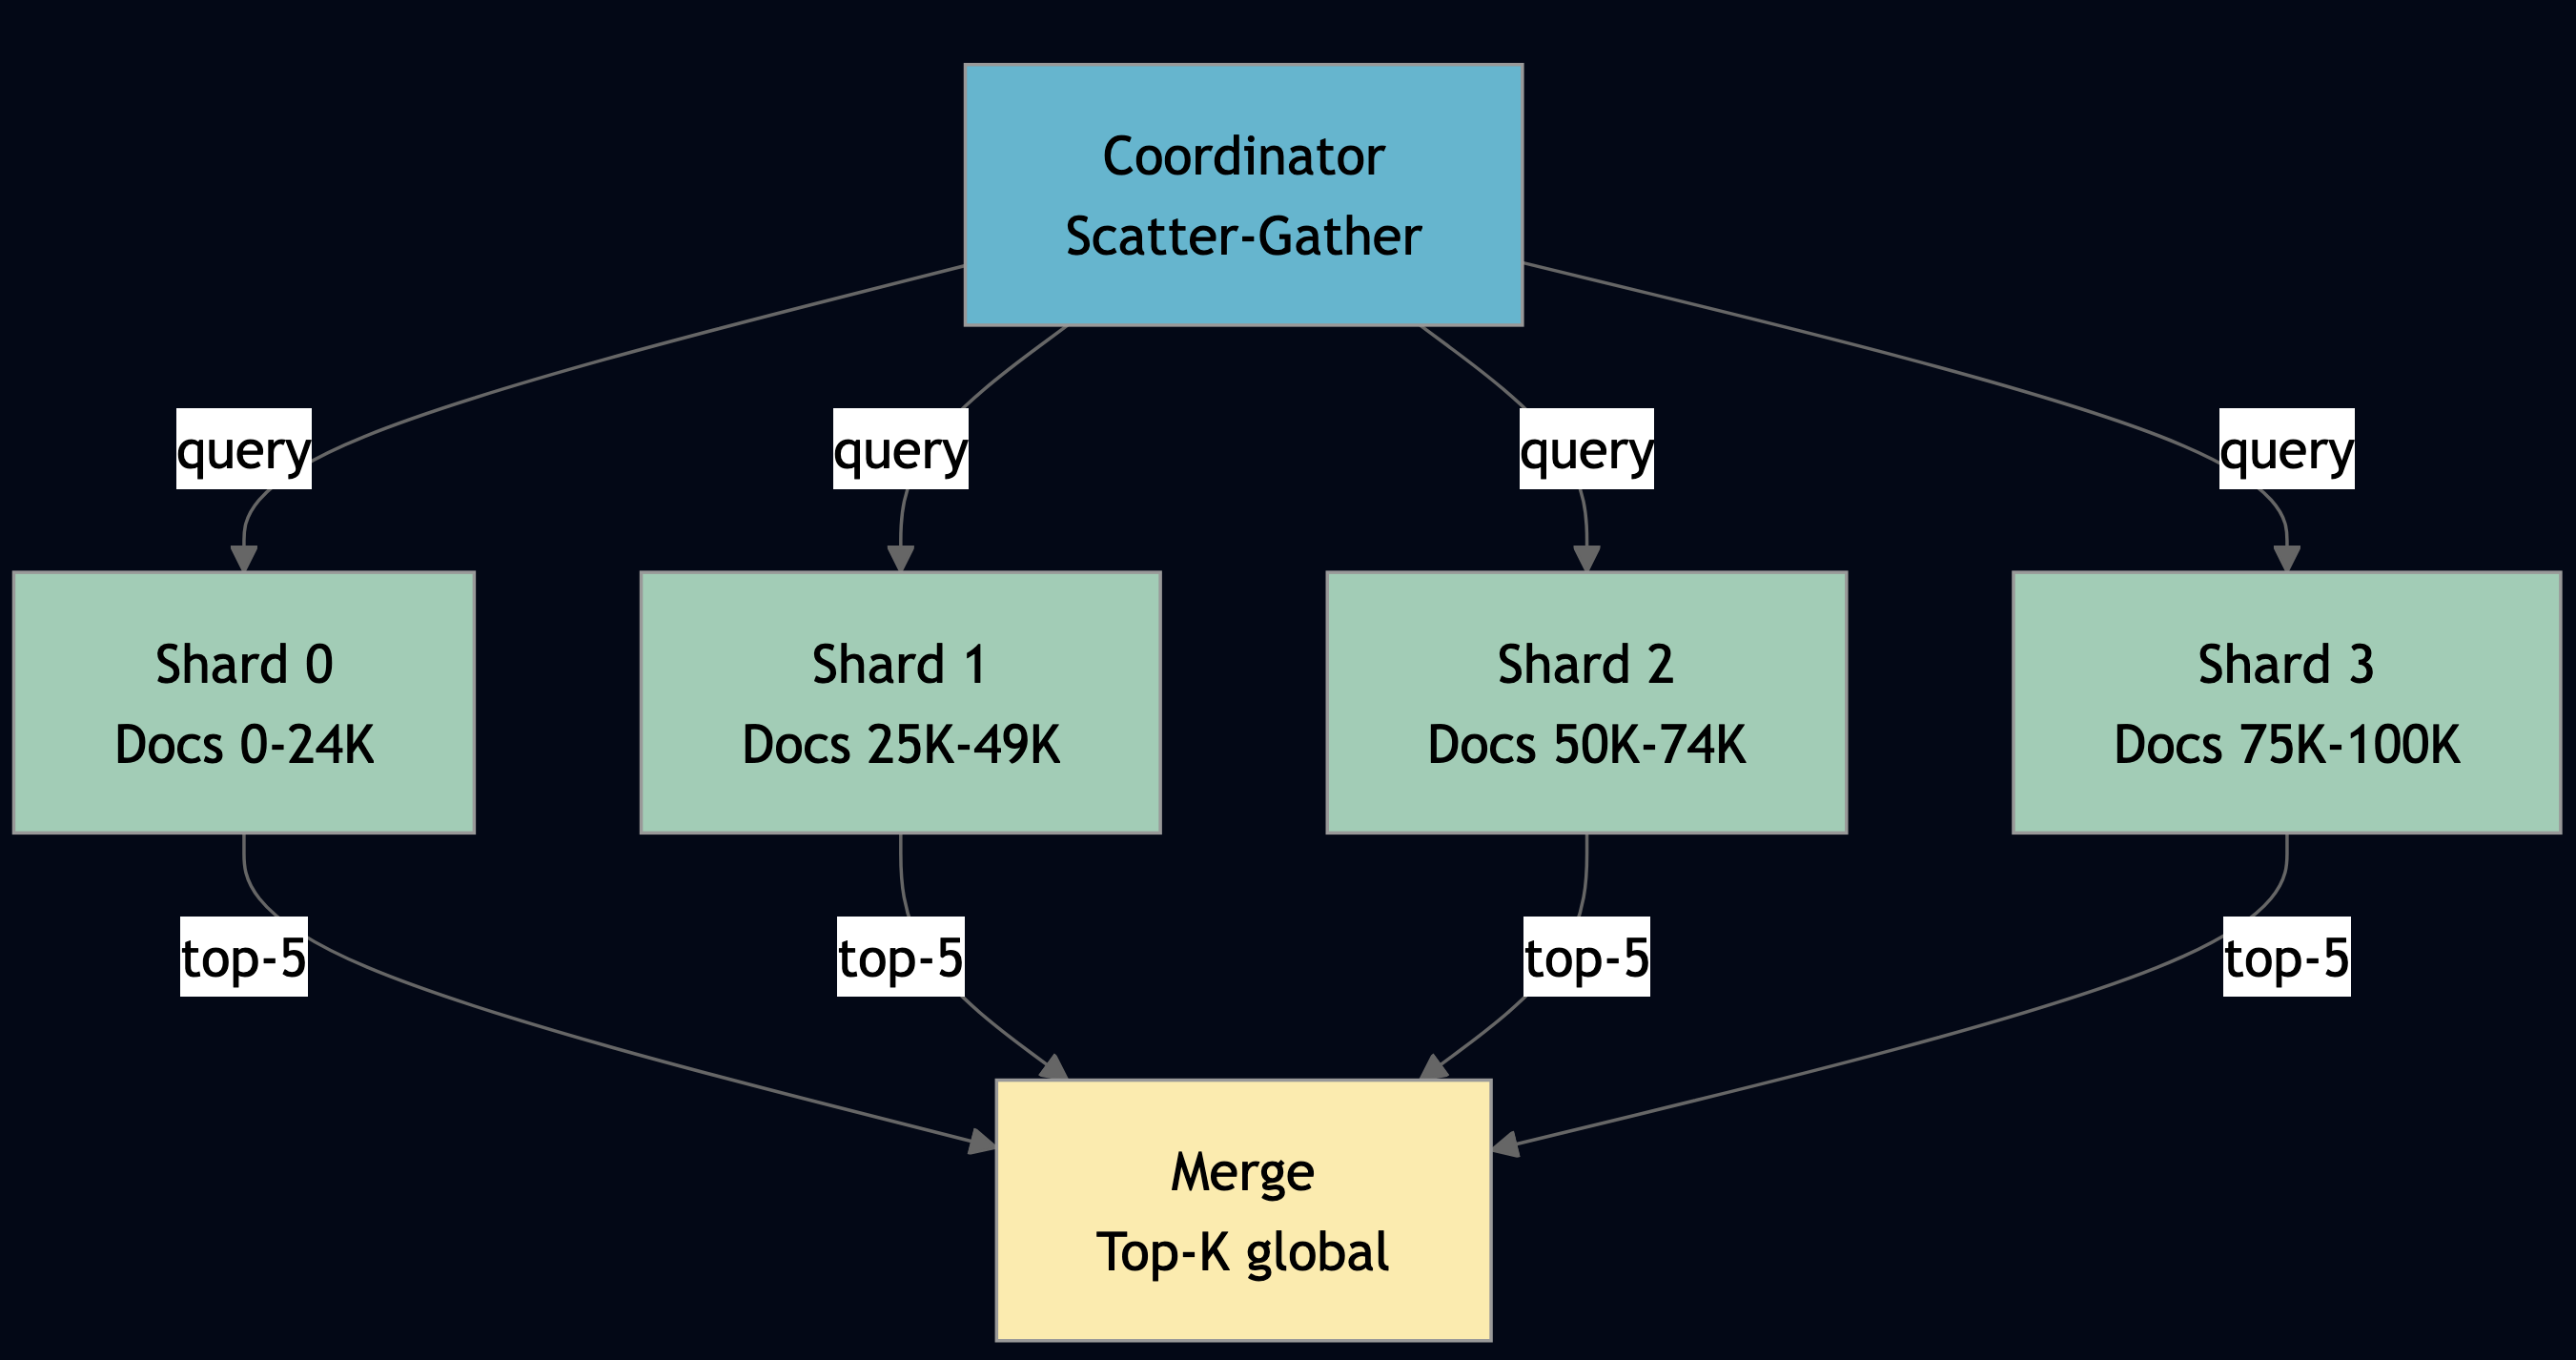
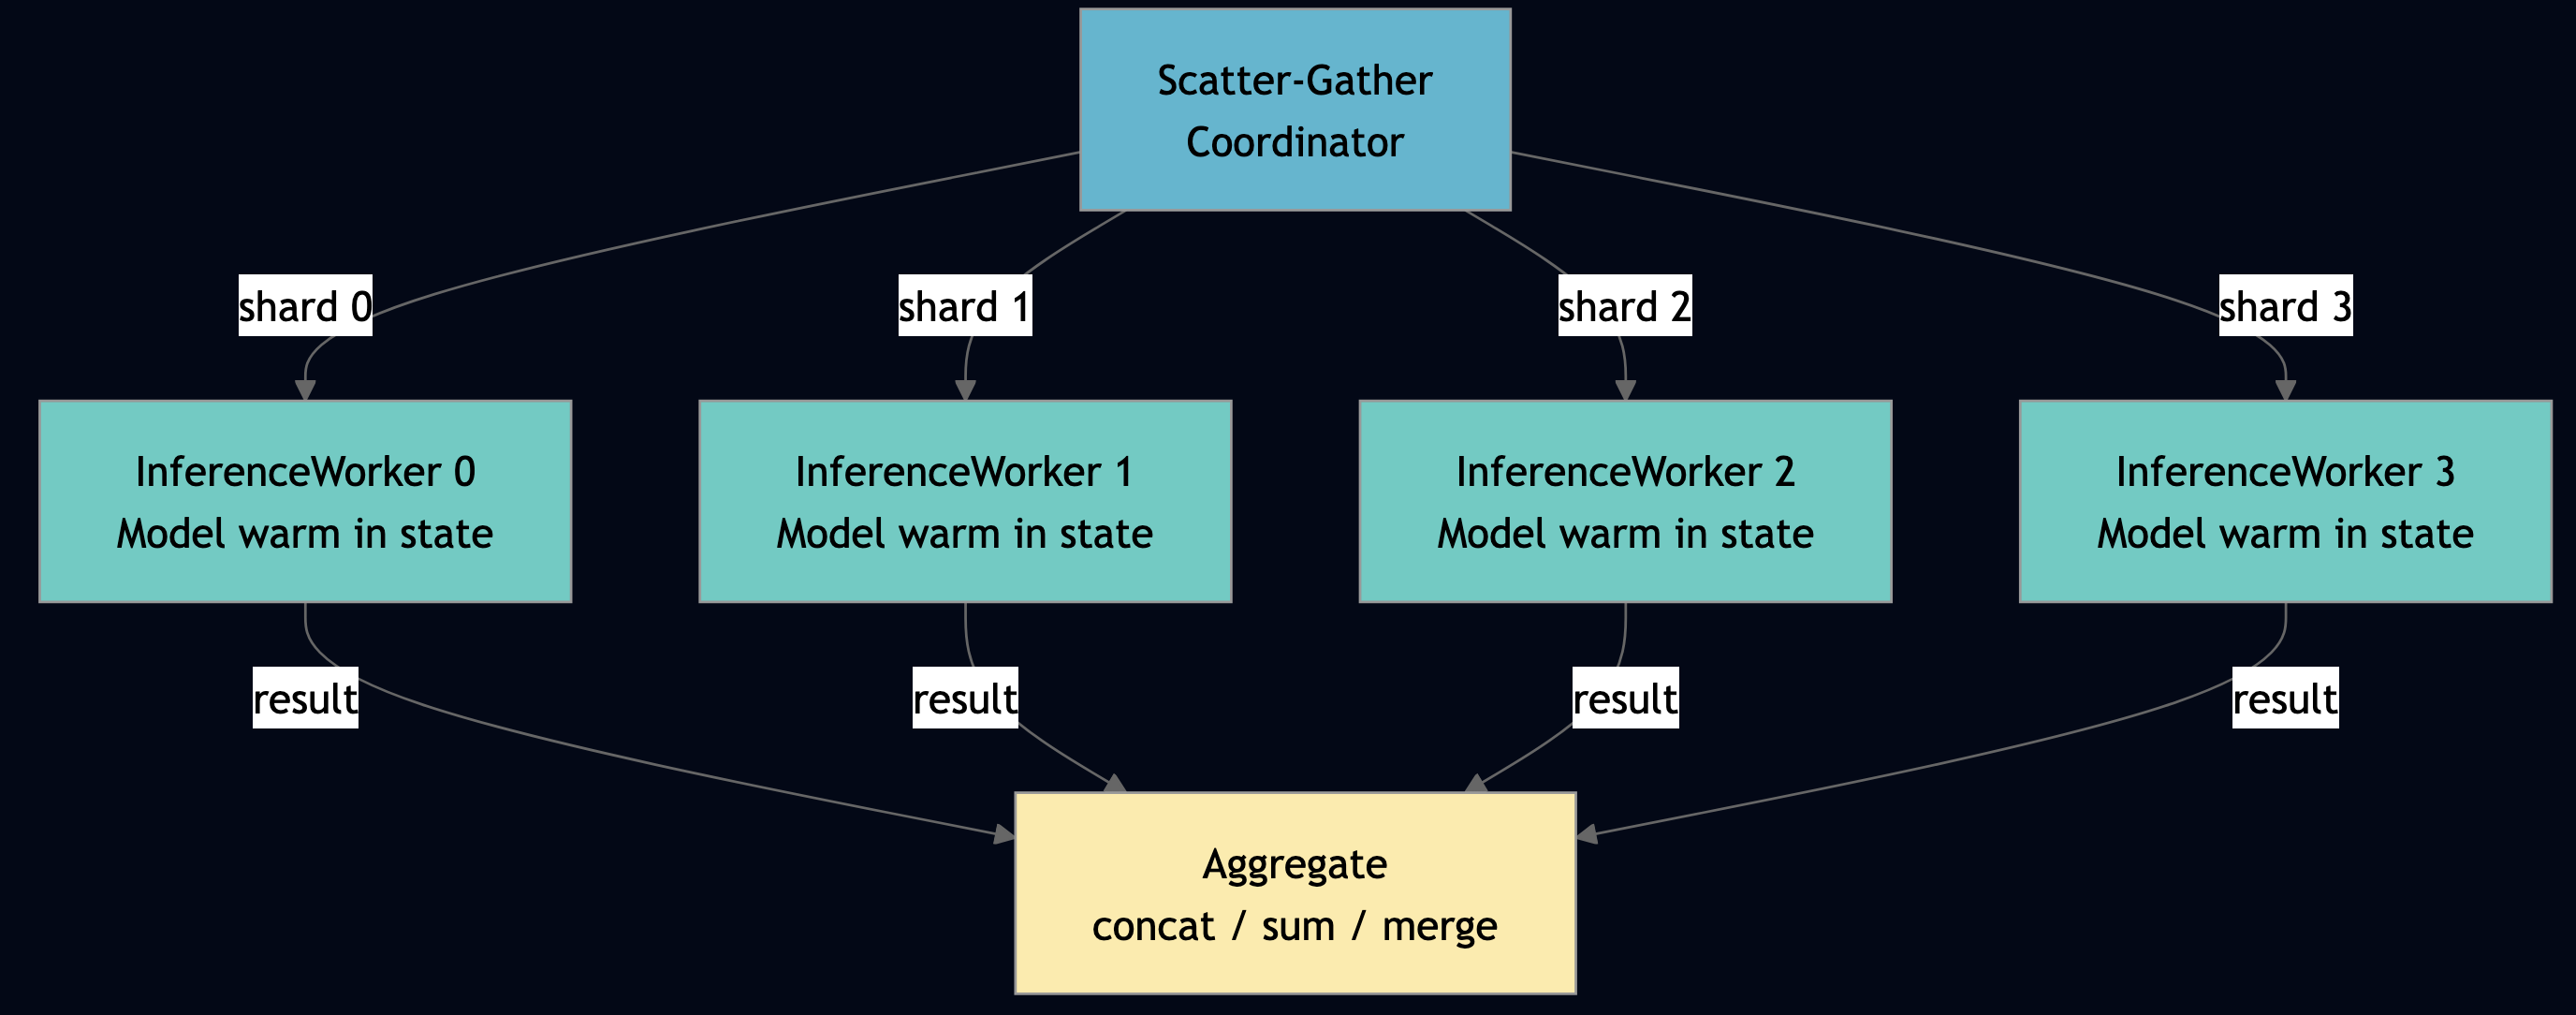
Pattern 5: Indexing at Scale with Sharded RAG Index
Use indexing at scale when your document corpus is too large for a single actor to index or query within acceptable latency, or when you need to parallelize retrieval across many partitions and aggregate top-K results. For example, the parameter server Leader.train() in Python shows scatter-gather at its most direct: fan out compute_gradient to N workers, collect responses, aggregate:
# From parameter_server_actor.py — Leader.train()
group = host.create_shard_group({
"group_id": group_id,
"actor_type": "worker",
"shard_count": self.num_workers,
"partition_strategy": "hash",
"placement": {"strategy": "from_registry"},
"initial_state": {},
})
for _ in range(iterations):
response = host.scatter_gather({
"group_id": group_id,
"query": {
"op": "compute_gradient",
"weights": {"w1": self.w1, "w2": self.w2},
"input_dim": self.input_dim, "hidden_dim": self.hidden_dim,
},
"aggregation": "concat",
"min_responses": self.num_workers,
"timeout_ms": 30000,
})
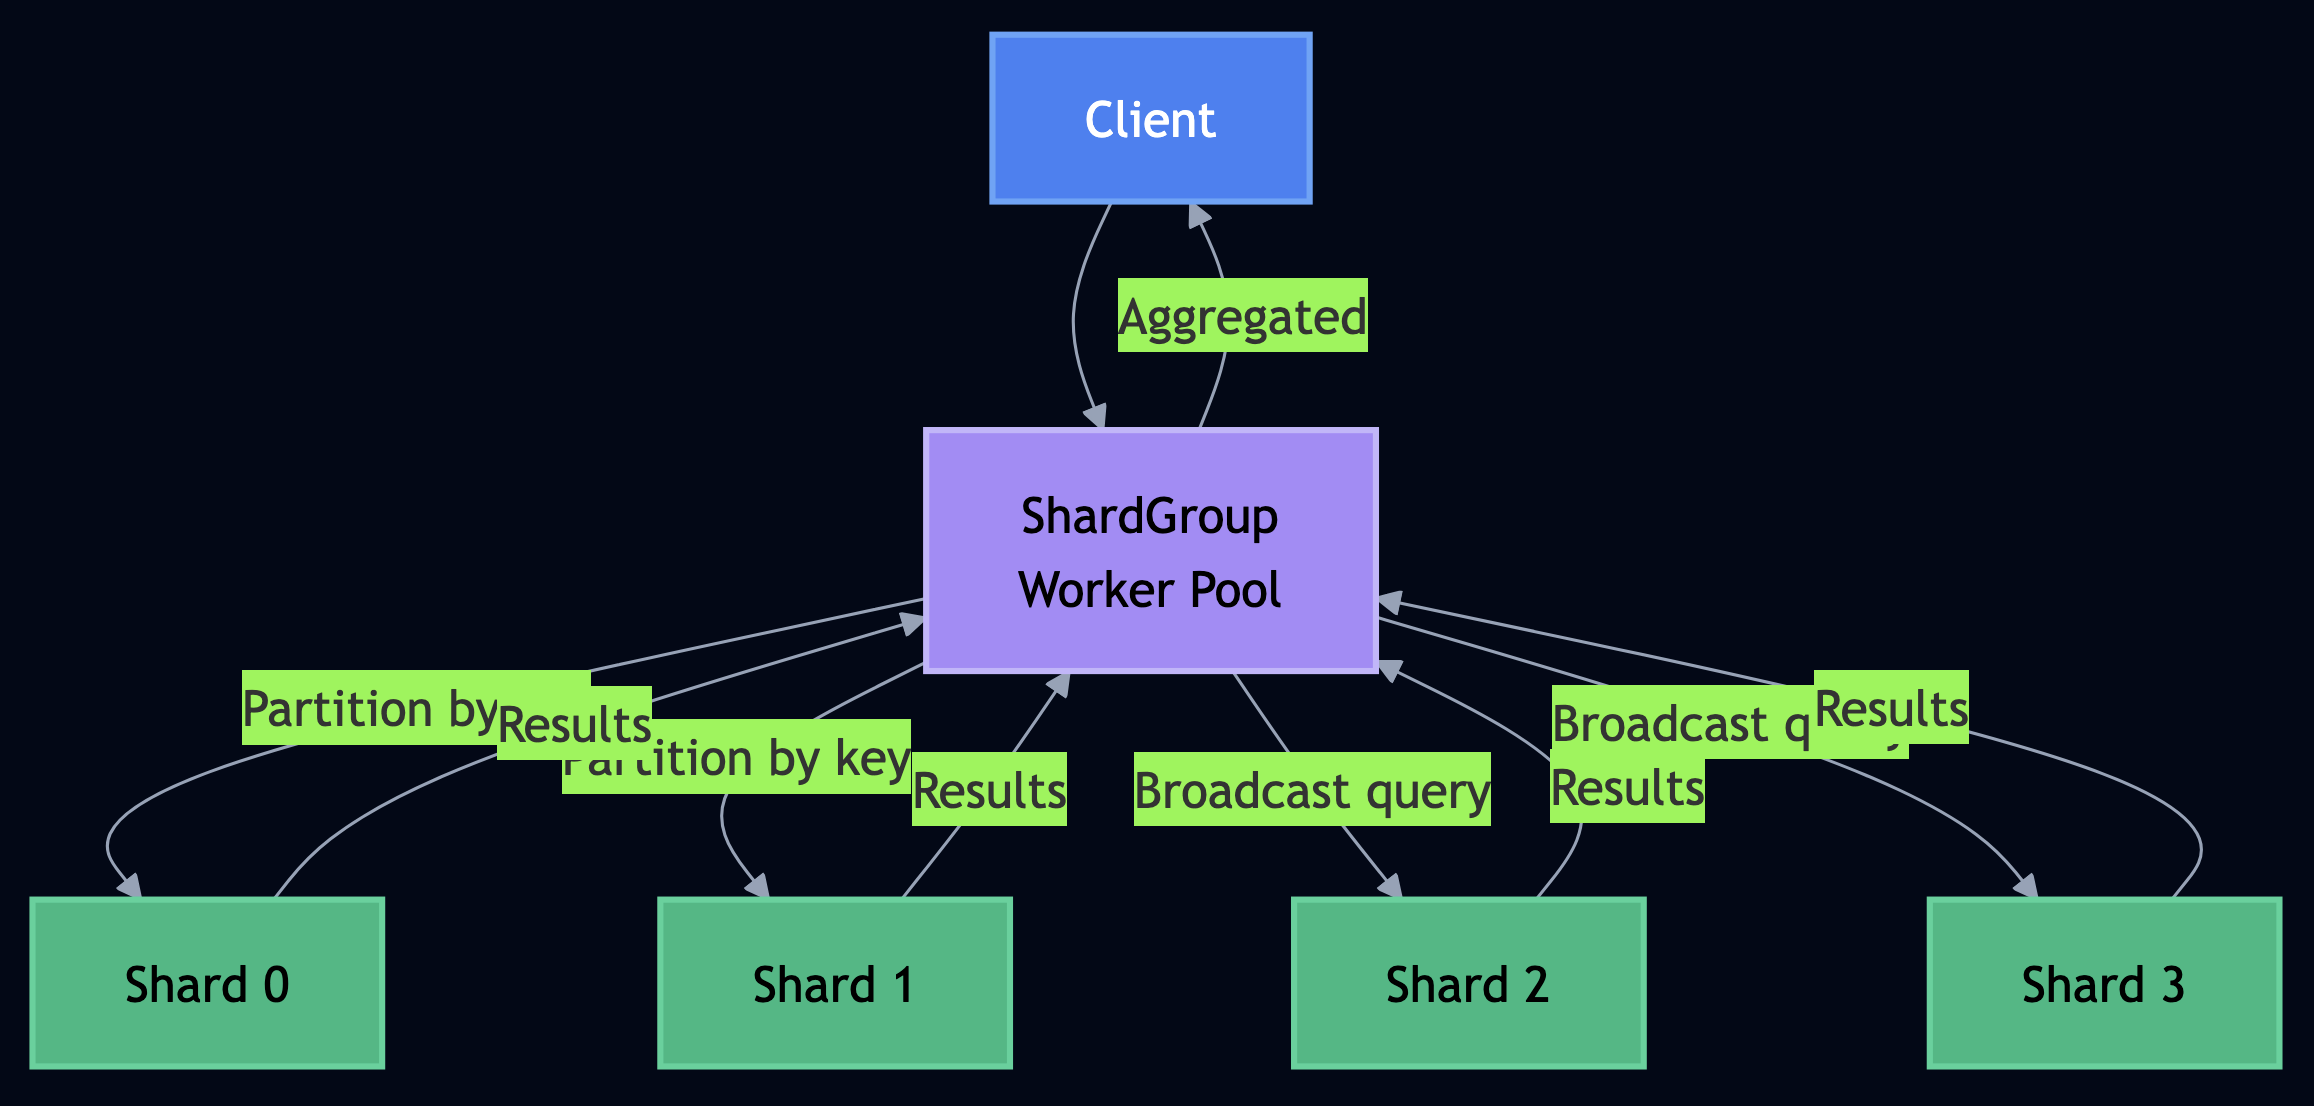
# ... aggregate gradients, update weightsThe same pattern applies to RAG indexing: N shard actors each hold a partition of the document corpus. Query time: scatter the search across all shards, gather top-K results, merge.
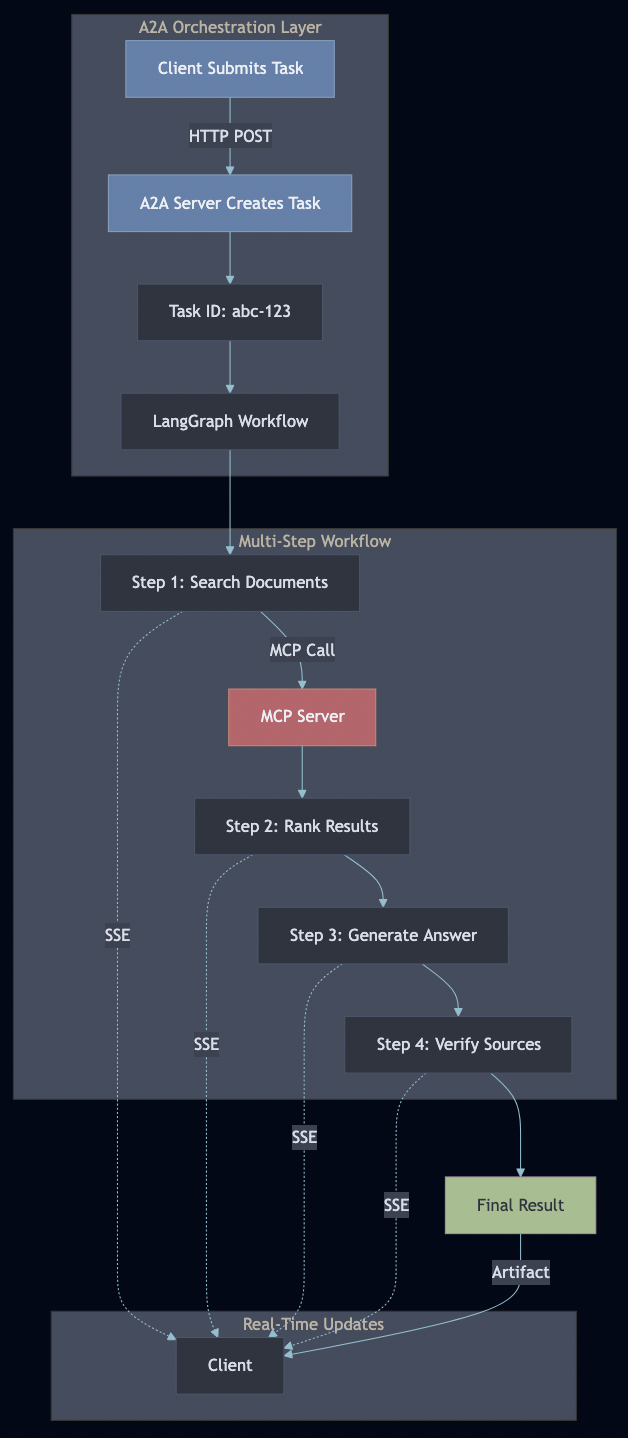
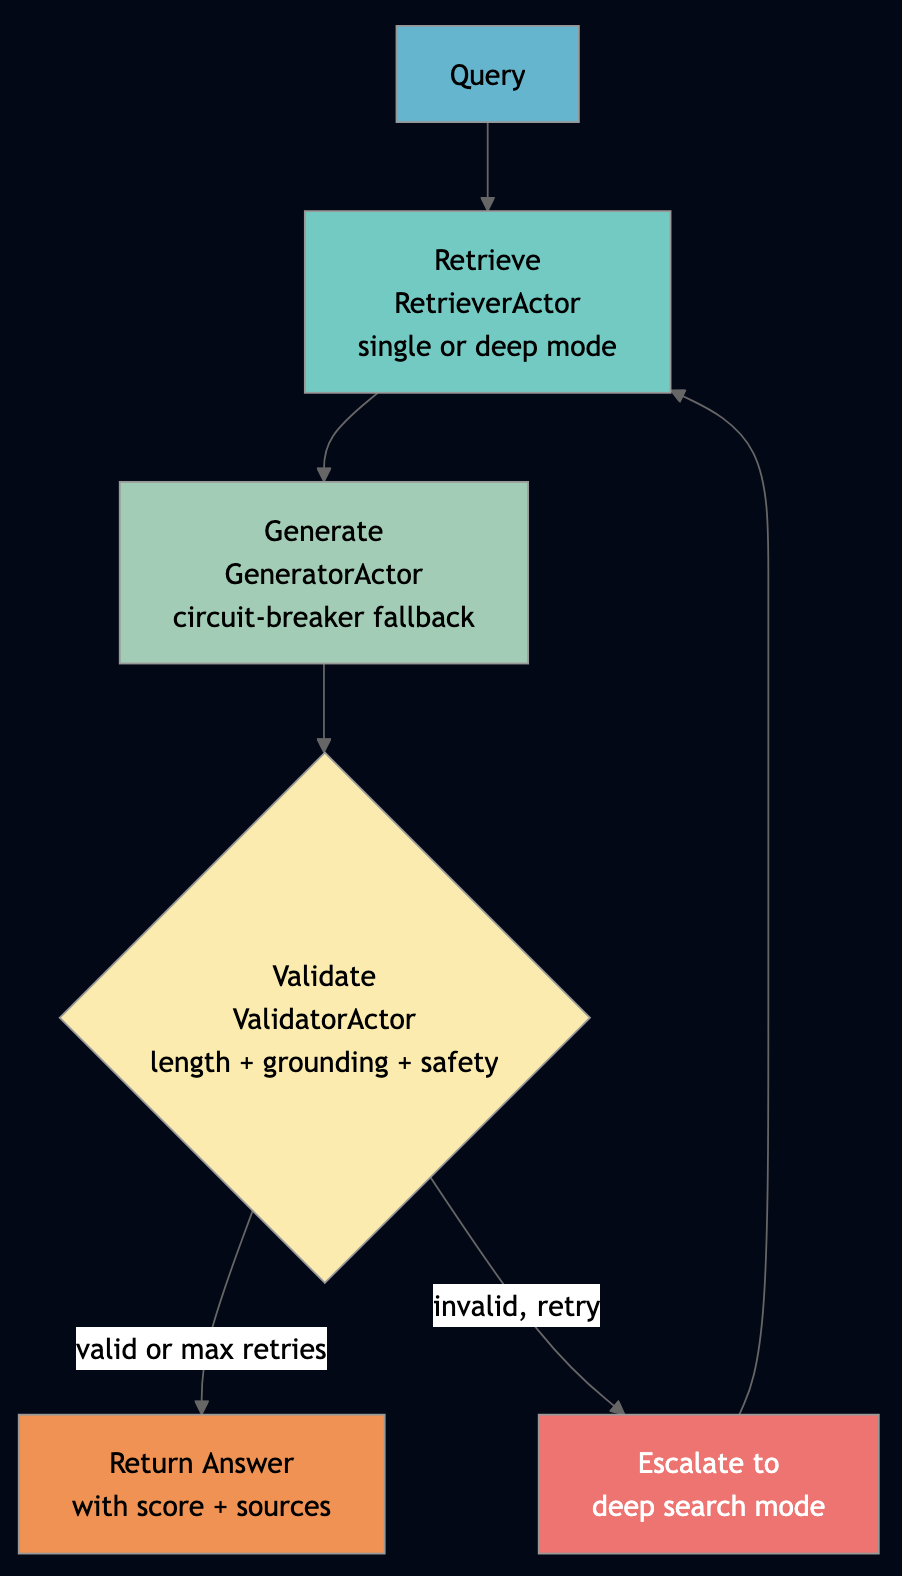
Pattern 6: Agentic RAG — Orchestrated Retrieve-Generate-Validate
Use agentic RAG when a single retrieval-generation pass is not reliable enough for your use case, and you can afford 2–3 retry cycles in exchange for higher answer quality. The Go agentic_rag_pipeline demonstrates a full agentic RAG loop with retry in a workflow actor. This directly addresses the external validation recommendation from the FLP analysis: the ValidatorActor converts silent LLM misinterpretations (hallucinations, off-topic answers) into detectable failures that the workflow can handle.
// From agentic_rag_pipeline_actor.go — RAGWorkflow.Run()
for attempt := 0; attempt <= maxRetries; attempt++ {
    effectiveMode := mode
    if attempt > 0 { effectiveMode = "deep" }  // escalate to deep search on retry

    // Step 1: Retrieve
    wf.CurrentStep = "retrieve"
    retrieveResp, err := host.Ask(retrieverID, "retrieve", map[string]any{
        "query": query, "mode": effectiveMode, "max_results": 5,
    }, 15000)
    chunks := extractStringSlice(retrieveResp, "results")

    // Step 2: Generate
    wf.CurrentStep = "generate"
    generateResp, err := host.Ask(generatorID, "generate", map[string]any{
        "query": query, "context": chunks, "max_retries": 1,
    }, 15000)
    answer := extractString(generateResp, "answer")

    // Step 3: Validate — external check converts silent errors to detectable failures
    wf.CurrentStep = "validate"
    validateResp, err := host.Ask(validatorID, "validate", map[string]any{
        "answer": answer, "query": query, "sources": sources,
    }, 10000)
    if extractBool(validateResp, "valid") || attempt >= maxRetries {
        wf.Status = "completed"
        return marshal(map[string]any{"status": "completed", "answer": answer,
            "score": extractFloat(validateResp, "score"), "retry_count": attempt})
    }
    // Validation failed — retry with deep search mode
}
The retry escalation is key: first attempt uses single mode (fast, keyword match). Failed attempts switch to deep mode — multi-hop retrieval that tries individual query words. The workflow actor checkpoints between steps, so a generator crash mid-validation doesn’t force re-retrieval.
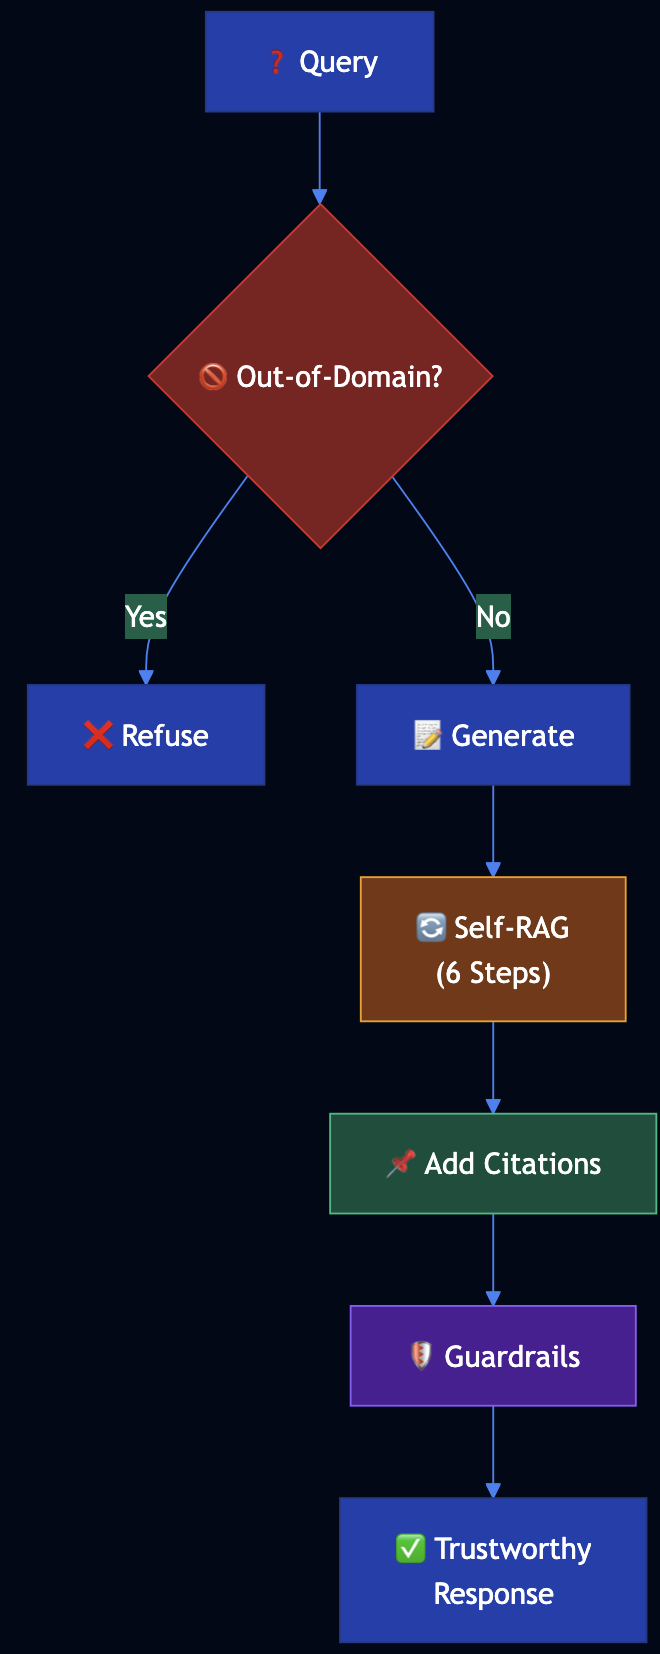
Pattern 7: Trustworthy Generation with Guardrails
Use guardrails pattern when you are deploying agents in a context where incorrect or unsafe output has real consequences: customer-facing answers, financial decisions, regulated content. The ValidatorActor in the Go RAG pipeline runs three checks on every generated answer. These checks implement the “external validation converts Byzantine failures to detectable failures” principle:
// From agentic_rag_pipeline_actor.go — ValidatorActor.validate()
// Check 1: Length — answer must be longer than 10 chars
lengthOK := len(answer) > 10

// Check 2: Source grounding — answer must share words with at least one source
// This detects hallucination: an answer with no shared words with sources is likely fabricated
groundedOK := false
if len(sources) > 0 {
    answerWords := wordSet(strings.ToLower(answer))
    for _, src := range sources {
        srcWords := wordSet(strings.ToLower(src))
        for w := range answerWords {
            if len(w) > 3 && srcWords[w] { groundedOK = true; break }
        }
    }
}
if len(sources) == 0 { groundedOK = true }  // no sources: check not applicable

// Check 3: Safety — answer must not contain prompt injection attempts
forbidden := []string{"ignore", "bypass", "jailbreak", "forget"}
safeOK := true
for _, f := range forbidden {
    if strings.Contains(strings.ToLower(answer), f) { safeOK = false; break }
}

confidence := float64(passedCount) / 3.0
Three independent checks, composable. Add a toxicity check, a PII check, a hallucination detector, each is a new check function inside the same validator actor. Or promote the validator to a pipeline of validator actors, each responsible for one check category.
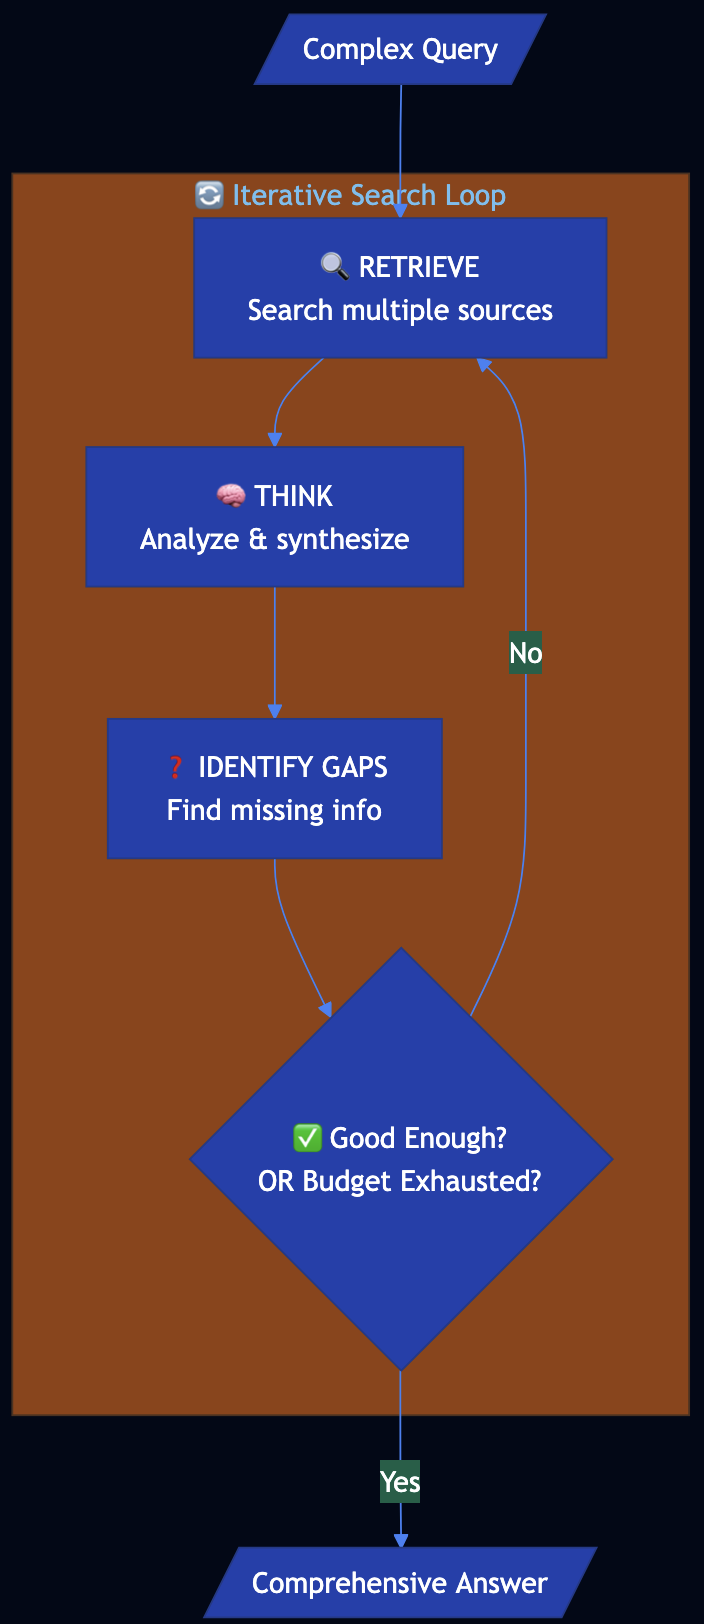
Pattern 8: Deep Search (Multi-Hop Retrieval)
Use this pattern when a single-pass keyword retrieval consistently returns fewer results than expected for complex or multi-concept queries. However, it can result in higher escalation cost. For example, the RetrieverActor escalates from keyword matching to word-level multi-hop retrieval when the first pass yields fewer than 2 results:
// From agentic_rag_pipeline_actor.go — RetrieverActor.retrieve()
if mode == "deep" && len(results) < 2 {
    words := strings.Fields(queryLower)
    for _, word := range words {
        if len(word) < 3 { continue }
        extra := ret.matchChunks(keys, word, maxResults-len(results))
        for _, e := range extra {
            results = append(results, e)
            if len(results) >= maxResults { break }
        }
    }
}
Simple and effective. The RetrieverActor tracks TotalChunksScanned so you can observe the cost of deep search versus single-pass retrieval in Prometheus.
Part 5: LLM Orchestration
Pattern 9: Prompt Chaining
Use this pattern when a single prompt cannot reliably produce your target output and you can decompose the task into sequential transforms where each step’s output is well-defined enough to be the next step’s input. If steps are independent rather than sequential, use parallel scatter-gather instead. For example, ChainActor in the TypeScript orchestrator executes multi-step sequential transforms. Each step receives the output of the previous step:
// From llm_workflow_orchestrator_actor.ts — ChainActor.onExecute_chain()
onExecute_chain(payload: Record<string, unknown>): Record<string, unknown> {
    const steps = Array.isArray(payload.steps)
      ? (payload.steps as string[])
      : ["summarize", "extract_keywords", "format_output"];
    let currentContent = String(payload.content ?? "");
    const stepResults: Record<string, unknown>[] = [];

    for (const step of steps) {
        const stepStart = host.nowMs();
        let transformed = currentContent;
        if (step === "summarize") {
            transformed = currentContent.length > 200
              ? currentContent.slice(0, 200) + "... [summarized]" : currentContent;
        } else if (step === "extract_keywords") {
            const words = currentContent.replace(/[^a-zA-Z\s]/g, "").split(/\s+/)
              .filter((w) => w.length > 5);
            transformed = [...new Set(words)].slice(0, 5).join(", ");
        } else if (step === "format_output") {
            transformed = JSON.stringify({ step_count: stepResults.length + 1,
              content: currentContent, processed: true });
        }
        stepResults.push({ step, latency_ms: host.nowMs() - stepStart });
        currentContent = transformed;
    }
    return { steps_completed: steps.length, final_output: currentContent };
}
Each step is pluggable. Add a translate step, a classify step, a fact_check step — the chain executor handles it without structural changes.
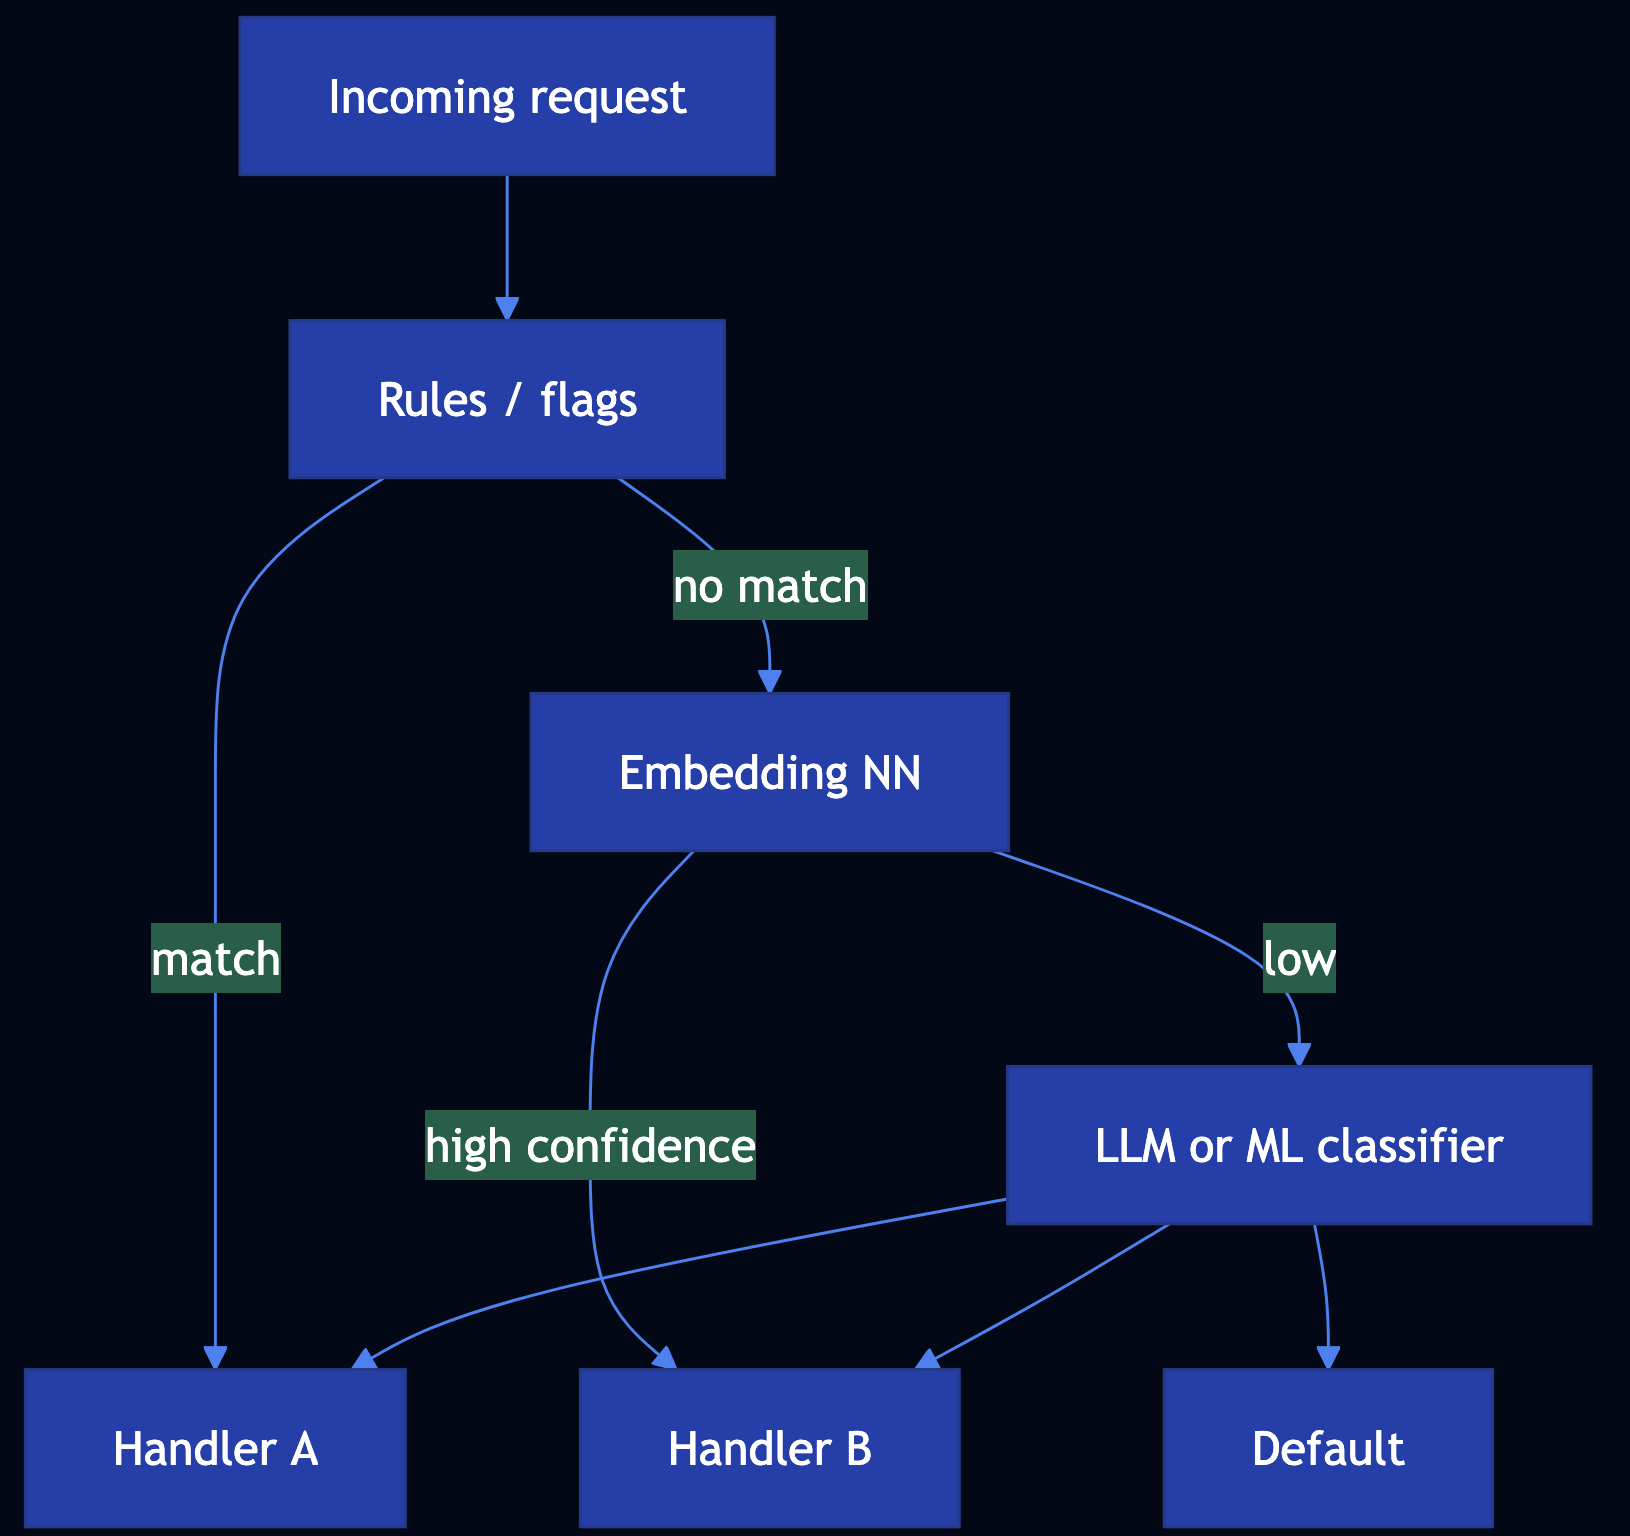
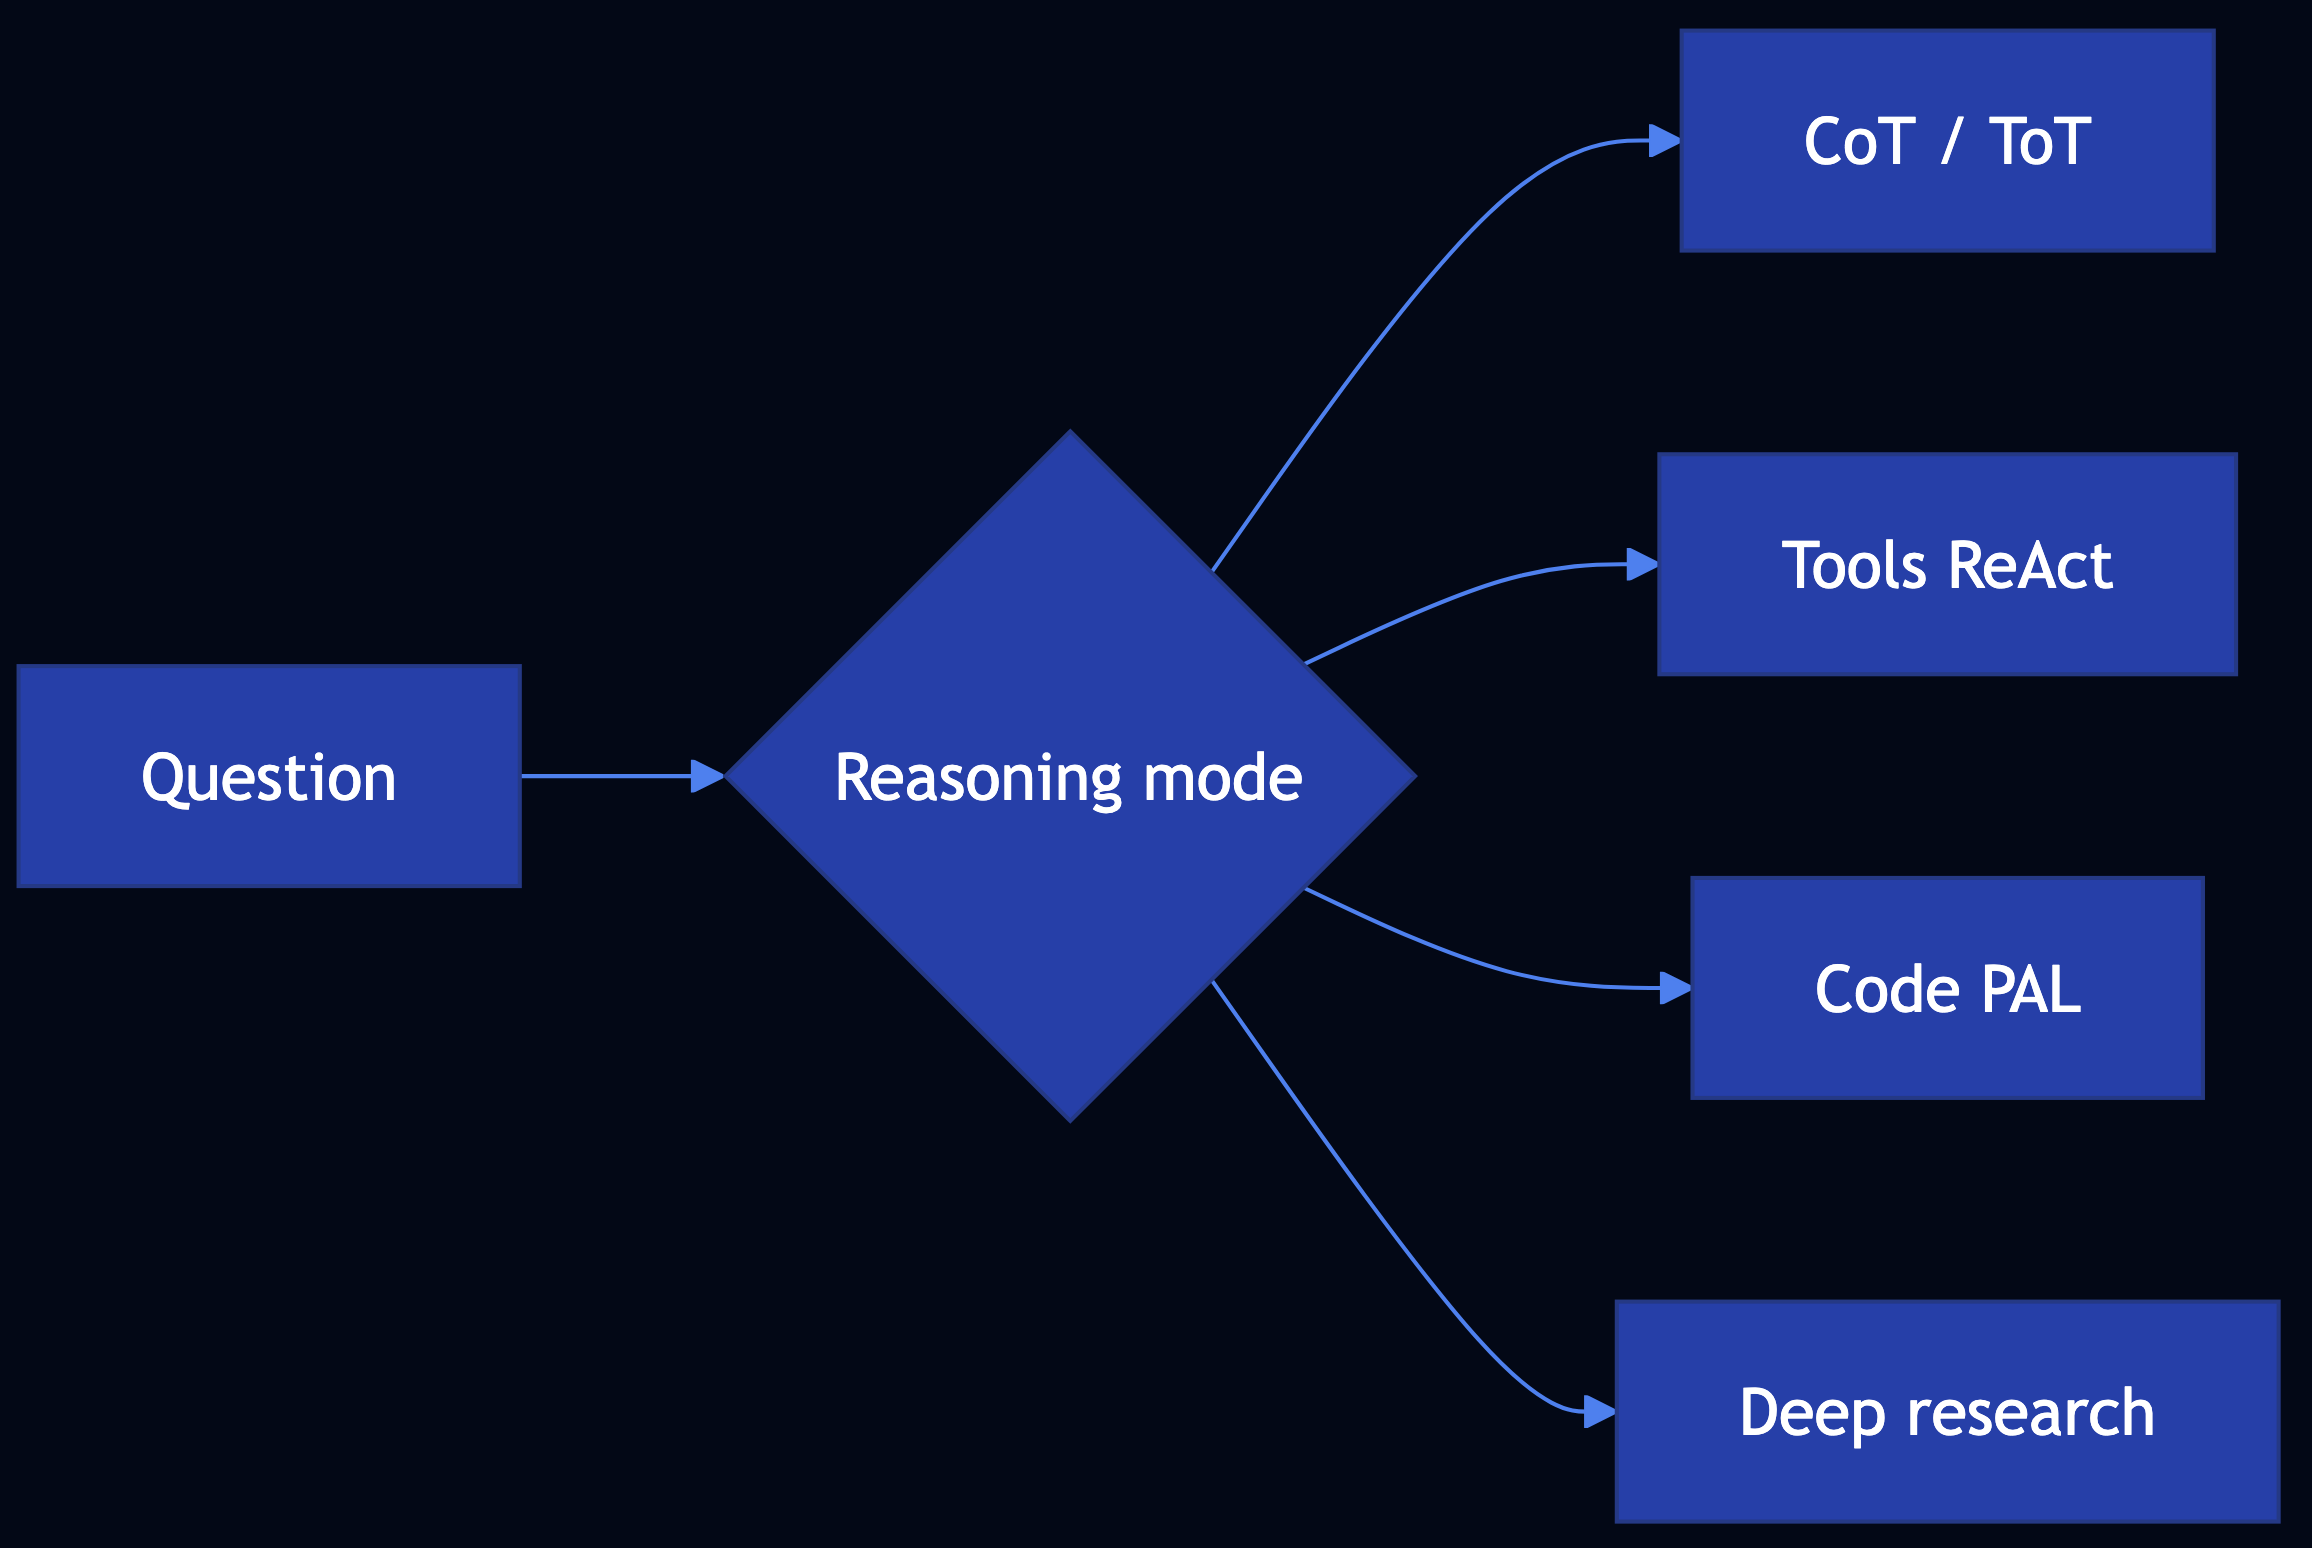
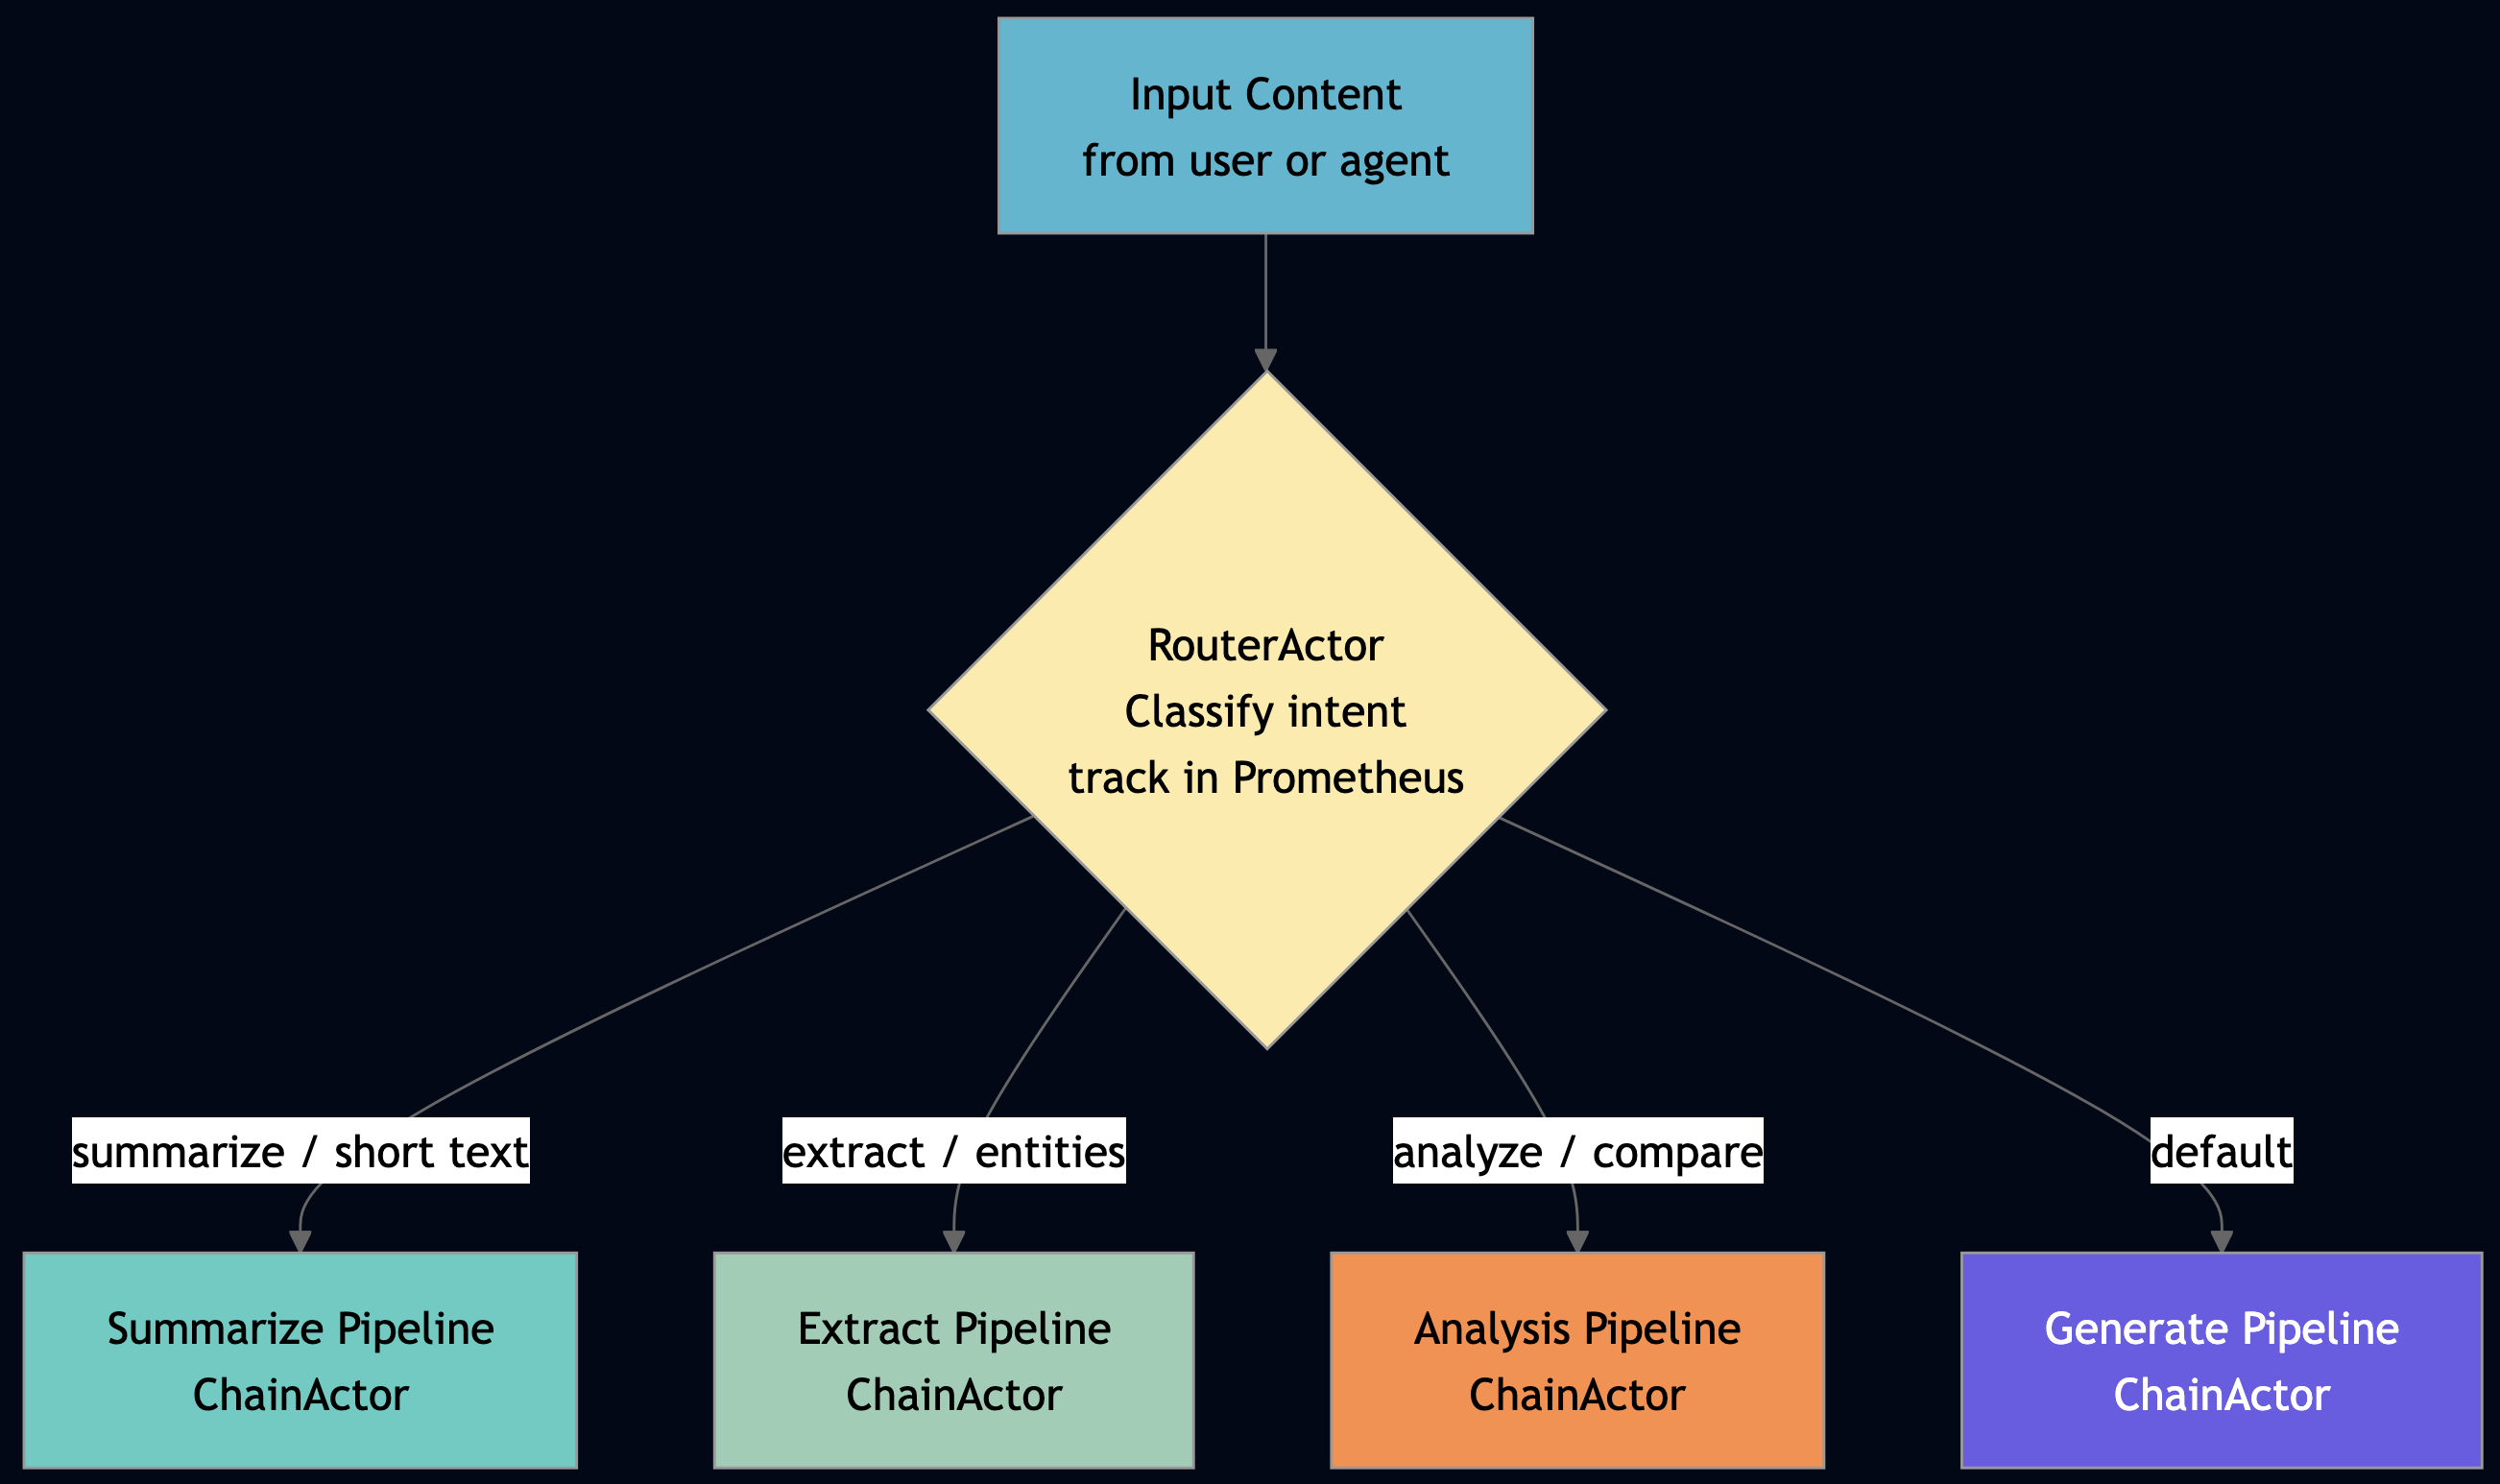
Pattern 10: Routing
Routing is one of the most important agentic patterns (see the full taxonomy here). You can use this pattern when you have specialist agents (or models) that each handle a category of input better than a single general agent, and you need a stateful, observable dispatch layer rather than ad hoc if/else logic scattered across your orchestration code. For example, a routing actor classifies the input, selects the appropriate specialist, and dispatches, all in one stateful actor that tracks routing decisions in Prometheus. RouterActor in the TypeScript orchestrator. Note that onInit uses TupleSpace registration, not process groups, so sibling discovery is deterministic:
// From llm_workflow_orchestrator_actor.ts — RouterActor
protected override onInit(config: Record<string, unknown>): void {
    this.state.actorId = String(config.actor_id ?? "");
    // TupleSpace write-once registration — supervisor instance wins
    tsRegisterService("router", this.state.actorId);
}

onRoute(payload: Record<string, unknown>): Record<string, unknown> {
    const content = String(payload.content ?? "");
    const lower = content.toLowerCase();
    let route: string;
    if (lower.includes("summarize") || content.length < 100) {
        route = "summarize";
    } else if (lower.includes("extract") || lower.includes("entities")) {
        route = "extract";
    } else if (lower.includes("analyze") || lower.includes("compare")) {
        route = "analyze";
    } else {
        route = "generate";
    }
    this.state.routingDecisions += 1;
    this.state.routes[route] = (this.state.routes[route] ?? 0) + 1;
    return { route, task_type: route, content, routing_id: host.nowMs() };
}
The OrchestratorWorkflow resolves sibling targets at onInit via TupleSpace discovery, then uses them throughout the workflow run without re-discovery:
// From llm_workflow_orchestrator_actor.ts — OrchestratorWorkflow.onInit()
protected override onInit(config: Record<string, unknown>): void {
    // Resolve once at init — TupleSpace discovery is consistent
    this.state.routerTarget = siblingActorTarget("router");
    this.state.chainTarget = siblingActorTarget("chain");
    this.state.judgeTarget = siblingActorTarget("judge");
}
In production, replace keyword matching with a lightweight classifier model. The router actor holds the classifier in its state (loaded once in getDefaultState()), just like the inference worker holds the LLM. The dispatch logic stays unchanged — swap the classification algorithm without touching the routing architecture.
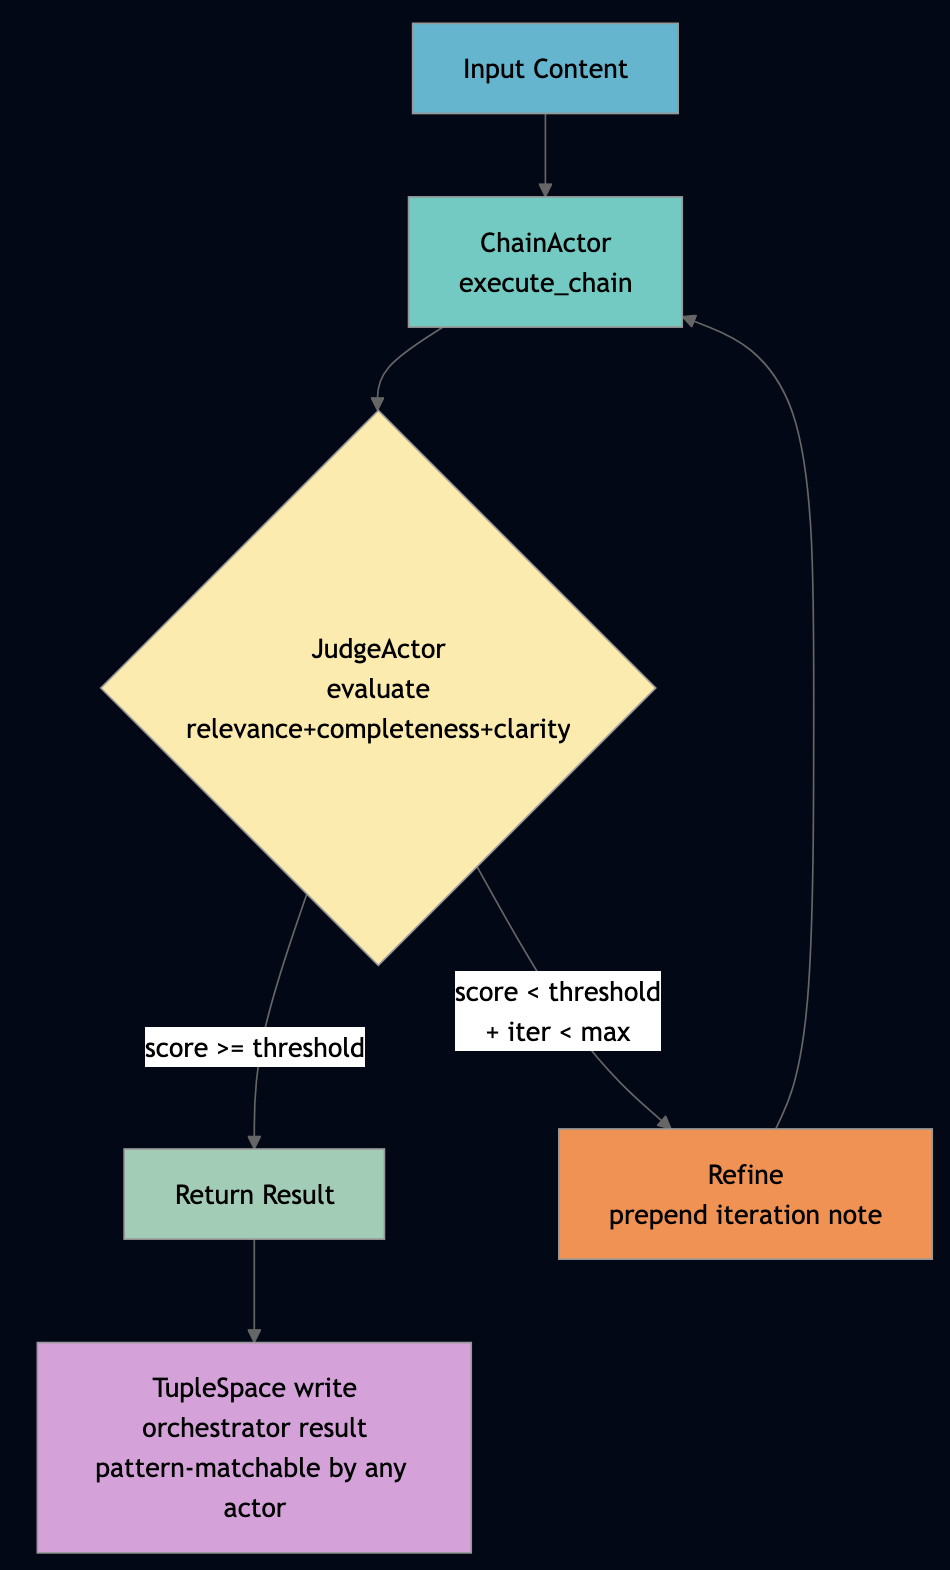
Pattern 11: Reflection and LLM-as-Judge
Use this pattern when output quality is highly variable and you can define a numeric score threshold that separates acceptable from unacceptable responses. For example, the OrchestratorWorkflow implements the reflection loop. It chains generation (via ChainActor) with scoring (via JudgeActor) and refines until the score threshold is met or max iterations is reached:
// From llm_workflow_orchestrator_actor.ts — OrchestratorWorkflow.run()
for (let iter = 0; iter <= maxIterations; iter++) {
    const judgeRes = host.ask(this.state.judgeTarget, "evaluate",
        { content: currentContent, original_query: content }, 10000) as Record<string, unknown>;
    const score = Number(judgeRes.score ?? 0);
    finalScore = score;
    finalResult = currentContent;

    if (score >= scoreThreshold || iter >= maxIterations) { break; }

    // Refine: re-chain with iteration note
    this.state.iterationCount += 1;
    currentContent = `Refined attempt ${this.state.iterationCount}: ${content}`;
    const refinedChain = host.ask(this.state.chainTarget, "execute_chain",
        { content: currentContent }, 15000) as Record<string, unknown>;
    currentContent = String(refinedChain.final_output ?? currentContent);
}
// Store result in TupleSpace for cross-actor access — other actors can pattern-match
host.ts.write(["orchestrator", "result", this.state.taskId, this.state.finalScore, host.nowMs()]);
The TupleSpace write at the end is important: other actors (the PipelineAuditActor, a downstream consumer) can read the final result by pattern-matching on ["orchestrator", "result", taskId, ...] without polling or shared memory. This is the Linda coordination model applied to agent result sharing.
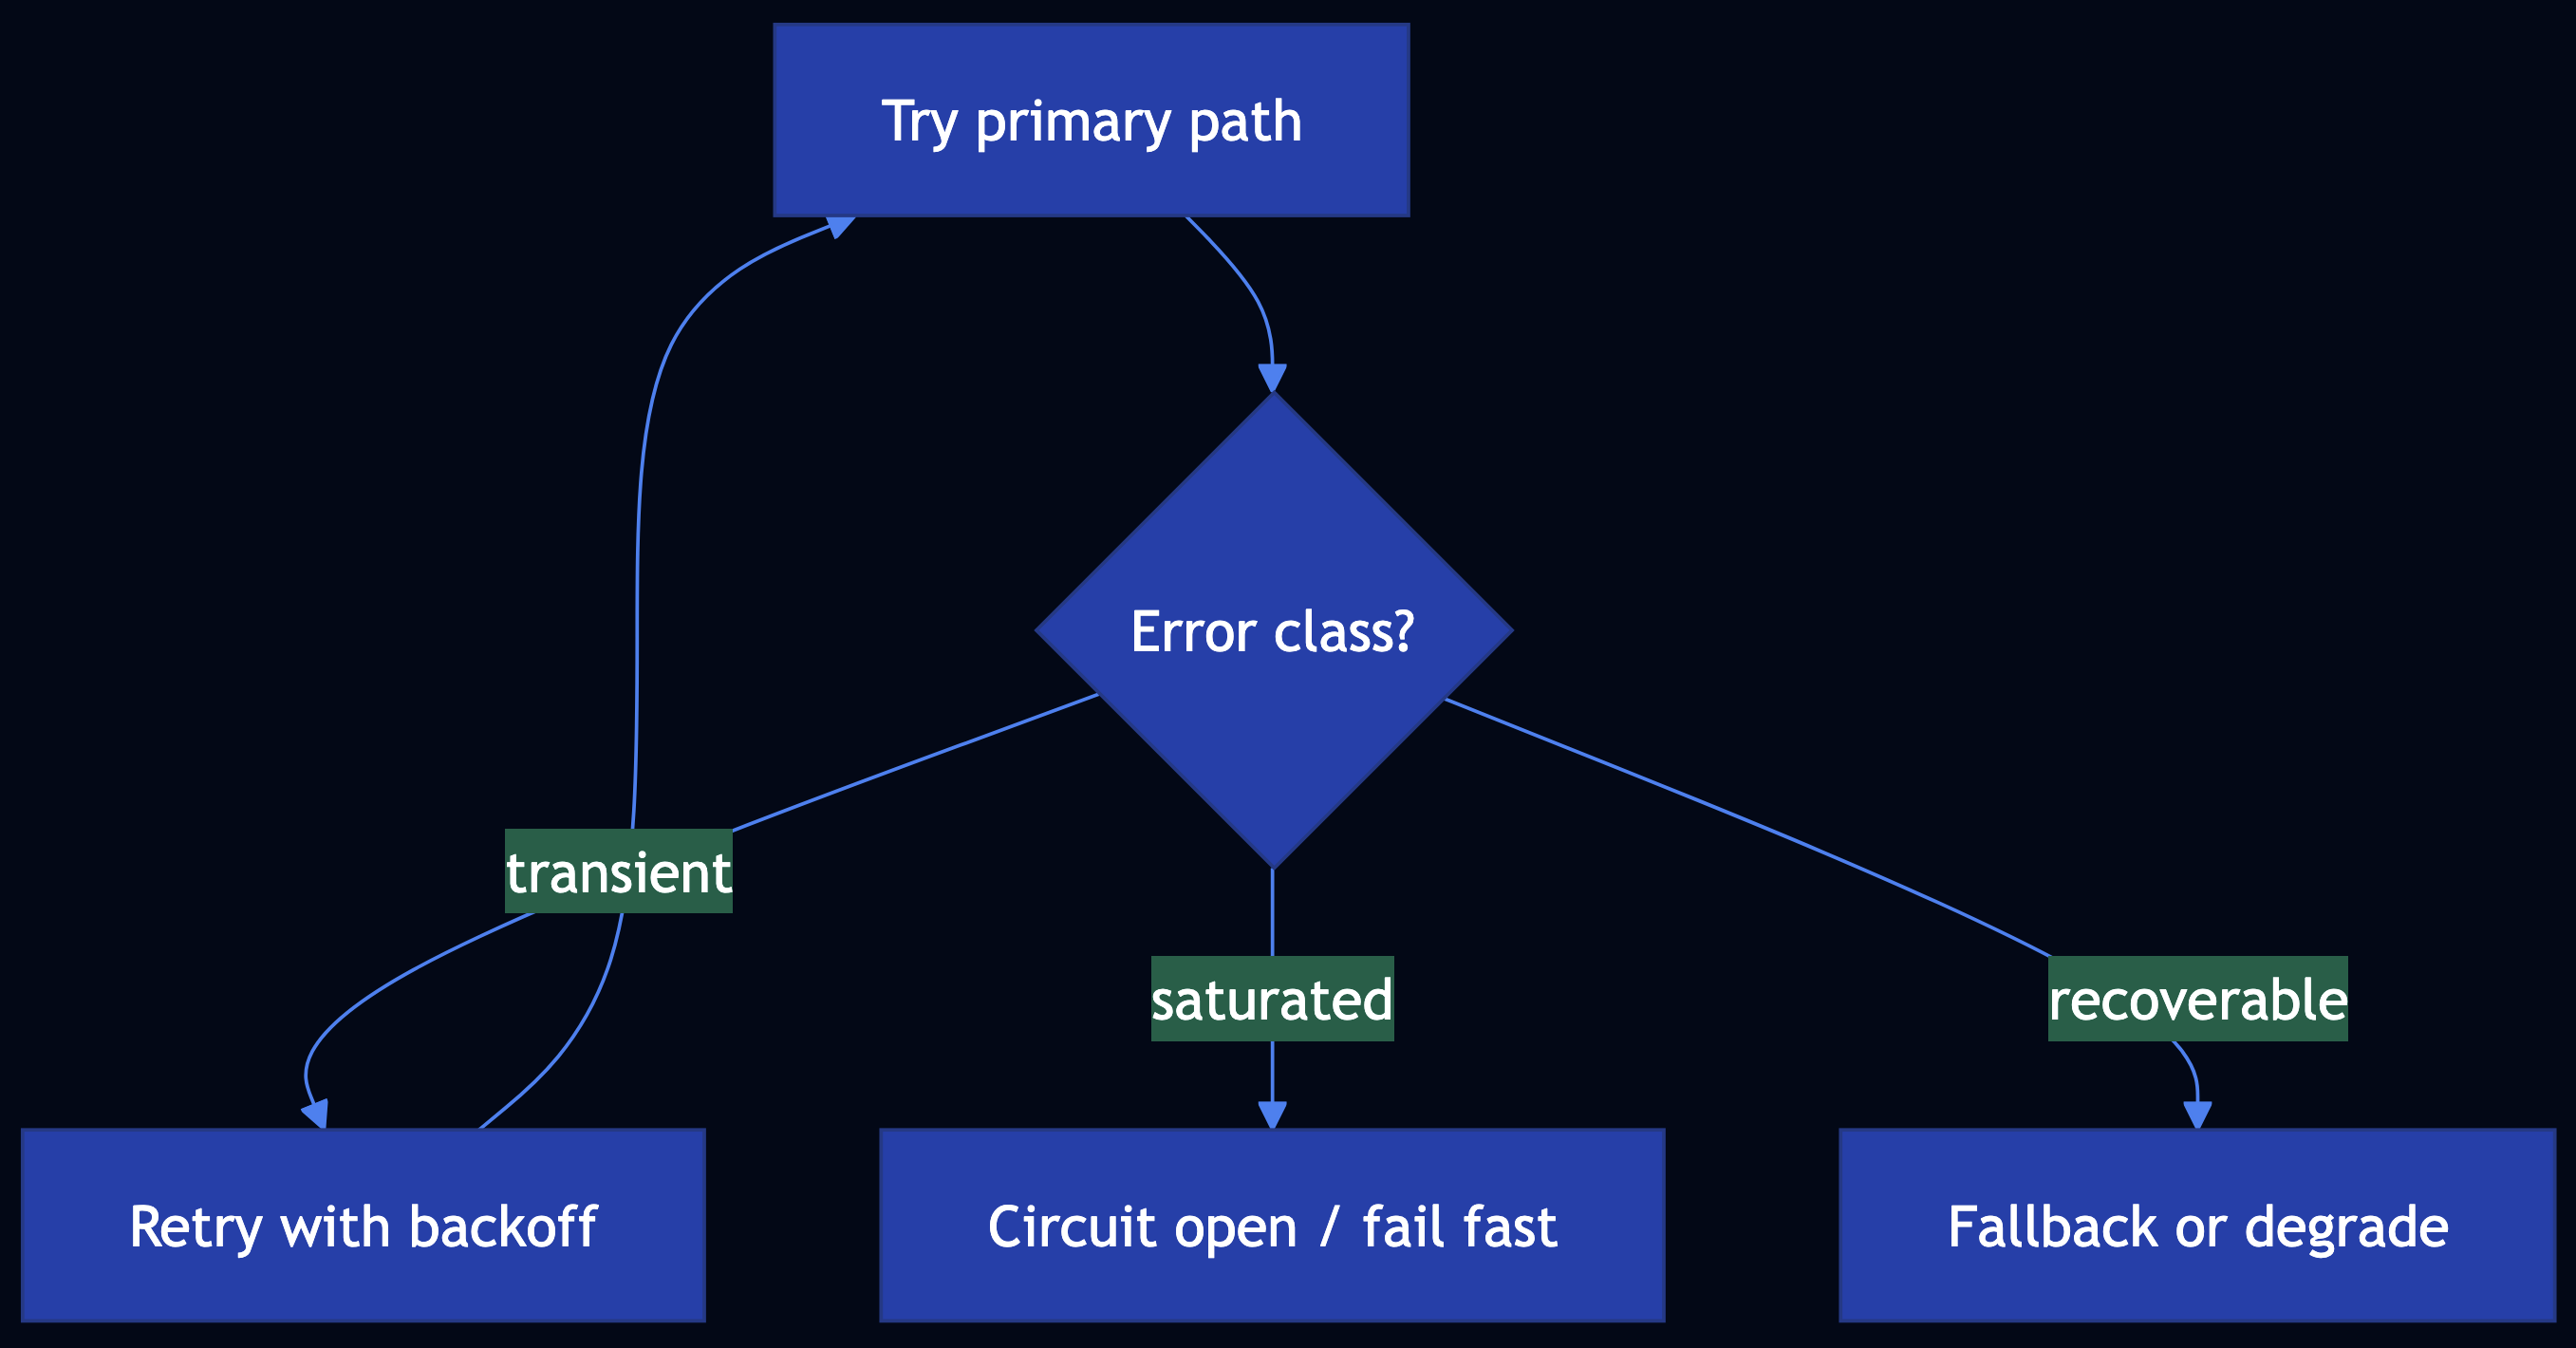
Pattern 12: Exception Handling with Circuit Breaker FSM
Use this pattern when your agents call downstream services (LLM providers, external APIs) that are occasionally unavailable, and an indefinite block on a failed call would cascade into pipeline-wide stalls. The circuit breaker converts an unresponsive dependency into a fast, predictable failure. For example, the GeneratorActor in Go implements a circuit breaker with three states. This directly addresses the FLP liveness problem: when a downstream LLM is unavailable (crashed, rate-limited), the circuit breaker converts an indefinite block into a fast fail, preserving system liveness.
// From agentic_rag_pipeline_actor.go — GeneratorActor.generate()
if gen.CircuitOpen {
    return marshal(map[string]any{
        "answer": "Service temporarily unavailable. Please try again later.",
        "model": "circuit-breaker-fallback", "circuit_open": true,
    })
}

for attempt := 0; attempt <= maxRetries; attempt++ {
    answer, err := gen.tryGenerate(query, contextChunks)
    if err == "" {
        gen.ConsecutiveFailures = 0
        return marshal(map[string]any{"answer": answer, "circuit_open": false})
    }
    gen.ConsecutiveFailures++
    if gen.ConsecutiveFailures >= 3 {
        gen.CircuitOpen = true
        return marshal(map[string]any{"error": "circuit opened", "circuit_open": true})
    }
}
Three consecutive failures open the circuit. The fallback message is immediate. The reset_circuit handler closes it again after recovery. No external circuit breaker library. The actor IS the circuit breaker and it persists its open/closed state via the durability facet, so a node restart doesn’t incorrectly re-open a circuit that was deliberately closed.
Pattern 13: Evol-Instruct with Prompt Mutation for Dataset Augmentation
Use this pattern when you are fine-tuning a model and your prompt dataset is too small or not diverse enough. Run this pattern to generate mutation candidates, score them with a judge, and keep the top performers. For example, ChainActor.onEvolve_instruction() mutates prompts to generate diverse training data:
// From llm_workflow_orchestrator_actor.ts — ChainActor.onEvolve_instruction()
onEvolve_instruction(payload: Record<string, unknown>): Record<string, unknown> {
    const instruction = String(payload.instruction ?? "");
    const mutations = Number(payload.mutations ?? 2);
    let evolved = instruction;
    let count = 0;
    if (mutations >= 1) { evolved = "Please explain in detail: " + evolved; count += 1; }
    if (mutations >= 2) { evolved = evolved + " Provide examples."; count += 1; }
    if (mutations >= 3) {
        const synonyms: Record<string, string> = { good: "excellent", use: "utilize", show: "demonstrate" };
        for (const [word, syn] of Object.entries(synonyms)) {
            evolved = evolved.replace(new RegExp(`\\b${word}\\b`, "gi"), syn);
        }
        count += 1;
    }
    return { original: instruction, evolved, mutations_applied: count };
}
Chain this with a judge: generate 10 mutations, score each, keep the top 3. Ship them as training examples. The ChainActor state tracks how many evolutions it has produced, so you can throttle and monitor via Prometheus.
Part 6: Scaling Patterns
This is why PlexSpaces was built, e.g., how do you scale AI inference across 16 nodes without writing a distributed systems PhD thesis? Ray solves it with remote functions. Horovod solves the AllReduce piece. Spark solves the batch piece. But they’re three separate frameworks with three separate observability stacks and three separate deployment models. PlexSpaces gives you four parallelization mechanisms in the same framework, accessible from the same actor, using the same host.* API:
| Mechanism | API | Use Case | Ray Equivalent |
|---|---|---|---|
| Shard Group | host.scatter_gather() | Stateful parallel workers, RAG shards, parameter server | ray.map_batches() + Ray Actors |
| Elastic Pool | host.pool_checkout() / host.pool_checkin() | Stateless workers, burst capacity | ray.remote() concurrency |
| MPI Collectives | host.broadcast/reduce/allreduce/barrier_shard_group() | Distributed training, gradient sync, consensus | Horovod (external) |
| Process Groups | host.PG().Join/Broadcast/Members() | Dynamic membership, pub-sub coordination | ray.util.collective (partial) |
The Python parallel_ai_inference demonstrates all four in one example. Run it with 2, 4, 8, or 16 shards and the BenchmarkActor measures throughput and latency at each level.
Pattern 14: Shard Groups for Stateful Parallelism
Use this pattern when your workload partitions naturally by key (documents by ID, users by hash) and each worker needs warm state across requests. For example, a model loaded in memory that should not be reloaded per request. If work is stateless and uniform, use elastic pools instead. The Python parallel_ai_inference below benchmark measures shard group throughput across 2, 4, 8, and 16 shards:
# From parallel_ai_inference_actor.py — BenchmarkActor.run_shard_benchmark()
for num_shards in shard_counts:
    group = host.create_shard_group({
        "group_id": f"bench-shard-{num_shards}-{host.now_ms()}",
        "actor_type": "inference_worker",
        "shard_count": num_shards,
        "partition_strategy": "hash",
        "placement": {"strategy": "from_registry"},
    })
    bench_start = host.now_ms()
    for i in range(requests_per_shard):
        response = host.scatter_gather({
            "group_id": group_id,
            "query": {"op": "infer", "request_id": f"bench-{num_shards}-{i}", "input": "sample-data"},
            "aggregation": "concat",
            "min_responses": num_shards,
            "timeout_ms": 30000,
        })
        for shard in _extract_shard_responses(response):
            payload = _unwrap_payload(shard.get("payload", {}))
            if payload.get("status") == "ok":
                latencies.append(int(payload.get("latency_ms", 0)))
    # ... compute throughput, p50, p99
Scaling (on my Apple M3 Pro):
| Shards | TotalReq | KB/req | Wall ms | p50 | p95 | p99 | Compute ms | Coord ms | Comp% | Gran | Eff% |
|---|---|---|---|---|---|---|---|---|---|---|---|
| 2 | 320 | 256.0 | 163 | 10 | 11 | 11 | 44 | 70 | 38.6 | 0.63 | 100.0 |
| 4 | 640 | 256.0 | 179 | 11 | 12 | 12 | 87 | 83 | 51.2 | 1.05 | 91.1 |
| 8 | 1280 | 256.0 | 190 | 11 | 12 | 12 | 176 | 87 | 66.9 | 2.02 | 85.8 |
| 16 | 2560 | 256.0 | 255 | 11 | 12 | 13 | 367 | 127 | 74.3 | 2.89 | 63.9 |
| 32 | 5120 | 256.0 | 466 | 11 | 14 | 16 | 764 | 264 | 74.3 | 2.89 | 35.0 |
Run parallel_ai_inference on your hardware to get real numbers and the BenchmarkActor outputs these metrics automatically. The key difference from Ray map_batches(): shard actors are stateful. The InferenceWorkerActor loads its model once in on_init and keeps it warm across requests. Ray’s stateless task model reloads the model on every batch.
Pattern 15: Elastic Pools
Use this pattern when your workload is stateless and bursty with no affinity requirement. Pools give you burst capacity without pre-partitioning; the virtual_actor facet shuts idle workers down automatically so you pay nothing at rest. The run_pool_benchmark handler in Python demonstrates dynamic checkout/checkin , a worker pool where requests lease actors, use them, and return them:
# From parallel_ai_inference_actor.py — BenchmarkActor.run_pool_benchmark()
for i in range(total_requests):
    checkout_start = host.now_ms()
    checkout = host.pool_checkout(pool_name, timeout_ms=5000)
    wait_ms = host.now_ms() - checkout_start

    if not checkout:
        failed += 1
        continue

    actor_id = checkout.get("actor_id")
    checkout_id = checkout.get("checkout_id")
    exec_start = host.now_ms()
    try:
        host.ask(actor_id, {"op": "infer", "request_id": f"pool-{i}", "input": "pool-sample"},
                 timeout_ms=10000)
        exec_ms = host.now_ms() - exec_start
        exec_times.append(exec_ms)
        successful += 1
    finally:
        host.pool_checkin(pool_name, actor_id, checkout_id, healthy=(failed == 0))
The pool tracks avg_wait_ms, avg_exec_ms, and pool_utilization. When utilization exceeds a threshold, the supervisor spawns additional pool workers. When it drops, idle workers deactivate via the virtual_actor facet and you pay zero at rest. Shard groups vs elastic pools: use shard groups when work partitions naturally (documents by ID, users by hash). Use pools when work is uniform and you want burst capacity without pre-partitioning.
Pattern 16: MPI Collectives
You can use MPI collective when you are running distributed training or gradient synchronization across multiple workers and need AllReduce, Barrier, or Broadcast semantics without pulling in a separate framework like Horovod. Also use for any distributed computation where all workers must agree on a shared value before proceeding to the next step. This is the capability that separates PlexSpaces from every other actor framework: native MPI-grade collective operations. Five collective operations, built in, available in Python, Go, Rust, and TypeScript.
# From parallel_ai_inference_actor.py — BenchmarkActor.run_collective_benchmark()
# 1. BroadcastShardGroup — config reset to all workers (MPI_Bcast equivalent)
t0 = host.now_ms()
broadcast_result = host.broadcast_shard_group({
    "group_id": group_id, "message": {"op": "reset"},
    "min_acks": num_shards, "timeout_ms": 10000,
})
timings["broadcast_ms"] = host.now_ms() - t0

# 2. BarrierShardGroup — wait for all workers to be ready (MPI_Barrier)
t0 = host.now_ms()
barrier_result = host.barrier_shard_group({"group_id": group_id, "timeout_ms": 10000})
timings["barrier_ms"] = host.now_ms() - t0

# 3. ReduceShardGroup — aggregate inference stats (MPI_Reduce with sum)
t0 = host.now_ms()
reduce_result = host.reduce_shard_group({
    "group_id": group_id, "map_function": {"op": "get_metrics"},
    "reduction": "sum", "timeout_ms": 10000,
})
timings["reduce_ms"] = host.now_ms() - t0

# 4. AllReduceShardGroup — consensus metrics across all workers (MPI_Allreduce)
t0 = host.now_ms()
allreduce_result = host.all_reduce_shard_group({
    "group_id": group_id, "map_function": {"op": "get_metrics"},
    "reduction": "sum", "timeout_ms": 10000,
})
timings["allreduce_ms"] = host.now_ms() - t0
What each operation does in AI/ML context:
| Operation | API | ML Use Case | MPI Equivalent |
|---|---|---|---|
| BroadcastShardGroup | host.broadcast_shard_group() | Push updated model weights to all workers | MPI_Bcast |
| BarrierShardGroup | host.barrier_shard_group() | Synchronize all workers before next training step | MPI_Barrier |
| ReduceShardGroup | host.reduce_shard_group() | Aggregate gradients from all workers -> coordinator | MPI_Reduce |
| AllReduceShardGroup | host.all_reduce_shard_group() | Every worker gets the aggregated gradient (Ring AllReduce) | MPI_Allreduce |
| ScatterGather | host.scatter_gather() | Fan-out inference requests, fan-in results | MPI_Scatter + MPI_Gather |
Ray needs Horovod for AllReduce, and Horovod is Python-only, requires NCCL, and runs as a separate job. PlexSpaces bakes all five collectives into the actor runtime, in all four languages, accessible from the same host.* API you use for everything else.
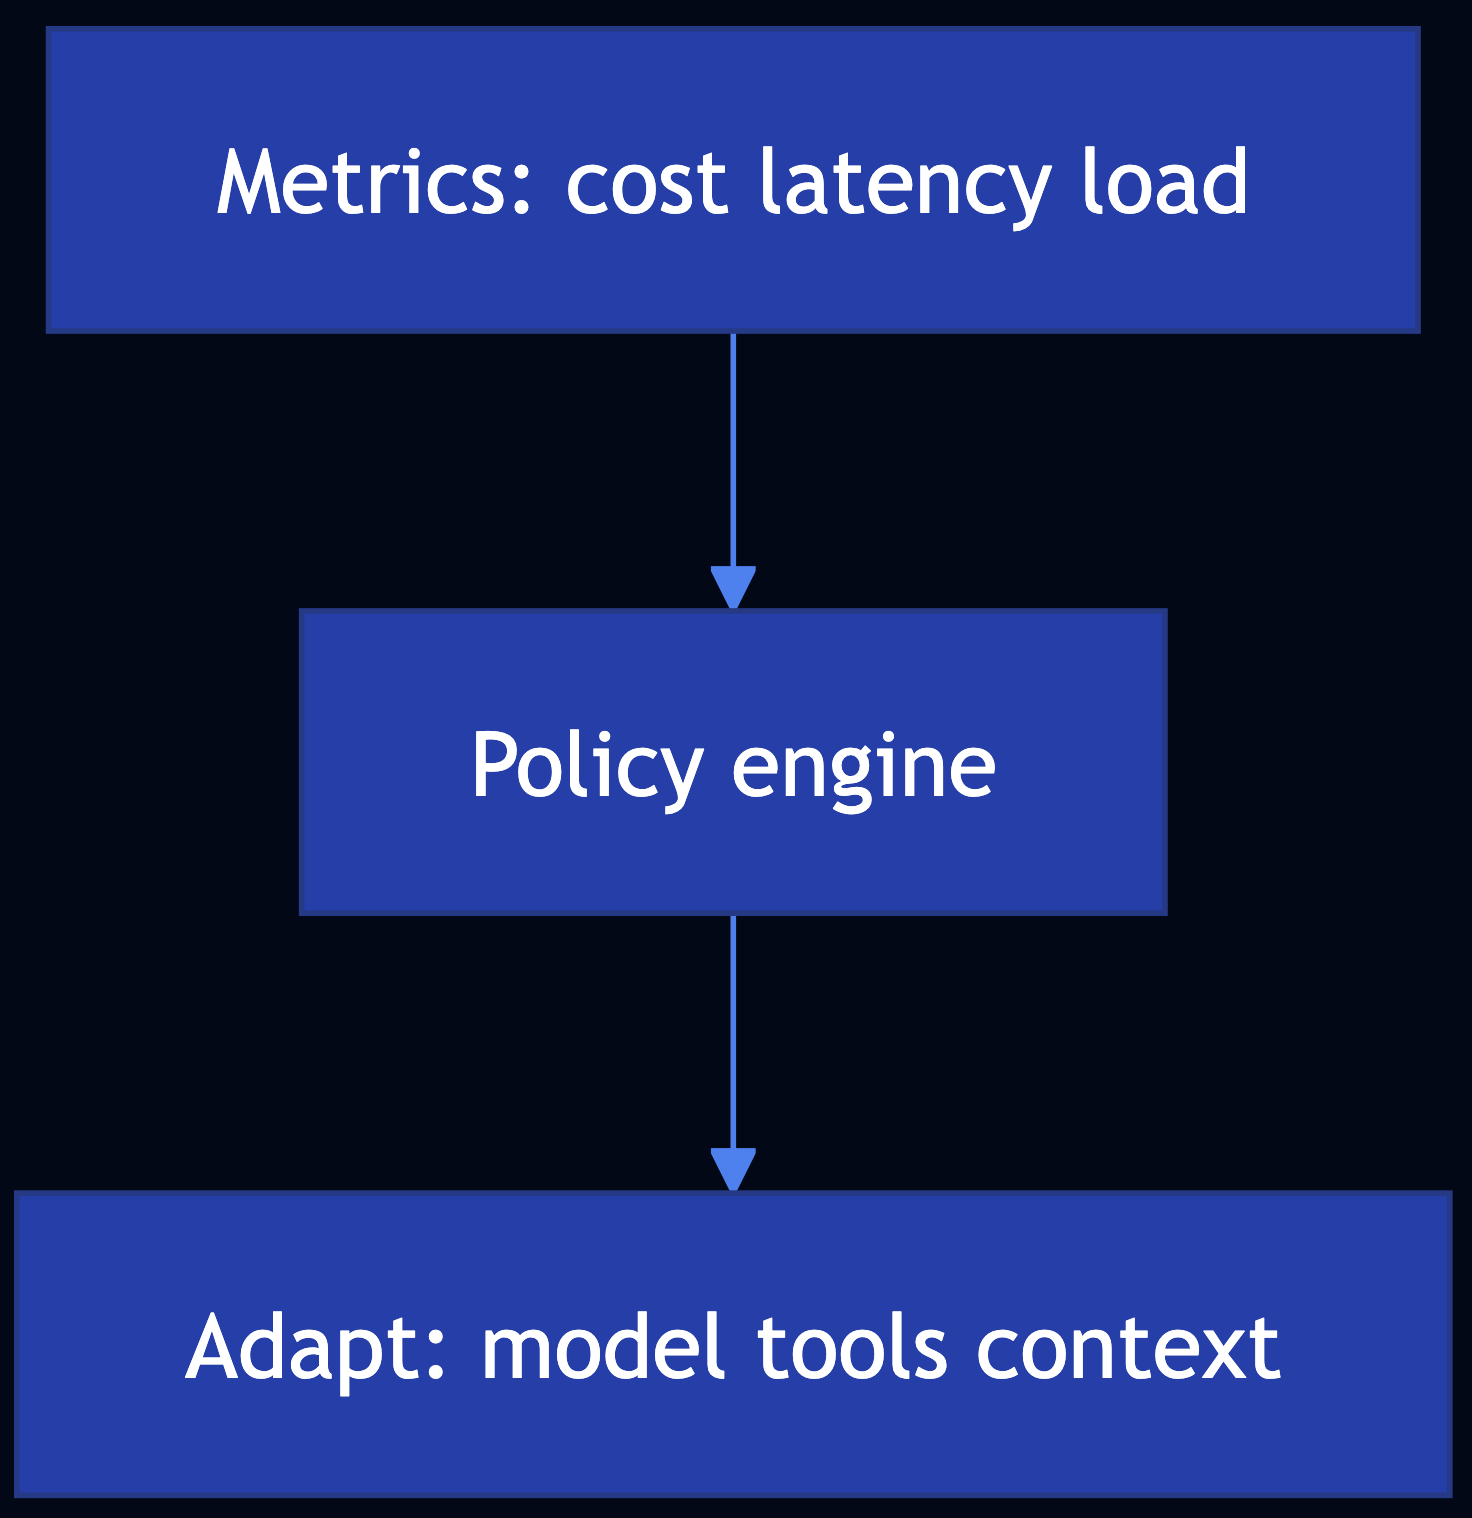
Pattern 17: Resource-Aware Cost Optimization
Use this pattern when you serve multiple tenants with different budgets and need to enforce financial limits at the infrastructure level. For example, BudgetManagerActor in Go tracks per-tenant USD spending across all inference calls. The state lives in TupleSpace and shared across all actor instances, race-safe via take-then-write:
// From resource_aware_inference_actor.go — BudgetManagerActor.getReport()
// State is in TupleSpace, not per-actor KV — all instances see the same data
func (b *BudgetManagerActor) getReport() string {
    // ReadAll matches pattern ["budget", tenantID, value] across all tenants
    tuples := host.TS().ReadAll([]any{"budget", nil, nil})
    report := make([]any, 0, len(tuples))
    for _, tup := range tuples {
        if len(tup) < 3 { continue }
        tenantID, _ := tup[1].(string)
        budgetUSD := b.tsReadBudgetFloat("budget", tenantID)
        usedCost := b.tsReadBudgetFloat("usage_cost", tenantID)
        report = append(report, map[string]any{
            "tenant_id": tenantID, "budget_usd": budgetUSD,
            "used_usd": usedCost, "remaining_usd": budgetUSD - usedCost,
        })
    }
    return marshal(map[string]any{"status": "ok", "report": report})
}
The model registry selects tier based on complexity AND remaining budget, large model for complex prompts when budget allows, fall back to small model when budget is tight. The resource-affinity side lives in app-config.toml:
# From resource_aware_inference/app-config.toml
[[supervisor.children]]
id = "inference_worker_large"
type = "inference_worker_large"
behavior_kind = "GenServer"
facets = [
  { type = "virtual_actor", priority = 100,
    config = { idle_timeout = "15m", activation_strategy = "lazy",
               labels = { tier = "large", gpu_capable = "true", memory_tier = "high" } } },
  { type = "metrics", priority = 50 }
]
args = { tier = "large", base_latency_ms = "400" }
Set gpu_capable = "true" on GPU nodes. The ModelRegistryActor.select_model() checks the prefer_gpu flag from the request and routes accordingly. Large-tier workers with gpu_capable = "true" get routed GPU-heavy requests. CPU workers handle small and medium requests. The BudgetFSM enforces the financial ceiling, no matter how capable the GPU, if the tenant budget is exhausted, requests get budget_exceeded before any GPU cycles are wasted.
Part 7: Agent Patterns
Pattern 18: Tool Calling and MCP Integration
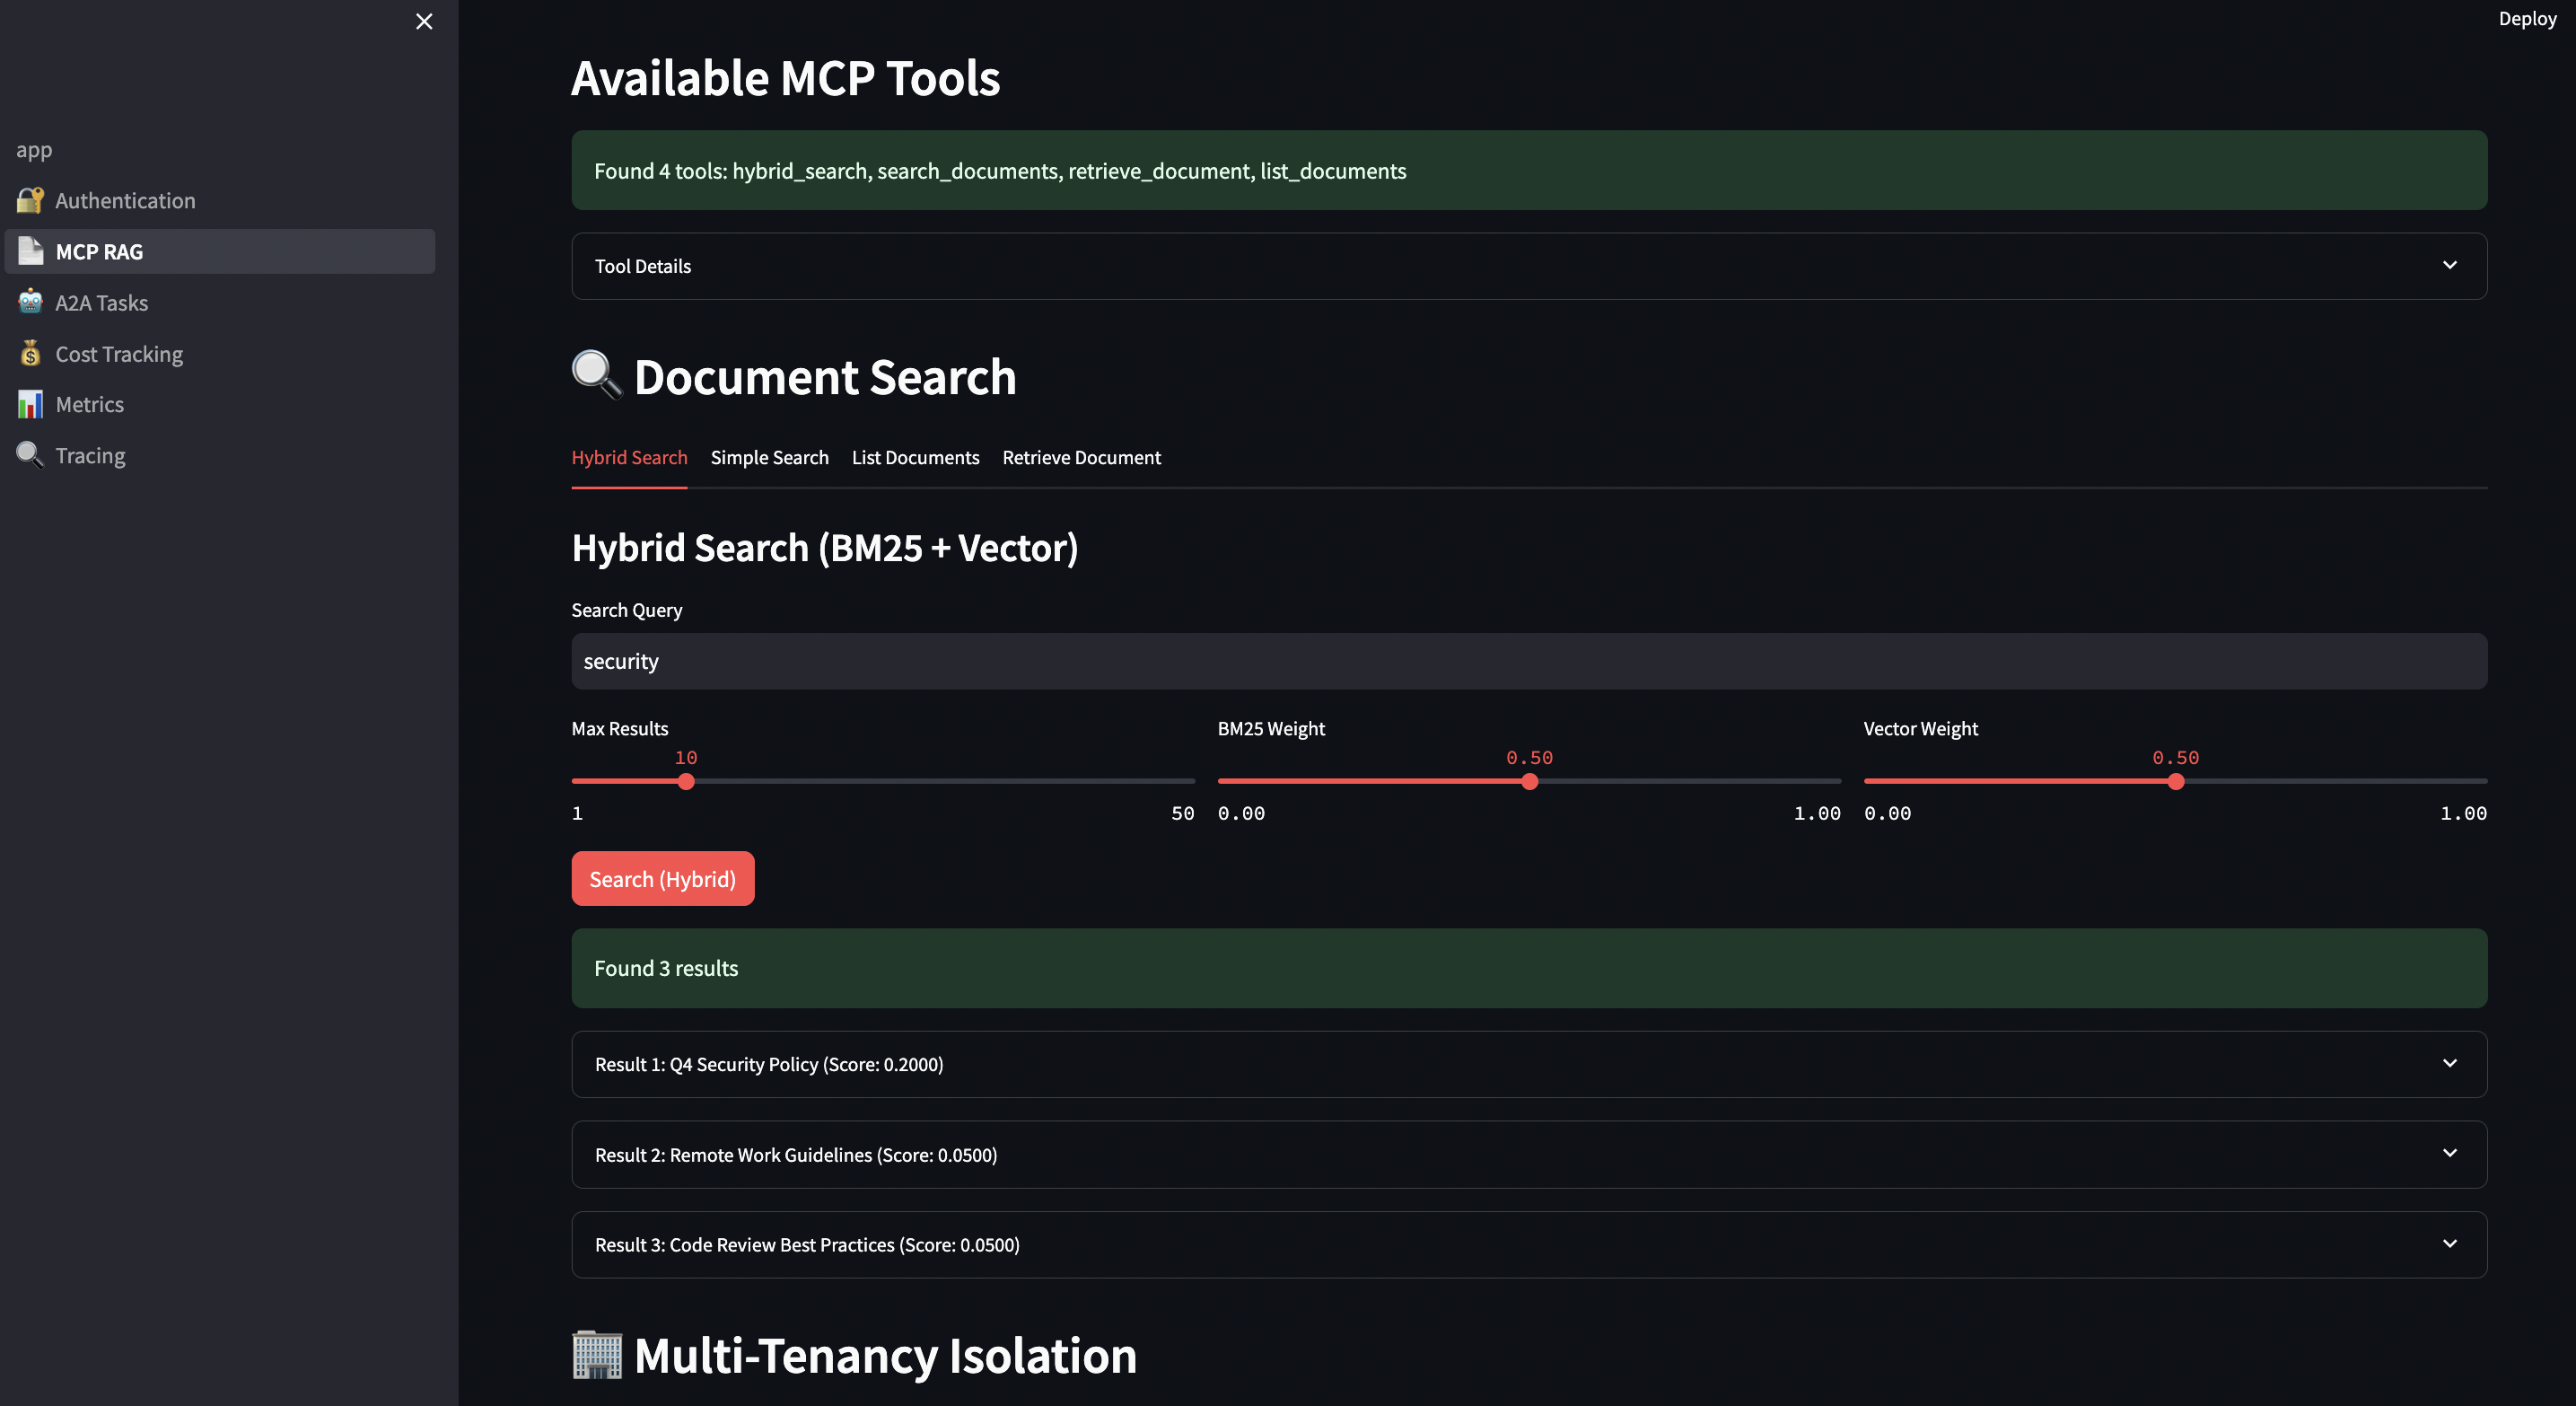
Use this pattern when your agents need to call external tools (search APIs, databases) and you want those tools to be stateful, fault-tolerant, and observable as first-class actors rather than raw HTTP calls that fail silently and leave no audit trail. For example, the Python mcp_tool_server implements full MCP (Model Context Protocol) tool calling via actors. Each MCP tool is an actor. The registry is an actor. The gateway is a workflow actor.
# From mcp_tool_server_actor.py — ToolRegistryActor.tools_call()
@handler("tools_call")
def tools_call(self, tool_name: str = "", input: dict = None) -> dict:
    if tool_name not in self.tools:
        return {"error": "tool_not_found", "available_tools": list(self.tools.keys())}

    # Validate required fields from JSON schema
    schema = self.tools[tool_name]
    required_fields = schema.get("inputSchema", {}).get("required", [])
    missing = [f for f in required_fields if f not in input]
    if missing:
        return {"error": "missing_required_fields", "missing": missing}

    # Route to specialist tool actor — location transparent
    target_actor = {"calculator": "calculator_tool", "search": "search_tool",
                    "weather": "weather_tool"}.get(tool_name, tool_name)
    self.invocation_counts[tool_name] = self.invocation_counts.get(tool_name, 0) + 1
    try:
        return host.ask(target_actor, "execute", input, timeout_ms=10000)
    except Exception as exc:
        self.error_counts[tool_name] = self.error_counts.get(tool_name, 0) + 1
        return {"error": "tool_execution_failed", "tool": tool_name, "message": str(exc)}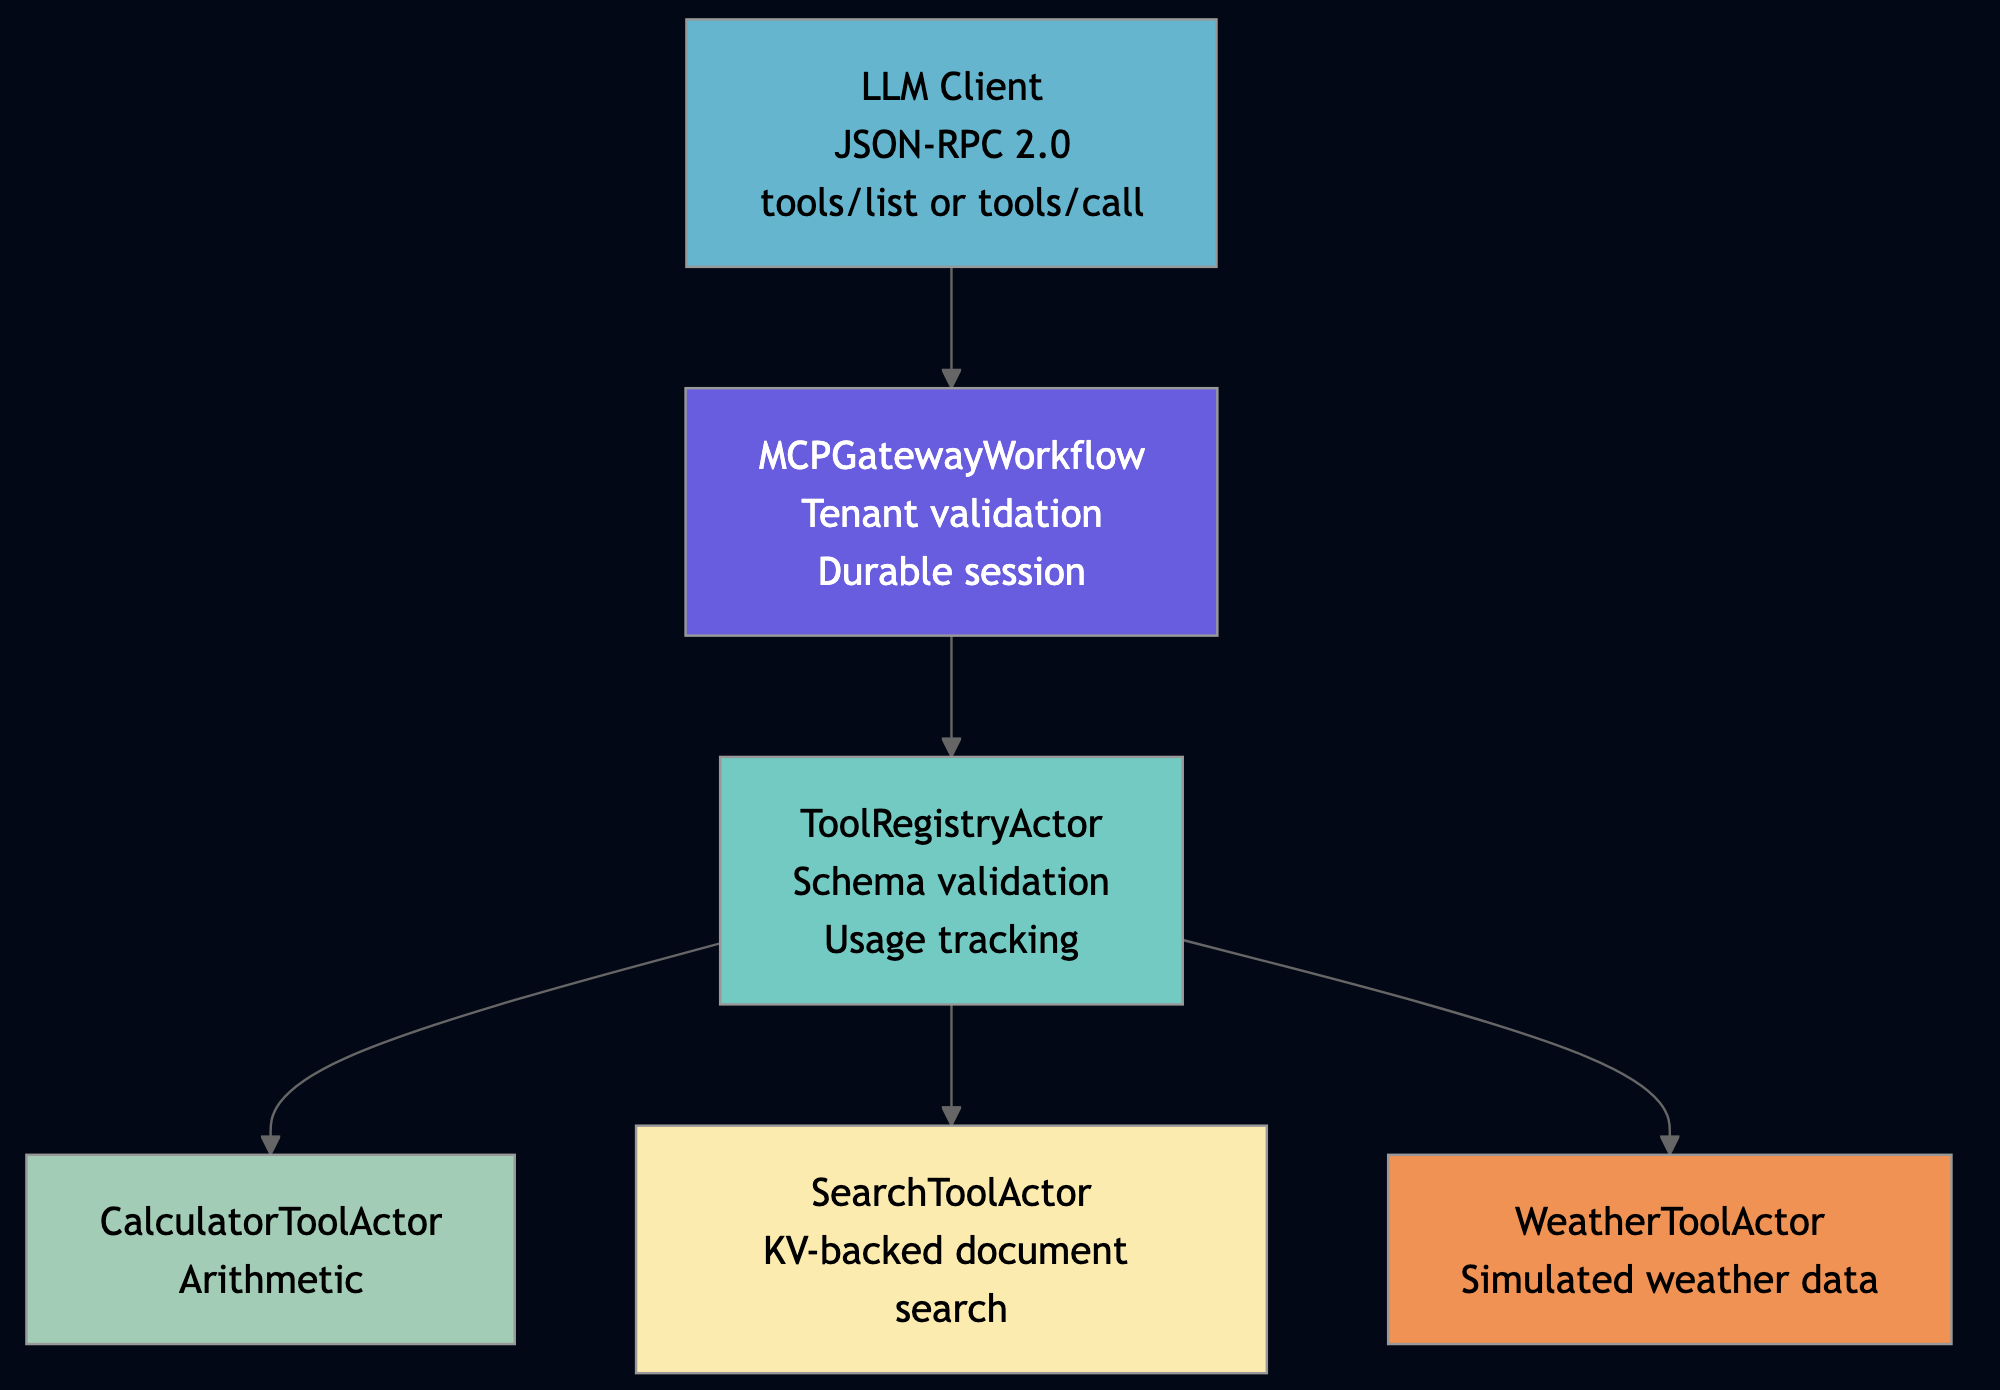
What standalone MCP servers lack: built-in state (registry survives restarts), multi-tenant access control (tenant namespace validation), Prometheus metrics (invocation counts, error rates, latency), and fault tolerance (supervisor tree restarts crashed tool actors). Actors provide all four for free.
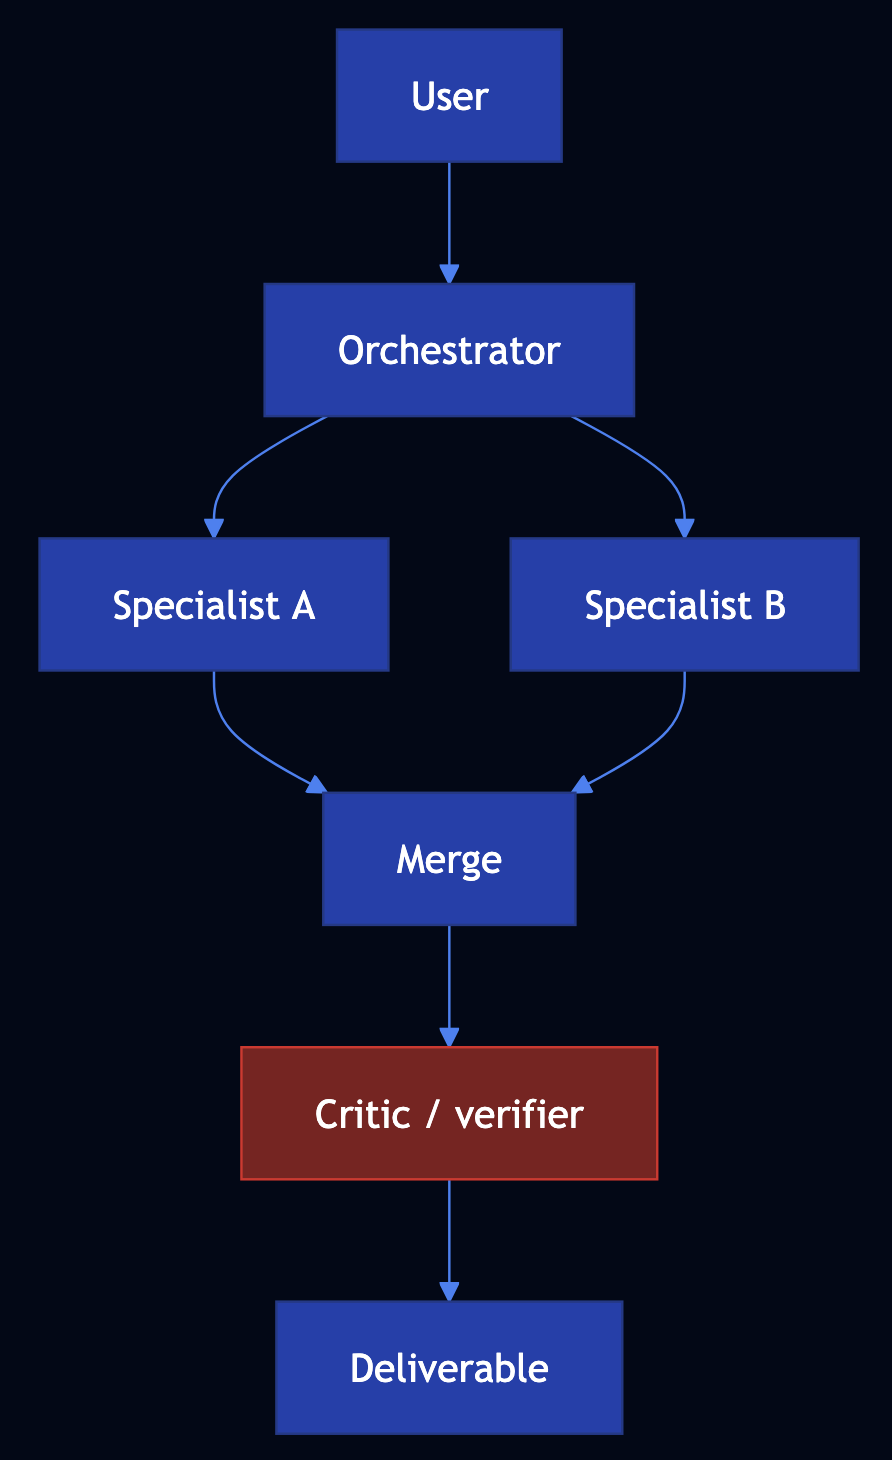
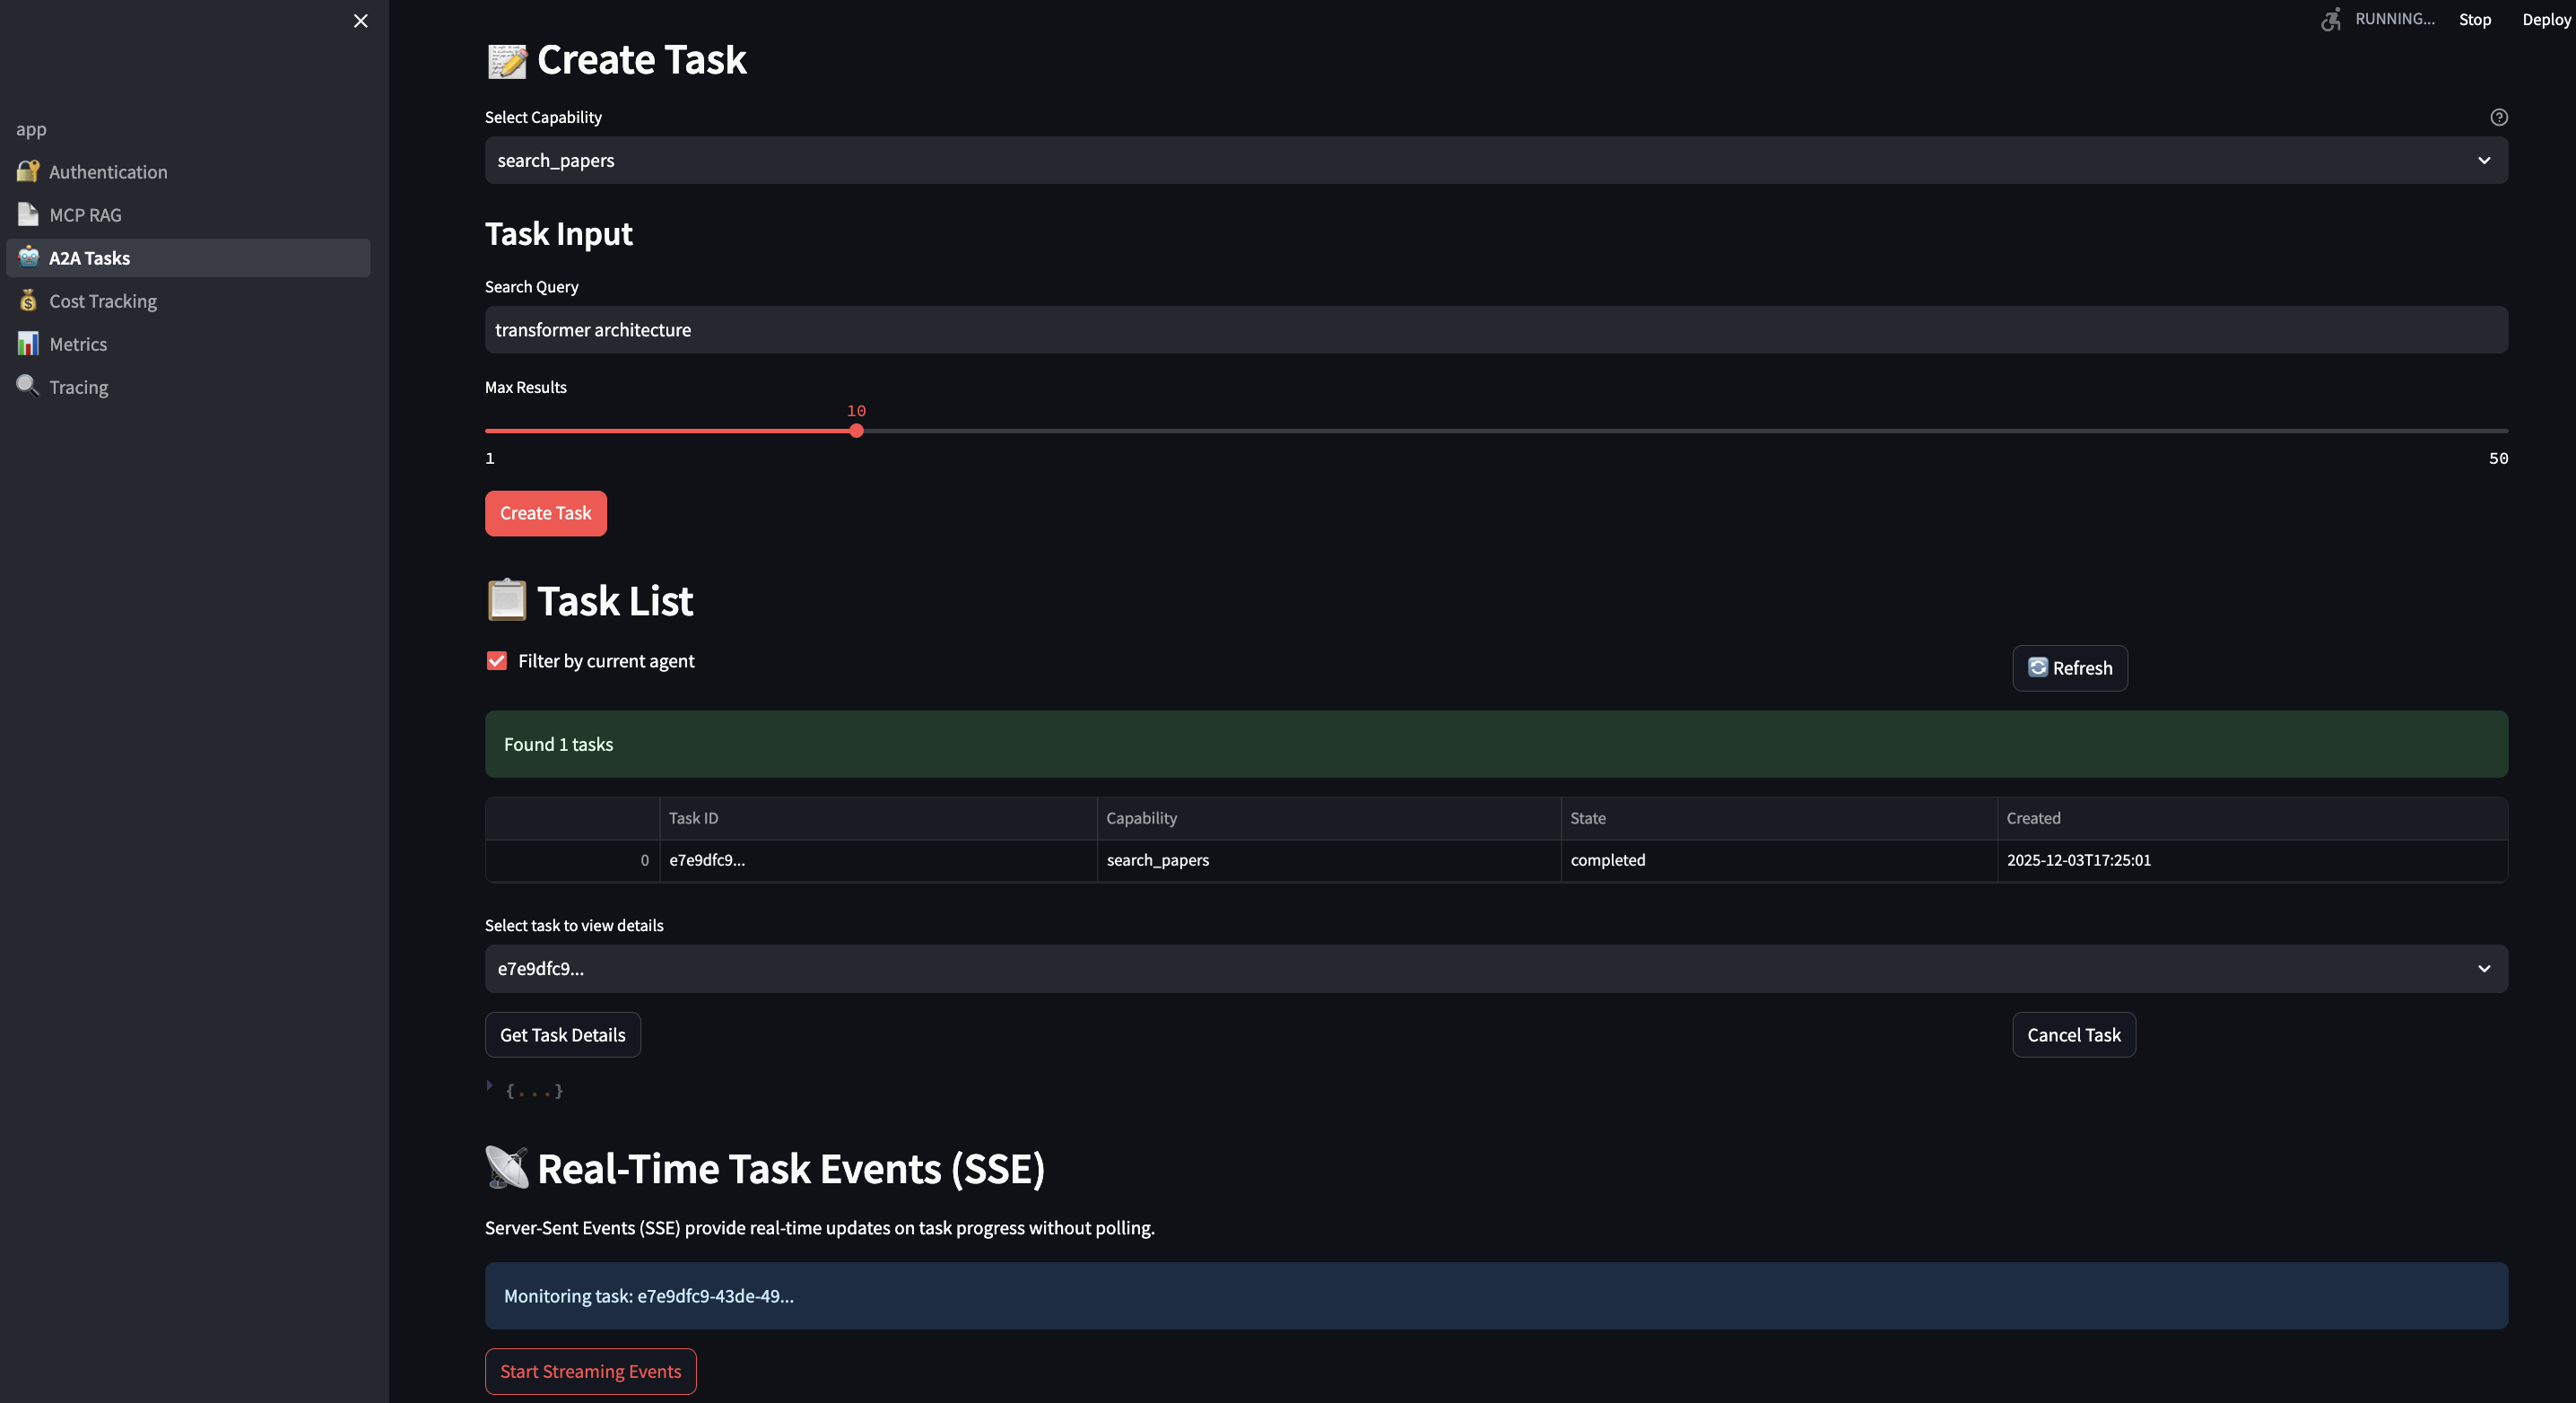
Pattern 19: Multi-Agent Collaboration and A2A
Use this pattern when a single agent’s context window or capability set is insufficient for the full task, and you need specialist agents to collaborate with explicit coordination. Use TupleSpace result sharing rather than shared memory; it makes the coordination auditable and race-free. For example, the Go a2a_multi_agent shows a complete multi-agent system with dynamic agent discovery and TupleSpace coordination. Critically, it uses the same TupleSpace patterns that solve the coordination problem identified in the FLP analysis and write results to addressable slots, never share memory directly:
// From a2a_multi_agent_actor.go — OrchestratorAgent.Run()
// Step 1: Discover research agents by capability
discoverResp, err := host.Ask(registryID, "discover", map[string]any{
    "capabilities": []string{"research"},
}, 10000)
researchAgentID := o.pickFirstAgent(discoverResp, selfID, "research_agent")

// Step 2: Delegate research
researchResp, err := host.Ask(researchAgentID, "research", map[string]any{
    "topic": task, "depth": 1,
}, 10000)

// Store in TupleSpace — other agents can read without polling or shared state
researchJSON, _ := json.Marshal(researchResp)
_ = host.TS().Write([]any{"task", taskID, "step", "research", string(researchJSON)})

// ... delegate to analysis and writing agents, each storing to TupleSpace

// Step 7: Aggregate all results from TupleSpace — pattern match retrieves all steps
allResults := host.TS().ReadAll([]any{"task", taskID, "step", nil, nil})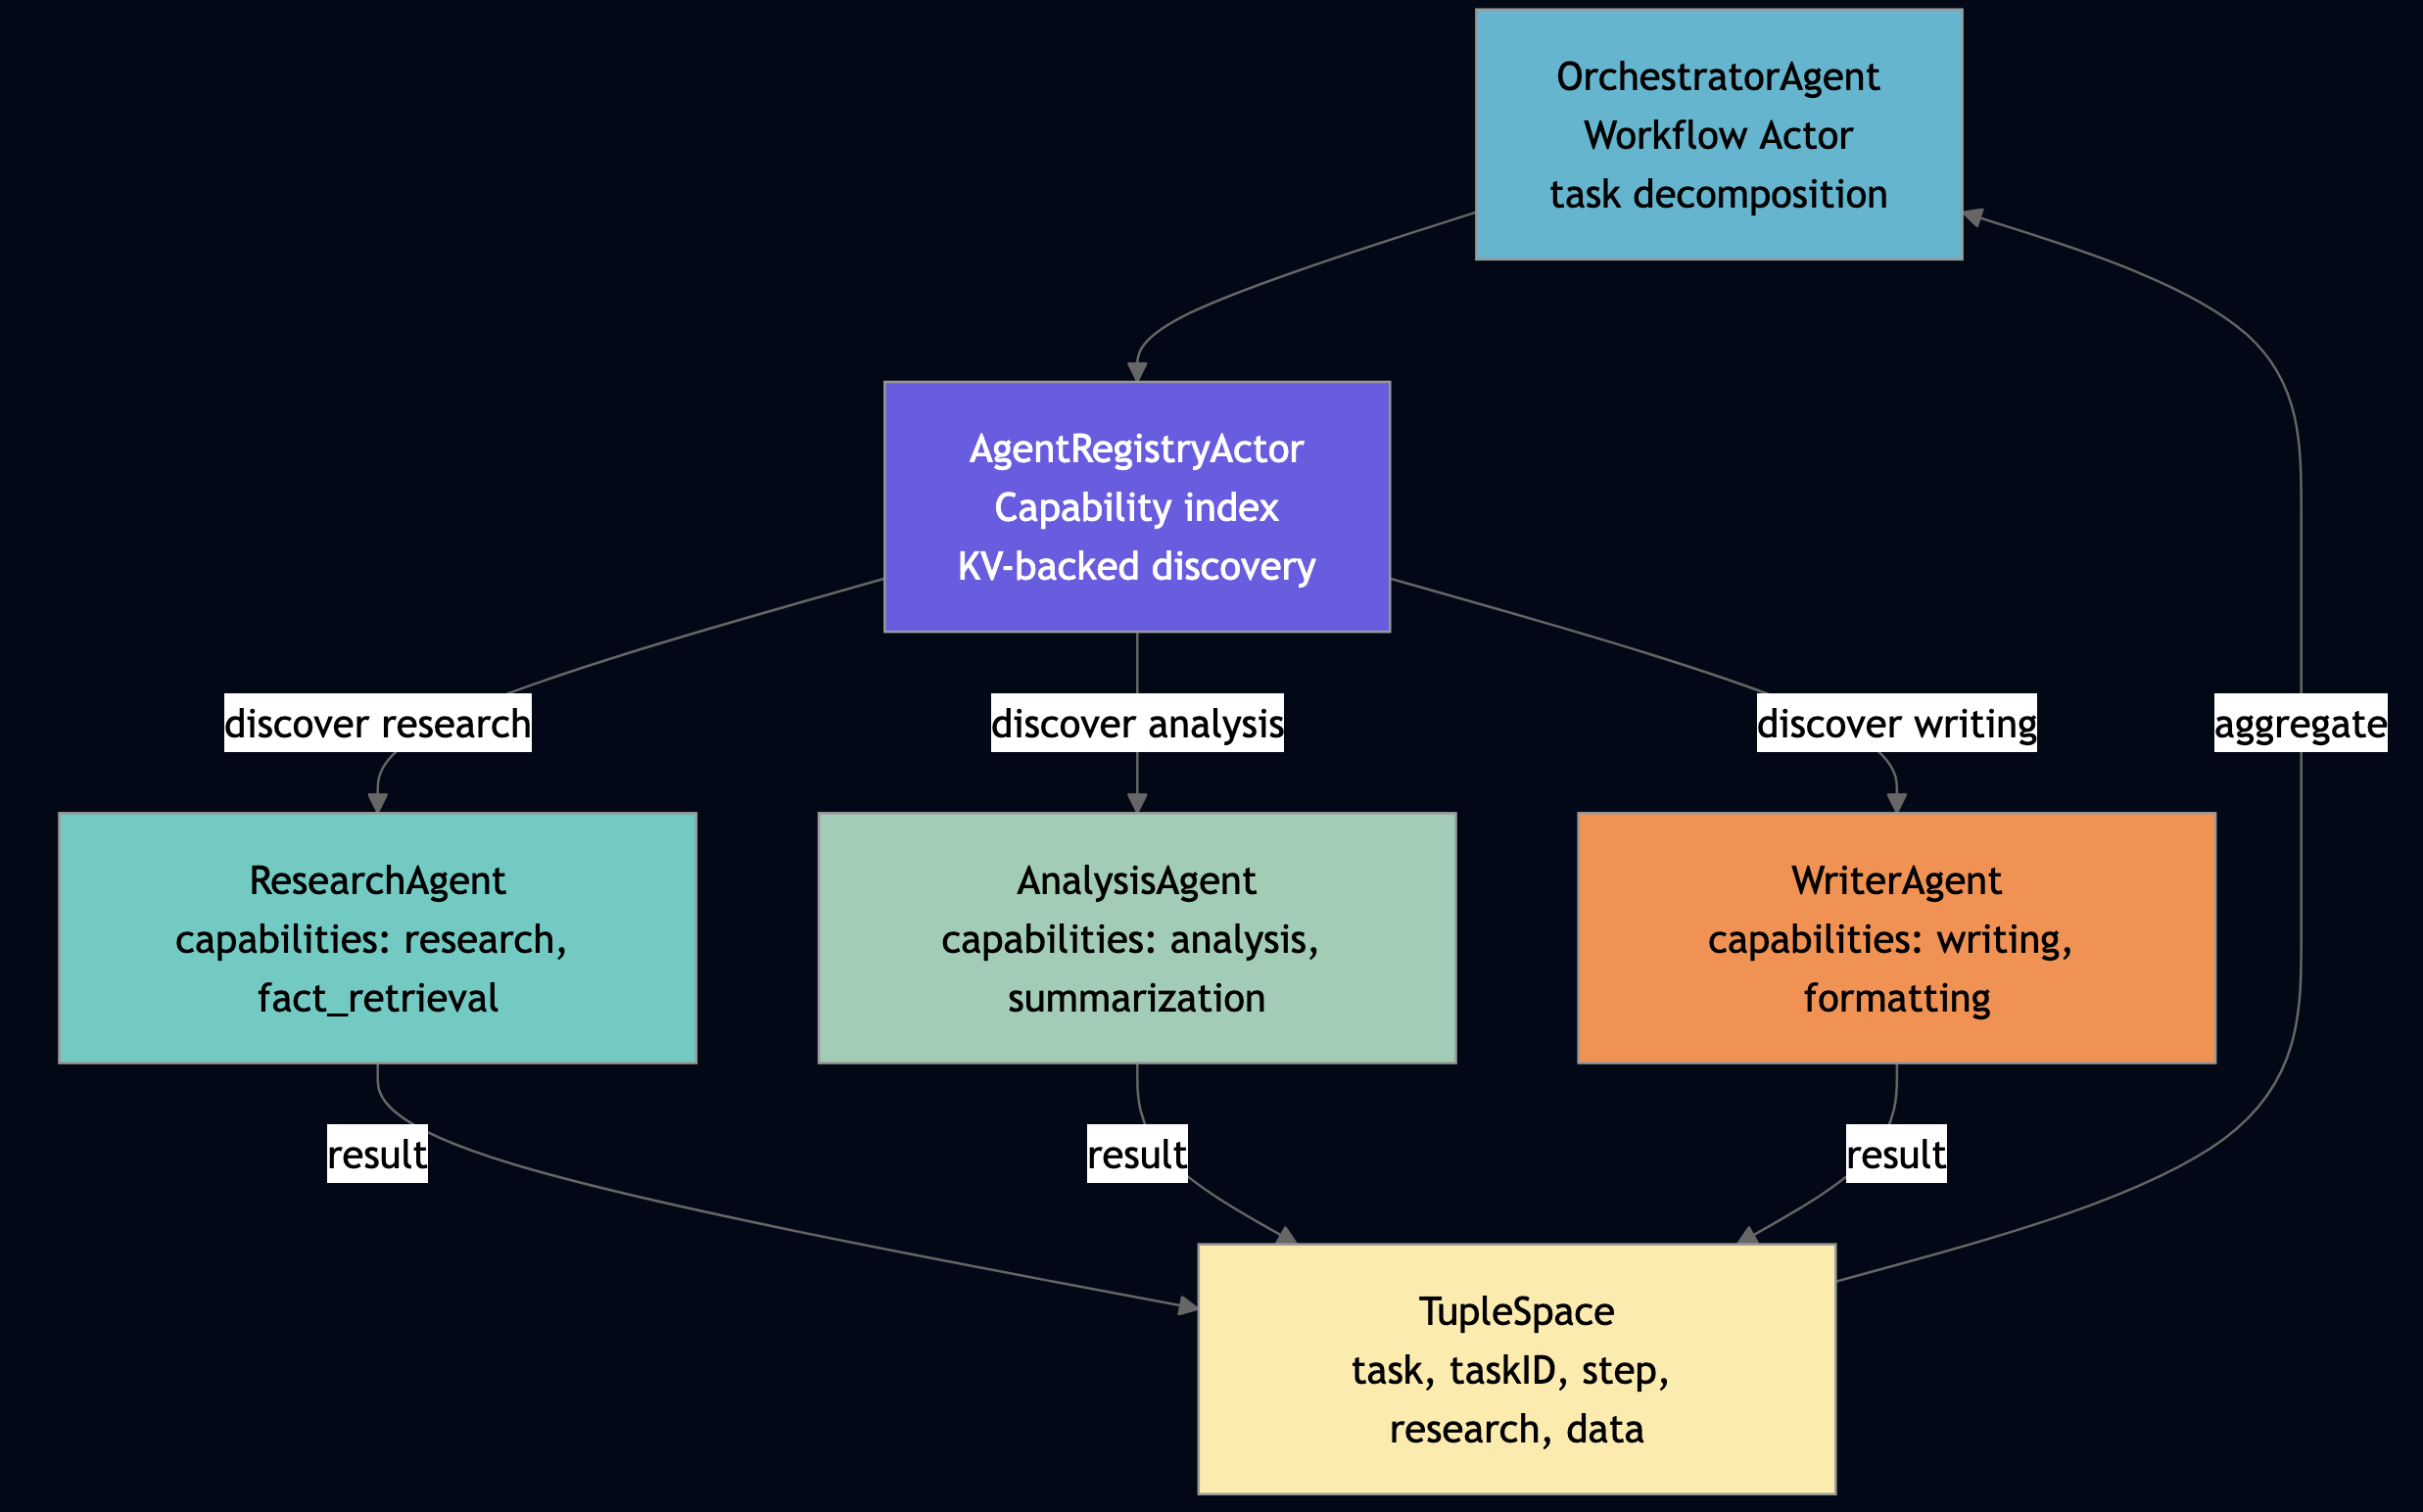
Location transparency is the critical insight for multi-agent systems. When OrchestratorAgent calls host.Ask(researchAgentID, "research", ...), it does not care whether the research agent is on the same node, a different node in the same cluster, or a different cluster entirely. The framework routes transparently.
Pattern 20: Batch Inference Pipeline
Use this pattern you need to process a large, bounded dataset through an inference pipeline as efficiently as possible like nightly jobs, model evaluation runs, bulk document processing. The Broadcast -> Barrier -> Scatter-Gather -> Reduce sequence maps directly to the initialization and execution steps of a distributed training or batch scoring job. For example, the parallel_ai_inference OrchestratorWorkflow runs multi-mode parallel inference:
# From parallel_ai_inference_actor.py — OrchestratorWorkflow._run_collective_mode()
# Broadcast -> Barrier -> Scatter-Gather -> Reduce
host.broadcast_shard_group({
    "group_id": group_id, "message": {"op": "reset"}, "min_acks": num_shards
})
host.barrier_shard_group({"group_id": group_id, "timeout_ms": 10000})

response = host.scatter_gather({
    "group_id": group_id,
    "query": {"op": "infer", "request_id": "collective-infer-0", "input": "collective-input"},
    "aggregation": "concat", "min_responses": num_shards,
})

host.reduce_shard_group({
    "group_id": group_id, "map_function": {"op": "get_metrics"}, "reduction": "sum"
})
Four operations in sequence: reset all workers (broadcast), synchronize (barrier), run inference (scatter-gather), collect metrics (reduce). This is exactly the initialization sequence for a distributed training step and it runs in one actor, in Python, in the same framework as the REST endpoint that triggered the inference.
Pattern 21: Async Agent Sessions
Use this pattern when your agents need to outlive the HTTP connection that triggered them such as background tasks, scheduled routines, multi-device handoff, or multi-user collaboration on a single agent session. For example, a synchronous HTTP/SSE transport couples the agent’s work lifetime to the connection lifetime.
| Scenario | HTTP/SSE Failure Mode | PlexSpaces Solution |
|---|---|---|
| Agent outlives the caller | Results stored in DB; client must poll | durability facet + Workflow Actor: state survives node restart, client reconnects and reads result from TupleSpace |
| Agent pushes unprompted | Must email or Slack out-of-band | Channels primitive (Kafka/Redis/SQS backends): agent publishes to channel, subscriber receives regardless of original connection state |
| Caller changes device | Requires custom session backend | virtual_actor + TupleSpace session state: agent is location-transparent, new device connects to same logical session |
| Multiple humans in one session | Not supported natively | Process Groups + Broadcast: all session participants join a group; agent broadcasts to all members |
PlexSpaces addresses both problems without external dependencies:
- Durable state: actor-local KV +
durabilityfacet checkpointing + TupleSpace for shared session data - Durable transport:
Channelsprimitive with six durable backends (Kafka, Redis, SQS, PostgreSQL, and others) — the agent writes to a channel, the subscriber reads from it regardless of whether the two were ever simultaneously connected
# Agent side — write result to durable channel when work completes
# No assumption that any client is currently connected
@workflow_actor(facets=["virtual_actor", "durability"])
class BackgroundResearchAgent:
    session_id: str = state(default="")

    @run_handler
    def start(self, request: dict = None) -> dict:
        # Do expensive, long-running work
        result = self._run_research(request.get("topic", ""))

        # Publish to named channel — durable, no connection required
        host.channel_publish(f"session:{self.session_id}:results", {
            "status": "complete",
            "result": result,
            "ts": host.now_ms()
        })

        # Also write to TupleSpace — any device reconnecting can pull directly
        host.ts_write(["session", self.session_id, "result", host.now_ms()])
        return {"status": "accepted", "session_id": self.session_id}
# Client side — subscribe to channel; survives disconnect/reconnect
# Works identically whether the client is a browser, mobile app, or another agent
subscriber = host.channel_subscribe(f"session:{session_id}:results")
# Blocks until a message arrives — no polling loop, no session URL
result = subscriber.next(timeout_ms=300_000)The critical difference from the Anthropic and Cloudflare hosted approaches: this runs on your infrastructure, in your cluster, with your data. There is no proprietary session backend you are locked into. The Channels primitive is a configuration choice and you can swap Kafka for Redis for SQS without touching agent code.
Part 8: The Distributed Systems Case for the Actor Model
Why Formal Coordination Protocol Matters
The FLP theorem and Byzantine bounds are mathematical facts, not engineering challenges to be optimized away. In distributed systems, we don’t try to make all nodes infallible, we design protocols that tolerate failures like Zab (ZooKeeper), Raft, PBFT. The actor model applies the same principle to AI agents:
- Accept that agents crash:
host.monitor()+ supervisor restart strategies - Accept that agents misinterpret: external validation via
ValidatorActor+ structured retry - Accept that messages can be delayed: async
host.Ask()with timeout + circuit breaker - Accept shared state is dangerous: TupleSpace coordination instead of direct state sharing
- Accept that consensus is expensive: explicit checkpointing so you don’t re-run completed work
None of these require smarter models. They require the right coordination infrastructure.
What Makes the Actor Model the Right Foundation
The actor model, as implemented in PlexSpaces, gives you exactly the properties that distributed systems theory says you need for safe multi-agent coordination:
| Distributed Systems Property | Actor Model Mechanism | PlexSpaces API |
|---|---|---|
| Failure atomicity without partial state corruption | Per-actor isolated state | Actor KV + TupleSpace |
| Failure detection know when a peer crashes | Link + Monitor | host.monitor(), host.link() |
| Crash recovery restart from last good state | Journaled checkpointing | durability facet |
| Consensus without shared memory | Message passing only | host.Ask(), host.Send() |
| Coordination without deadlock | Linda model TupleSpace | host.ts.write/read/take() |
| Liveness under partial failure | Supervisor tree | one_for_one, rest_for_one strategies |
| Byzantine isolation | No cross-actor direct state access | Actor boundaries enforced by WASM sandbox |
| External validation | Standalone validator actors | ValidatorActor + retry loop pattern |
Framework Comparison
| PlexSpaces | Ray | Spark | Horovod | Lambda + SQS | |
|---|---|---|---|---|---|
| Cold start | ~50 microsecond (WASM AOT) | ~100ms (Python) | ~10s (JVM) | N/A | 100ms–10s |
| Worker state | Actor-local, durable | External store | Shuffle | Stateless | Stateless |
| Ring AllReduce | Native | Needs Horovod | No | Yes | No |
| Workflow durability | Per-stage checkpoint | No | No | No | Step Functions |
| MPI collectives | 5 ops built-in | No | No | Partial | No |
| Multi-tenancy | Built-in, JWT | No | No | No | IAM per function |
| MCP tool calling | Actor-native | No | No | No | No |
| A2A multi-agent | TupleSpace + registry | No | No | No | No |
| Durable async transport | Channels (6 backends) | No | No | No | SQS only |
| Failure detection | monitor() + supervisor | Limited | No | No | DLQ |
| Polyglot | Python, Go, Rust, TypeScript | Python primarily | JVM + PySpark | Python/C++ | Any FaaS |
| APP-file deploy | Yes, multi-app per node | No | No | No | Per-function |
| Ecosystem maturity | Early-stage; smaller community and fewer third-party integrations | Large ML ecosystem, extensive documentation | Massive data engineering ecosystem | Narrow but well-understood | AWS-native, excellent managed ops |
| Learning curve | High: new coordination model, four-language SDK, WASM packaging | Medium: Python-first, familiar to ML teams | Medium for PySpark, high for Scala | Low if you know PyTorch | Low: functions are simple, AWS handles ops |
| Best fit | Stateful polyglot agent systems with strict coordination, isolation, and durability requirements | Large-scale stateless Python ML workloads; teams already on Ray | Batch ETL and analytics at petabyte scale | Distributed deep learning gradient sync | Lightweight serverless event processing; AWS-native shops |
| Avoid when | Your team is Python-only and already invested in Ray or other similar frameworks | You need stateful actors with durability, strict multi-tenancy, or non-Python languages | You need low-latency online serving or stateful agents | You need anything beyond gradient synchronization | You need stateful workflows, complex coordination, or multi-tenant isolation |
Conclusion
Every pattern in this post is ultimately the same argument applied to a different surface area: accept the mathematical constraints of distributed systems rather than pretending they dissolve when the nodes are language models instead of databases. The FLP theorem does not care that your consensus participants are generating text. Byzantine fault tolerance does not care that the incorrect messages are hallucinated API shapes instead of corrupted packets. The constraints are identical like the need for isolated state, explicit coordination, crash detection, and external validation.
The actor model has provided exactly those properties since the 1970s. What’s new is the workload, not the substrate. The 20+ patterns in this post cover the full spectrum from single-agent durability to 10,000-agent distributed coordination. They all reduce to four primitives applied consistently:
- FLP safety: isolated actor state, message-only communication, no shared memory corruption
- FLP liveness: supervision trees,
host.monitor()crash detection,durabilityfacet checkpointing - Byzantine isolation: external
ValidatorActor, WASM sandbox per actor, structured retry - Coordination without deadlock: TupleSpace write-once registration, Linda-model result sharing,
Channelsfor durable async transport
The gap between “one agent that works in a demo” and “ten thousand agents that work at 3 AM on a Tuesday when two nodes are down and one tenant’s budget is exhausted” is not a gap that better prompts or bigger models close. It’s a distributed systems engineering problem, and it has distributed systems solutions. That’s what PlexSpaces is built around and it’s why the actor model, fifty years after its introduction, is still the right foundation.
GitHub: github.com/bhatti/PlexSpaces
Previous posts in this series:
- Building PlexSpaces: Decades of Distributed Systems Distilled
- Polyglot WebAssembly: Four Languages, One Runtime
- From Data Lakes to AI Inference: Scalable Data Pipelines
- Generative and Agentic AI Design Patterns
- Agentic AI for API Compatibility: Building Intelligent Guardians with LangChain and LangGraph
- Automated PII Detection: Building Privacy Guardians with LangChain and Vertex AI
- Pragmatic Agentic AI: How I Rebuilt Years of FinTech Infrastructure with ReAct, RAG, and Free Local Models
- Agentic AI for Personal Productivity: Building a Daily Minutes Assistant with RAG, MCP, and ReAct
- Building a Production-Grade Enterprise AI Platform with vLLM: A Complete Guide from the Trenches
- Building Production-Grade AI Agents with MCP & A2A: A Complete Guide from the Trenches