1. Introduction
The architecture of Formicary, a distributed orchestration engine will be described, which is intended for the execution of background tasks, jobs, and workflows. The operation is based on a directed acyclic graph of tasks, where each task is seen as a unit of work. Execution of these tasks can be achieved through a variety of protocols, including Docker, Kubernetes, Shell, HTTP, and Messaging. The Leader-Follower model (comprising a queen-leader and ant-workers) is employed by Formicary. Tasks are scheduled by the queen-leader, and their execution is carried out by the ant-workers. The Pipes and Filter and SEDA patterns are supported, permitting the output from one task to serve as the input for another. Parallel execution and result aggregation of tasks are made possible by the Fork/Join pattern. Distribution of tasks is guided by tags, labels, and executor protocols. The following is a list of its significant features:
- Declarative Task/Job Definitions: Tasks and Jobs are defined as DAGs using simple YAML configuration files, with support for GO-based templates for customization.
- Authentication & Authorization: The access to Formicary is secured using OAuth and OIDC standards.
- Persistence of Artifacts: Artifacts and outputs from tasks can be stored and used by subsequent tasks or as job inputs.
- Extensible Execution Methods: Supports a variety of execution protocols, including Docker, Kubernetes, HTTP, and custom protocols.
- Quota: Limit maximum allowed CPU, memory, and disk quota usage for each task.
- Caching: Supports caching for dependencies such as npm, maven, gradle, and python.
- Encryption: Secures confidential configurations in databases and during network communication.
- Scheduling: Cron-based scheduling for periodic job execution.
- Optional and Finalized Tasks: Supports optional tasks that may fail and finalized tasks that run regardless of job success or failure.
- Child Jobs: Supports spawning of child jobs based on Fork/Join patterns.
- Retry Mechanisms: Supports retrying of tasks or jobs based on error/exit codes.
- Job Filtering and Priority: Allows job/task execution filtering and prioritization.
- Job prioritization, job/task retries, and cancellation.
- Resource based Routing: Supports constraint-based routing of workloads for computing resources based on tags, labels, execution protocols, etc.
- Monitoring, Alarms and Notifications: Offers job execution reports, real-time log streaming, and email notifications.
- Other: Graceful and abrupt shutdown capabilities. Reporting and statistics on job outcomes and resource usage.
2. Use-Cases
The Formicary is designed for efficient and flexible job and task execution, adaptable to various complex scenarios, and capable of scaling according to the user base and task demands. Following is a list of its major use cases:
- Complex Workflow Orchestration: Formicary is specially designed to run a series of integration tests, code analysis, and deployment tasks that depend on various conditions and outputs of previous tasks. Formicary can orchestrate this complex workflow across multiple environments, such as staging and production, with tasks running in parallel or sequence based on conditions.
- Image Processing Pipeline: Formicary supports artifacts management for uploading images to S3 compatible storage including Minio. It allows orchestrating a series of tasks for image resizing, watermarking, and metadata extraction, with the final output stored in an object store.
- Automate Build, Test and Release Workflows: A DevOps team can use Formicary to trigger a workflow that builds the project, runs tests, creates a Release, uploads build artifacts to the release, and publishes the package to a registry like npm or PyPI.
- Scheduled Data ETL Job: A data engineering team can use Formicary to manage scheduled ETL jobs that extract data from multiple sources, transform it, and load it into a data warehouse, with tasks to validate and clean the data at each step.
- Machine Learning Pipeline: A data science team can use Formicary pipeline to preprocess datasets, train machine learning models, evaluate their performance, and, based on certain metrics, decide whether to retrain the models or adjust preprocessing steps.
3. Architecture
The Formicary architecture is a complex system designed for task orchestration and execution, based on the Leader-Follower, SEDA and Fork/Join patterns.
3.1 Design Patterns
Here are some common design patterns used in the Formicary architecture:
- Microservices Architecture: Formicary architecture is decomposed into smaller, independent services that enhances scalability and facilitates independent deployment and updates.
- Pipeline Pattern: It structures the processing of tasks in a linear sequence of processing steps (stages).
- Distributed Task Queues: It manages task distribution among multiple worker nodes. This ensures load balancing and effective utilization of resources.
- Event-Driven Architecture: Formicary components communicate with events, triggering actions based on event occurrence for handling asynchronous processes and integrating various services.
- Load Balancer Pattern: It distributes incoming requests or tasks evenly across a pool of servers and prevents any single server from becoming a bottleneck.
- Circuit Breaker Pattern: It prevents a system from repeatedly trying to execute an operation that’s likely to fail.
- Retry Pattern: It automatically re-attempts failed operations a certain number of times before considering the operation failed.
- Observer Pattern: Formicary uses observer pattern for monitoring, logging, and metrics collection.
- Scheduler-Agent-Supervisor Pattern: The Formicary schedulers trigger tasks, agents to execute them, and supervisors to monitor task execution.
- Immutable Infrastructure: It treats infrastructure entities as immutable, replacing them for each deployment instead of updating them.
- Fork-Join Pattern: It decomposes a task into sub-tasks, processes them in parallel, and then combines the results.
- Caching Pattern: It stores intermediate build artifacts such as npm/maven/gradle libraries in a readily accessible location to reduce latency and improves performance.
- Back-Pressure Pattern: It controls the rate of task generation or data flow to prevent overwhelming the system.
- Idempotent Operations: It ensures that an operation produces the same result even if it’s executed multiple times.
- External Configuration Store Pattern: It manages job configuration and settings in a separate, external location, enabling easier changes and consistency across services.
- Blue-Green Deployment Pattern: It manages deployment by switching between two identical environments, one running the current version (blue) and one running the new version (green).
3.2 High-level Components
The architecture of Formicary is designed to manage and execute complex workflows where tasks are organized in a DAG structure. This architecture is inherently scalable and robust, catering to the needs of task scheduling, execution, and monitoring. Here’s an overview of its key functionalities and components:

3.2.1 Functionalities
- Job Processing: Formicary supports defining workflows as Job, where each node represents a task, and edges define dependencies. It ensures that tasks are executed in an order that respects their dependencies.
- Task Distribution: Tasks, defined as units of work, are distributed among ant-workers based on tags and executor protocols (Kubernetes, Docker, Shell, HTTP, Websockets, etc.).
- Scalability: Formicary scales to handle a large number of tasks and complex workflows. It supports horizontal scaling where more workers can be added to handle increased load.
- Fault Tolerance and Reliability: It handles failures and retries of tasks.
- Extensibility: It provides interfaces and plugins for extending its capabilities.
- Resource Management: Efficiently allocates resources for task execution, optimizing for performance and cost.
- Resource Quotas: It define maximum resource quotas for CPU, memory, disk space, and network usage for each job or task. This prevent any single job from over-consuming resources, ensuring fair resource allocation among all jobs.
- Prioritization: It prioritize jobs based on criticality or predefined rules.
- Job Throttling: It implement throttling mechanisms to control the rate at which jobs are fed into the system.
- Kubernetes Clusters: Formicary allows for the creation of kubernetes clusters to supports auto-scaling and termination to optimize resource usage and cost.
- Monitoring and Logging: It offers extensive monitoring and logging capabilities.
- Authentication and Authorization: Formicary enforces strict authentication and authorization based on OAuth 2.0 and OIDC protocols before allowing access to the system.
- Multitenancy: Formicary accommodates multiple tenants, allowing various organizations to sign up with one or more users, ensuring their data is safeguarded through robust authentication and authorization measures.
- Common Plugins: Formicary allows the sharing of common plugins that function as sub-jobs for reusable features, which other users can then utilize.
3.2.2 Core Components
Following are core components of the Formicary system:
API Controller
The API controller defines an API that supports the following functions:
- Checking the status of current, pending, or completed jobs
- Submitting new jobs for execution
- Looking up or modifying job specifications
- Enrolling ant workers and overseeing resources for processing
- Retrieving or uploading job-related artifacts
- Handling settings, error codes, and resource allocation
- Delivering both real-time and historical data reports
UI Controller
The UI controller offers the following features:
- Displaying ongoing, queued, or completed jobs
- Initiating new job submissions
- Reviewing job specifications or introducing new ones
- Supervising ant workers and execution units
- Accessing or submitting artifacts
- Configuring settings, error codes, and resource management
- Providing access to both live and archived reports
Resource Manager
The resource manager enrolls ant workers and monitors the resources accessible for processing jobs. Ant workers regularly inform the resource manager about their available capacity and current workload. This continuous communication allows the resource manager to assess the maximum number of jobs that can run simultaneously without surpassing the capacity of the workers.
Job Scheduler
The job scheduler examines the queue for jobs awaiting execution and consults the resource manager to determine if a job can be allocated for execution. When sufficient resources are confirmed to be available, it dispatches a remote command to the Job-Launcher to initiate the job’s execution. Please note that the formicary architecture allows for multiple server instances, with the scheduler operating on the leader node. Meanwhile, other servers host the job-launcher and executor components, which are responsible for executing and orchestrating jobs.
Job Launcher
The job launcher remains attentive to incoming requests for job execution and initiates the process by engaging the Job-Supervisor. The Job-Supervisor then takes on the role of overseeing the execution of the job, ensuring its successful completion.
Job Supervisor
The job supervisor initiates a job in an asynchronous manner and manages the job’s execution. It oversees each task through the Task-Supervisor and determines the subsequent task to execute, guided by the status or exit code of the previously completed task.
Task Supervisor
The task supervisor initiates task execution by dispatching a remote instruction to the ant worker equipped to handle the specific task method, then stands by for a response. Upon receiving the outcome, the task supervisor records the results in the database for future reference and analysis.
Ant Workers
An ant worker registers with the queen server by specifying the types of tasks it can handle, using specific methods or tags for identification. Once registered, it remains vigilant for task requests, processing each one asynchronously according to the execution protocols defined for each task, and then relaying the results back to the server. Before starting on a task, the ant worker ensures all required artifacts are gathered and then uploads them once the task is completed. Moreover, the ant worker is responsible for managing the lifecycle of any external containers, such as those in Docker and Kubernetes systems, from initiation to termination.
To maintain system efficiency and prevent any single worker from becoming overwhelmed, the ant worker consistently updates the queen server with its current workload and capacity. This mechanism allows for a balanced distribution of tasks, ensuring that no worker is overloaded. The architecture is scalable, allowing for the addition of more ant workers to evenly spread the workload. These workers communicate with the queen server through messaging queues, enabling them to:
- Regularly update the server on their workload and capacity.
- Download necessary artifacts needed for task execution.
- Execute tasks using the appropriate executors, such as Docker, HTTP, Kubernetes, Shell, or Websockets.
- Upload the resulting artifacts upon completion of tasks.
- Monitor and manage the lifecycle of Docker/Kubernetes containers, reporting back any significant events to the server.
Executors
The formicary system accommodates a range of executor methods, such as Kubernetes Pods, Docker containers, Shell commands, HTTP requests, and Messaging protocols, to abstract the runtime environment for executing tasks. The choice of executor within the formicary is defined through designated methods, with each method specifying a different execution environment.
| Executor | Method |
|---|---|
| Kubernetes Pods | KUBERNETES |
| Docker containers | DOCKER |
| Shell | SHELL |
| HTTP (GET POST, PUT, DELETE) | HTTP_GET HTTP_POST_FORM HTTP_POST_JSON HTTP_PUT_FORM HTTP_PUT_JSON HTTP_DELETE WEBSOCKET |
| Fork/Await | JOB_FORK, JOB_FORK_AWAIT |
| Artifact/Expiration | EXPIRE_ARTIFACTS |
| Messaging | MESSAGING |
Note: These execution methods can be easily extended to support other executor protocols to provide greater flexibility in how tasks are executed and integrated with different environments.
Database
The formicary system employs a relational database to systematically store and manage a wide array of data, including job requests, detailed job definitions, resource allocations, error codes, and various configurations.
Artifacts and Object Store
The formicary system utilizes an object storage solution to maintain the artifacts produced during task execution, those generated within the image cache, or those uploaded directly by users. This method ensures a scalable and secure way to keep large volumes of unstructured data, facilitating easy access and retrieval of these critical components for operational efficiency and user interaction.
Messaging
Messaging enables seamless interaction between the scheduler and the workers, guaranteeing dependable dissemination of tasks across distributed settings.
Notification System
The notification system dispatches alerts and updates regarding the pipeline status to users.
3.3 Data Model
Here’s an overview of its key data model in Formicary system:
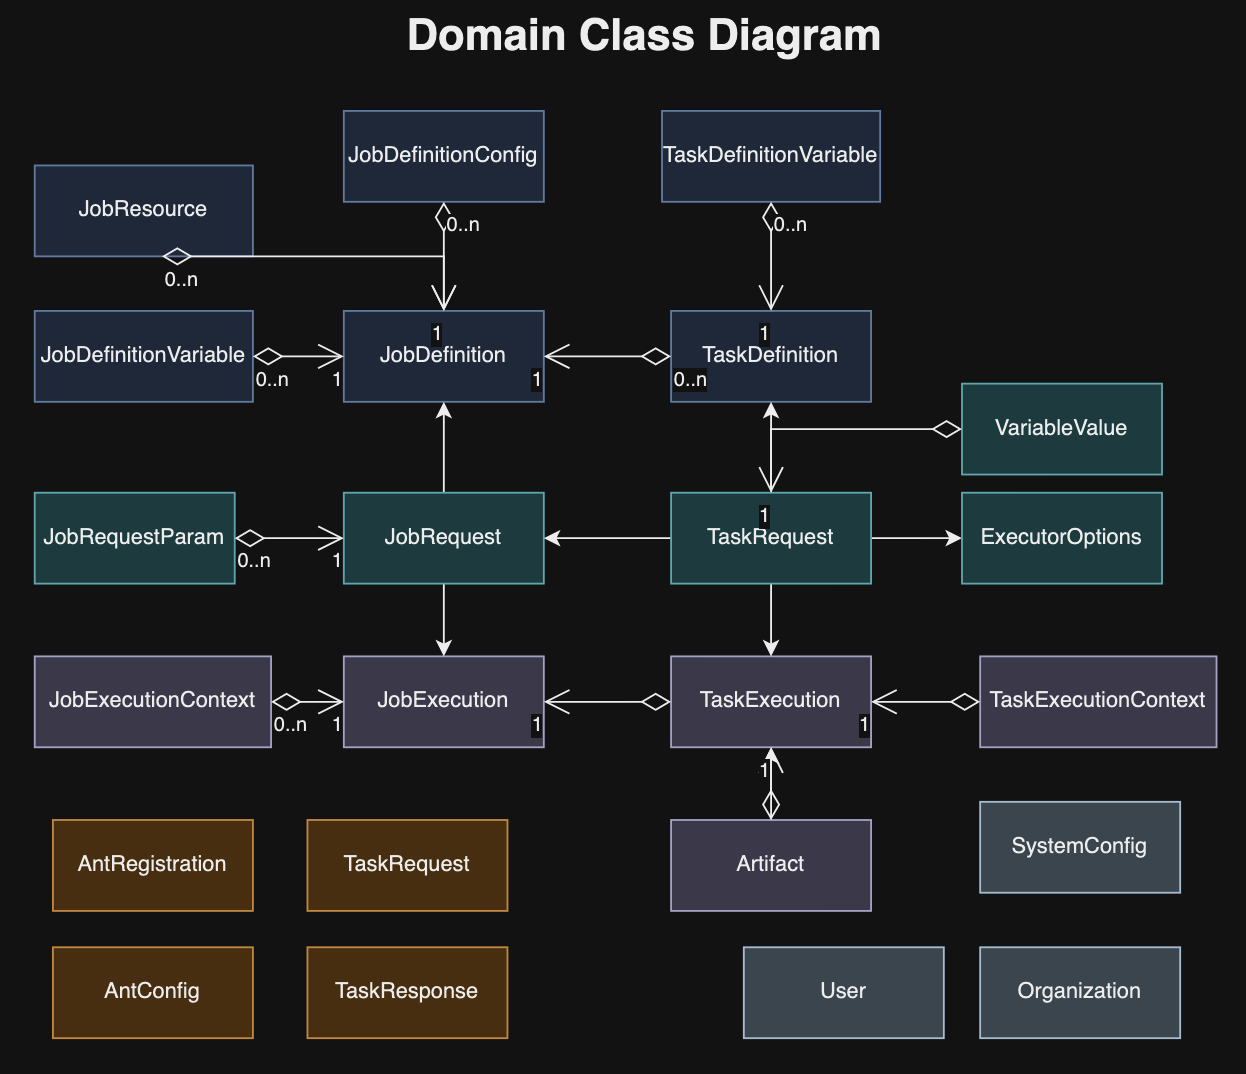
3.3.1 Job Definition
A JobDefinition outlines a set of tasks arranged in a Directed Acyclic Graph (DAG), executed by worker entities. The workflow progresses based on the exit codes of tasks, determining the subsequent task to execute. Each task definition encapsulates a job’s specifics, and upon receiving a new job request, an instance of this job is initiated through JobExecution.
type JobDefinition struct {
	// ID defines UUID for primary key
	ID string `yaml:"-" json:"id" gorm:"primary_key"`
	// JobType defines a unique type of job
	JobType string `yaml:"job_type" json:"job_type"`
	// Version defines internal version of the job-definition, which is updated when a job is updated. The database
	// stores each version as a separate row but only latest version is used for new jobs.
	Version int32 `yaml:"-" json:"-"`
	// SemVersion - semantic version is used for external version, which can be used for public plugins.
	SemVersion string `yaml:"sem_version" json:"sem_version"`
	// URL defines url for job
	URL string `json:"url"`
	// UserID defines user who updated the job
	UserID string `json:"user_id"`
	// OrganizationID defines org who submitted the job
	OrganizationID string `json:"organization_id"`
	// Description of job
	Description string `yaml:"description,omitempty" json:"description"`
	// Platform can be OS platform or target runtime and a job can be targeted for specific platform that can be used for filtering
	Platform string `yaml:"platform,omitempty" json:"platform"`
	// CronTrigger can be used to run the job periodically
	CronTrigger string `yaml:"cron_trigger,omitempty" json:"cron_trigger"`
	// Timeout defines max time a job should take, otherwise the job is aborted
	Timeout time.Duration `yaml:"timeout,omitempty" json:"timeout"`
	// Retry defines max number of tries a job can be retried where it re-runs failed job
	Retry int `yaml:"retry,omitempty" json:"retry"`
	// HardResetAfterRetries defines retry config when job is rerun and as opposed to re-running only failed tasks, all tasks are executed.
	HardResetAfterRetries int `yaml:"hard_reset_after_retries,omitempty" json:"hard_reset_after_retries"`
	// DelayBetweenRetries defines time between retry of job
	DelayBetweenRetries time.Duration `yaml:"delay_between_retries,omitempty" json:"delay_between_retries"`
	// MaxConcurrency defines max number of jobs that can be run concurrently
	MaxConcurrency int `yaml:"max_concurrency,omitempty" json:"max_concurrency"`
	// disabled is used to stop further processing of job, and it can be used during maintenance, upgrade or debugging.
	Disabled bool `yaml:"-" json:"disabled"`
	// PublicPlugin means job is public plugin
	PublicPlugin bool `yaml:"public_plugin,omitempty" json:"public_plugin"`
	// RequiredParams from job request (and plugin)
	RequiredParams []string `yaml:"required_params,omitempty" json:"required_params" gorm:"-"`
	// Tags are used to use specific followers that support the tags defined by ants.
	// Tags is aggregation of task tags
	Tags string `yaml:"tags,omitempty" json:"tags"`
	// Methods is aggregation of task methods
	Methods string `yaml:"methods,omitempty" json:"methods"`
	// Tasks defines one to many relationships between job and tasks, where a job defines
	// a directed acyclic graph of tasks that are executed for the job.
	Tasks []*TaskDefinition `yaml:"tasks" json:"tasks" gorm:"ForeignKey:JobDefinitionID" gorm:"auto_preload" gorm:"constraint:OnUpdate:CASCADE"`
	// Configs defines config properties of job that are used as parameters for the job template or task request when executing on a remote
	// ant follower. Both config and variables provide similar capabilities but config can be updated for all job versions and can store
	// sensitive data.
	Configs []*JobDefinitionConfig `yaml:"-" json:"-" gorm:"ForeignKey:JobDefinitionID" gorm:"auto_preload" gorm:"constraint:OnUpdate:CASCADE"`
	// Variables defines properties of job that are used as parameters for the job template or task request when executing on a remote
	// ant follower. Both config and variables provide similar capabilities but variables are part of the job yaml definition.
	Variables []*JobDefinitionVariable `yaml:"-" json:"-" gorm:"ForeignKey:JobDefinitionID" gorm:"auto_preload" gorm:"constraint:OnUpdate:CASCADE"`
	// CreatedAt job creation time
	CreatedAt time.Time `yaml:"-" json:"created_at"`
	// UpdatedAt job update time
	UpdatedAt time.Time `yaml:"-" json:"updated_at"`
}
3.3.2 Task Definition
A TaskDefinition outlines the work performed by worker entities. It specifies the task’s parameters and, upon a new job request, a TaskExecution instance is initiated to carry out the task. The task details, including its method and tags, guide the dispatch of task requests to a compatible remote worker. Upon task completion, the outcomes are recorded in the database for reference.
type TaskDefinition struct {
	// ID defines UUID for primary key
	ID string `yaml:"-" json:"id" gorm:"primary_key"`
	// JobDefinitionID defines foreign key for JobDefinition
	JobDefinitionID string `yaml:"-" json:"job_definition_id"`
	// TaskType defines type of task
	TaskType string `yaml:"task_type" json:"task_type"`
	// Method TaskMethod defines method of communication
	Method common.TaskMethod `yaml:"method" json:"method"`
	// Description of task
	Description string `yaml:"description,omitempty" json:"description"`
	// HostNetwork defines kubernetes/docker config for host_network
	HostNetwork string `json:"host_network,omitempty" yaml:"host_network,omitempty" gorm:"-"`
	// AllowFailure means the task is optional and can fail without failing entire job
	AllowFailure bool `yaml:"allow_failure,omitempty" json:"allow_failure"`
	// AllowStartIfCompleted  means the task is always run on retry even if it was completed successfully
	AllowStartIfCompleted bool `yaml:"allow_start_if_completed,omitempty" json:"allow_start_if_completed"`
	// AlwaysRun means the task is always run on execution even if the job fails. For example, a required task fails (without
	// AllowFailure), the job is aborted and remaining tasks are skipped but a task defined as `AlwaysRun` is run even if the job fails.
	AlwaysRun bool `yaml:"always_run,omitempty" json:"always_run"`
	// Timeout defines max time a task should take, otherwise the job is aborted
	Timeout time.Duration `yaml:"timeout,omitempty" json:"timeout"`
	// Retry defines max number of tries a task can be retried where it re-runs failed tasks
	Retry int `yaml:"retry,omitempty" json:"retry"`
	// DelayBetweenRetries defines time between retry of task
	DelayBetweenRetries time.Duration `yaml:"delay_between_retries,omitempty" json:"delay_between_retries"`
	// Webhook config
	Webhook *common.Webhook `yaml:"webhook,omitempty" json:"webhook" gorm:"-"`
	// OnExitCodeSerialized defines next task to execute
	OnExitCodeSerialized string `yaml:"-" json:"-"`
	// OnExitCode defines next task to run based on exit code
	OnExitCode map[common.RequestState]string `yaml:"on_exit_code,omitempty" json:"on_exit_code" gorm:"-"`
	// OnCompleted defines next task to run based on completion
	OnCompleted string `yaml:"on_completed,omitempty" json:"on_completed" gorm:"on_completed"`
	// OnFailed defines next task to run based on failure
	OnFailed string `yaml:"on_failed,omitempty" json:"on_failed" gorm:"on_failed"`
	// Variables defines properties of task
	Variables []*TaskDefinitionVariable `yaml:"-" json:"-" gorm:"ForeignKey:TaskDefinitionID" gorm:"auto_preload" gorm:"constraint:OnUpdate:CASCADE"`
	TaskOrder int       `yaml:"-" json:"-" gorm:"task_order"`
	// ReportStdout is used to send stdout as a report
	ReportStdout bool `yaml:"report_stdout,omitempty" json:"report_stdout"`
	// Transient properties -- these are populated when AfterLoad or Validate is called
	NameValueVariables interface{} `yaml:"variables,omitempty" json:"variables" gorm:"-"`
	// Header defines HTTP headers
	Headers map[string]string `yaml:"headers,omitempty" json:"headers" gorm:"-"`
	// BeforeScript defines list of commands that are executed before main script
	BeforeScript []string `yaml:"before_script,omitempty" json:"before_script" gorm:"-"`
	// AfterScript defines list of commands that are executed after main script for cleanup
	AfterScript []string `yaml:"after_script,omitempty" json:"after_script" gorm:"-"`
	// Script defines list of commands to execute in container
	Script []string `yaml:"script,omitempty" json:"script" gorm:"-"`
	// Resources defines resources required by the task
	Resources BasicResource `yaml:"resources,omitempty" json:"resources" gorm:"-"`
	// Tags are used to use specific followers that support the tags defined by ants.
	// For example, you may start a follower that processes payments and the task will be routed to that follower
	Tags []string `yaml:"tags,omitempty" json:"tags" gorm:"-"`
	// Except is used to filter task execution based on certain condition
	Except string `yaml:"except,omitempty" json:"except" gorm:"-"`
	// JobVersion defines job version
	JobVersion string `yaml:"job_version,omitempty" json:"job_version" gorm:"-"`
	// Dependencies defines dependent tasks for downloading artifacts
	Dependencies []string `json:"dependencies,omitempty" yaml:"dependencies,omitempty" gorm:"-"`
	// ArtifactIDs defines id of artifacts that are automatically downloaded for job-execution
	ArtifactIDs []string `json:"artifact_ids,omitempty" yaml:"artifact_ids,omitempty" gorm:"-"`
	// ForkJobType defines type of job to work
	ForkJobType string `json:"fork_job_type,omitempty" yaml:"fork_job_type,omitempty" gorm:"-"`
	// URL to use
	URL string `json:"url,omitempty" yaml:"url,omitempty" gorm:"-"`
	// AwaitForkedTasks defines list of jobs to wait for completion
	AwaitForkedTasks      []string `json:"await_forked_tasks,omitempty" yaml:"await_forked_tasks,omitempty" gorm:"-"`
	MessagingRequestQueue string   `json:"messaging_request_queue,omitempty" yaml:"messaging_request_queue,omitempty" gorm:"-"`
	MessagingReplyQueue   string   `json:"messaging_reply_queue,omitempty" yaml:"messaging_reply_queue,omitempty" gorm:"-"`
	// CreatedAt job creation time
	CreatedAt time.Time `yaml:"-" json:"created_at"`
	// UpdatedAt job update time
	UpdatedAt time.Time `yaml:"-" json:"updated_at"`
}
3.3.3 JobExecution
JobExecution refers to a specific instance of a job-definition that gets activated upon the submission of a job-request. When a job is initiated by the job-launcher, this triggers the creation of a job-execution instance, which is also recorded in the database. Following this initiation, the job-launcher transfers responsibility for the job to the job-supervisor, which then commences execution, updating the status of both the job request and execution to EXECUTING. The job supervisor manages the execution process, ultimately altering the status to COMPLETED or FAILED upon completion. Throughout this process, the formicary system emits job lifecycle events to reflect these status changes, which can be monitored by UI or API clients.
For every task outlined within the task-definition associated with the JobExecution, a corresponding TaskExecution instance is generated. This setup tracks the progress and state of both job and task executions within a database, and any outputs generated during the job execution process are preserved in object storage.
type JobExecution struct {
	// ID defines UUID for primary key
	ID string `json:"id" gorm:"primary_key"`
	// JobRequestID defines foreign key for job request
	JobRequestID uint64 `json:"job_request_id"`
	// JobType defines type for the job
	JobType    string `json:"job_type"`
	JobVersion string `json:"job_version"`
	// JobState defines state of job that is maintained throughout the lifecycle of a job
	JobState types.RequestState `json:"job_state"`
	// OrganizationID defines org who submitted the job
	OrganizationID string `json:"organization_id"`
	// UserID defines user who submitted the job
	UserID string `json:"user_id"`
	// ExitCode defines exit status from the job execution
	ExitCode string `json:"exit_code"`
	// ExitMessage defines exit message from the job execution
	ExitMessage string `json:"exit_message"`
	// ErrorCode captures error code at the end of job execution if it fails
	ErrorCode string `json:"error_code"`
	// ErrorMessage captures error message at the end of job execution if it fails
	ErrorMessage string `json:"error_message"`
	// Contexts defines context variables of job
	Contexts []*JobExecutionContext `json:"contexts" gorm:"ForeignKey:JobExecutionID" gorm:"auto_preload"`
	// Tasks defines list of tasks that are executed for the job
	Tasks []*TaskExecution `json:"tasks" gorm:"ForeignKey:JobExecutionID" gorm:"auto_preload"`
	// StartedAt job execution start time
	StartedAt time.Time `json:"started_at"`
	// EndedAt job execution end time
	EndedAt *time.Time `json:"ended_at"`
	// UpdatedAt job execution last update time
	UpdatedAt time.Time `json:"updated_at"`
	// CPUSecs execution time
	CPUSecs int64 `json:"cpu_secs"`
}
The state of job execution includes: PENDING, READY, COMPLETED, FAILED, EXECUTING, STARTED, PAUSED, and CANCELLED.
3.3.4 TaskExecution
TaskExecution records the execution of a task or a unit of work, carried out by ant-workers in accordance with the specifications of the task-definition. It captures the status and the outputs produced by the task execution, storing them in the database and the object-store. When a task begins, it is represented by a task-execution instance, initiated by the task supervisor. This instance is stored in the database by the task supervisor, which then assembles a task request to dispatch to a remote ant worker. The task supervisor awaits the worker’s response before updating the database with the outcome. Task execution concludes with either a COMPLETED or FAILED status, and it also accommodates an exit code provided by the worker. Based on the final status or exit code, orchestration rules determine the subsequent task to execute.
type TaskExecution struct {
	// ID defines UUID for primary key
	ID string `json:"id" gorm:"primary_key"`
	// JobExecutionID defines foreign key for JobExecution
	JobExecutionID string `json:"job_execution_id"`
	// TaskType defines type of task
	TaskType string `json:"task_type"`
	// Method defines method of communication
	Method types.TaskMethod `yaml:"method" json:"method"`
	// TaskState defines state of task that is maintained throughout the lifecycle of a task
	TaskState types.RequestState `json:"task_state"`
	// AllowFailure means the task is optional and can fail without failing entire job
	AllowFailure bool `json:"allow_failure"`
	// ExitCode defines exit status from the job execution
	ExitCode string `json:"exit_code"`
	// ExitMessage defines exit message from the job execution
	ExitMessage string `json:"exit_message"`
	// ErrorCode captures error code at the end of job execution if it fails
	ErrorCode string `json:"error_code"`
	// ErrorMessage captures error message at the end of job execution if it fails
	ErrorMessage string `json:"error_message"`
	// FailedCommand captures command that failed
	FailedCommand string `json:"failed_command"`
	// AntID - id of ant with version
	AntID string `json:"ant_id"`
	// AntHost - host where ant ran the task
	AntHost string `json:"ant_host"`
	// Retried keeps track of retry attempts
	Retried int `json:"retried"`
	// Contexts defines context variables of task
	Contexts []*TaskExecutionContext `json:"contexts" gorm:"ForeignKey:TaskExecutionID" gorm:"auto_preload"`
	// Artifacts defines list of artifacts that are generated for the task
	Artifacts []*types.Artifact `json:"artifacts" gorm:"ForeignKey:TaskExecutionID"`
	// TaskOrder
	TaskOrder int `json:"task_order"`
	// CountServices
	CountServices int `json:"count_services"`
	// CostFactor
	CostFactor float64 `json:"cost_factor"`
  	Stdout []string `json:"stdout" gorm:"-"`
	// StartedAt job creation time
	StartedAt time.Time `json:"started_at"`
	// EndedAt job update time
	EndedAt *time.Time `json:"ended_at"`
	// UpdatedAt job execution last update time
	UpdatedAt time.Time `json:"updated_at"`
}
The state of TaskExecution includes READY, STARTED, EXECUTING, COMPLETED, and FAILED.
3.3.5 JobRequest
JobRequest outlines a user’s request to execute a job as per its job-definition. Upon submission, a job-request is marked as PENDING in the database and later, it is asynchronously scheduled for execution by the job scheduler, depending on resource availability. It’s important to note that users have the option to schedule a job for a future date to avoid immediate execution. Additionally, a job definition can include a cron property, which automatically generates job requests at predetermined times for execution. Besides user-initiated requests, a job request might also be issued by a parent job to execute a child job in a fork/join manner.
type JobRequest struct {
	//gorm.Model
	// ID defines UUID for primary key
	ID uint64 `json:"id" gorm:"primary_key"`
	// ParentID defines id for parent job
	ParentID uint64 `json:"parent_id"`
	// UserKey defines user-defined UUID and can be used to detect duplicate jobs
	UserKey string `json:"user_key"`
	// JobDefinitionID points to the job-definition version
	JobDefinitionID string `json:"job_definition_id"`
	// JobExecutionID defines foreign key for JobExecution
	JobExecutionID string `json:"job_execution_id"`
	// LastJobExecutionID defines foreign key for JobExecution
	LastJobExecutionID string `json:"last_job_execution_id"`
	// OrganizationID defines org who submitted the job
	OrganizationID string `json:"organization_id"`
	// UserID defines user who submitted the job
	UserID string `json:"user_id"`
	// Permissions provides who can access this request 0 - all, 1 - Org must match, 2 - UserID must match from authentication
	Permissions int `json:"permissions"`
	// Description of the request
	Description string `json:"description"`
	// Platform overrides platform property for targeting job to a specific follower
	Platform string `json:"platform"`
	// JobType defines type for the job
	JobType    string `json:"job_type"`
	JobVersion string `json:"job_version"`
	// JobState defines state of job that is maintained throughout the lifecycle of a job
	JobState types.RequestState `json:"job_state"`
	// JobGroup defines a property for grouping related job
	JobGroup string `json:"job_group"`
	// JobPriority defines priority of the job
	JobPriority int `json:"job_priority"`
	// Timeout defines max time a job should take, otherwise the job is aborted
	Timeout time.Duration `yaml:"timeout,omitempty" json:"timeout"`
	// ScheduleAttempts defines attempts of schedule
	ScheduleAttempts int `json:"schedule_attempts" gorm:"schedule_attempts"`
	// Retried keeps track of retry attempts
	Retried int `json:"retried"`
	// CronTriggered is true if request was triggered by cron
	CronTriggered bool `json:"cron_triggered"`
	// QuickSearch provides quick search to search a request by params
	QuickSearch string `json:"quick_search"`
	// ErrorCode captures error code at the end of job execution if it fails
	ErrorCode string `json:"error_code"`
	// ErrorMessage captures error message at the end of job execution if it fails
	ErrorMessage string `json:"error_message"`
	// Params are passed with job request
	Params []*JobRequestParam `yaml:"-" json:"-" gorm:"ForeignKey:JobRequestID" gorm:"auto_preload" gorm:"constraint:OnUpdate:CASCADE"`
	// Execution refers to job-Execution
	Execution       *JobExecution          `yaml:"-" json:"execution" gorm:"-"`
	Errors          map[string]string      `yaml:"-" json:"-" gorm:"-"`
	// ScheduledAt defines schedule time when job will be submitted so that you can submit a job
	// that will be executed later
	ScheduledAt time.Time `json:"scheduled_at"`
	// CreatedAt job creation time
	CreatedAt time.Time `json:"created_at"`
	// UpdatedAt job update time
	UpdatedAt time.Time `json:"updated_at" gorm:"updated_at"`
}
3.3.6 TaskRequest
TaskRequest specifies the parameters for a task that is dispatched to a remote ant-worker for execution. This request is transmitted through a messaging middleware to the most appropriate ant-worker, selected based on its resource availability and capacity to handle the task efficiently.
type TaskRequest struct {
	UserID          string                   `json:"user_id" yaml:"user_id"`
	OrganizationID  string                   `json:"organization_id" yaml:"organization_id"`
	JobDefinitionID string                   `json:"job_definition_id" yaml:"job_definition_id"`
	JobRequestID    uint64                   `json:"job_request_id" yaml:"job_request_id"`
	JobType         string                   `json:"job_type" yaml:"job_type"`
	JobTypeVersion  string                   `json:"job_type_version" yaml:"job_type_version"`
	JobExecutionID  string                   `json:"job_execution_id" yaml:"job_execution_id"`
	TaskExecutionID string                   `json:"task_execution_id" yaml:"task_execution_id"`
	TaskType        string                   `json:"task_type" yaml:"task_type"`
	CoRelationID    string                   `json:"co_relation_id"`
	Platform        string                   `json:"platform" yaml:"platform"`
	Action          TaskAction               `json:"action" yaml:"action"`
	JobRetry        int                      `json:"job_retry" yaml:"job_retry"`
	TaskRetry       int                      `json:"task_retry" yaml:"task_retry"`
	AllowFailure    bool                     `json:"allow_failure" yaml:"allow_failure"`
	Tags            []string                 `json:"tags" yaml:"tags"`
	BeforeScript    []string                 `json:"before_script" yaml:"before_script"`
	AfterScript     []string                 `json:"after_script" yaml:"after_script"`
	Script          []string                 `json:"script" yaml:"script"`
	Timeout         time.Duration            `json:"timeout" yaml:"timeout"`
	Variables       map[string]VariableValue `json:"variables" yaml:"variables"`
	ExecutorOpts    *ExecutorOptions         `json:"executor_opts" yaml:"executor_opts"`
}
3.3.7 ExecutorOptions
ExecutorOptions specify the settings for the underlying executor, including Docker, Kubernetes, Shell, HTTP, etc., ensuring tasks are carried out using the suitable computational resources.
type ExecutorOptions struct {
	Name                       string                  `json:"name" yaml:"name"`
	Method                     TaskMethod              `json:"method" yaml:"method"`
	Environment                EnvironmentMap          `json:"environment,omitempty" yaml:"environment,omitempty"`
	HelperEnvironment          EnvironmentMap          `json:"helper_environment,omitempty" yaml:"helper_environment,omitempty"`
	WorkingDirectory           string                  `json:"working_dir,omitempty" yaml:"working_dir,omitempty"`
	ArtifactsDirectory         string                  `json:"artifacts_dir,omitempty" yaml:"artifacts_dir,omitempty"`
	Artifacts                  ArtifactsConfig         `json:"artifacts,omitempty" yaml:"artifacts,omitempty"`
	CacheDirectory             string                  `json:"cache_dir,omitempty" yaml:"cache_dir,omitempty"`
	Cache                      CacheConfig             `json:"cache,omitempty" yaml:"cache,omitempty"`
	DependentArtifactIDs       []string                `json:"dependent_artifact_ids,omitempty" yaml:"dependent_artifact_ids,omitempty"`
	MainContainer              *ContainerDefinition    `json:"container,omitempty" yaml:"container,omitempty"`
	HelperContainer            *ContainerDefinition    `json:"helper,omitempty" yaml:"helper,omitempty"`
	Services                   []Service               `json:"services,omitempty" yaml:"services,omitempty"`
	Privileged                 bool                    `json:"privileged,omitempty" yaml:"privileged,omitempty"`
	Affinity                   *KubernetesNodeAffinity `json:"affinity,omitempty" yaml:"affinity,omitempty"`
	NodeSelector               map[string]string       `json:"node_selector,omitempty" yaml:"node_selector,omitempty"`
	NodeTolerations            NodeTolerations         `json:"node_tolerations,omitempty" yaml:"node_tolerations,omitempty"`
	PodLabels                  map[string]string       `json:"pod_labels,omitempty" yaml:"pod_labels,omitempty"`
	PodAnnotations             map[string]string       `json:"pod_annotations,omitempty" yaml:"pod_annotations,omitempty"`
	NetworkMode                string                  `json:"network_mode,omitempty" yaml:"network_mode,omitempty"`
	HostNetwork                bool                    `json:"host_network,omitempty" yaml:"host_network,omitempty"`
	Headers                    map[string]string       `yaml:"headers,omitempty" json:"headers"`
	QueryParams                map[string]string       `yaml:"query,omitempty" json:"query"`
	MessagingRequestQueue      string                  `json:"messaging_request_queue,omitempty" yaml:"messaging_request_queue,omitempty"`
	MessagingReplyQueue        string                  `json:"messaging_reply_queue,omitempty" yaml:"messaging_reply_queue,omitempty"`
	ForkJobType                string                  `json:"fork_job_type,omitempty" yaml:"fork_job_type,omitempty"`
	ForkJobVersion             string                  `json:"fork_job_version,omitempty" yaml:"fork_job_version,omitempty"`
	ArtifactKeyPrefix          string                  `json:"artifact_key_prefix,omitempty" yaml:"artifact_key_prefix,omitempty"`
	AwaitForkedTasks           []string                `json:"await_forked_tasks,omitempty" yaml:"await_forked_tasks,omitempty"`
	CostFactor                 float64                 `json:"cost_factor,omitempty" yaml:"cost_factor,omitempty"`
}
3.3.8 TaskResponse
TaskResponse outlines the outcome of a task execution, encompassing its status, context, generated artifacts, and additional outputs.
type TaskResponse struct {
	JobRequestID    uint64                 `json:"job_request_id"`
	TaskExecutionID string                 `json:"task_execution_id"`
	JobType         string                 `json:"job_type"`
	JobTypeVersion  string                 `json:"job_type_version"`
	TaskType        string                 `json:"task_type"`
	CoRelationID    string                 `json:"co_relation_id"`
	Status          RequestState           `json:"status"`
	AntID           string                 `json:"ant_id"`
	Host            string                 `json:"host"`
	Namespace       string                 `json:"namespace"`
	Tags            []string               `json:"tags"`
	ErrorMessage    string                 `json:"error_message"`
	ErrorCode       string                 `json:"error_code"`
	ExitCode        string                 `json:"exit_code"`
	ExitMessage     string                 `json:"exit_message"`
	FailedCommand   string                 `json:"failed_command"`
	TaskContext     map[string]interface{} `json:"task_context"`
	JobContext      map[string]interface{} `json:"job_context"`
	Artifacts       []*Artifact            `json:"artifacts"`
	Warnings        []string               `json:"warnings"`
	Stdout          []string               `json:"stdout"`
	CostFactor      float64                `json:"cost_factor"`
	Timings         TaskResponseTimings    `json:"timings"`
}
3.4 Events Model
Here’s a summary of the principal events model within the Formicary system, which facilitates communication among the main components:

In above diagram, the lifecycle events are published upon start and completion of a job-request, job-execution, task-execution, and containers. Other events are propagated upon health errors, logging and leader election for the job scheduler.
3.5 Physical Architecture
Following diagram depicts the physical architecture of the Formicary system:
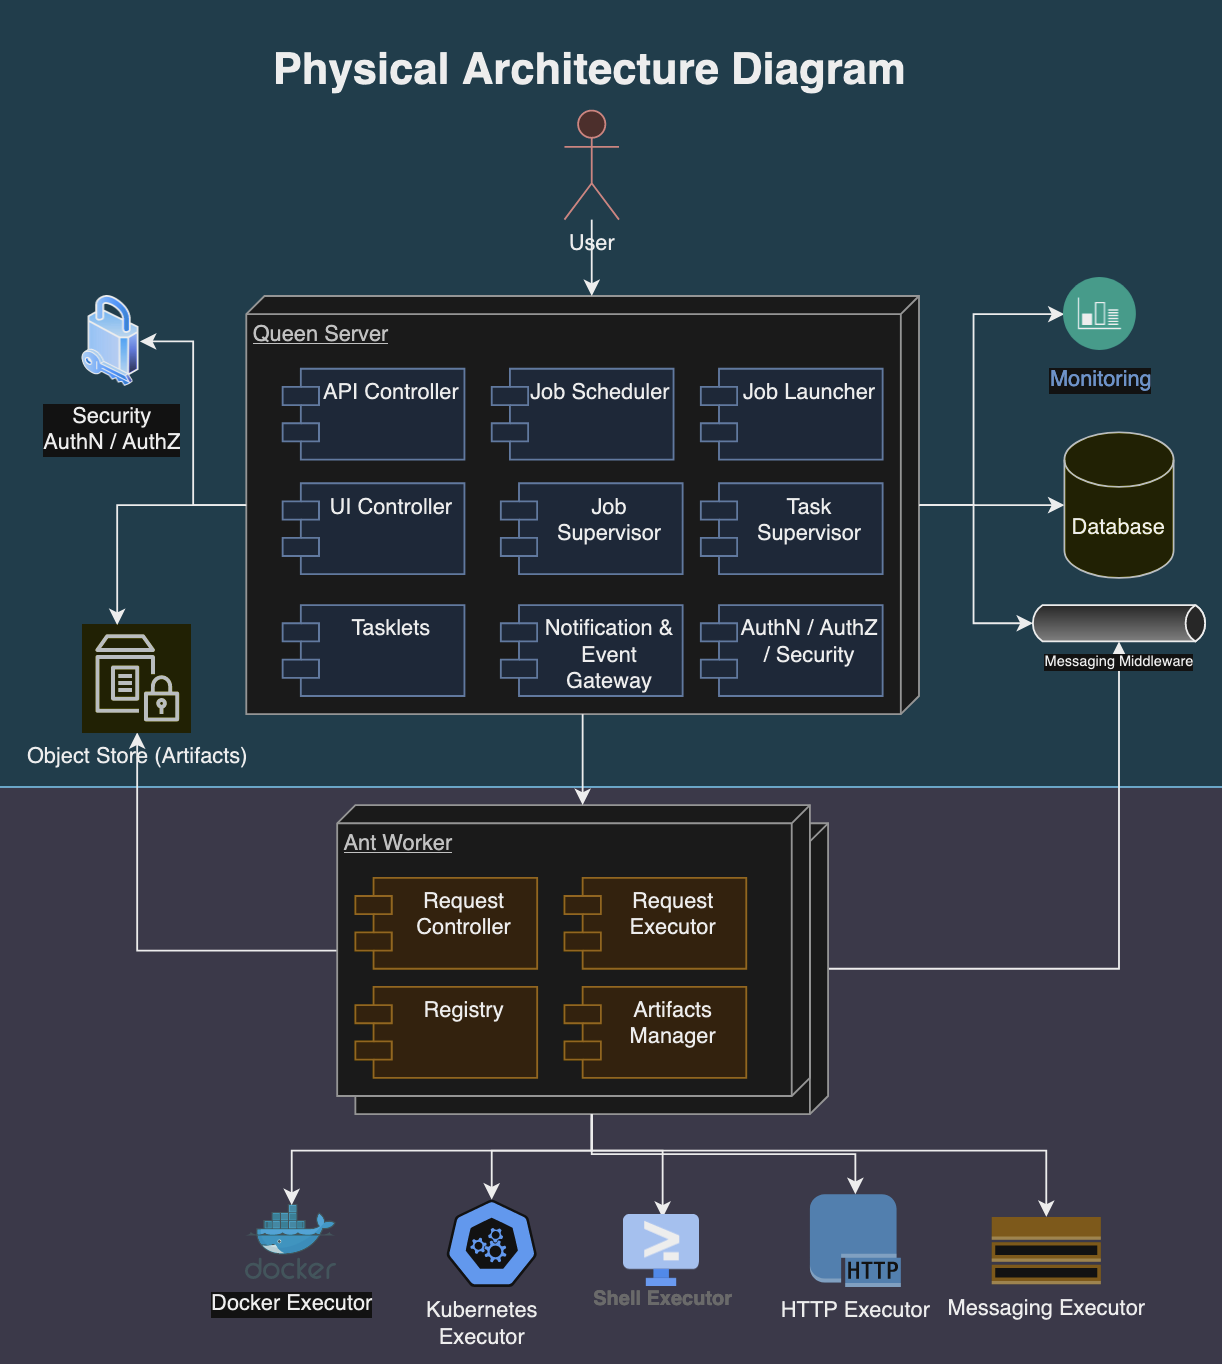
The physical architecture of a Formicary system is structured as follows:
- Queen Server: It manages task scheduling, resource allocation, and system monitoring. The job requests, definitions, user data, and configuration settings are maintained in the database.
- Ant Workers: These are distributed computing resources that execute the tasks assigned by the central server. Each ant worker is equipped with the necessary software to perform various tasks, such as processing data, running applications, or handling web requests. Worker nodes report their status, capacity, and workload back to the central server to facilitate efficient task distribution.
- Storage Systems: Relational databases are used to store structured data such as job definitions, user accounts, and system configurations. Object storage systems hold unstructured data, including task artifacts, logs, and binary data.
- Messaging Middleware: Messaging queues and APIs facilitate asynchronous communication and integration with other systems.
- Execution Environments: Consist of container orchestration systems like Kubernetes and Docker for isolating and managing task executions. They provide scalable and flexible environments that support various execution methods, including shell scripts, HTTP requests, and custom executables.
- Monitoring and Alerting Tools: Formicary system integrates with Prometheus for monitoring solutions to track the health, performance, and resource usage of both the central server and worker nodes. Alerting mechanisms notify administrators and users about system events, performance bottlenecks, and potential issues.
- Security Infrastructure: Authentication and authorization mechanisms control access to resources and tasks based on user roles and permissions.
This architecture allows the Formicary system to scale horizontally by adding more worker nodes as needed to handle increased workloads, and vertically by enhancing the capabilities of the central server and worker nodes. The system’s design emphasizes reliability, scalability, and efficiency, making it suitable for a wide range of applications, from data processing and analysis to web hosting and content delivery.
4. API Overview
The Formicary API is a comprehensive orchestration engine designed for executing complex job workflows, represented as a directed acyclic graph (DAG) of tasks. It’s built on design principles such as Leader-Follower, Pipes-Filter, Fork-Join, and SEDA, catering to a range of execution strategies. The API supports task unit management, job definition, and workflow configurations, including conditional logic and parameterization. The API defines a range of models for different entities such as AntRegistration, Artifact, JobDefinition, JobRequest, and many more, providing a structured approach to orchestration. Key functionalities of the Formicary API include:
4.1 Ant Registration
Management of ant registrations, enabling queries and retrievals by ID such as:
- GET /api/ants: Queries ant registration.
- GET /api/ants/{id}: Retrieves ant-registration by its id.
4.2 Artifacts
Handling of artifacts, allowing for querying, uploading, and managing artifact data, including downloading and log retrieval.
- GET /api/artifacts: Queries artifacts by name, task-type, etc.
- POST /api/artifacts: Uploads artifact data from the request body and returns metadata for the uploaded data.
- DELETE /api/artifacts:/{id}: Deletes an artifact by its ID.
- GET /api/artifacts:/{id}: Retrieves an artifact by its ID.
4.3 System Configs
Creation, deletion, updating, and querying of system configurations.
- GET /api/configs: Retrieves system configs.
- POST /api/configs: Creates new system config based on request body.
- DELETE /api/configs/{id}: Deletes an existing system config based on id.
- GET /api/configs/{id}: Finds an existing system config based on id.
- PUT /api/configs/{id}: Updates an existing system config based on request body.
4.4 Error Codes
Management of error codes, including creation, updating, deletion, and querying by type or regex.
- GET /api/errors: Queries error-codes by type, regex.
- POST /api/errors: Creates new error code based on request body.
- PUT /api/errors: Updates new error code based on request body.
- DELETE /api/errors/{id}: Deletes error code by id.
- GET /api/errors/{id}: Finds error code by id.
4.5 Container Execution
Querying of container executions and management of container executors.
- GET /api/executors: Queries container executions.
- GET /api/executors/{id}: Deletes container-executor by its id.
4.6 Job Definitions
Comprehensive job definition management, including creation, deletion, querying, concurrency updates, enabling/disabling, and graphical representation (DOT format).
- GET /api/jobs/definitions: Queries job definitions by criteria such as type, platform, etc.
- POST /api/jobs/definitions: Uploads job definitions using JSON or YAML body based on content-type header.
- DELETE /api/jobs/definitions/{id}: Deletes the job-definition by id.
- GET /api/jobs/definitions/{id}: Finds the job-definition by id.
- PUT /api/jobs/definitions/{id}/concurrency: Updates the concurrency for job-definition by id to limit the maximum jobs that can be executed at the same time.
- POST /api/jobs/definitions/{id}/disable: disables job-definition so that no new requests are executed while in-progress jobs are allowed to complete.
- GET /api/jobs/definitions/{id}/dot: Returns Graphviz DOT definition for the graph of tasks defined in the job.
- GET /api/jobs/definitions/{id}/stats: Returns Real-time statistics of jobs running.
- POST /api/jobs/definitions/{id}/enable: Enables job-definition so that new requests can start processing.
- GET /api/jobs/definitions/{type}/yaml: Finds job-definition by type and returns response YAML format.
- GET /api/jobs/plugins: Queries job definitions by criteria such as type, platform, etc.
4.7 Job Configs
Configuration management for jobs, including adding, deleting, finding, and updating configs.
- GET /api/jobs/definitions/{jobId}/configs: Queries job configs by criteria such as name, type, etc.
- POST /api/jobs/definitions/{jobId}/configs: Adds a config for the job.
- DELETE /api/jobs/definitions/{jobId}/configs/{id}: Deletes a config for the job by id.
- GET /api/jobs/definitions/{jobId}/configs/{id}: Finds a config for the job by id.
- PUT /api/jobs/definitions/{jobId}/configs/{id}: Updates a config for the job.
4.8 Job Requests
Handling of job requests, including submission, querying, cancellation, restart, triggering, and wait time calculations.
- GET /api/jobs/requests: Queries job requests by criteria such as type, platform, etc.
- POST /api/jobs/requests: Submits a job-request for processing, which is saved in the database and is then scheduled for execution.
- GET /api/jobs/requests/{id}: Finds the job-request by id.
- POST /api/jobs/requests/{id}/cancel: Cancels a job-request that is pending for execution or already executing.
- POST /api/jobs/requests/{id}/pause: Pauses a job-request that is pending for execution or already executing.
- GET /api/jobs/requests/{id}/dot: Returns Graphviz DOT request for the graph of tasks defined in the job request.
- GET /api/jobs/requests/{id}/dot.png: Returns Graphviz DOT image for the graph of tasks defined in the job.
- POST /api/jobs/requests/{id}/restart: Restarts a previously failed job so that it can re-execute.
- POST /api/jobs/requests/{id}/trigger: Triggers a scheduled job.
- GET /api/jobs/requests/{id}/wait_time: Returns wait time for the job-request.
- GET /api/jobs/requests/dead_ids: Returns job-request ids for recently completed jobs.
- GET /api/jobs/requests/stats: Returns statistics for the job-request such as success rate, latency, etc.
4.9 Job Resources
Management of job resources, including adding, finding, updating, and configuring resources.
- GET /api/jobs/resources: Queries job resources by criteria such as type, platform, etc.
- POST /api/jobs/resources: Adds a job-resource that can be used for managing internal or external constraints.
- GET /api/jobs/resources/{id}: Finds the job-resource by id.
- PUT /api/jobs/resources/{id}: Updates a job-resource that can be used for managing internal or external constraints.
- POST /api/jobs/resources/{id}/configs: Saves the configuration of a job-resource.
- DELETE /api/jobs/resources/{id}/configs/{configId}: Deletes the configuration of a job-resource.
- POST /api/jobs/resources/{id}/disable: Disables the job-resource so that any jobs requiring it will not be able to execute.
4.10 Organizations
Organization management, including creation, deletion, updating, and querying.
- GET /api/orgs: Queries organizations by criteria such as org-unit, bundle, etc.
- POST /api/orgs: Creates new organization.
- DELETE /api/orgs/{id}: Deletes the organization by its id.
- GET /api/orgs/{id}: Finds the organization by its id.
- PUT /api/orgs/{id}: Updates the organization profile.
- POST /api/orgs/{id}/invite: Invites a user to an organization.
- POST /api/orgs/usage_report: Generates usage report for the organization.
4.11 Organization Configs
Management of organization-specific configs.
- GET /api/orgs/{orgId}/configs: Queries organization configs by criteria such as name, type, etc.
- POST /api/orgs/{orgId}/configs: Adds a config for the organization.
- DELETE /api/orgs/{orgId}/configs/{id}: Deletes a config for the organization by id.
- GET /api/orgs/{orgId}/configs/{id}: Finds a config for the organization by id.
- PUT /api/orgs/{orgId}/configs/{id}: Updates a config for the organization.
4.12 Subscriptions
Management of system subscriptions.
- GET /api/subscriptions: Finds an existing system subscription based on id.
- POST /api/subscriptions: Creates new system subscription based on request body.
- DELETE /api/subscriptions/{id}: Deletes an existing system subscription based on id.
- GET /api/subscriptions/{id}: Finds an existing system subscription based on id.
- PUT /api/subscriptions/{id}: Updates an existing system subscription based on request body.
4.13 Users
User management within an organization, including creation, deletion, and profile updates.
- GET /api/users: Queries users within the organization that is allowed.
- POST /api/users: Creates new user.
- DELETE /api/users/{id}: Deletes the user profile by its id.
- GET /api/users/{id}: Finds user profile by its id.
- PUT /api/users/{id}: Updates user profile.
- PUT /api/users/{id}/notify: Updates user notification.
4.14 User Tokens
Management of user tokens for API access.
- GET /api/users/{userId}/tokens: Queries user-tokens for the API access.
- POST /api/users/{userId}/tokens: Creates new user-token for the API access.
- DELETE /api/users/{userId}/tokens/{id}: Deletes user-token by its id so that it cannot be used for the API access.
The API documentation is accessible at a URL and includes a Swagger YAML file for detailed API specifications. The API emphasizes support and extensibility, offering various endpoints for managing jobs, configurations, resources, and user interactions within the orchestration platform.
5. Getting Started
5.1 Declarative Job & Task Declaration
In the Formicary system, a job is structured as a declarative directed acyclic graph (DAG). This setup dictates the execution sequence, where the transition from one task to another is contingent upon the exit code or status of the preceding node or task.
5.1.1 Job Configuration
A job is described as a series of tasks arranged in a directed acyclic graph (DAG), with each task detailing the required environment, commands/APIs, and configuration parameters necessary for execution. The definition of a job encompasses the following attributes:
- job_type: defines a short unique name of the job and as Formicary is a multi-tenant system, it’s only needs to be unique within an organization. For example:
job_type: my_test_job - job_variables: defines variables for job context that are available for all tasks, e.g.
job_variables:
    OSVersion: 10.1
Architecture: ARM64 - description: is an optional property to specify details about the job, e.g.,
description: A test job for building a node application. - max_concurrency: defines max number of jobs that can be run concurrently, e.g.
max_concurrency: 5 - required_params: specifies list of parameter names that must be defined when submitting a job request, e.g.,
required_params:
    Name
Age - cron_trigger: uses cron syntax to schedule the job at regular intervals, for example, the following job is set to run every minute:
cron_trigger: 0 * * * * * * - skip_if: allows a job to skip execution based on a conditional logic using GO template, e.g. following condition will skip processing if git branch name is not main:
skip_if: {{if ne .GitBranch "main"}} true {{end}} - retry: A job may be configured to attempt retries a certain number of times. For example,
retry: 3 - delay_between_retries: specifies the pause duration between each attempt. For instance, following setting specifies delay of 10 seconds between each retry:
delay_between_retries: 10s - hard_reset_after_retries: When a job fails, only the failed tasks are executed. However, you can use hard_reset_after_retries so that all tasks are executed due to persisted failure, e.g.:
hard_reset_after_retries: 3 - timeout: defines the maximum time that a job can take for the execution and if the job takes longer, then it’s aborted, e.g.,
timeout: 5m - public_plugin: indicates the job is a public plugin so it can be shared by any other user in the system, e.g.,
public_plugin: true - sem_version: specifies a semantic version of the public plugin, e.g.,
sem_version: 1.2.5 - tasks: defines an array of task definitions. The order of tasks is not important as formicary creates a graph based on dependencies between the tasks for execution.
5.1.2 Task Configuration
A task serves as a work segment carried out by an ant worker, encompassing the following attributes within its definition:
task_type: defines type or name of the task, e.g.:- task_type: lint-task- description: specifies details about the task, e.g.:
description: This task verifies code quality with the lint tool. - method: defines executor to use for the task such as
- DOCKER
- KUBERNETES
- SHELL
- HTTP_GET
- HTTP_POST_FORM
- HTTP_POST_JSON
- HTTP_PUT_FORM
- HTTP_PUT_JSON
- HTTP_DELETE
- WEBSOCKET
- MESSAGING
- FORK_JOB
- AWAIT_FORKED_JOB
- EXPIRE_ARTIFACTS
- on_completed: defines next task to run if task completes successfully, e.g.,:
on_completed: build - on_failed: defines the next task to run if task fails, e.g.,:
on_failed: cleanup - on_exit: is used to run the next task based on exit-code returned by the task, e.g.,
on_exit_code:
101: cleanup
COMPLETED: deploy - environment: defines environment variables that will be available for commands that are executed, e.g.:
environment:
AWS_REGION: us-east-1 - variables: define context property that can be used for scripts as template parameters or pass to the executors, e.g.,
variables:
    max-string-len: 50
service-name: myservice - after_script: is used to list commands that are executed after the main script regardless the main script succeeds or fails, e.g.:
after_script:
- echo cleaning up - before_script: is used to list commands that are executed before the main script, e.g.:
before_script:
    - git clone https://{{.GithubToken}}@github.com/bhatti/go-cicd.git .
- go mod vendor - timeout: defines the maximum time that a task can take for the execution otherwise it’s aborted, e.g.,:
timeout: 5m - cache: allows caching for directories that store 3rd party dependencies, e.g., following example shows caching of pip dependencies so that they are not downloaded upon each execution:
cache:
    key: cache-key
    paths:
        - .cache/pip
- venv - retry: defines maximum attempts to execute a task if it fails, e.g.,:
retry: 3 - delay_between_retries: defines delay between a task retries, e.g.,:
delay_between_retries: 10s - url: specifies URL to invoke for HTTP executor, e.g.,:
method: HTTP_GET
url: https://jsonplaceholder.typicode.com/todos/1 - artifacts: defines list of files or directories that are persisted in the artifacts store and are available for dependent tasks or user download, e.g.,
artifacts:
    paths:
- output.json - except: is used to skip task execution based on certain condition, e.g.:
except: {{if ne .GitBranch "main" }} true {{end}} - allow_failure: defines the task is optional and can fail without failing entire job, e.g.,
allow_failure: true - allow_start_if_completed: Upon retry, only failed tasks are re-executed, but you can mark certain tasks to rerun previously completed task, e.g.
allow_start_if_completed: true - always_run: A task can be marked as always_run so that they are run even when the job fails for cleanup purpose, e.g.,
always_run: true - tags: is used to route the task to a specific ant worker that supports given tags, e.g.,:
tags:
- Mac - webhook: configures a job to call an external webhook API upon completion of a job or task, e.g.:
webhook:
    url: {{.WebhookURL}}
    headers:
        Authorization: Bearer {{.WebhookAuth}}
    query:
task_key: task_value - services: allows starting sidecar container(s) with the given image, e.g.,:
services:
– name: redis
image: redis:6.2.2-alpine
ports:
– number: 6379 - notify: configure job to receive email or slack notifications when a job completes successfully or with failure, e.g., (Note:
whenparameter can takealways,onSuccess,onFailureornevervalues):
notify:
email:
recipients:
– myemail@mydomain.cc
when: always - fork_job_type / await_forked_tasks: allows spawning other related jobs or marketplace plugins from a job, which are run concurrently, e.g.:
- task_type: fork-task
  method: FORK_JOB
  fork_job_type: child-job
  on_completed: fork-wait
- task_type: fork-wait
   method: AWAIT_FORKED_JOB
   await_forked_tasks:
- fork-task - EXPIRE_ARTIFACTS: method can be used to expire old artifacts, e.g.:
- task_type: expire
method: EXPIRE_ARTIFACTS - MESSAGING: implements a customized executor by subscribing to the messaging queue, e.g.,
- task_type: trigger
  method: MESSAGING
  messaging_request_queue: formicary-message-ant-request
  messaging_reply_queue: formicary-message-ant-response
5.1.3 GO Templates
The job and task definition supports GO templates, and you can use variables that are passed by job-request or task definitions, e.g.
- task_type: extract
  method: DOCKER
  container:
    image: python:3.8-buster
  script:
    - python -c 'import yfinance as yf;import json;stock = yf.Ticker("{{.Symbol}}");j = json.dumps(stock.info);print(j);' > stock.json
In addition, you can also use if/then conditions with templates, e.g.
- task_type: task1
  method: DOCKER
  container:
    image: alpine
  script:
    { { if .IsWindowsPlatform } }
    - ipconfig /all
    { { else } }
    - ifconfig -a
    { { end } }
5.2 Installation and Startup of Core Components
5.2.1 Prerequisites
- Execution Environment: Install Docker https://docs.docker.com/engine/install/, Docker-Compose from https://docs.docker.com/compose/install/, and Kubernetes cluster such as https://microk8s.io/docs, AWS EKS, Google Kubernetes Engine (GKE), and Azure Kubernetes Service (AKS).
- Database: Install Goose and GORM for relational database that supports postgres, mysql, sqlite3, mssql, redshift, tidb, clickhouse, vertica, ydb, and duckdb.
- Messaging: Install Redis https://redis.io/ or Apache pulsar https://pulsar.apache.org.
- Artifacts & Object Store: Install Minio – https://min.io/download.
5.2.2 Launching Server
Here is an example docker-compose file designed to launch the queen-server, database server, messaging server, and object-store:
version: '3.7'
services:
  redis:
    image: "redis:alpine"
    ports:
      - "6379:6379"
    volumes:
      - redis-data:/data
  minio:
    image: minio/minio:RELEASE.2024-02-09T21-25-16Z
    volumes:
      - minio-data:/data
    ports:
      - "9000:9000"
      - "9001:9001"
    environment:
      MINIO_ROOT_USER: admin
      MINIO_ROOT_PASSWORD: password
    command: server /data --console-address ":9001"
    healthcheck:
      test: ["CMD", "curl", "-f", "http://localhost:9000/minio/health/live"]
      interval: 30s
      timeout: 20s
      retries: 3
  mysql:
    image: "mysql:8"
    command: --default-authentication-plugin=mysql_native_password
    restart: always
    ports:
      - "3306:3306"
    environment:
      MYSQL_ALLOW_EMPTY_PASSWORD: "yes"
      DB_NAME: ${DB_NAME:-formicary_db}
      DB_USER: ${DB_USER:-formicary_user}
      DB_PASSWORD: ${DB_PASSWORD:-formicary_pass}
      DB_ROOT_USER: ${DB_ROOT_USER:-root}
      DB_ROOT_PASSWORD: ${DB_ROOT_PASSWORD:-rootroot}
      MYSQL_USER: ${DB_USER}
      MYSQL_PASSWORD: ${DB_PASSWORD}
      MYSQL_DATABASE: ${DB_NAME}
      MYSQL_ROOT_PASSWORD: ${MYSQL_ROOT_PASSWORD:-rootroot}
    healthcheck:
      test: ["CMD", "mysqladmin" ,"ping", "-h", "localhost"]
      timeout: 20s
      retries: 10
    volumes:
      - mysql-data:/var/lib/mysql
  formicary-server:
    build:
      context: .
      dockerfile: Dockerfile
    depends_on:
      - redis
      - mysql
      - minio
    environment:
      COMMON_DEBUG: '${DEBUG:-false}'
      COMMON_REDIS_HOST: 'redis'
      COMMON_REDIS_PORT: '${COMMON_REDIS_PORT:-6379}'
      COMMON_S3_ENDPOINT: 'minio:9000'
      COMMON_S3_ACCESS_KEY_ID: 'admin'
      COMMON_S3_SECRET_ACCESS_KEY: 'password'
      COMMON_S3_REGION: '${AWS_DEFAULT_REGION:-us-west-2}'
      COMMON_S3_BUCKET: '${BUCKET:-formicary-artifacts}'
      COMMON_S3_PREFIX: '${PREFIX:-formicary}'
      COMMON_AUTH_GITHUB_CLIENT_ID: '${COMMON_AUTH_GITHUB_CLIENT_ID}'
      COMMON_AUTH_GITHUB_CLIENT_SECRET: '${COMMON_AUTH_GITHUB_CLIENT_SECRET}'
      COMMON_AUTH_GOOGLE_CLIENT_ID: '${COMMON_AUTH_GOOGLE_CLIENT_ID}'
      COMMON_AUTH_GOOGLE_CLIENT_SECRET: '${COMMON_AUTH_GOOGLE_CLIENT_SECRET}'
      CONFIG_FILE: ${CONFIG_FILE:-/config/formicary-queen.yaml}
      COMMON_HTTP_PORT: ${HTTP_PORT:-7777}
      DB_USER: ${DB_USER:-formicary_user}
      DB_PASSWORD: ${DB_PASSWORD:-formicary_pass}
      DB_HOST: 'mysql'
      DB_TYPE: "mysql"
      DB_DATA_SOURCE: "${DB_USER:-formicary_user}:${DB_PASSWORD:-formicary_pass}@tcp(mysql:3306)/${DB_NAME:-formicary_db}?charset=utf8mb4&parseTime=true&loc=Local"
    ports:
      - 7777:7777
    volumes:
      - ./config:/config
    entrypoint: ["/bin/sh", "-c", "/migrations/mysql_setup_db.sh migrate-only && exec /formicary --config=/config/formicary-queen.yaml --id=formicary-server-id1"]
volumes:
  minio-data:
  redis-data:
  mysql-data:
  mysql-initdb:
You can then define the server configuration file as follows:
id: queen-server-id
subscription_quota_enabled: false
common:
  messaging_provider: REDIS_MESSAGING
  external_base_url: https://public-website
  auth:
    enabled: false
    secure: true
    jwt_secret: secret-key
Note: The configuration above supports OAuth 2.0 based authentication and allows enabling of the allocation of computing resource quotas per user. Furthermore, it supports setting up notifications through email and Slack.
You can then launch the server as follows:
docker-compose up
Once, the Formicary system starts up, you can use dashboard UI or API for managing jobs at the specified host and port.
5.2.3 Launching Ant Worker(s)
Here is an example docker-compose file designed to launch the ant-worker:
version: '3.7'
services:
  formicary-ant:
    network_mode: "host"
    build:
      context: .
      dockerfile: Dockerfile
    environment:
      COMMON_DEBUG: '${DEBUG:-false}'
      COMMON_REDIS_HOST: '${QUEEN_SERVER:-192.168.1.102}'
      COMMON_REDIS_PORT: '${COMMON_REDIS_PORT:-6379}'
      COMMON_S3_ENDPOINT: '${QUEEN_SERVER:-192.168.1.102}:9000'
      COMMON_S3_ACCESS_KEY_ID: 'admin'
      COMMON_S3_SECRET_ACCESS_KEY: 'password'
      COMMON_S3_REGION: '${AWS_DEFAULT_REGION:-us-west-2}'
      COMMON_S3_BUCKET: '${BUCKET:-formicary-artifacts}'
      COMMON_S3_PREFIX: '${PREFIX:-formicary}'
      COMMON_HTTP_PORT: ${HTTP_PORT:-5555}
      CONFIG_FILE: ${CONFIG_FILE:-/config/formicary-ant.yaml}
    volumes:
      - ./config:/config
      - ./.kube:/home/formicary-user/.kube
    entrypoint: ["/bin/sh", "-c", "/formicary ant --config=/config/formicary-ant.yaml --id=formicary-ant-id1 --tags \"builder pulsar redis kotlin aws-lambda\""]
Above config shares config for the redis and minio so that ant workers can access queen server and store artifacts directly in the object-store. Here is a sample configuration for the ant worker:
methods:
  - DOCKER
  - KUBERNETES
  - HTTP_GET
  - HTTP_POST_FORM
  - HTTP_POST_JSON
  - HTTP_PUT_FORM
  - HTTP_PUT_JSON
  - HTTP_DELETE
docker:
  host: "tcp://192.168.1.102:2375"
common:
  id: ant-worker-id
  public_dir: "/public/"
  messaging_provider: REDIS_MESSAGING
  external_base_url: https://public-website
kubernetes:
  allow_privilege_escalation: true
  pod_security_context:
    run_as_user: 0
Above docker-compose file mounts a kubernetes config file that you can generate using microk8s.config such as:
apiVersion: v1
clusters:
- cluster:
    certificate-authority-data: LS..
    server: https://192.168.1.120:16443
  name: microk8s-cluster
contexts:
- context:
    cluster: microk8s-cluster
    user: admin
  name: microk8s
current-context: microk8s
kind: Config
preferences: {}
users:
- name: admin
  user:
    token: V..
Above kubernetes configuration assumes that you are running your kubernetes cluster at 192.168.1.120 and you can change it accordingly. You can then launch the worker as follows:
docker-compose -f ant-docker-compose.yaml up
6. Usage with Examples
The Formicary system can be utilized for running batch jobs, orchestrating workflows, or managing CI/CD pipelines. In this system, the execution parameters are detailed in a job configuration file. Each job outlines a Directed Acyclic Graph (DAG) that represents the sequence in which tasks should be executed, essentially mapping out the workflow or the execution trajectory for the tasks. Each task is defined as a discrete unit of work, capable of being executed through various executors such as DOCKER, KUBERNETES, HTTP, WEBSOCKET, SHELL, MESSAGING, among others.
6.1 Workload & Pipeline Processing
A pipeline encapsulates various stages of data processing, adaptable to numerous scenarios such as CI/CD pipelines in software development, ETL processes for data import/export, or other types of batch processing. The formicary facilitates these pipelines through the concept of tasks and jobs, where a task represents a single unit of work, and a job is a collection of tasks organized in a DAG. Tasks within a job are executed in sequence, with the execution order of subsequent tasks contingent on the exit status of the preceding task.
The following example illustrates a job definition for a straightforward pipeline where a video pipeline first validates input, downloads a mock video and then mock encodes it:
job_type: video-encoding
description: Simple example of video encoding
max_concurrency: 1
tasks:
- task_type: validate
  script:
    - echo request must have URL {{.URL}}, InputEncoding {{.InputEncoding}} and OutputEncoding {{.OutputEncoding}}
  container:
    image: alpine
  on_completed: download
- task_type: download
  container:
    image: python:3.8-buster
  script:
    - curl -o video_file.{{.InputEncoding}} {{.URL}}
  artifacts:
    paths:
      - video_file.{{.InputEncoding}}
  on_completed: encode
- task_type: encode
  container:
    image: alpine
  script:
    - ls -l
    - mv video_file.{{.InputEncoding}} video_file.{{.OutputEncoding}}
  dependencies:
    - download
  artifacts:
    paths:
      - video_file.{{.OutputEncoding}}
6.1.1 Uploading Job Definition
You can upload above pipeline job using API as follows:
curl -v -H "Authorization: Bearer $TOKEN" \
  -H "Content-Type: application/yaml" \
    --data-binary @video-encoding.yaml $SERVER/api/jobs/definitions
6.1.2 Submitting Job Request
You can then submit the job request as follows:
curl -v -H "Authorization: Bearer $TOKEN" \
    -H "Content-Type: application/json" \
    --data '{"job_type": "video-encoding", "params": {"InputEncoding": "MP4", "OutputEncoding": "WebM", "URL": "https://github.com"}}' \
    $SERVER/api/jobs/requests
The above example kicks off video-encoding job and passes URL, InputEncoding, and OutputEncoding as parameters. You can then view status of the job using dashboard UI, e.g.,

Above UI also allows users to download artifacts generated by various tasks.
6.2 Parallel Workload & Pipeline Processing
You can then enhance workload & pipelines by adding multiple jobs that originate from the parent job and run concurrently in the background. For instance, a video-encoding job can achieve parallel video encoding by initiating multiple jobs as illustrated below:
job_type: parallel-video-encoding
description: Parallel example of video encoding
max_concurrency: 1
tasks:
- task_type: validate
  script:
    - echo request must have URL {{.URL}}, InputEncoding {{.InputEncoding}} and OutputEncoding {{.OutputEncoding}}
  container:
    image: alpine
  on_completed: download
- task_type: download
  container:
    image: python:3.8-buster
  script:
    - curl -o video_file.{{.InputEncoding}} {{.URL}}
  artifacts:
    paths:
      - video_file.{{.InputEncoding}}
  on_completed: split
- task_type: split
  container:
    image: alpine
  script:
    - ls -l
    - cp video_file.{{.InputEncoding}} video_file.{{.InputEncoding}}.1
    - cp video_file.{{.InputEncoding}} video_file.{{.InputEncoding}}.2
    - cp video_file.{{.InputEncoding}} video_file.{{.InputEncoding}}.3
  dependencies:
    - download
  artifacts:
    paths:
      - video_file.{{.InputEncoding}}.1
      - video_file.{{.InputEncoding}}.2
  on_completed: fork-encode1
- task_type: fork-encode1
  method: FORK_JOB
  fork_job_type: video-encoding
  variables:
    URL: {{.split_ArtifactURL_1}}
    InputEncoding: {{.InputEncoding}}
    OutputEncoding: {{.OutputEncoding}}
  on_completed: fork-encode2
- task_type: fork-encode2
  method: FORK_JOB
  fork_job_type: video-encoding
  variables:
    URL: {{.split_ArtifactURL_2}}
    InputEncoding: {{.InputEncoding}}
    OutputEncoding: {{.OutputEncoding}}
  on_completed: fork-await
- task_type: fork-await
  method: AWAIT_FORKED_JOB
  on_completed: combine
  await_forked_tasks:
    - fork-encode1
    - fork-encode2
- task_type: combine
  container:
    image: alpine
  script:
    - ls -l
    - cat video_file.{{.InputEncoding}}* >  video_file.{{.OutputEncoding}}
  dependencies:
    - fork-await
  artifacts:
    paths:
      - video_file.{{.OutputEncoding}}
Above definition defines validate and download tasks as before but split task splits video file into smaller video files that can be encoded in parallel. It then defines fork-encode1 and fork-encode2 tasks to fork child video-encoding job that was defined earlier and then wait for their completion in fork-await task. Finally, it combines output files into a single file. Following graph diagram shows the execution flow:

6.2.1 Fork Task
The task method with value of FORK_JOB spawns a child job where fork_job_type defines type of the job and variables define the input parameters to the job.
6.2.2 Waiting for completion of child jobs
The task method with value of AWAIT_FORKED_JOB waits for completion of child jobs where await_forked_tasks defines list of jobs to wait.
6.2.3 Uploading Job Definition
You can upload above pipeline job using API as follows:
curl -v -H "Authorization: Bearer $TOKEN" \
  -H "Content-Type: application/yaml" \
    --data-binary @parallel-video-encoding.yaml $SERVER/api/jobs/definitions
6.2.4 Submitting Job Request
You can then submit the job request as follows:
curl -v -H "Authorization: Bearer $TOKEN" \
    -H "Content-Type: application/json" \
    --data '{"job_type": "parallel-video-encoding", "params": {"InputEncoding": "MP4", "OutputEncoding": "WebM", "URL": "https://github.com"}}' \
    $SERVER/api/jobs/requests
The above example kicks off parallel-video-encoding job and passes URL, InputEncoding, and OutputEncoding as parameters.
6.3 CI/CD Pipelines
To implement CI/CD, you can create a job configuration and upload it to the server. The various stages of the build process, such as compilation, testing, and deployment, are represented by tasks within this job configuration. Organizations can use continuous integration to regularly integrating code changes into a shared repository where each integration is automatically built and tested, facilitating early detection of bugs and integration issues. Further continuous delivery and deployment automates the release of software to production, moving away from manual approvals and deployments. Here is a list of major features for supporting CI/CD pipelines in the Formicary system:
- Artifacts management for any packages and binaries produced during the CI/CD pipeline or software deployment.
- Job Parameters and Variables: Refer to the documentation on Variables and Request Parameters to set up job configuration variables and request parameters.
- Environment Variables: Consult the section on Environment Variables to configure and access environment variables within your container.
- Job / Organization Configs: For secure configurations at the job and organization level, see the Job / Organization Configs section.
- Access Tokens for Source Code Repositories: Instructions for accessing source code repositories can be found in the relevant documentation.
- Starting Jobs Manually: For manual job initiation, see the guide on Scheduling Jobs Manually. Jobs can be submitted as outlined there.
- Scheduling Jobs for the Future: To schedule a job for a future time, refer to the Job Scheduling documentation.
- Regular Interval Job Scheduling: For setting up jobs to run at regular intervals, see the Periodic Job Scheduling section.
- GitHub Webhooks: Utilize GitHub webhooks for job scheduling as described in the GitHub-Webhooks documentation.
- Post-Commit Hooks: For job scheduling using git post-commit hooks, consult the Post-commit hooks section.
- Skipping Job Requests: To skip scheduled jobs, refer to the Job Skip documentation.
Following is an example of CI/CD pipeline for a simple GO project:
job_type: go-build-ci
max_concurrency: 1
# only run on main branch
skip_if: {{if ne .GitBranch "main"}} true {{end}}
tasks:
- task_type: build
  method: DOCKER
  working_dir: /sample
  container:
    image: golang:1.16-buster
  before_script:
    - git clone https://{{.GithubToken}}@github.com/bhatti/go-cicd.git .
    - git checkout -t origin/{{.GitBranch}} || git checkout {{.GitBranch}}
    - go mod download
    - go mod vendor
  script:
    - echo branch {{.GitBranch}}, Commit {{.GitCommitID}}
    - make build
  after_script:
    - ls -l
  cache:
    key_paths:
      - go.mod
    paths:
      - vendor
  on_completed: test
- task_type: test
  method: DOCKER
  container:
    image: golang:1.16-buster
  working_dir: /sample
  environment:
    GO111MODULE: on
    CGO_ENABLED: 0
  before_script:
    - git clone https://{{.GithubToken}}@github.com/bhatti/go-cicd.git .
    - git checkout -t origin/{{.GitBranch}} || git checkout {{.GitBranch}}
  script:
    - make test-coverage
  after_script:
    - ls -l
  dependencies:
    - build
  on_completed: deploy
- task_type: deploy
  method: DOCKER
  container:
    image: golang:1.16-buster
  working_dir: /sample
  before_script:
    - git clone https://{{.GithubToken}}@github.com/bhatti/go-cicd.git .
    - git checkout -t origin/{{.GitBranch}} || git checkout {{.GitBranch}}
  script:
    - make build
  dependencies:
    - test
Above job configuration demonstrates how different stages of build, test and deployment process can be defined with artifacts and vendor-cachings support.
6.3.1 Uploading Job Definition
You can upload above pipeline job using API as follows:
curl -v -H "Authorization: Bearer $TOKEN" \
  -H "Content-Type: application/yaml" \
    --data-binary @go-build-ci.yaml $SERVER/api/jobs/definitions
6.3.2 Secure storage of access tokens
You can store access tokens for your git repository securely with encryption as follows:
curl -v -H "Authorization: Bearer $TOKEN" -H "Content-Type: application/yaml" \
  $SERVER/api/jobs/definitions/<job-id>/configs -d '{"Name": "GithubToken", "Value": "<mytoken>", "Secret": true}'
6.3.3 Submitting Job Request
You can then submit the job request as follows:
curl -v -H "Authorization: Bearer $TOKEN" \
   -H "Content-Type: application/json" \
   --data '{"job_type": "go-build-ci", "params": { "GitCommitID": "$COMMIT", "GitBranch": "$BRANCH", "GitCommitMessage": "$COMMIT_MESSAGE" } }' \
   $SERVER/api/jobs/requests
The above example kicks off go-build-ci job and passes GitCommitID, GitBranch, and GitMessage as parameters.
6.3.4 Github-Webhooks
See Github-Webhooks for scheduling above job with GitHub webhooks support.
6.3.5 PostCommit Hooks
See Post-commit hooks for scheduling above job using Git post-commit hooks.
6.4 ETL Jobs
Here is a sample ETL (Extract, Transform, Load) job that retrieves stock data, processes and extracts pricing information, and conducts calculations on the obtained data:
job_type: etl-stock-job
description: Simple ETL Stock pipeline example
max_concurrency: 1
tasks:
- task_type: extract
  method: KUBERNETES
  container:
    image: python:3.8-buster
  before_script:
    - pip install yfinance --upgrade --no-cache-dir
  script:
    - python -c 'import yfinance as yf;import json;stock = yf.Ticker("{{.Symbol}}");j = json.dumps(stock.info);print(j);' > stock.json
  artifacts:
    paths:
      - stock.json
  on_completed: transform
- task_type: transform
  method: KUBERNETES
  tags:
  - builder
  container:
    image: alpine
  dependencies:
    - extract
  before_script:
    - apk --update add jq && rm -rf /var/lib/apt/lists/* && rm /var/cache/apk/*
  script:
    - cat stock.json | jq '.ask,.bid' > askbid.txt
  artifacts:
    paths:
      - askbid.txt
  on_completed: load
- task_type: load
  method: KUBERNETES
  tags:
  - builder
  dependencies:
    - transform
  script:
    - awk '{ sum += $1; n++ } END { if (n > 0) print sum / n; }' askbid.txt > avg.txt
  after_script:
    - ls -l
  container:
    image: alpine
  artifacts:
    paths:
      - avg.txt
6.4.1 Uploading Job Definition
You can upload above ETL job using API as follows:
curl -v -H "Authorization: Bearer $TOKEN" \
  -H "Content-Type: application/yaml" \
    --data-binary @etl-stock-job.yaml $SERVER/api/jobs/definitions
6.4.2 Submitting Job Request
You can then submit the job request as follows:
curl -v -H "Authorization: Bearer $TOKEN" \
    -H "Content-Type: application/json" \
    --data '{"job_type": "etl-stock-job", "params": {"Symbol": "AAPL"}}' \
    $SERVER/api/jobs/requests
The above example kicks off etl-stock-job and passes Symbol as a parameter. You can then download results after the job execution.
6.5 Scanning Containers
6.5.1 Trivy
Trivy is a simple and comprehensive vulnerability/misconfiguration scanner for containers and other artifacts. Following example shows scanning a docker in docker (dind) using Trivy:
job_type: trivy-scan-job
description: vulnerability/misconfiguration scanner for containers using Trivy
url: https://aquasecurity.github.io/trivy/v0.19.0/
max_concurrency: 1
job_variables:
  CI_COMMIT_SHA: db65c90a07e753e71db5143c877940f4c11a33e1
tasks:
  - task_type: scan
    working_dir: /trivy-ci-test
    variables:
      DOCKER_HOST: tcp://localhost:2375
      DOCKER_TLS_CERTDIR: ""
      IMAGE: trivy-ci-test:{{.CI_COMMIT_SHA}}
    container:
      image: docker:20.10-git
    privileged: true
    services:
      - name: docker-dind
        alias: docker
        image: docker:20.10-dind
        entrypoint: [ "env", "-u", "DOCKER_HOST" ]
        command: [ "dockerd-entrypoint.sh" ]
    allow_failure: true
    before_script:
      - echo image $IMAGE
      - git clone https://github.com/aquasecurity/trivy-ci-test.git .
      - wget -qO - "https://api.github.com/repos/aquasecurity/trivy/releases/latest" | grep '"tag_name":' | sed -E 's/.*"v([^"]+)".*/\1/'
      - export TRIVY_VERSION=$(wget -qO - "https://api.github.com/repos/aquasecurity/trivy/releases/latest" | grep '"tag_name":' | sed -E 's/.*"v([^"]+)".*/\1/')
      - echo $TRIVY_VERSION
      - apk add --update-cache --upgrade curl
      - curl -sfL https://raw.githubusercontent.com/aquasecurity/trivy/main/contrib/install.sh | sh -s -- -b /usr/local/bin
      - mkdir -p /root/.docker/
      - curl -o /root/.docker/ca.pem https://gist.githubusercontent.com/bhatti/8a37691361c09afbef751cb168715867/raw/118f47230adec566cef72661e66370cf95ba1be8/ca.pem
    script:
      # Build image
      - docker build -t $IMAGE .
      - curl -o tmpl.tpl https://raw.githubusercontent.com/aquasecurity/trivy/main/contrib/gitlab-codequality.tpl
      # Build report
      - trivy --exit-code 0 --cache-dir .trivycache/ --no-progress --format template --template "tmpl.tpl" -o gl-container-scanning-report.json $IMAGE
      # Print report
      - trivy --exit-code 0 --cache-dir .trivycache/ --no-progress --severity HIGH $IMAGE
      # Fail on severe vulnerabilities
      - trivy --exit-code 1 --cache-dir .trivycache/ --severity CRITICAL --no-progress $IMAGE
    cache:
      paths:
        - .trivycache/
    artifacts:
      paths:
        - gl-container-scanning-report.json
6.6 Other Advanced Usage
Following examples illustrate advanced configuration of job orchestration (See Job and Task Definition Options for more details):
6.6.1 Kubernetes Jobs with Volumes and Services
Following example illustrates usage of Kubernetes Volume, Mounts and Services:
job_type: kube-example1
description: Simple Kubernetes example with volume mounts, secrets and ports
max_concurrency: 1
tasks:
- task_type: k8-task
  tags:
  - builder
  pod_labels:
    foor: bar
  script:
    - ls -l /myshared
    - ls -l /myempty
    - sleep 30
  method: KUBERNETES
  host_network: false
  services:
    - name: redis
      image: redis:6.2.2-alpine
      ports:
        - number: 6379
  container:
    image: ubuntu:16.04
    volumes:
      host_path:
        - name: mount1
          mount_path: /myshared
          host_path: /shared
      empty_dir:
        - name: mount2
          mount_path: /myempty
      projected:
        - name: oidc-token
          mount_path: /var/run/sigstore/cosign
          sources:
            - service_account_token:
              path: oidc-token
              expiration_seconds: 600
              audience: sigstore
You can use kubctl describe pod <podname> to verify labels, volumes or services such as:
 Labels:       AntID=formicary-ant-id1
               foor=bar
    ...
 Volumes:
   mount1:
     Type:          HostPath (bare host directory volume)
     Path:          /shared
    ...
 Mounts:
   /myshared from mount1 (rw)
    ...
 Containers:
   svc-redis:
     Container ID:
     Image:          redis:6.2.2-alpine
    ...
6.6.2 Kubernetes Jobs with Resources
Here is a sample job definition that specifies resources for Kubernetes:
job_type: kube-example2
description: Simple Kubernetes example with resources
max_concurrency: 1
tasks:
- task_type: kubby
  tags:
  - builder
  pod_labels:
    foor: bar
  script:
    - echo hello world
    - ls -l
    - sleep 21
  method: KUBERNETES
  container:
    image: ubuntu:16.04
    cpu_limit: "1"
    cpu_request: 500m
    memory_limit: 2Gi
    memory_request: 1Gi
    ephemeral_storage_limit: 2Gi
    ephemeral_storage_request: 1Gi
6.6.3 Scheduling a job in Future
You can submit a job at scheduled time by adding scheduled_at parameter as follows:
curl -v -H "Authorization:
  Bearer $TOKEN" -H "Content-Type:
    application/json" --data '{"job_type": "my-job", "scheduled_at": "2028-06-15T00:00:00.0-00:00", "params": { "Target": "bob" } }' \
    $SERVER/api/jobs/requests
6.6.4 Periodic Jobs
You can configure a job to execute periodically using a cron syntax as follows:
 job_type: cron-kube-build
 cron_trigger: 0 * * * * * *
 tasks:
...
6.6.5 Retries with Backoff
You can set up a job to automatically retry a failed task or the entire job up to a specified number of maximum attempts, incorporating a delay between each retry attempt as described below:
job_type: test-job
retry: 3
delay_between_retries: 10s
...
6.6.6 Timeout
You can configure a job to timeout if it does not complete with the allowed duration as shown below:
job_type: test-job
timeout: 5m
...
6.6.7 On-Exit Task
Besides determining the subsequent task through on_completed or on_failed, you can employ on_exit to initiate the next task according to the exit code produced by the task. This exit code, distinct from the task’s status, is generated by the command specified in the script. It’s important to note that on_exit assigns specific exit codes for COMPLETED and FAILED, allowing you to consolidate all exit conditions in a single location, for example:
job_type: taco-job
tasks:
- task_type: allocate
  container:
    image: alpine
  script:
    - echo allocating
  on_completed: check-date
- task_type: check-date
  container:
    image: alpine
  script:
    - echo monday && exit {{.ExitCode}}
  on_exit_code:
    1: monday
    2: tuesday
    3: friday
  on_completed: deallocate
- task_type: monday
  container:
    image: alpine
  script:
    - echo monday
  on_completed: deallocate
- task_type: tuesday
  container:
    image: alpine
  script:
    - echo tuesday
  on_completed: taco-tuesday
- task_type: taco-tuesday
  container:
    image: alpine
  script:
    - echo taco tuesday
  on_completed: deallocate
- task_type: friday
  container:
    image: alpine
  script:
    - echo friday
  on_completed: party
- task_type: party
  container:
    image: alpine
  script:
    - echo tgif party
  on_completed: deallocate
- task_type: deallocate
  container:
    image: alpine
  always_run: true
  script:
    - echo deallocating
6.6.8 Building Docker images using Docker in Docker (dind)
Following example shows using docker in docker (dind) using TLS to build images:
job_type: dind-tls-job
max_concurrency: 1
tasks:
- task_type: build
  working_dir: /sample
  variables:
    DOCKER_HOST: tcp://localhost:2376
    DOCKER_TLS_VERIFY: 1
    DOCKER_TLS: 1
    DOCKER_TLS_CERTDIR: "/mycerts"
  container:
    image: docker:20.10-git
    volumes:
      empty_dir:
        - name: certs
          mount_path: /mycerts/client
  privileged: true
  services:
    - name: docker-dind
      alias: docker
      image: docker:20.10-dind
      entrypoint: ["env", "-u", "DOCKER_HOST"]
      command: ["dockerd-entrypoint.sh"]
      volumes:
        empty_dir:
          - name: certs
            mount_path: /mycerts/client
  before_script:
    - git clone https://github.com/aquasecurity/trivy-ci-test.git .
    - mkdir -p /root/.docker/ && cp /mycerts/client/* /root/.docker
    - apk --no-cache add ca-certificates
    - docker info
  script:
    # Build image
    - docker build -t my-image .
6.6.9 Sensor or Polling Job
Following example shows how exit_codes with EXECUTING state can be used for polling tasks:
job_type: sensor-job
tasks:
- task_type: first
  method: HTTP_GET
  environment:
    OLD_ENV_VAR: ijk
  allow_failure: true
  timeout: 15s
  delay_between_retries: 5s
  script:
    {{ if lt .JobElapsedSecs 3 }}
    - https://jsonplaceholder.typicode.com/blaaaaahtodos/1
    {{ else }}
    - https://jsonplaceholder.typicode.com/todos/1
    {{ end }}
  on_completed: second
  on_exit_code:
    404: EXECUTING
- task_type: second
  container:
    image: alpine
  script:
      - echo nonce {{.Nonce}}
      - exit {{ Random 0 5 }}
  on_exit_code:
    1: FAILED
    2: RESTART_JOB
    3: COMPLETED
    4: ERR_BLAH
    5: RESTART_TASK
  on_completed: third
- task_type: third
  container:
    image: alpine
  environment:
    OLD_ENV_VAR: ijk
  script:
    - date > date.txt
    - env NEW_ENV_VAR=xyz
    - echo variable value is $NEW_ENV_VAR
  artifacts:
    paths:
      - date.txt
6.6.10 Formicary Plugins
A plugin represents a publicly accessible job definition that other jobs can utilize. It can encompass a range of functions, from security assessments to data evaluation and beyond. While any member within an organization can share a job definition, a public plugin enables the creation of a job that’s accessible to all users. Organizations can publish a plugin by creating a job definition that starts with the organization’s bundle prefix and includes a semantic version number, like 1.0 or 1.2.1, indicating its version. Here is an example plugin:
job_type: io.formicary.stock-plugin
description: Simple Plugin example
public_plugin: true
sem_version: 1.0-dev
max_concurrency: 1
tasks:
  - task_type: extract
    method: KUBERNETES
    container:
      image: python:3.8-buster
    before_script:
      - pip install yfinance --upgrade --no-cache-dir
    script:
      - python -c 'import yfinance as yf;import json;stock = yf.Ticker("{{.Symbol}}");j = json.dumps(stock.info);print(j);' > stock.json
    artifacts:
      paths:
        - stock.json
    on_completed: transform
  - task_type: transform
    method: KUBERNETES
    tags:
      - builder
    container:
      image: alpine
    dependencies:
      - extract
    before_script:
      - apk --update add jq && rm -rf /var/lib/apt/lists/* && rm /var/cache/apk/*
    script:
      - jq '.ask,.bid' > askbid.txt
    artifacts:
      paths:
        - askbid.txt
    on_completed: load
  - task_type: load
    method: KUBERNETES
    tags:
      - builder
    dependencies:
      - transform
    script:
      - awk '{ sum += $1; n++ } END { if (n > 0) print sum / n; }' askbid.txt > avg.txt
    after_script:
      - ls -l
    container:
      image: alpine
    artifacts:
      paths:
        - avg.txt
Spawning Plugin Job
The formicary allows spawning other plugins from a job using FORK_JOB method, e.g.
 - task_type: spawn-plugin
   method: FORK_JOB
   fork_job_type: io.formicary.stock-plugin
   fork_job_version: 1.0-dev
   variables:
     Symbol: {{.Symbol}}
   on_completed: wait-plugin
7. Formicary Executors
In Formicary, an executor abstracts the runtime environment needed for executing a task. The type of executor is specified through the use of a method. Formicary natively supports the following executor methods:
7.1 Shell Executor
The shell executor forks a shell process from the ant worker to run commands specified in the script section. This executor doesn’t need extra configuration; however, assigning a unique user with appropriate permissions to the ant worker is advisable to ensure security.
7.2 REST APIs
The REST API Executor triggers external HTTP APIs through actions such as GET, POST, PUT, or DELETE, for example:
job_type: http-job
tasks:
- task_type: get
  method: HTTP_GET
  url: https://jsonplaceholder.typicode.com/todos/1
  on_completed: post
- task_type: post
  method: HTTP_POST_JSON
  url: https://jsonplaceholder.typicode.com/todos
  on_completed: put
- task_type: put
  method: HTTP_PUT_JSON
  url: https://jsonplaceholder.typicode.com/todos/1
  on_completed: delete
- task_type: delete
  method: HTTP_DELETE
  url: https://jsonplaceholder.typicode.com/todos/1
7.3 Websockets
The Websockets method enables browser-based or ant workers written in Python, Go, Java, and other languages to connect and carry out tasks, for example:
job_type: web-job
tasks:
- task_type: process
  method: WEBSOCKET
  tags:
    - web
    - js
The web or client uses websocket clients register with the server, e.g.
    const ws = new WebSocket(uri);
    ws.onopen = function () {
        const registration = {
            'ant_id': 'sample-web',
            'tags': ['js', 'web'],
            'methods': ['WEBSOCKET']
        }
        ws.send(JSON.stringify(registration));
    }

    ws.onmessage = function (evt) {
        const msg = JSON.parse(evt.data);
        // handle message
        msg.status = 'COMPLETED';
        ws.send(JSON.stringify(msg));
    }
7.4 Docker
The Docker executor initiates a primary container, named after the job or task, to run the specified script, along with a secondary ‘helper’ container, designated by a ‘-helper’ suffix, to handle artifact management, e.g.,
common:
  id: test-id
  messaging_provider: "REDIS_MESSAGING"
tags:
  - tag1
  - tag2
methods:
  - DOCKER
docker:
  registry:
    registry: docker-registry-server
    username: docker-registry-user
    password: docker-registry-pass
    pull_policy: if-not-present
  host: kubernetes-host
7.5 Kubernetes
The Kubernetes executor launches a primary container, which executes the script and is named according to the job or task, along with an auxiliary ‘helper’ container, identified by a ‘-helper’ suffix, for artifact management. Tasks can specify dependent services that are initiated with a ‘svc-‘ prefix, e.g.:
name: task1
method: KUBERNETES
environment:
  AWS-KEY: Mykey
container:
  image: ubuntu:16.04
  volumes:
    host_path:
      - name: mount1
        mount_path: /shared
        host_path: /host/shared
    pvc:
      - name: mount2
        mount_path: /mnt/sh1
    config_map:
      - name: mount3
        mount_path: /mnt/sh2
        items:
          item1: val1
    secret:
      - name: mount4
        mount_path: /mnt/sh3
        items:
          item1: val1
    empty_dir:
      - name: mount4
        mount_path: /mnt/sh3
    projected:
      - name: oidc-token
        mount_path: /var/run/sigstore/cosign
        sources:
          - service_account_token:
            path: oidc-token
            expiration_seconds: 600
            audience: sigstore
  volume_driver: voldriver
  devices:
    - devices
  bind_dir: /shared
  cpu_limit: "1"
  cpu_request: 500m
  memory_limit: 1Gi
  memory_request: 1Gi
services:
  - name: svc-name
    image: ubuntu:16.04
    command:
      - cmd1
    entrypoint:
      - /bin/bash
    volumes:
      host_path:
        - name: svc-mount1
          mount_path: /shared
          host_path: /host/shared
          read_only: false
      pvc:
        - name: svc-mount2
          mount_path: /mnt/sh1
          read_only: true
      config_map:
        - name: svc-mount3
          mount_path: /mnt/sh2
          read_only: true
          items:
            item1: val1
      secret:
        - name: svc-mount4
          mount_path: /mnt/sh3
          items:
            mysecret: file-name
      empty_dir:
        - name: svc-mount5
          mount_path: /mnt/sh3
      projected:
        - name: oidc-token
          mount_path: /var/run/sigstore/cosign
          sources:
            - service_account_token:
              path: oidc-token
              expiration_seconds: 600
              audience: sigstore
    cpu_limit: "1"
    cpu_request: 500m
    memory_limit: 1Gi
    memory_request: 1Gi
privileged: true
affinity:
  required_during_scheduling_ignored_during_execution:
    node_selector_terms:
      - match_expressions:
          - key: datacenter
            operator: In
            values:
              - seattle
        match_fields:
          - key: key2
            operator: In
            values:
              - val2
  preferred_during_scheduling_ignored_during_execution:
    - weight: 1
      preference:
        match_expressions:
          - key: datacenter
            operator: In
            values:
              - chicago
        match_fields:
          - key: color
            operator: In
            values:
              - blue
node_selector:
  formicary: "true"
node_tolerations:
  empty: PreferNoSchedule
  myrole: NoSchedule
pod_labels:
  foo: bar
pod_annotations:
  ann1: val
network_mode: mod1
host_network: true
7.6 Messaging or Customized Executor
You can create a custom executor by subscribing to a messaging queue. For instance, below is an example of a messaging executor:
// MessagingHandler structure
type MessagingHandler struct {
	id            string
	requestTopic  string
	responseTopic string
	queueClient   queue.Client
}

// NewMessagingHandler constructor
func NewMessagingHandler(
	id string,
	requestTopic string,
	responseTopic string,
	queueClient queue.Client,
) *MessagingHandler {
	return &MessagingHandler{
		id:            id,
		requestTopic:  requestTopic,
		responseTopic: responseTopic,
		queueClient:   queueClient,
	}
}

func (h *MessagingHandler) Start(
	ctx context.Context,
) (err error) {
	return h.queueClient.Subscribe(
		ctx,
		h.requestTopic,
		h.id,
		make(map[string]string),
		true, // shared subscription
		func(ctx context.Context, event *queue.MessageEvent) error {
			defer event.Ack()
			err = h.execute(ctx, event.Payload)
			if err != nil {
				logrus.WithFields(logrus.Fields{
					"Component": "MessagingHandler",
					"Payload":   string(event.Payload),
					"Target":    h.id,
					"Error":     err}).Error("failed to execute")
				return err
			}
			return nil
		},
	)
}

// Stop stops subscription
func (h *MessagingHandler) Stop(
	ctx context.Context,
) (err error) {
	return h.queueClient.UnSubscribe(
		ctx,
		h.requestTopic,
		h.id,
	)
}

// execute incoming request
func (h *MessagingHandler) execute(
	ctx context.Context,
	reqPayload []byte) (err error) {
	var req *types.TaskRequest
    req, err = types.UnmarshalTaskRequest(h.antCfg.EncryptionKey, reqPayload)
	if err != nil {
		return err
	}
	resp := types.NewTaskResponse(req)

	// Implement business logic below
	epoch := time.Now().Unix()
	if epoch%2 == 0 {
		resp.Status = types.COMPLETED
	} else {
		resp.ErrorCode = "ERR_MESSAGING_WORKER"
		resp.ErrorMessage = "mock error for messaging client"
		resp.Status = types.FAILED
	}
	resp.AddContext("epoch", epoch)

	// Send back reply
    resPayload, err := resp.Marshal(h.antCfg.EncryptionKey)
	if err != nil {
		return err
	}
	_, err = h.queueClient.Send(
		ctx,
		h.responseTopic,
		make(map[string]string),
		resPayload,
		false)
	return err
}
8. Summary
The Formicary is specially designed for executing background tasks, jobs, DAGs, and workflows in a complex, scalable environment. Each task represents a discrete unit of work that can be executed using a variety of protocols such as Docker, Kubernetes, Shell, HTTP, and Messaging. Its architecture employs a Leader-Follower model with a queen-leader that schedules tasks and ant-workers that execute them. It supports advanced patterns like Pipes and Filters, SEDA, and Fork/Join, enabling tasks to be interconnected, parallelized, and aggregated. Formicary distinguishes itself from other similar frameworks by supporting declarative job definitions, extensible execution, AuthN/AuthZ, artifacts management, quota management, caching and encryption, and advanced scheduling options including cron-based scheduling, task retries, and job prioritization, offer significant control over job execution. The resource management capabilities especially the dynamic allocation and monitoring of resources help to optimize task execution without overloading the system
Formicary‘s architecture supports a wide range of use cases from complex workflow orchestration across various environments to specific tasks like image processing pipelines, automated build/test/release workflows, scheduled data ETL jobs, and machine learning pipelines. Formicary supports advanced error handling and retry capabilities, essential for long-running and complex tasks. Its ability to handle complex, conditional workflows and scale according to demand makes it suitable for organizations with intricate processing requirements.


