Shahzad Bhatti Welcome to my ramblings and rants!

December 15, 2023

Implementing FIDO and WebAuthn based Multi-Factor Authentication

Filed under: Computing,Password management — admin @ 10:22 pm

Multi-Factor Authentication (MFA) or 2FA allows multiple method of authentication to verify the user’s identity. The authentication factors generally include something the user has such as security token, something the user knows such as password/PIN/OTP, and something the user is such as biometrics. There are many means for MFA including:

  • SMS-Based Verification: delivers one-time password (OTP) via text message but it is vulnerable to SIM swapping, interception, and phishing attacks.
  • TOTP: uses Authenticator Apps to generate Time-based One-Time Passwords but it requires a smartphone.
  • Push Notifications: provides more convenience but it is vulnerable for users to mistakenly approve malicious requests.
  • Hardware Security Keys (FIDO/U2F): offers more secure; resistant to phishing and man-in-the-middle attacks but requires carrying an additional device.
  • Biometrics: provides more convenient and secure authentication but can result in privacy and data security violations if implemented incorrectly.

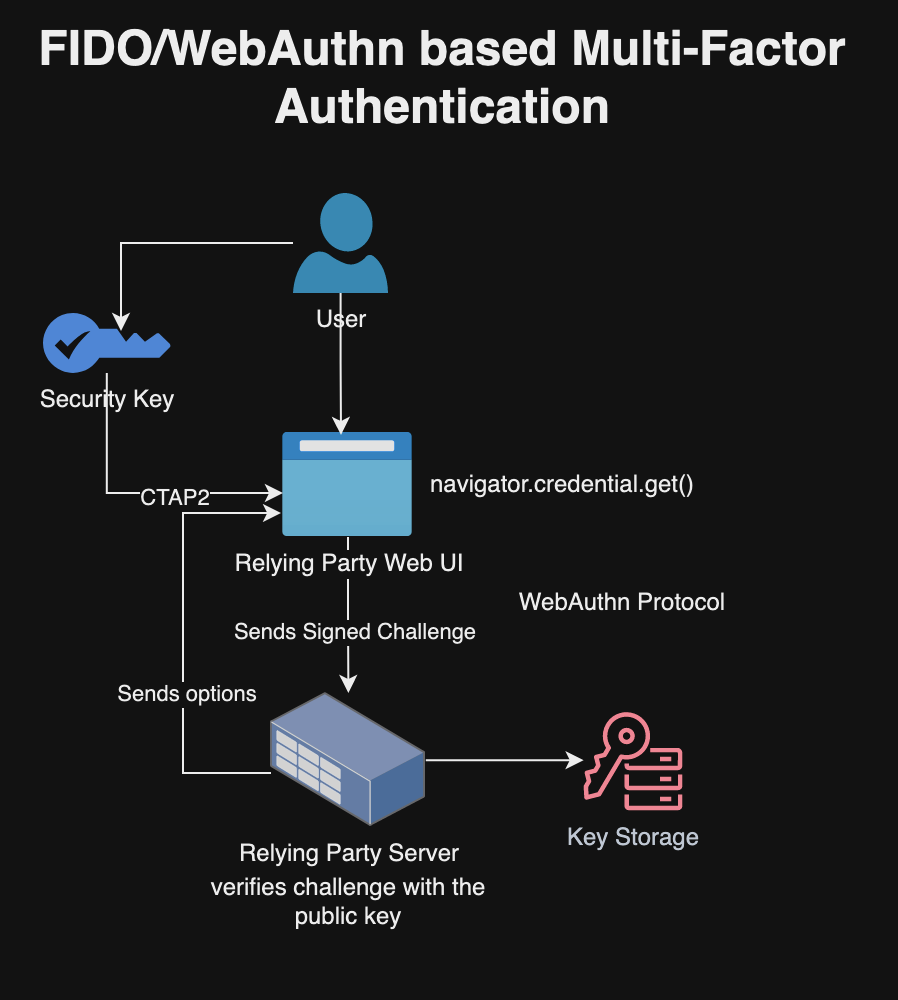
In our implementation, we will use the FIDO (Fast Identity Online) standards, along with CTAP (Client to Authenticator Protocol) and WebAuthn (Web Authentication). FIDO includes specifications like UAF (Universal Authentication Framework) for passwordless authentication and U2F (Universal 2nd Factor) for second-factor authentication. FIDO2 is an extension of the original FIDO standards that includes the CTAP (Client to Authenticator Protocol) and WebAuthn (Web Authentication). CTAP allows external devices to act as authenticators and WebAuthn is a web standard developed by the W3C for secure and passwordless authentication on the web. FIDO/CTAP/WebAuthn uses public key cryptography where the private key never leaves the user’s device and only the public key is stored on the server. This greatly reduces the risk of private key compromise or maintaining shared secrets, which is a common vulnerability in traditional password-based systems. This approach further protects against common attack vectors such as phishing, man-in-the-middle attacks, and data breaches where password databases are compromised. The FIDO/CTAP/WebAuthn uses unique assertions for each login session and device attestation that makes it extremely difficult for attackers to use stolen credentials or to replay an intercepted authentication session. In short, FIDO and WebAuthn provides better security based on public key cryptography, more resistant to phishing attacks, and offers better user experience with cross-platform compatibility compared to other forms of multi-factor authentication.

Registering key with FIDO/WebAuthn
Multi-factor Authenticating with FIDO/WebAuthn

Building Services and Web Client for Multi-Factor Authentication

Following implementation is based on my experience with building multi-factor authentication for PlexPass, which is an open source password manager. The PlexPass is built in Rust and provides web based UI along with CLI and REST APIs. In this implementation, the WebAuthn protocol is implemented using webauthn-rs library for multi-factor authentication. Here’s a general overview of how webauthn-rs can be added to a Rust application:

Add the Dependency:

First, you need to add webauthn-rs to your project’s Cargo.toml file:

[dependencies]
webauthn-rs = { version = "0.4", features = ["danger-allow-state-serialisation"] }

Configure the WebAuthn Environment:

You can then set up the WebAuthn environment with your application’s details, which includes the origin (the URL of your website), relying party name (your site’s name), and other configuration details as follows:

use webauthn_rs::prelude::*;

fn create_webauthn_config() -> WebauthnConfig {
    WebauthnConfigBuilder::new()
        .rp_name("My App".to_string())
        .rp_id("localhost") // Change for production
        .origin("https://localhost:8443") // Change for production
        .build()
        .unwrap()
}

let config = create_webauthn_config();
let webauthn = Webauthn::new(config);

You can view an actual example of this configuration in https://github.com/bhatti/PlexPass/blob/main/src/service/authentication_service_impl.rs.

Integrate with User Accounts:

WebAuthn should be integrated with your user account system and WebAuthn credentials should be associated user accounts upon registration and authentication. For example, here is a User object used by the PlexPass password manager:

pub struct User {
    // id of the user.
    pub user_id: String,
    // The username of user.
    pub username: String,
    ...
  
    // hardware keys for MFA via UI.
    pub hardware_keys: Option<HashMap<String, HardwareSecurityKey>>,
    // otp secret for MFA via REST API/CLI.
    pub otp_secret: String,
  
    // The attributes of user.
    pub attributes: Option<Vec<NameValue>>,
    pub created_at: Option<NaiveDateTime>,
    pub updated_at: Option<NaiveDateTime>,
}

Implementing Registration

When a user registers their device, first it will be registered and then associated with user account. Here is how PlexPass defines registration start method on the server side:

    // Start MFA registration
    async fn start_register_key(&self,
                                ctx: &UserContext,
    ) -> PassResult<CreationChallengeResponse> {
        let user = self.user_repository.get(ctx, &ctx.user_id).await?;
        // clear reg-state
        self.hsm_store.set_property(&ctx.username, WEBAUTHN_REG_STATE, "")?;
        // If the user has any other credentials, we exclude these here so they 
        // can't be duplicate registered.
        // It also hints to the browser that only new credentials should be 
        // "blinked" for interaction.
        let exclude_credentials = user.hardware_key_ids();

        let (ccr, reg_state) = self.webauthn.start_passkey_registration(
            Uuid::parse_str(&ctx.user_id)?, // user-id as UUID
            &ctx.username, // internal username
            &ctx.username, // display username
            exclude_credentials)?;
        // NOTE: We shouldn't sore reg_state in session because we are using cookies store.
        // Instead, we will store HSM for safe storage.
        let json_reg_state = serde_json::to_string(&reg_state)?;
        self.hsm_store.set_property(&ctx.username, WEBAUTHN_REG_STATE, &json_reg_state)?;
        Ok(ccr)
    }

The above implementation first loads user object from the database and clears any previous state of device registration. The PlexPass uses secure storage such as Keychain on Mac for storing registration state and though you may store registration state in the session but you shouldn’t use it if the session is actually stored in a cookie as that will be exposed to remote clients. In addition, the registration method finds device-ids of all existing devices so that we don’t register same device more than once. It then returns CreationChallengeResponse, which is used by the Web UI to prompt user to insert the security key. Here is example response from the above registration challenge:

{
  "publicKey": {
    "rp": {
      "name": "PlexPass-Webauthn",
      "id": "localhost"
    },
    "user": {
      "id": {
        "0": 130, "1": 244,...
      },
      "name": "myuser",
      "displayName": "my user"
    },
    "challenge": {
      "30": 197,"31": 221..
    },
    "pubKeyCredParams": [
      {
        "type": "public-key",
        "alg": -7
      },
      {
        "type": "public-key",
        "alg": -257
      }
    ],
    "timeout": 60000,
    "attestation": "none",
    "excludeCredentials": [],
    "authenticatorSelection": {
      "requireResidentKey": false,
      "userVerification": "preferred"
    },
    "extensions": {
      "uvm": true,
      "credProps": true
    }
  }
}

Client-Side Registration

On the client side (in the user’s browser), you can use the challenge to register the user’s authenticator, e.g.,

        const newCredential = await navigator.credentials.create(options);

For example, here is how PlexPass registers MFA key on the client side:

async function registerMFAKey() {
    try {
        let response = await fetch('/ui/webauthn/register_start');
        let options = await response.json();

        // Convert challenge from Base64URL to Base64, then to Uint8Array
        const challengeBase64 = base64UrlToBase64(options.publicKey.challenge);
        options.publicKey.challenge = Uint8Array.from(atob(challengeBase64), c => c.charCodeAt(0));

        // Convert user ID from Base64URL to Base64, then to Uint8Array
        const userIdBase64 = base64UrlToBase64(options.publicKey.user.id);
        options.publicKey.user.id = Uint8Array.from(atob(userIdBase64), c => c.charCodeAt(0));

        // Convert each excludeCredentials id from Base64URL to ArrayBuffer
        if (options.publicKey.excludeCredentials) {
            for (let cred of options.publicKey.excludeCredentials) {
                cred.id = base64UrlToArrayBuffer(cred.id);
            }
        }
      
        // Create a new credential
        const newCredential = await navigator.credentials.create(options);

        // Prepare data to be sent to the server
        const credentialForServer = {
            id: newCredential.id,
            rawId: arrayBufferToBase64(newCredential.rawId),
            response: {
                attestationObject: arrayBufferToBase64(newCredential.response.attestationObject),
                clientDataJSON: arrayBufferToBase64(newCredential.response.clientDataJSON)
            },
            type: newCredential.type
        };

        // Send the new credential to the server for verification and storage
        response = await fetch('/ui/webauthn/register_finish', {
            method: 'POST',
            headers: {'Content-Type': 'application/json'},
            body: JSON.stringify(credentialForServer)
        });
        let savedKey = await response.json();
        ...
    } catch (err) {
        console.error('Error during registration:', err);
    }
}

Note: The webauthn-rs library sends data in the Base64-URL format instead of Base64 so the javascript code provides conversion. Here is an example of the transformation logic:

function arrayBufferToBase64(buffer) {
    let binary = '';
    let bytes = new Uint8Array(buffer);
    let len = bytes.byteLength;
    for (let i = 0; i < len; i++) {
        binary += String.fromCharCode(bytes[i]);
    }
    return window.btoa(binary);
}

function base64UrlToBase64(base64Url) {
    // Replace "-" with "+" and "_" with "/"
    let base64 = base64Url.replace(/-/g, '+').replace(/_/g, '/');
    // Pad with "=" to make the length a multiple of 4 if necessary
    while (base64.length % 4) {
        base64 += '=';
    }
    return base64;
}

function base64UrlToArrayBuffer(base64url) {
    var padding = '='.repeat((4 - base64url.length % 4) % 4);
    var base64 = (base64url + padding)
        .replace(/\-/g, '+')
        .replace(/_/g, '/');

    var rawData = window.atob(base64);
    var outputArray = new Uint8Array(rawData.length);

    for (var i = 0; i < rawData.length; ++i) {
        outputArray[i] = rawData.charCodeAt(i);
    }
    return outputArray.buffer;
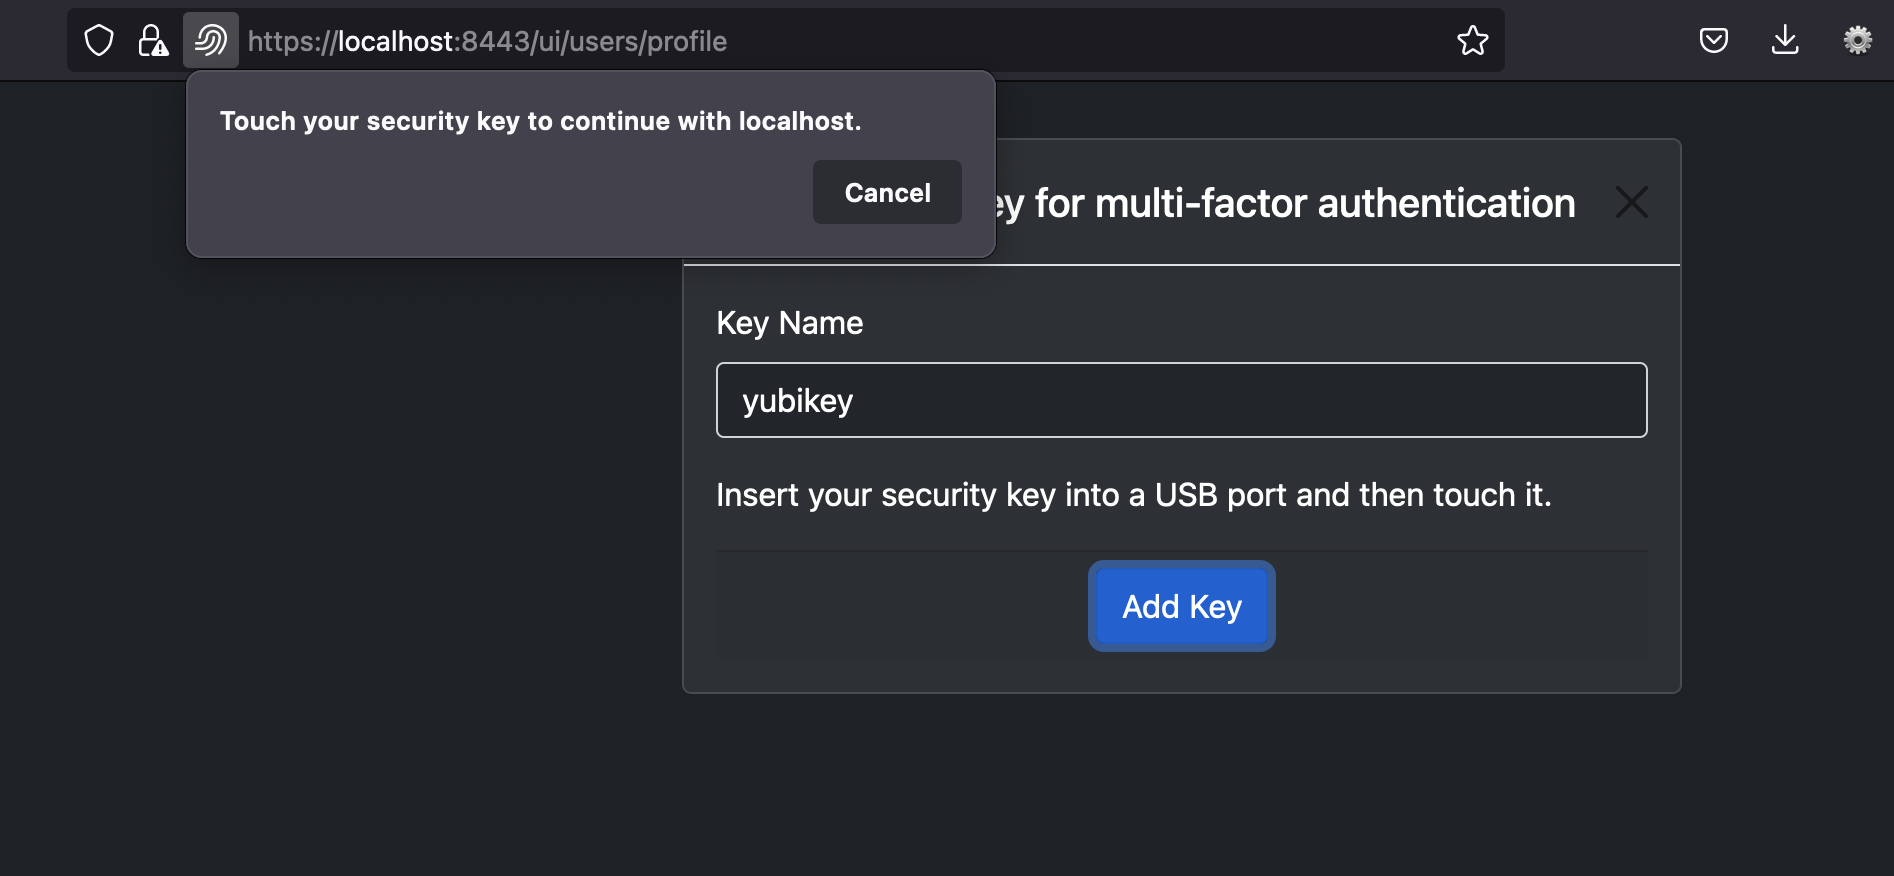
}

The Web client in above example asks user to insert the security key and then sends attestation to the server. For example, here is screenshot in PlexPass application for prompting user to add security key:

MFA Registration

Here is an example of response from Web client:

{
  "id": "tMV..",
  "rawId": "tMVM..PJA==",
  "response": {
    "attestationObject": "o2Nm...JFw==",
    "clientDataJSON": "eyJja...ifQ=="
  },
  "type": "public-key"
}

Verify Registration Response

The server side then verifies attestation and then adds security key so that user can be prompted to insert security key upon authentication. Here is how PlexPass defines registration finish method on the server side:

    // Finish MFA registration ad returns user
    async fn finish_register_key(&self,
                                 ctx: &UserContext,
                                 key_name: &str,
                                 req: &RegisterPublicKeyCredential,
		) -> PassResult<HardwareSecurityKey> {
        let reg_state_str = self.hsm_store.get_property(&ctx.username, WEBAUTHN_REG_STATE)?;
        if reg_state_str.is_empty() {
            return Err(PassError::authentication("could not find webauthn registration key"));
        }
        let reg_state: PasskeyRegistration = serde_json::from_str(&reg_state_str)?;
        self.hsm_store.set_property(&ctx.username, WEBAUTHN_REG_STATE, "")?;

        let sk = self.webauthn.finish_passkey_registration(req, &reg_state)?;
        let mut user = self.user_repository.get(ctx, &ctx.user_id).await?;
        let hardware_key = user.add_security_key(key_name, &sk);
        self.user_repository.update(ctx, &user).await?;
        Ok(hardware_key)
    }

In above example, the server side extracts registration state from Keychain and then invokes finish_passkey_registration of webauthn-rs library using registration state and client side attestation. The hardware keys are then added to the user object and saved in the database. PlexPass encrypts user object in the database based on user’s password so all security keys are safeguarded against unauthorized access.

Fallback Mechanisms

When registering security keys for multi-factor authentication, it’s recommended to implement fallback authentication methods for scenarios where the user’s security key is unavailable. For example, PlexPass generates a recovery code that can be used to reset multi-factor authentication in case the security key is lost as displayed below:

Implementing Authentication

When a user attempts to log in, the server side recognizes that user has configured multi-facor authentication, generate an authentication challenge and then directed to a web page to prompt user to insert the security key. Here is how PlexPass defines authentication start authentication method on the server side:

    // Start authentication with MFA
    async fn start_key_authentication(&self,
                                      ctx: &UserContext,
    ) -> PassResult<RequestChallengeResponse> {
        // clear reg-state
        self.hsm_store.set_property(&ctx.username, WEBAUTHN_AUTH_STATE, "")?;
        let user = self.user_repository.get(ctx, &ctx.user_id).await?;

        let allow_credentials = user.get_security_keys();
        if allow_credentials.is_empty() {
            return Err(PassError::authentication("could not find webauthn keys"));
        }

        let (rcr, auth_state) = self.webauthn
            .start_passkey_authentication(&allow_credentials)?;

        // Note: We will store auth-state in HSM as we use cookie-store for session.
        let json_auth_state = serde_json::to_string(&auth_state)?;
        self.hsm_store.set_property(&ctx.username, WEBAUTHN_AUTH_STATE, &json_auth_state)?;

        Ok(rcr)
    }

In above example, the server side loads user object from the database, extracts security keys, and uses start_passkey_authentication method of webauthn-rs library to create authentication challenge.

Note: The server side saves authentication state in secure storage similar to the registration state so that it’s safeguarded against unauthorized access.

Client-Side Authentication

The client side prompts user to insert the key with following Javascript code:

async function signinMFA(options) {
    try {
        // Convert challenge from Base64URL to ArrayBuffer
        options.publicKey.challenge = base64UrlToArrayBuffer(options.publicKey.challenge);

        // Convert id from Base64URL to ArrayBuffer for each allowed credential
        if (options.publicKey.allowCredentials) {
            for (let cred of options.publicKey.allowCredentials) {
                cred.id = base64UrlToArrayBuffer(cred.id);
            }
        }

        // Request an assertion
        const assertion = await navigator.credentials.get(options);

        console.log(JSON.stringify(assertion))
        // Send the assertion to the server for verification
        let response = await doFetch('/ui/webauthn/login_finish', {
            method: 'POST',
            headers: {'Content-Type': 'application/json'},
            body: JSON.stringify(assertion)
        });
      ...
    } catch (err) {
        console.error('Error during authentication:', err);
    }
}

The authentication options from the server looks like:

{
  "publicKey": {
    "challenge": {},
    "timeout": 60000,
    "rpId": "localhost",
    "allowCredentials": [
      {
        "type": "public-key",
        "id": {}
      }
    ],
    "userVerification": "preferred"
  }
}

The client UI prompts user to insert the key and then sends a response with signed challenge such as:

{
  "authenticatorAttachment": "cross-platform",
  "clientExtensionResults": {},
  "id": "hR..",
  "rawId": "hR..",
  "response": {
    "authenticatorData": "SZ..",
    "clientDataJSON": "ey...",
    "signature": "ME..0"
  },
  "type": "public-key"
}

Verify Authentication Response

The server then verifies signed challenge to authenticate the user. Here is an example of authentication business logic based on PlexPass application:

    // Finish MFA authentication
    async fn finish_key_authentication(&self,
                                       ctx: &UserContext,
                                       session_id: &str,
                                       auth: &PublicKeyCredential) -> PassResult<()> {
        let auth_state_str = self.hsm_store.get_property(&ctx.username, WEBAUTHN_AUTH_STATE)?;
        if auth_state_str.is_empty() {
            return Err(PassError::authentication("could not find webauthn auth key"));
        }
        self.hsm_store.set_property(&ctx.username, WEBAUTHN_AUTH_STATE, "")?;
        let auth_state: PasskeyAuthentication = serde_json::from_str(&auth_state_str)?;

        let auth_result = self.webauthn.finish_passkey_authentication(auth, &auth_state)?;
        let mut user = self.user_repository.get(ctx, &ctx.user_id).await?;

        user.update_security_keys(&auth_result);
        self.user_repository.update(ctx, &user).await?;
        let _session = self.login_session_repository.mfa_succeeded(&ctx.user_id, session_id)?;
        Ok(())
    }

The server side loads authentication state from secure storage and user object from the database. It then uses finish_passkey_authentication method of webauthn-rs library to validate signed challenge and updates user object and user-session so that user can proceed with full access to the application.

Multi-Factor Authentication with Command-Line and REST APIs

The PlexPass password manager uses Time-based One-Time Passwords (TOTP) for adding multi-factor authentication to the command-line access and REST APIs. This also means that users can reset security keys using CLI and APIs with the recovery code. A base32 based TOTP code is automatically generated when a user registers, which is accessible via WebUI, CLI or REST APIs. Here is an example of using multi-factor authentication with CLI:

otp=`plexpass -j true generate-otp --otp-secret DA**|jq '.otp_code'`
plexpass -j true --master-username charlie --master-password *** \
	--otp-code $otp reset-multi-factor-authentication --recovery-code D**

Summary

In summary, FIDO, CTAP, and WebAuthn represent a major leap forward in Multi-Factor Authentication (MFA), effectively addressing several vulnerabilities of traditional authentication methods. These protocols bolster security using cryptographic techniques and minimize the reliance on shared secrets, enhancing both security and user experience. However, a notable gap exists in readily available resources and comprehensive examples, particularly in integrating these standards. This gap was evident when I incorporated MFA into the PlexPass password manager using the webauthn-rs Rust library. While it offered server-side sample code, the absence of corresponding client-side JavaScript examples posed a lot of challenges for me. By sharing my experiences and learnings, I hope to facilitate wider adoption of FIDO/CTAP/WebAuthn standards, given their superior security capabilities.

December 11, 2023

When Caching is not a Silver Bullet

Filed under: Computing — admin @ 2:25 pm

Caching is often considered a “silver bullet” in software development due to its immediate and significant impact on the performance and scalability of applications. The benefits of caching include:

  1. Immediate Performance Gains: Caching can drastically reduce response times by storing frequently accessed data in memory, avoiding the need for slower database queries.
  2. Reduced Load on Backend Systems: By serving data from the cache particularly during traffic spikes, the load on backend services and databases is reduced, leading to better performance and potentially lower costs.
  3. Improved User Experience: Faster data retrieval leads to a smoother and more responsive user experience, which is crucial for customer satisfaction and retention.
  4. Scalability: Caching can help an application scale by handling increased load by distributing it across multiple cache instances without a proportional increase in backend resources.
  5. Availability: In cases of temporary outages or network issues, a cache can serve stale data, enhancing system availability.

However, implementing cache properly requires understanding many aspects such as caching strategies, caching locality, eviction policies and other challenges that are described below:

1. Caching Strategies

Following is a list of common caching strategies:

1.1 Cache Aside (Lazy Loading)

In a cache-aside strategy, data is loaded into the cache only when needed, in a lazy manner. Initially, the application checks the cache for the required data. In the event of a cache miss, it retrieves the data from the database or another data source and subsequently fills the cache with the response from the data server. This approach is relatively straightforward to implement and prevents unnecessary cache population. However, it places the responsibility of maintaining cache consistency on the application and results in increased latencies and cache misses during the initial access.

cache-aside
use std::collections::HashMap;

let mut cache = HashMap::new();
let key = "data_key";

if !cache.contains_key(key) {
    let data = load_data_from_db(key); // Function to load data from the database
    cache.insert(key, data);
}

let result = cache.get(key);

1.2 Read-Through Cache

In this strategy, the cache sits between the application and the data store. When a read occurs, if the data is not in the cache, it is retrieved from the data store and then returned to the application while also being stored in the cache. This approach simplifies application logic for cache management and cache consistency. However, initial reads may lead to higher latencies due to cache misses and cache may store unused data.

read-through cache
fn get_data(key: &str, cache: &mut HashMap<String, String>) -> String {
    cache.entry(key.to_string()).or_insert_with(|| {
        load_data_from_db(key) // Load from DB if not in cache
    }).clone()
}

1.3 Write-Through Cache

In this strategy, data is written into the cache, which then updates the data store simultaneously. This ensures data consistency and provides higher efficiency for write-intensive applications. However, it may cause higher latency due to synchronously writing to both cache and the data store.

write-through cache
fn write_data(key: &str, value: &str, cache: &mut HashMap<String, String>) {
    cache.insert(key.to_string(), value.to_string());
    write_data_to_db(key, value); // Simultaneously write to DB
}

1.4 Write-Around Cache

In this strategy, data is written directly to the data store, bypassing the cache. This approach is used to prevent the cache from being flooded with write-intensive operations and provides higher performance for applications that require less frequent reads. However, it may result in higher read latencies due to cache misses.

write-around cache
fn write_data(key: &str, value: &str, cache: &mut HashMap<String, String>) {
    // Write directly to DB, bypass cache
    write_data_to_db(key, value);
}

1.5 Write-Back (Write-Behind) Cache

In this approach, data is first written to the cache and then, after a certain interval or condition, written to the data store. This reduces the latency of write operations and load on the data store. However, it may result in data loss if cache fails before the data is persisted in the data store. In addition, it adds more complexity to ensure data consistency and durability.

write-behind cache
use std::collections::HashMap;
use std::thread;
use std::time::Duration;

fn write_data(key: &str, value: &str, cache: &mut HashMap<String, String>) {
    cache.insert(key.to_string(), value.to_string());
    
    // An example of asynchronous write to data store.
    thread::spawn(move || {
        thread::sleep(Duration::from_secs(5)); // Simulate delayed write
        write_data_to_db(key, value);
    });
}

1.6 Comparison of Caching Strategies

Following is comparison summary of above caching strategies:

  • Performance: Write-back and write-through provide good performance for write operations but at the risk of data consistency (write-back) or increased latency (write-through). Cache-aside and read-through are generally better for read operations.
  • Data Consistency: Read-through and write-through are strong in maintaining data consistency, as they ensure synchronization between the cache and the data store.
  • Complexity: Cache-aside requires more application-level management, while read-through and write-through can simplify application logic but may require more sophisticated cache solutions.
  • Use Case Suitability: The choosing right caching generally depends on the specific needs of the application, such as whether it is read or write-intensive, and the tolerance of data consistency versus performance.

2. Cache Eviction Strategies

Cache eviction strategies are crucial for managing cache memory, especially when the cache is full and new data needs to be stored. Here are some common cache eviction strategies:

2.1 Least Recently Used (LRU)

LRU removes the least recently accessed items first with assumption that items accessed recently are more likely to be accessed again. This is fairly simple and effective strategy but requires tracking access times and may not be suitable for some use-cases.

2.2 First In, First Out (FIFO)

FIFO evicts the oldest items first, based on when they were added to the cache. This strategy is easy to implement and offers a fair strategy by assigning same lifetime to each item. However, it does not account for frequency or recency of the item in cache so it may lead to lower cache hit rate.2.3

2.3 Least Frequently Used (LFU)

LFU removes items that are used least frequently by counting how often an item is accessed. It is useful for use-cases where some items are accessed more frequently but requires tracking frequency of access.

2.4 Random Replacement (RR)

RR randomly selects a cache item to evict. This method is straightforward to implement but it may remove important frequently or recently used items, leading to a lower hit rate and unpredictability of cache performance.

2.5 Time To Live (TTL)

In this strategy, items are evicted based on a predetermined time-to-live. After an item has been in the cache for the specified duration, it is automatically evicted. It is useful for data that becomes stale after a certain period but it does not consider item’s access frequency or recency.

2.6 Most Recently Used (MRU)

It is opposite of LRU and evicts the most recently used items. It may be effective for certain use-cases but leads to poor performance for most common use-cases.

and does not require keeping track of access patterns.

2.7 Comparison of Cache Eviction Strategies

  • Adaptability: LRU and LFU are generally more adaptable to different access patterns compared to FIFO or RR.
  • Complexity vs. Performance: LFU and LRU tend to offer better cache performance but are more complex to implement. RR and FIFO are simpler but might not offer optimal performance.
  • Specific Scenarios: The choosing right eviction strategy generally depends on the specific access patterns of the application.

3. Cache Consistency

Cache consistency refers to ensuring that all copies of data in various caches are the same as the source of truth. Keeping data consistent across all caches can incur significant overhead, especially in distributed environments. There is often a trade-off between consistency and latency; stronger consistency can lead to higher latency. Here is list of other concepts related to cache consistency:

3.1 Cache Coherence

Cache coherence is related to consistency but usually refers to maintaining a uniform state of cached data in a distributed system. Maintaining cache coherence can be complex and resource-intensive due to communication between nodes and requires proper concurrency control to handle concurrent read/write operations.

3.2 Cache Invalidation

Cache invalidation involves removing or marking data in the cache as outdated when the corresponding data in the source changes. Invalidation can become complicated if cached objects have dependencies or relationships. Other tradeoffs include deciding whether to invalidate cache entries that may lead to cache misses or update them in place, which may be more complex.

3.3 Managing Stale Data

Stale data occurs when cached data is out of sync with the source. Managing stale data involves strategies to minimize the time window during which stale data might be served. Different data might have different rates of change, requiring varied approaches to managing staleness.

3.4 Thundering Herd Problem

The thundering herd problem occurs when many clients try to access a cache item that has just expired or been invalidated, causing all of them to hit the backend system simultaneously. A variant of this problem is the cache stampede, where multiple processes attempt to regenerate the cache concurrently after a cache miss.

3.5 Comparison of Cache Consistency Approaches

  • Write Strategies: Write-through vs. write-back caching impact consistency and performance differently. Write-through improves consistency but can be slower, while write-back is faster but risks data loss and consistency issues.
  • TTL and Eviction Policies: Time-to-live (TTL) settings and eviction policies can help manage stale data but require careful tuning based on data access patterns.
  • Distributed Caching Solutions: Technologies like distributed cache systems (e.g., Redis, Memcached) offer features to handle these challenges but come with their own complexities.
  • Event-Driven Invalidation: Using event-driven architectures to trigger cache invalidation can be effective but requires a well-designed message system.

4. Cache Locality

Cache locality refers to how data is organized and accessed in a cache system, which can significantly impact the performance and scalability of applications. There are several types of cache locality, each with its own set of tradeoffs and considerations:

4.1 Local/On-Server Caching

Local caching refers to storing data in memory on the same server or process that is running the application. It allows fast access to data as it doesn’t involve network calls or external dependencies. However, the cache size is limited by the server’s memory capacity and it is difficult to maintain consistency in distributed systems since each instance has its own cache without shared state. Other drawbacks include coldstart due to empty cache on server restart and lack of BulkHeads barrier because it takes memory away from the application server, which may cause application failure.

4.2 External Caching

External caching involves storing data on a separate server or service, such as Redis or Memcached. It can handle larger datasets as it’s not limited by the memory of a single server and offers shared state for multiple instances in distributed system. However, it is slower than local caching due to network latency and requires managing and maintaining separate caching infrastructure. Another drawback is that unavailability of external cache can result in higher load on the datastore and may cause cascading failure.

4.3 Inline Caching

Inline caching embeds caching logic directly in the application code, where data retrieval occurs. A key difference between inline and local caching is that local caching focuses on the cache being in the same physical or virtual server, while inline caching emphasizes the integration of cache logic directly within the application code. However, inline caching can make the application code more complex, tightly coupled and harder to maintain.

4.4 Side Caching

Side caching involves a separate service or layer that the application interacts with for cached data, often implemented as a microservice. It separates caching concerns from application logic. However, it requires managing an additional component. It differs from external caching as external caching is about a completely independent caching service that can be used by multiple different applications.

4.5 Combination of Local and External Cache

When dealing with the potential unavailability of an external cache, which can significantly affect the application’s availability and scalability as well as the load on the dependent datastore, a common approach is to integrate external caching with local caching. This strategy allows the application to fall back to serving data from the local cache, even if it might be stale, in case the external cache becomes unavailable. This requires setting maximum threshold for serving stale data besides setting expiration TTL for the item. Additionally, other remediation tactics such as load shedding and request throttling can be employed.

4.5 Comparison of Cache Locality

  • Performance vs. Scalability: Local caching is faster but less scalable, while external caching scales better but introduces network latency.
  • Complexity vs. Maintainability: Inline caching increases application complexity but offers precise control, whereas side caching simplifies the application but requires additional infrastructure management.
  • Suitability: Local and inline caching are more suited to applications with specific, high-performance requirements and simpler architectures. In contrast, external and side caching are better for distributed, scalable systems and microservices architectures.
  • Flexibility vs. Control: External and side caching provide more flexibility and are easier to scale and maintain. However, they offer less control over caching behavior compared to local and inline caching.

5. Monitoring, Metrics and Alarms

Monitoring a caching system effectively requires tracking various metrics to ensure optimal performance, detect failures, and identify any misbehavior or inefficiencies. Here are key metrics, monitoring practices, and alarm triggers that are typically used for caching systems:

5.1 Key Metrics for Caching Systems

  1. Hit Rate: The percentage of cache read operations that were served by the cache.
  2. Miss Rate: The percentage of cache read operations that required a fetch from the primary data store.
  3. Eviction Rate: The rate at which items are removed from the cache.
  4. Latency: Measures the time taken for cache read and write operations.
  5. Cache Size and Usage: Monitoring the total size of the cache and how much of it is being used helps in capacity planning and detecting memory leaks.
  6. Error Rates: The number of errors encountered during cache operations.
  7. Throughput: The number of read/write operations handled by the cache per unit of time.
  8. Load on Backend/Data Store: Measures the load on the primary data store, which can decrease with effective caching.

5.2 Monitoring and Alarm Triggers

By continuously monitoring, alerts can be configured for critical metrics thresholds, such as very low hit rates, high latency, or error rates exceeding a certain limit. These metrics help with capacity planning by observing high eviction rates along with a high utilization of cache size. Alarm can be triggered if error rates spike suddenly. Similarly, a significant drop in hit rate might indicate cache inefficiency or changing data access patterns.

6. Other Caching Considerations

In addition to the caching strategies, eviction policies, and data locality discussed earlier, there are several other important considerations that need special attention when designing and implementing a caching system:

6.1 Concurrency Control

A reliable caching approach requires handling simultaneous read and write operations in a multi-threaded or distributed environment while ensuring data integrity and avoiding data races.

6.2 Fault Tolerance and Recovery

The caching system should be resilient to failures and should be easy to recover from hardware or network failures without significant impact on the application.

6.3 Scalability

As demand increases, the caching system should scale appropriately. This could involve scaling out (adding more nodes) or scaling up (adding resources to existing nodes).

6.3 Security

When caching sensitive data, security aspects such as encryption, access control, and secure data transmission become critical.

6.4 Ongoing Maintenance

The caching system requires ongoing maintenance and tweaking based on monitoring cache hit rates, performance metrics, and operational health.

6.5 Cost-Effectiveness

The cost of implementing and maintaining the caching system should be weighed against the performance and scalability benefits it provides.

6.6 Integration with Existing Infrastructure

The caching solution requires integration the existing technology stack, thus it should not require extensive changes to current systems.

6.7 Capacity Planning

The caching solution proper planning regarding the size of the cache and hardware resources based on monitoring eviction rates, latency and operational health.

6.8 Cache Size

Cache size plays a critical role in the performance and scalability of applications. A larger cache can store more data, potentially increasing the likelihood of cache hits. However, this relationship plateaus after a certain point; beyond an optimal size, the returns in terms of hit rate improvement diminish. While a larger cache can reduce the number of costly trips to the primary data store but too large cache can increase lookup cost and consume more memory. Finding optimal cache size requires careful analysis of the specific use case, access patterns, and the nature of the data being cached.

6.9 Encryption

For sensitive data, caches may need to implement encryption, which can add overhead and complexity.

6.10 Data Volatility

Highly dynamic data might not benefit as much from caching or may require frequent invalidation, impacting cache hit rates.

6.11 Hardware

The underlying hardware (e.g., SSDs vs. HDDs, network speed) can significantly impact the performance of external caching solutions.

6.12 Bimodal Behavior

The performance of caching can vary significantly between hits and misses, leading to unpredictable performance (bimodal behavior).

6.13 Cache Warming

In order to avoid higher latency for first time due to cache misses, applications may populate the cache with data before it’s needed, which can add additional complexity especially determining what data to preload.

6.14 Positive and Negative Caching

Positive caching involves storing the results of successful query responses. On the other hand, negative caching involves storing the information about the non-existence or failure of a requested data. Negative caching can be useful if a client is misconfigured to access non-existing data, which may result in higher load on the data source. It is critical to set an appropriate TTL (time-to-live) for negative cache entries so that it doesn’t delay the visibility of new data; too short. In addition, negative caching requires timely cache invalidation to handle changes in data availability.

6.15 Asynchronous Cache Population and Background Refresh

Asynchronous cache population involves updating or populating the cache in a non-blocking manner. Instead of the user request waiting for the cache to be populated, the data is fetched and stored in the cache asynchronously. Background refresh periodically refreshing cached data in the background before it becomes stale or expires. This allows system to handle more requests as cache operations do not block user requests but it adds more complexity for managing the timing and conditions under which the cache is populated asynchronously.

6.16 Prefetching and Cache Warming

Prefetching involves loading data into the cache before it is actually requested, based on predicted future requests so that overall system efficiency is improved. Cache warming uses the process of pre-loading to populate the data immediately after the cache is created or cleared.

6.17 Data Format and Serialization

When using an external cache in a system that undergoes frequent updates, data format and serialization play a crucial role in ensuring compatibility, particularly for forward and backward-compatible changes. The choice of serialization format (e.g., JSON, XML, Protocol Buffers) can impact forward and backward compatibility. Incorrect handling of data formats can lead to corruption, especially if an older version of an application cannot recognize new fields or different data structures upon rollbacks. The caching system is recommended to include a version number in the cached data schema, testing for compatibility, clearing or versioning cache on rollbacks, and monitoring for errors.

6.18 Cache Stampede

This occurs when a popular cache item expires, and numerous concurrent requests are made for this data, causing a surge in database or backend load.

6.19 Memory Leaks

Improper management of cache size can lead to memory leaks, where the cache keeps growing and consumes all available memory.

6.20 Cache Poisoning

In cases where the caching mechanism is not well-secured, there’s a risk of cache poisoning, where incorrect or malicious data gets cached. This can lead to serving inappropriate content to users or even security breaches.

6.21 Soft and Hard TTL with Periodic Refresh

If a periodic background refresh meant to update a cache fails to retrieve data from the source, there’s a risk that the cache may become invalidated. However, there are scenarios where serving stale data is still preferable to having no data. In such cases, implementing two distinct TTL (Time To Live) configurations can be beneficial: a ‘soft’ TTL, upon which a refresh is triggered without invalidating the cache, and a ‘hard’ TTL, which is longer and marks the point at which the cache is actually invalidated.

7. Production Outages

Due to complexity of managing caching systems, it can also lead to significant production issues and outages when not implemented or managed correctly. Here are some notable examples of outages or production issues caused by caching:

7.1 Public Outages

  • In 2010, Facebook experienced a notable issue where an error in their caching layer caused the site to slow down significantly. This problem was due to cache stampede where a feedback loop created in their caching system, which led to an overload of one of their databases.
  • In 2017, GitLab once faced an incident where a cache invalidation problem caused users to see wrong data. The issue occurred due to the caching of incorrect user data, leading to a significant breach of data privacy as users could view others’ private repositories.
  • In 2014, Reddit has experienced several instances of downtime related to its caching layer. In one such instance, an issue with the caching system led to an outage where users couldn’t access the site.
  • In 2014, Microsoft Azure’s storage service faced a significant outage, which was partly attributed to a caching bug introduced in an update. The bug affected the Azure Storage front-ends and led to widespread service disruptions.

7.2 Work Projects

Following are a few examples of caching related problems that I have experienced at work:

  • Caching System Overload Leading to Downtime: In one of the cloud provider system at work, we experienced an outage because the caching infrastructure was not scaled to handle sudden spikes in traffic and the timeouts for connecting to the caching server was set too high. This led to high request latency and cascading failure that affected the entire application.
  • Memory Leak in Caching Layer: When working at a retail trading organization that cached quotes used an embedded caching layer, which had a memory leak that led to server crash and was fixed by periodic server bounce because the root cause couldn’t be determined due to a huge monolithic application.
  • Security and Encryption: Another system at work, we cached credentials in an external cache, which were stored without any encryption and exposed an attack vector to execute actions on behalf of customers. This was discovered during a different caching related issue and the system removed the use of external cache.
  • Cache Poisoning with Delayed Visibility: In one of configuration system that employed caching with very high expiration time, an issue arose when an incorrect configuration was deployed. The error in the new configuration was not immediately noticed because the system continued to serve the previous, correct configuration from the cache due to its long expiration period.
  • Rollbacks and Patches: In one of system, a critical update was released to correct erroneous graph data, but users continued to encounter the old graphs because the cached data could not be invalidated.
  • BiModal Logic: Implementing an application-based caching strategy introduces the necessity to manage cache misses and cache hydration. This addition creates a bimodal complexity within the system, characterized by varying latency. Moreover, such a strategy can obscure issues like race conditions and data-store failures, making them harder to detect and resolve.
  • Thundering Herd and Cache Stampede: In a number of systems, I have observed a variant of thundering herd and cache stampede problems where a server restart cleared all cache that caused cold cache problem, which then turns into thundering herd when clients start making requests.
  • Unavailability of Caching servers: In several systems that depend on external caching, there have been instances of performance degradation observed when the caching servers either become unavailable or are unable to accommodate the demand from users.
  • Stale Data: In one particular system, an application was using an deprecated client library for an external caching server. This older version of the library erroneously returned expired data, instead of properly expiring it in the cache. To address this issue, timestamps were added to the cached items, allowing the application to effectively identify and handle stale data.
  • Load and Performance Testing: During load or performance testing, I’ve noticed that caching was not factored into the process, which obscured important metrics. Therefore, it’s critical to either account for the cache’s impact or disable it during testing, especially when the objective is to accurately measure requests to the underlying data source.

Summary

In summary, caching stands out as an effective method to enhance performance and scalability, yet it demands thoughtful strategy selection and an understanding of its complexities. The approach must navigate challenges such as maintaining data consistency and coherence, managing cache invalidation, handling the complexities of distributed systems, ensuring effective synchronization, and addressing issues related to stale data, warm-up periods, error management, and resource utilization. Tailoring caching strategies to fit the unique requirements and constraints of your application and infrastructure is crucial for its success.

Effective cache management, precise configuration, and rigorous testing are pivotal, particularly in expansive, distributed systems. These practices play a vital role in mitigating risks commonly associated with caching, such as memory leaks, configuration errors, overconsumption of resources, and synchronization hurdles. In short, caching should be considered as a solution only when other approaches are inadequate, and it should not be hastily implemented as a fix at the first sign of performance issues without a thorough understanding of the underlying cause. It’s crucial to meticulously evaluate the potential challenges mentioned previously before integrating a caching layer, to genuinely enhance the system’s efficiency, scalability, and reliability.

Powered by WordPress