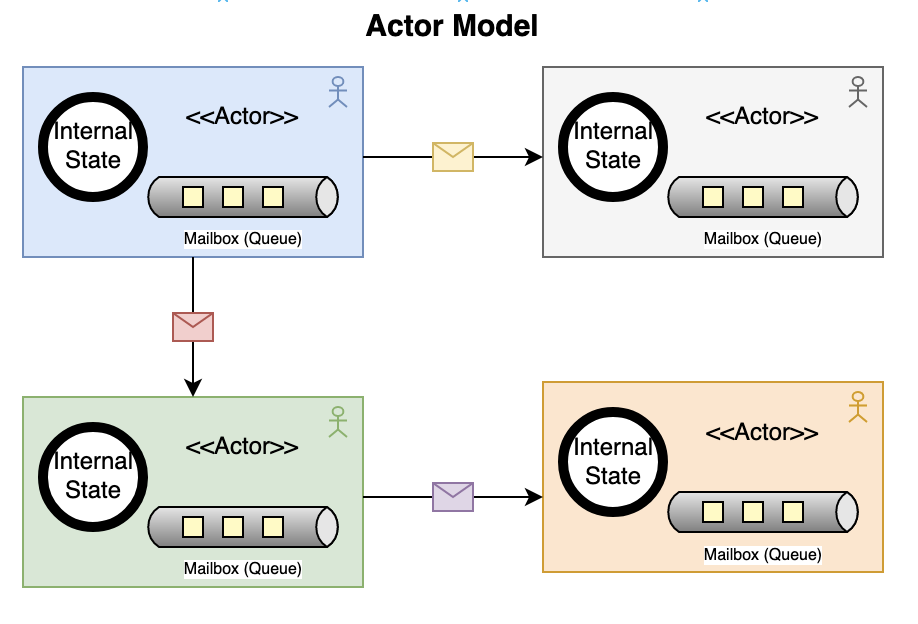
Over the years, I have seen countless production issues due to improper transaction management. A typical example: an API requires changes to multiple database tables, and each update is wrapped in different methods without proper transaction boundaries. This works fine when everything goes smoothly, but due to database constraints or other issues, a secondary database update might fail. In too many cases, the code doesn’t handle proper rollback and just throws an error—leaving the database in an inconsistent state.
In other cases, I’ve debugged production bugs due to improper coordination between database updates and event queues, where we desperately needed atomic behavior. I used J2EE in the late 1990s and early 2000s, which provided support for two-phase commit (2PC) to coordinate multiple updates across resources. However, 2PC wasn’t a scalable solution. I then experimented with aspect-oriented programming like AspectJ to handle cross-cutting concerns like transaction management, but it resulted in more complex code that was difficult to debug and maintain.
Later, I moved to Java Spring, which provided annotations for transaction management. This was both efficient and elegant—the @Transactional annotation made transaction boundaries explicit without cluttering business logic. When I worked at a travel booking company where we had to coordinate flight reservations, hotel bookings, car rentals, and insurance through various vendor APIs, I built a transaction framework based on the command pattern and chain of responsibility. This worked well for issuing compensating transactions when a remote API call failed midway through our public API workflow.
However, when I moved to Go and Rust, I found a lack of these basic transaction management primitives. I often see bugs in Go and Rust codebases that could have been caught earlier—many implementations assume the happy path and don’t properly handle partial failures or rollback scenarios.
In this blog, I’ll share learnings from my experience across different languages and platforms. I’ll cover best practices for establishing proper transaction boundaries, from single-database ACID transactions to distributed SAGA patterns, with working examples in Java/Spring, Go, and Rust. The goal isn’t just to prevent data corruption—it’s to build systems you can reason about, debug, and trust.
The Happy Path Fallacy
Most developers write code assuming everything will work perfectly. Here’s a typical “happy path” implementation:
// This looks innocent but is fundamentally broken
public class OrderService {
    public void processOrder(Order order) {
        orderRepository.save(order);           // What if this succeeds...
        paymentService.chargeCard(order);      // ...but this fails?
        inventoryService.allocate(order);      // Now we have inconsistent state
        emailService.sendConfirmation(order);  // And this might never happen
    }
}
The problem isn’t just that operations can fail—it’s that partial failures leave your system in an undefined state. Without proper transaction boundaries, you’re essentially playing Russian roulette with your data integrity. In my experience analyzing production systems, I’ve found that most data corruption doesn’t come from dramatic failures or outages. It comes from these subtle, partial failures that happen during normal operation. A network timeout here, a service restart there, and suddenly your carefully designed system is quietly hemorrhaging data consistency.
Transaction Fundamentals
Before we dive into robust transaction management in our applications, we need to understand what databases actually provide and how they achieve consistency guarantees. Most developers treat transactions as a black box—call BEGIN, do some work, call COMMIT, and hope for the best. But understanding the underlying mechanisms is crucial for making informed decisions about isolation levels, recognizing performance implications, and debugging concurrency issues when they inevitably arise in production. Let’s examine the foundational concepts that every developer working with transactions should understand.
The ACID Foundation
Before diving into implementation patterns, let’s establish why ACID properties matter:
- Atomicity: Either all operations in a transaction succeed, or none do
- Consistency: The database remains in a valid state before and after the transaction
- Isolation: Concurrent transactions don’t interfere with each other
- Durability: Once committed, changes survive system failures
These aren’t academic concepts—they’re the guardrails that prevent your system from sliding into chaos. Let’s see how different languages and frameworks help us maintain these guarantees.
Isolation Levels: The Hidden Performance vs Consistency Tradeoff
Most developers don’t realize that their database isn’t using the strictest isolation level by default. In fact, most production databases (MySQL, PostgreSQL, Oracle, SQL Server) default to READ COMMITTED, not SERIALIZABLE. This creates subtle race conditions that can lead to double spending and other financial disasters.
// The double spending problem with default isolation
@Service
public class VulnerableAccountService {

    // This uses READ COMMITTED by default - DANGEROUS for financial operations!
    @Transactional
    public void withdrawFunds(String accountId, BigDecimal amount) {
        Account account = accountRepository.findById(accountId);

        // RACE CONDITION: Another transaction can modify balance here!
        if (account.getBalance().compareTo(amount) >= 0) {
            account.setBalance(account.getBalance().subtract(amount));
            accountRepository.save(account);
        } else {
            throw new InsufficientFundsException();
        }
    }
}

// What happens with concurrent requests:
// Thread 1: Read balance = $100, check passes
// Thread 2: Read balance = $100, check passes
// Thread 1: Withdraw $100, balance = $0
// Thread 2: Withdraw $100, balance = -$100 (DOUBLE SPENDING!)
Database Default Isolation Levels
| Database | Default Isolation | Financial Safety |
|---|---|---|
| PostgreSQL | READ COMMITTED | ? Vulnerable |
| MySQL | REPEATABLE READ | ?? Better but not perfect |
| Oracle | READ COMMITTED | ? Vulnerable |
| SQL Server | READ COMMITTED | ? Vulnerable |
| H2/HSQLDB | READ COMMITTED | ? Vulnerable |
The Right Way: Database Constraints + Proper Isolation
// Method 1: Database constraints (fastest)
@Entity
@Table(name = "accounts")
public class Account {
    @Id
    private String accountId;

    @Column(nullable = false)
    @Check(constraints = "balance >= 0") // Database prevents negative balance
    private BigDecimal balance;

    @Version
    private Long version;
}

@Service
public class SafeAccountService {

    // Let database constraint handle the race condition
    @Transactional
    public void withdrawFundsWithConstraint(String accountId, BigDecimal amount) {
        try {
            Account account = accountRepository.findById(accountId);
            account.setBalance(account.getBalance().subtract(amount));
            accountRepository.save(account); // Database throws exception if balance < 0
        } catch (DataIntegrityViolationException e) {
            throw new InsufficientFundsException("Withdrawal would result in negative balance");
        }
    }

    // Method 2: SERIALIZABLE isolation (most secure)
    @Transactional(isolation = Isolation.SERIALIZABLE)
    public void withdrawFundsSerializable(String accountId, BigDecimal amount) {
        Account account = accountRepository.findById(accountId);
        if (account.getBalance().compareTo(amount) >= 0) {
            account.setBalance(account.getBalance().subtract(amount));
            accountRepository.save(account);
        } else {
            throw new InsufficientFundsException();
        }
        // SERIALIZABLE guarantees no other transaction can interfere
    }

    // Method 3: Optimistic locking (good performance)
    @Transactional
    @Retryable(value = {OptimisticLockingFailureException.class}, maxAttempts = 3)
    public void withdrawFundsOptimistic(String accountId, BigDecimal amount) {
        Account account = accountRepository.findById(accountId);
        if (account.getBalance().compareTo(amount) >= 0) {
            account.setBalance(account.getBalance().subtract(amount));
            accountRepository.save(account); // Version check prevents race conditions
        } else {
            throw new InsufficientFundsException();
        }
    }
}
MVCC
Most developers don’t realize that modern databases achieve isolation levels through Multi-Version Concurrency Control (MVCC), not traditional locking. Understanding MVCC explains why certain isolation behaviors seem counterintuitive. Instead of locking rows for reads, databases maintain multiple versions of each row with timestamps. When you start a transaction, you get a consistent snapshot of the database as it existed at that moment.
// What actually happens under MVCC
@Transactional(isolation = Isolation.REPEATABLE_READ)
public void demonstrateMVCC() {
    // T1: Transaction starts, gets snapshot at time=100
    Account account = accountRepository.findById("123"); // Reads version at time=100

    // T2: Another transaction modifies the account (creates version at time=101)

    // T1: Reads same account again
    Account sameAccount = accountRepository.findById("123"); // Still reads version at time=100!

    assert account.getBalance().equals(sameAccount.getBalance()); // MVCC guarantees this
}
MVCC vs Traditional Locking
-- Traditional locking approach (not MVCC)
BEGIN TRANSACTION;
SELECT * FROM accounts WHERE id = '123' FOR SHARE; -- Acquires shared lock
-- Other transactions blocked from writing until this transaction ends

-- MVCC approach (PostgreSQL, MySQL InnoDB)
BEGIN TRANSACTION ISOLATION LEVEL REPEATABLE READ;
SELECT * FROM accounts WHERE id = '123'; -- No locks, reads from snapshot
-- Other transactions can write freely, creating new versions
MVCC delivers better performance and reduces deadlock contention compared to traditional locking, but it comes with cleanup overhead requirements (PostgreSQL VACUUM, MySQL purge operations). I have encountered numerous production issues where real-time queries or ETL jobs would suddenly degrade in performance due to aggressive background VACUUM operations on older PostgreSQL versions, though recent versions have significantly improved this behavior. MVCC can also lead to stale reads in long-running transactions, as they maintain their snapshot view even as the underlying data changes.
// MVCC write conflict example
@Transactional
@Retryable(value = {OptimisticLockingFailureException.class})
public void updateAccountMVCC(String accountId, BigDecimal newBalance) {
    Account account = accountRepository.findById(accountId);

    // If another transaction modified this account between our read
    // and write, MVCC will detect the conflict and retry
    account.setBalance(newBalance);
    accountRepository.save(account); // May throw OptimisticLockingFailureException
}
This is why PostgreSQL defaults to READ COMMITTED and why long-running analytical queries should use dedicated read replicas—MVCC snapshots can become expensive to maintain over time.
Java and Spring: The Gold Standard
Spring’s @Transactional annotation is probably the most elegant solution I’ve encountered for transaction management. It uses aspect-oriented programming to wrap methods in transaction boundaries, making the complexity invisible to business logic.
Basic Transaction Management
@Service
@Transactional
public class OrderService {

    @Autowired
    private OrderRepository orderRepository;

    @Autowired
    private PaymentService paymentService;

    @Autowired
    private InventoryService inventoryService;

    // All operations within this method are atomic
    public Order processOrder(CreateOrderRequest request) {
        Order order = new Order(request);
        order = orderRepository.save(order);

        // If any of these fail, everything rolls back
        Payment payment = paymentService.processPayment(
            order.getCustomerId(),
            order.getTotalAmount()
        );

        inventoryService.reserveItems(order.getItems());
        order.setPaymentId(payment.getId());
        order.setStatus(OrderStatus.CONFIRMED);

        return orderRepository.save(order);
    }
}
Different Transaction Types
Spring provides fine-grained control over transaction behavior:
@Service
public class OrderService {

    // Read-only transactions can be optimized by the database
    @Transactional(readOnly = true)
    public List<Order> getOrderHistory(String customerId) {
        return orderRepository.findByCustomerId(customerId);
    }

    // Long-running operations need higher timeout
    @Transactional(timeout = 300) // 5 minutes
    public void processBulkOrders(List<CreateOrderRequest> requests) {
        for (CreateOrderRequest request : requests) {
            processOrder(request);
        }
    }

    // Critical operations need strict isolation
    @Transactional(isolation = Isolation.SERIALIZABLE)
    public void transferInventory(String fromLocation, String toLocation,
                                String itemId, int quantity) {
        Item fromItem = inventoryRepository.findByLocationAndItem(fromLocation, itemId);
        Item toItem = inventoryRepository.findByLocationAndItem(toLocation, itemId);

        if (fromItem.getQuantity() < quantity) {
            throw new InsufficientInventoryException();
        }

        fromItem.setQuantity(fromItem.getQuantity() - quantity);
        toItem.setQuantity(toItem.getQuantity() + quantity);

        inventoryRepository.save(fromItem);
        inventoryRepository.save(toItem);
    }

    // Some operations should create new transactions
    @Transactional(propagation = Propagation.REQUIRES_NEW)
    public void logAuditEvent(String event, String details) {
        AuditLog log = new AuditLog(event, details, Instant.now());
        auditRepository.save(log);
        // This commits immediately, independent of calling transaction
    }

    // Handle specific rollback conditions
    @Transactional(rollbackFor = {BusinessException.class, ValidationException.class})
    public void processComplexOrder(ComplexOrderRequest request) {
        // Business logic that might throw business exceptions
        validateOrderRules(request);
        Order order = createOrder(request);
        processPayment(order);
    }
}
Nested Transactions and Propagation
Understanding nested transactions is critical for building robust systems. In some cases, you want a child transaction to succeed regardless of whether the parent transaction succeeds or not—these are often called “autonomous transactions” or “independent transactions.” The solution was to use REQUIRES_NEW propagation for audit operations, creating independent transactions that commit immediately regardless of what happens to the parent transaction. Similarly, for notification services, you typically want notifications to be sent even if the business operation partially fails—users should know that something went wrong.
@Service
public class OrderProcessingService {

    @Autowired
    private OrderService orderService;

    @Autowired
    private NotificationService notificationService;

    @Transactional
    public void processOrderWithNotification(CreateOrderRequest request) {
        // This participates in the existing transaction
        Order order = orderService.processOrder(request);

        // This creates a new transaction that commits independently
        notificationService.sendOrderConfirmation(order);

        // If something fails here, the order transaction can still commit
        // but the notification might not be sent
    }
}

@Service
public class NotificationService {

    // Creates a new transaction - notifications are sent even if
    // the main order processing fails later
    @Transactional(propagation = Propagation.REQUIRES_NEW)
    public void sendOrderConfirmation(Order order) {
        NotificationRecord record = new NotificationRecord(
            order.getCustomerId(),
            "Order confirmed: " + order.getId(),
            NotificationType.ORDER_CONFIRMATION
        );
        notificationRepository.save(record);

        // Send actual notification asynchronously
        emailService.sendAsync(order.getCustomerEmail(),
                              "Order Confirmation",
                              generateOrderEmail(order));
    }
}
Go with GORM: Explicit Transaction Management
Go doesn’t have the luxury of annotations, so transaction management becomes more explicit. This actually has benefits—the transaction boundaries are clearly visible in the code.
Basic GORM Transactions
package services

import (
    "context"
    "fmt"
    "gorm.io/gorm"
)

type OrderService struct {
    db *gorm.DB
}

type Order struct {
    ID          uint   `gorm:"primarykey"`
    CustomerID  string
    TotalAmount int64
    Status      string
    PaymentID   string
    Items       []OrderItem `gorm:"foreignKey:OrderID"`
}

type OrderItem struct {
    ID       uint   `gorm:"primarykey"`
    OrderID  uint
    SKU      string
    Quantity int
    Price    int64
}

// Basic transaction with explicit rollback handling
func (s *OrderService) ProcessOrder(ctx context.Context, request CreateOrderRequest) (*Order, error) {
    tx := s.db.Begin()
    defer func() {
        if r := recover(); r != nil {
            tx.Rollback()
            panic(r)
        }
    }()

    order := &Order{
        CustomerID:  request.CustomerID,
        TotalAmount: request.TotalAmount,
        Status:      "PENDING",
    }

    // Save the order
    if err := tx.Create(order).Error; err != nil {
        tx.Rollback()
        return nil, fmt.Errorf("failed to create order: %w", err)
    }

    // Process payment
    paymentID, err := s.processPayment(ctx, tx, order)
    if err != nil {
        tx.Rollback()
        return nil, fmt.Errorf("payment failed: %w", err)
    }

    // Reserve inventory
    if err := s.reserveInventory(ctx, tx, request.Items); err != nil {
        tx.Rollback()
        return nil, fmt.Errorf("inventory reservation failed: %w", err)
    }

    // Update order with payment info
    order.PaymentID = paymentID
    order.Status = "CONFIRMED"
    if err := tx.Save(order).Error; err != nil {
        tx.Rollback()
        return nil, fmt.Errorf("failed to update order: %w", err)
    }

    if err := tx.Commit().Error; err != nil {
        return nil, fmt.Errorf("failed to commit transaction: %w", err)
    }

    return order, nil
}
Functional Transaction Wrapper
To reduce boilerplate, we can create a transaction wrapper:
// TransactionFunc represents a function that runs within a transaction
type TransactionFunc func(tx *gorm.DB) error

// WithTransaction wraps a function in a database transaction
func (s *OrderService) WithTransaction(fn TransactionFunc) error {
    tx := s.db.Begin()
    defer func() {
        if r := recover(); r != nil {
            tx.Rollback()
            panic(r)
        }
    }()

    if err := fn(tx); err != nil {
        tx.Rollback()
        return err
    }

    return tx.Commit().Error
}

// Now our business logic becomes cleaner
func (s *OrderService) ProcessOrderClean(ctx context.Context, request CreateOrderRequest) (*Order, error) {
    var order *Order

    err := s.WithTransaction(func(tx *gorm.DB) error {
        order = &Order{
            CustomerID:  request.CustomerID,
            TotalAmount: request.TotalAmount,
            Status:      "PENDING",
        }

        if err := tx.Create(order).Error; err != nil {
            return fmt.Errorf("failed to create order: %w", err)
        }

        paymentID, err := s.processPaymentInTx(ctx, tx, order)
        if err != nil {
            return fmt.Errorf("payment failed: %w", err)
        }

        if err := s.reserveInventoryInTx(ctx, tx, request.Items); err != nil {
            return fmt.Errorf("inventory reservation failed: %w", err)
        }

        order.PaymentID = paymentID
        order.Status = "CONFIRMED"

        return tx.Save(order).Error
    })

    return order, err
}
Context-Based Transaction Management
For more sophisticated transaction management, we can use context to pass transactions:
type contextKey string

const txKey contextKey = "transaction"

// WithTransactionContext creates a new context with a transaction
func WithTransactionContext(ctx context.Context, tx *gorm.DB) context.Context {
    return context.WithValue(ctx, txKey, tx)
}

// TxFromContext retrieves a transaction from context
func TxFromContext(ctx context.Context) (*gorm.DB, bool) {
    tx, ok := ctx.Value(txKey).(*gorm.DB)
    return tx, ok
}

// GetDB returns either the transaction from context or the main DB
func (s *OrderService) GetDB(ctx context.Context) *gorm.DB {
    if tx, ok := TxFromContext(ctx); ok {
        return tx
    }
    return s.db
}

// Now services can automatically use transactions when available
func (s *PaymentService) ProcessPayment(ctx context.Context, customerID string, amount int64) (string, error) {
    db := s.GetDB(ctx) // Uses transaction if available

    payment := &Payment{
        CustomerID: customerID,
        Amount:     amount,
        Status:     "PROCESSING",
    }

    if err := db.Create(payment).Error; err != nil {
        return "", err
    }

    // Simulate payment processing
    if amount > 100000 { // Reject large amounts for demo
        payment.Status = "FAILED"
        db.Save(payment)
        return "", fmt.Errorf("payment amount too large")
    }

    payment.Status = "COMPLETED"
    payment.TransactionID = generatePaymentID()

    if err := db.Save(payment).Error; err != nil {
        return "", err
    }

    return payment.TransactionID, nil
}

// Usage with context-based transactions
func (s *OrderService) ProcessOrderWithContext(ctx context.Context, request CreateOrderRequest) (*Order, error) {
    var order *Order

    return order, s.WithTransaction(func(tx *gorm.DB) error {
        // Create context with transaction
        txCtx := WithTransactionContext(ctx, tx)

        order = &Order{
            CustomerID:  request.CustomerID,
            TotalAmount: request.TotalAmount,
            Status:      "PENDING",
        }

        if err := tx.Create(order).Error; err != nil {
            return err
        }

        // These services will automatically use the transaction
        paymentID, err := s.paymentService.ProcessPayment(txCtx, order.CustomerID, order.TotalAmount)
        if err != nil {
            return err
        }

        if err := s.inventoryService.ReserveItems(txCtx, request.Items); err != nil {
            return err
        }

        order.PaymentID = paymentID
        order.Status = "CONFIRMED"

        return tx.Save(order).Error
    })
}
Read-Only and Isolation Control
// Read-only operations can be optimized
func (s *OrderService) GetOrderHistory(ctx context.Context, customerID string) ([]Order, error) {
    var orders []Order

    // Use read-only transaction for consistency
    err := s.db.Transaction(func(tx *gorm.DB) error {
        return tx.Raw("SELECT * FROM orders WHERE customer_id = ? ORDER BY created_at DESC",
                     customerID).Scan(&orders).Error
    }, &sql.TxOptions{ReadOnly: true})

    return orders, err
}

// Operations requiring specific isolation levels
func (s *InventoryService) TransferStock(ctx context.Context, fromSKU, toSKU string, quantity int) error {
    return s.db.Transaction(func(tx *gorm.DB) error {
        var fromItem, toItem InventoryItem

        // Lock rows to prevent concurrent modifications
        if err := tx.Set("gorm:query_option", "FOR UPDATE").
            Where("sku = ?", fromSKU).First(&fromItem).Error; err != nil {
            return err
        }

        if err := tx.Set("gorm:query_option", "FOR UPDATE").
            Where("sku = ?", toSKU).First(&toItem).Error; err != nil {
            return err
        }

        if fromItem.Quantity < quantity {
            return fmt.Errorf("insufficient inventory")
        }

        fromItem.Quantity -= quantity
        toItem.Quantity += quantity

        if err := tx.Save(&fromItem).Error; err != nil {
            return err
        }

        return tx.Save(&toItem).Error

    }, &sql.TxOptions{Isolation: sql.LevelSerializable})
}
Rust: Custom Transaction Annotations with Macros
Rust doesn’t have runtime annotations like Java, but we can create compile-time macros that provide similar functionality. This approach gives us zero-runtime overhead while maintaining clean syntax.
Building a Transaction Macro System
First, let’s create the macro infrastructure:
// src/transaction/mod.rs
use diesel::prelude::*;
use diesel::result::Error as DieselError;
use std::fmt;

#[derive(Debug)]
pub enum TransactionError {
    Database(DieselError),
    Business(String),
    Validation(String),
}

impl fmt::Display for TransactionError {
    fn fmt(&self, f: &mut fmt::Formatter) -> fmt::Result {
        match self {
            TransactionError::Database(e) => write!(f, "Database error: {}", e),
            TransactionError::Business(e) => write!(f, "Business error: {}", e),
            TransactionError::Validation(e) => write!(f, "Validation error: {}", e),
        }
    }
}

impl std::error::Error for TransactionError {}

pub type TransactionResult<T> = Result<T, TransactionError>;

// Macro for creating transactional functions
#[macro_export]
macro_rules! transactional {
    (
        fn $name:ident($($param:ident: $param_type:ty),*) -> $return_type:ty {
            $($body:tt)*
        }
    ) => {
        fn $name(conn: &mut PgConnection, $($param: $param_type),*) -> TransactionResult<$return_type> {
            conn.transaction::<$return_type, TransactionError, _>(|conn| {
                $($body)*
            })
        }
    };
}

// Macro for read-only transactions
#[macro_export]
macro_rules! read_only {
    (
        fn $name:ident($($param:ident: $param_type:ty),*) -> $return_type:ty {
            $($body:tt)*
        }
    ) => {
        fn $name(conn: &mut PgConnection, $($param: $param_type),*) -> TransactionResult<$return_type> {
            // In a real implementation, we'd set READ ONLY mode
            conn.transaction::<$return_type, TransactionError, _>(|conn| {
                $($body)*
            })
        }
    };
}
Using the Transaction Macros
// src/services/order_service.rs
use diesel::prelude::*;
use crate::transaction::*;
use crate::models::*;
use crate::schema::orders::dsl::*;

pub struct OrderService;

impl OrderService {
    // Transactional order processing with automatic rollback
    transactional! {
        fn process_order(request: CreateOrderRequest) -> Order {
            // Create the order
            let new_order = NewOrder {
                customer_id: &request.customer_id,
                total_amount: request.total_amount,
                status: "PENDING",
            };

            let order: Order = diesel::insert_into(orders)
                .values(&new_order)
                .get_result(conn)
                .map_err(TransactionError::Database)?;

            // Process payment
            let payment_id = Self::process_payment_internal(conn, &order)
                .map_err(|e| TransactionError::Business(format!("Payment failed: {}", e)))?;

            // Reserve inventory
            Self::reserve_inventory_internal(conn, &request.items)
                .map_err(|e| TransactionError::Business(format!("Inventory reservation failed: {}", e)))?;

            // Update order with payment info
            let updated_order = diesel::update(orders.filter(id.eq(order.id)))
                .set((
                    payment_id.eq(&payment_id),
                    status.eq("CONFIRMED"),
                ))
                .get_result(conn)
                .map_err(TransactionError::Database)?;

            Ok(updated_order)
        }
    }

    // Read-only transaction for queries
    read_only! {
        fn get_order_history(customer_id: String) -> Vec<Order> {
            let order_list = orders
                .filter(customer_id.eq(&customer_id))
                .order(created_at.desc())
                .load::<Order>(conn)
                .map_err(TransactionError::Database)?;

            Ok(order_list)
        }
    }

    // Helper functions that work within existing transactions
    fn process_payment_internal(conn: &mut PgConnection, order: &Order) -> Result<String, String> {
        use crate::schema::payments::dsl::*;

        let new_payment = NewPayment {
            customer_id: &order.customer_id,
            order_id: order.id,
            amount: order.total_amount,
            status: "PROCESSING",
        };

        let payment: Payment = diesel::insert_into(payments)
            .values(&new_payment)
            .get_result(conn)
            .map_err(|e| format!("Payment creation failed: {}", e))?;

        // Simulate payment processing logic
        if order.total_amount > 100000 {
            diesel::update(payments.filter(id.eq(payment.id)))
                .set(status.eq("FAILED"))
                .execute(conn)
                .map_err(|e| format!("Payment update failed: {}", e))?;

            return Err("Payment amount too large".to_string());
        }

        let transaction_id = format!("txn_{}", uuid::Uuid::new_v4());

        diesel::update(payments.filter(id.eq(payment.id)))
            .set((
                status.eq("COMPLETED"),
                transaction_id.eq(&transaction_id),
            ))
            .execute(conn)
            .map_err(|e| format!("Payment finalization failed: {}", e))?;

        Ok(transaction_id)
    }

    fn reserve_inventory_internal(conn: &mut PgConnection, items: &[OrderItemRequest]) -> Result<(), String> {
        use crate::schema::inventory::dsl::*;

        for item in items {
            // Lock the inventory row for update
            let mut inventory_item: InventoryItem = inventory
                .filter(sku.eq(&item.sku))
                .for_update()
                .first(conn)
                .map_err(|e| format!("Inventory lookup failed: {}", e))?;

            if inventory_item.quantity < item.quantity {
                return Err(format!("Insufficient inventory for SKU: {}", item.sku));
            }

            inventory_item.quantity -= item.quantity;

            diesel::update(inventory.filter(sku.eq(&item.sku)))
                .set(quantity.eq(inventory_item.quantity))
                .execute(conn)
                .map_err(|e| format!("Inventory update failed: {}", e))?;
        }

        Ok(())
    }
}
Advanced Transaction Features in Rust
// More sophisticated transaction management with isolation levels
#[macro_export]
macro_rules! serializable_transaction {
    (
        fn $name:ident($($param:ident: $param_type:ty),*) -> $return_type:ty {
            $($body:tt)*
        }
    ) => {
        fn $name(conn: &mut PgConnection, $($param: $param_type),*) -> TransactionResult<$return_type> {
            // Set serializable isolation level
            conn.batch_execute("SET TRANSACTION ISOLATION LEVEL SERIALIZABLE")
                .map_err(TransactionError::Database)?;

            conn.transaction::<$return_type, TransactionError, _>(|conn| {
                $($body)*
            })
        }
    };
}

// Usage for operations requiring strict consistency
impl InventoryService {
    serializable_transaction! {
        fn transfer_stock(from_sku: String, to_sku: String, quantity: i32) -> (InventoryItem, InventoryItem) {
            use crate::schema::inventory::dsl::*;

            // Lock both items in consistent order to prevent deadlocks
            let (first_sku, second_sku) = if from_sku < to_sku {
                (&from_sku, &to_sku)
            } else {
                (&to_sku, &from_sku)
            };

            let mut from_item: InventoryItem = inventory
                .filter(sku.eq(first_sku))
                .for_update()
                .first(conn)
                .map_err(TransactionError::Database)?;

            let mut to_item: InventoryItem = inventory
                .filter(sku.eq(second_sku))
                .for_update()
                .first(conn)
                .map_err(TransactionError::Database)?;

            // Ensure we have the right items
            if from_item.sku != from_sku {
                std::mem::swap(&mut from_item, &mut to_item);
            }

            if from_item.quantity < quantity {
                return Err(TransactionError::Business(
                    "Insufficient inventory for transfer".to_string()
                ));
            }

            from_item.quantity -= quantity;
            to_item.quantity += quantity;

            let updated_from = diesel::update(inventory.filter(sku.eq(&from_sku)))
                .set(quantity.eq(from_item.quantity))
                .get_result(conn)
                .map_err(TransactionError::Database)?;

            let updated_to = diesel::update(inventory.filter(sku.eq(&to_sku)))
                .set(quantity.eq(to_item.quantity))
                .get_result(conn)
                .map_err(TransactionError::Database)?;

            Ok((updated_from, updated_to))
        }
    }
}
Async Transaction Support
For modern Rust applications using async/await:
// src/transaction/async_transaction.rs
use diesel_async::{AsyncPgConnection, AsyncConnection};
use diesel_async::pooled_connection::bb8::Pool;

#[macro_export]
macro_rules! async_transactional {
    (
        async fn $name:ident($($param:ident: $param_type:ty),*) -> $return_type:ty {
            $($body:tt)*
        }
    ) => {
        async fn $name(pool: &Pool<AsyncPgConnection>, $($param: $param_type),*) -> TransactionResult<$return_type> {
            let mut conn = pool.get().await
                .map_err(|e| TransactionError::Database(e.into()))?;

            conn.transaction::<$return_type, TransactionError, _>(|conn| {
                Box::pin(async move {
                    $($body)*
                })
            }).await
        }
    };
}

// Usage with async operations
impl OrderService {
    async_transactional! {
        async fn process_order_async(request: CreateOrderRequest) -> Order {
            // All the same logic as before, but with async/await support
            let new_order = NewOrder {
                customer_id: &request.customer_id,
                total_amount: request.total_amount,
                status: "PENDING",
            };

            let order: Order = diesel::insert_into(orders)
                .values(&new_order)
                .get_result(conn)
                .await
                .map_err(TransactionError::Database)?;

            // Process payment asynchronously
            let payment_id = Self::process_payment_async(conn, &order).await
                .map_err(|e| TransactionError::Business(format!("Payment failed: {}", e)))?;

            // Continue with order processing...

            Ok(order)
        }
    }
}
Multi-Database Transactions: Two-Phase Commit
I used J2EE and XA transactions extensively in the late 1990s and early 2000s when these standards were being defined by Sun Microsystems with major contributions from IBM, Oracle, and BEA Systems. While these technologies provided strong consistency guarantees, they added enormous complexity to applications and resulted in significant performance issues. The fundamental problem with 2PC is that it’s a blocking protocol—if the transaction coordinator fails during the commit phase, all participating databases remain locked until the coordinator recovers. I’ve seen production systems grind to a halt for hours because of coordinator failures. There are also edge cases that 2PC simply cannot handle, such as network partitions between the coordinator and participants, which led to the development of three-phase commit (3PC). In most cases, you should avoid distributed transactions entirely and use patterns like SAGA, event sourcing, or careful service boundaries instead.
Java XA Transactions
@Configuration
@EnableTransactionManagement
public class XATransactionConfig {

    @Bean
    @Primary
    public DataSource orderDataSource() {
        MysqlXADataSource xaDataSource = new MysqlXADataSource();
        xaDataSource.setURL("jdbc:mysql://localhost:3306/orders");
        xaDataSource.setUser("orders_user");
        xaDataSource.setPassword("orders_pass");
        return xaDataSource;
    }

    @Bean
    public DataSource inventoryDataSource() {
        MysqlXADataSource xaDataSource = new MysqlXADataSource();
        xaDataSource.setURL("jdbc:mysql://localhost:3306/inventory");
        xaDataSource.setUser("inventory_user");
        xaDataSource.setPassword("inventory_pass");
        return xaDataSource;
    }

    @Bean
    public JtaTransactionManager jtaTransactionManager() {
        JtaTransactionManager jtaTransactionManager = new JtaTransactionManager();
        jtaTransactionManager.setTransactionManager(atomikosTransactionManager());
        jtaTransactionManager.setUserTransaction(atomikosUserTransaction());
        return jtaTransactionManager;
    }

    @Bean(initMethod = "init", destroyMethod = "close")
    public UserTransactionManager atomikosTransactionManager() {
        UserTransactionManager transactionManager = new UserTransactionManager();
        transactionManager.setForceShutdown(false);
        return transactionManager;
    }

    @Bean
    public UserTransactionImp atomikosUserTransaction() throws SystemException {
        UserTransactionImp userTransactionImp = new UserTransactionImp();
        userTransactionImp.setTransactionTimeout(300);
        return userTransactionImp;
    }
}

@Service
public class DistributedOrderService {

    @Autowired
    @Qualifier("orderDataSource")
    private DataSource orderDataSource;

    @Autowired
    @Qualifier("inventoryDataSource")
    private DataSource inventoryDataSource;

    // XA transaction spans both databases
    @Transactional
    public void processDistributedOrder(CreateOrderRequest request) {
        // Operations on orders database
        try (Connection orderConn = orderDataSource.getConnection()) {
            PreparedStatement orderStmt = orderConn.prepareStatement(
                "INSERT INTO orders (customer_id, total_amount, status) VALUES (?, ?, ?)"
            );
            orderStmt.setString(1, request.getCustomerId());
            orderStmt.setBigDecimal(2, request.getTotalAmount());
            orderStmt.setString(3, "PENDING");
            orderStmt.executeUpdate();
        }

        // Operations on inventory database
        try (Connection inventoryConn = inventoryDataSource.getConnection()) {
            for (OrderItem item : request.getItems()) {
                PreparedStatement inventoryStmt = inventoryConn.prepareStatement(
                    "UPDATE inventory SET quantity = quantity - ? WHERE sku = ? AND quantity >= ?"
                );
                inventoryStmt.setInt(1, item.getQuantity());
                inventoryStmt.setString(2, item.getSku());
                inventoryStmt.setInt(3, item.getQuantity());

                int updatedRows = inventoryStmt.executeUpdate();
                if (updatedRows == 0) {
                    throw new InsufficientInventoryException("Not enough inventory for " + item.getSku());
                }
            }
        }

        // If we get here, both database operations succeeded
        // The XA transaction manager will coordinate the commit across both databases
    }
}
Go Distributed Transactions
Go doesn’t have built-in distributed transaction support, so we need to implement 2PC manually:
package distributed

import (
    "context"
    "database/sql"
    "fmt"
    "log"
    "time"

    "github.com/google/uuid"
)

type TransactionManager struct {
    resources []XAResource
}

type XAResource interface {
    Prepare(ctx context.Context, txID string) error
    Commit(ctx context.Context, txID string) error
    Rollback(ctx context.Context, txID string) error
}

type DatabaseResource struct {
    db   *sql.DB
    name string
}

func (r *DatabaseResource) Prepare(ctx context.Context, txID string) error {
    tx, err := r.db.BeginTx(ctx, nil)
    if err != nil {
        return err
    }

    // Store transaction for later commit/rollback
    // In production, you'd need a proper transaction store
    transactionStore[txID+"-"+r.name] = tx

    return nil
}

func (r *DatabaseResource) Commit(ctx context.Context, txID string) error {
    tx, exists := transactionStore[txID+"-"+r.name]
    if !exists {
        return fmt.Errorf("transaction not found: %s", txID)
    }

    err := tx.Commit()
    delete(transactionStore, txID+"-"+r.name)
    return err
}

func (r *DatabaseResource) Rollback(ctx context.Context, txID string) error {
    tx, exists := transactionStore[txID+"-"+r.name]
    if !exists {
        return nil // Already rolled back
    }

    err := tx.Rollback()
    delete(transactionStore, txID+"-"+r.name)
    return err
}

// Global transaction store (in production, use Redis or similar)
var transactionStore = make(map[string]*sql.Tx)

func (tm *TransactionManager) ExecuteDistributedTransaction(ctx context.Context, fn func() error) error {
    txID := uuid.New().String()

    // Phase 1: Prepare all resources
    for _, resource := range tm.resources {
        if err := resource.Prepare(ctx, txID); err != nil {
            // Rollback all prepared resources
            tm.rollbackAll(ctx, txID)
            return fmt.Errorf("prepare failed: %w", err)
        }
    }

    // Execute business logic
    if err := fn(); err != nil {
        tm.rollbackAll(ctx, txID)
        return fmt.Errorf("business logic failed: %w", err)
    }

    // Phase 2: Commit all resources
    for _, resource := range tm.resources {
        if err := resource.Commit(ctx, txID); err != nil {
            log.Printf("Commit failed for txID %s: %v", txID, err)
            // In production, you'd need a recovery mechanism here
            return fmt.Errorf("commit failed: %w", err)
        }
    }

    return nil
}

func (tm *TransactionManager) rollbackAll(ctx context.Context, txID string) {
    for _, resource := range tm.resources {
        if err := resource.Rollback(ctx, txID); err != nil {
            log.Printf("Rollback failed for txID %s: %v", txID, err)
        }
    }
}

// Usage example
func ProcessDistributedOrder(ctx context.Context, request CreateOrderRequest) error {
    orderDB, _ := sql.Open("mysql", "orders_connection_string")
    inventoryDB, _ := sql.Open("mysql", "inventory_connection_string")

    tm := &TransactionManager{
        resources: []XAResource{
            &DatabaseResource{db: orderDB, name: "orders"},
            &DatabaseResource{db: inventoryDB, name: "inventory"},
        },
    }

    return tm.ExecuteDistributedTransaction(ctx, func() error {
        // Business logic goes here - use the prepared transactions
        orderTx := transactionStore[txID+"-orders"]
        inventoryTx := transactionStore[txID+"-inventory"]

        // Create order
        _, err := orderTx.Exec(
            "INSERT INTO orders (customer_id, total_amount, status) VALUES (?, ?, ?)",
            request.CustomerID, request.TotalAmount, "PENDING",
        )
        if err != nil {
            return err
        }

        // Update inventory
        for _, item := range request.Items {
            result, err := inventoryTx.Exec(
                "UPDATE inventory SET quantity = quantity - ? WHERE sku = ? AND quantity >= ?",
                item.Quantity, item.SKU, item.Quantity,
            )
            if err != nil {
                return err
            }

            rowsAffected, _ := result.RowsAffected()
            if rowsAffected == 0 {
                return fmt.Errorf("insufficient inventory for %s", item.SKU)
            }
        }

        return nil
    })
}
Concurrency Control: Optimistic vs Pessimistic
Understanding when to use optimistic versus pessimistic concurrency control can make or break your application’s performance under load.
Pessimistic Locking: “Better Safe Than Sorry”
// Java/JPA pessimistic locking
@Service
public class AccountService {

    @Transactional
    public void transferFunds(String fromAccountId, String toAccountId, BigDecimal amount) {
        // Lock accounts in consistent order to prevent deadlocks
        String firstId = fromAccountId.compareTo(toAccountId) < 0 ? fromAccountId : toAccountId;
        String secondId = fromAccountId.compareTo(toAccountId) < 0 ? toAccountId : fromAccountId;

        Account firstAccount = accountRepository.findById(firstId, LockModeType.PESSIMISTIC_WRITE);
        Account secondAccount = accountRepository.findById(secondId, LockModeType.PESSIMISTIC_WRITE);

        Account fromAccount = fromAccountId.equals(firstId) ? firstAccount : secondAccount;
        Account toAccount = fromAccountId.equals(firstId) ? secondAccount : firstAccount;

        if (fromAccount.getBalance().compareTo(amount) < 0) {
            throw new InsufficientFundsException();
        }

        fromAccount.setBalance(fromAccount.getBalance().subtract(amount));
        toAccount.setBalance(toAccount.getBalance().add(amount));

        accountRepository.save(fromAccount);
        accountRepository.save(toAccount);
    }
}
// Go pessimistic locking with GORM
func (s *AccountService) TransferFunds(ctx context.Context, fromAccountID, toAccountID string, amount int64) error {
    return s.WithTransaction(func(tx *gorm.DB) error {
        var fromAccount, toAccount Account

        // Lock accounts in consistent order
        firstID, secondID := fromAccountID, toAccountID
        if fromAccountID > toAccountID {
            firstID, secondID = toAccountID, fromAccountID
        }

        // Lock first account
        if err := tx.Set("gorm:query_option", "FOR UPDATE").
            Where("id = ?", firstID).First(&fromAccount).Error; err != nil {
            return err
        }

        // Lock second account
        if err := tx.Set("gorm:query_option", "FOR UPDATE").
            Where("id = ?", secondID).First(&toAccount).Error; err != nil {
            return err
        }

        // Ensure we have the correct accounts
        if fromAccount.ID != fromAccountID {
            fromAccount, toAccount = toAccount, fromAccount
        }

        if fromAccount.Balance < amount {
            return fmt.Errorf("insufficient funds")
        }

        fromAccount.Balance -= amount
        toAccount.Balance += amount

        if err := tx.Save(&fromAccount).Error; err != nil {
            return err
        }

        return tx.Save(&toAccount).Error
    })
}
Optimistic Locking: “Hope for the Best, Handle the Rest”
// JPA optimistic locking with version fields
@Entity
public class Account {
    @Id
    private String id;

    private BigDecimal balance;

    @Version
    private Long version; // JPA automatically manages this

    // getters and setters...
}

@Service
public class OptimisticAccountService {

    @Transactional
    @Retryable(value = {OptimisticLockingFailureException.class}, maxAttempts = 3)
    public void transferFunds(String fromAccountId, String toAccountId, BigDecimal amount) {
        Account fromAccount = accountRepository.findById(fromAccountId);
        Account toAccount = accountRepository.findById(toAccountId);

        if (fromAccount.getBalance().compareTo(amount) < 0) {
            throw new InsufficientFundsException();
        }

        fromAccount.setBalance(fromAccount.getBalance().subtract(amount));
        toAccount.setBalance(toAccount.getBalance().add(amount));

        // If either account was modified by another transaction,
        // OptimisticLockingFailureException will be thrown
        accountRepository.save(fromAccount);
        accountRepository.save(toAccount);
    }
}
// Rust optimistic locking with version fields
#[derive(Queryable, Identifiable, AsChangeset)]
#[diesel(table_name = accounts)]
pub struct Account {
    pub id: String,
    pub balance: i64,
    pub version: i32,
}

impl AccountService {
    transactional! {
        fn transfer_funds_optimistic(from_account_id: String, to_account_id: String, amount: i64) -> () {
            use crate::schema::accounts::dsl::*;

            // Read current versions
            let from_account: Account = accounts
                .filter(id.eq(&from_account_id))
                .first(conn)
                .map_err(TransactionError::Database)?;

            let to_account: Account = accounts
                .filter(id.eq(&to_account_id))
                .first(conn)
                .map_err(TransactionError::Database)?;

            if from_account.balance < amount {
                return Err(TransactionError::Business("Insufficient funds".to_string()));
            }

            // Update with version check
            let from_updated = diesel::update(
                accounts
                    .filter(id.eq(&from_account_id))
                    .filter(version.eq(from_account.version))
            )
            .set((
                balance.eq(from_account.balance - amount),
                version.eq(from_account.version + 1)
            ))
            .execute(conn)
            .map_err(TransactionError::Database)?;

            if from_updated == 0 {
                return Err(TransactionError::Business("Concurrent modification detected".to_string()));
            }

            let to_updated = diesel::update(
                accounts
                    .filter(id.eq(&to_account_id))
                    .filter(version.eq(to_account.version))
            )
            .set((
                balance.eq(to_account.balance + amount),
                version.eq(to_account.version + 1)
            ))
            .execute(conn)
            .map_err(TransactionError::Database)?;

            if to_updated == 0 {
                return Err(TransactionError::Business("Concurrent modification detected".to_string()));
            }

            Ok(())
        }
    }
}
Distributed Transactions: SAGA Pattern
When 2PC becomes too heavyweight or you’re dealing with services that don’t support XA transactions, the SAGA pattern provides an elegant alternative using compensating transactions.
Command Pattern for Compensating Transactions
I initially applied this design pattern at a travel booking company in mid 2000 where we had to integrate with numerous external vendors—airline companies, hotels, car rental agencies, insurance providers, and activity booking services. Each vendor had different APIs, response times, and failure modes, but we needed to present customers with a single, atomic booking experience. The command pattern worked exceptionally well for this scenario. When a customer booked a vacation package, we’d execute a chain of commands: reserve flight, book hotel, rent car, purchase insurance. If any step failed midway through, we could automatically issue compensating transactions to undo the previous successful reservations. This approach delivered both excellent performance (operations could run in parallel where possible) and high reliability.
// Base interfaces for SAGA operations
public interface SagaCommand<T> {
    T execute() throws Exception;
    void compensate(T result) throws Exception;
}

public class SagaOrchestrator {

    public class SagaExecution<T> {
        private final SagaCommand<T> command;
        private T result;
        private boolean executed = false;

        public SagaExecution(SagaCommand<T> command) {
            this.command = command;
        }

        public T execute() throws Exception {
            result = command.execute();
            executed = true;
            return result;
        }

        public void compensate() throws Exception {
            if (executed && result != null) {
                command.compensate(result);
            }
        }
    }

    private final List<SagaExecution<?>> executions = new ArrayList<>();

    public <T> T execute(SagaCommand<T> command) throws Exception {
        SagaExecution<T> execution = new SagaExecution<>(command);
        executions.add(execution);
        return execution.execute();
    }

    public void compensateAll() {
        // Compensate in reverse order
        for (int i = executions.size() - 1; i >= 0; i--) {
            try {
                executions.get(i).compensate();
            } catch (Exception e) {
                log.error("Compensation failed", e);
                // In production, you'd need dead letter queue handling
            }
        }
    }
}

// Concrete command implementations
public class CreateOrderCommand implements SagaCommand<Order> {
    private final OrderService orderService;
    private final CreateOrderRequest request;

    public CreateOrderCommand(OrderService orderService, CreateOrderRequest request) {
        this.orderService = orderService;
        this.request = request;
    }

    @Override
    public Order execute() throws Exception {
        return orderService.createOrder(request);
    }

    @Override
    public void compensate(Order order) throws Exception {
        orderService.cancelOrder(order.getId());
    }
}

public class ProcessPaymentCommand implements SagaCommand<Payment> {
    private final PaymentService paymentService;
    private final String customerId;
    private final BigDecimal amount;

    @Override
    public Payment execute() throws Exception {
        return paymentService.processPayment(customerId, amount);
    }

    @Override
    public void compensate(Payment payment) throws Exception {
        paymentService.refundPayment(payment.getId());
    }
}

public class ReserveInventoryCommand implements SagaCommand<List<InventoryReservation>> {
    private final InventoryService inventoryService;
    private final List<OrderItem> items;

    @Override
    public List<InventoryReservation> execute() throws Exception {
        return inventoryService.reserveItems(items);
    }

    @Override
    public void compensate(List<InventoryReservation> reservations) throws Exception {
        for (InventoryReservation reservation : reservations) {
            inventoryService.releaseReservation(reservation.getId());
        }
    }
}

// Usage in service
@Service
public class SagaOrderService {

    public void processOrderWithSaga(CreateOrderRequest request) throws Exception {
        SagaOrchestrator saga = new SagaOrchestrator();

        try {
            // Execute commands in sequence
            Order order = saga.execute(new CreateOrderCommand(orderService, request));

            Payment payment = saga.execute(new ProcessPaymentCommand(
                paymentService, order.getCustomerId(), order.getTotalAmount()
            ));

            List<InventoryReservation> reservations = saga.execute(
                new ReserveInventoryCommand(inventoryService, request.getItems())
            );

            // If we get here, everything succeeded
            orderService.confirmOrder(order.getId());

        } catch (Exception e) {
            // Compensate all executed commands
            saga.compensateAll();
            throw e;
        }
    }
}
Persistent SAGA with State Machine
// SAGA state management
@Entity
public class SagaTransaction {
    @Id
    private String id;

    @Enumerated(EnumType.STRING)
    private SagaStatus status;

    private String currentStep;

    @ElementCollection
    private List<String> completedSteps = new ArrayList<>();

    @ElementCollection
    private List<String> compensatedSteps = new ArrayList<>();

    private String contextData; // JSON serialized context

    // getters/setters...
}

public enum SagaStatus {
    STARTED, IN_PROGRESS, COMPLETED, COMPENSATING, COMPENSATED, FAILED
}

@Component
public class PersistentSagaOrchestrator {

    @Autowired
    private SagaTransactionRepository sagaRepo;

    @Transactional
    public void executeSaga(String sagaId, List<SagaStep> steps) {
        SagaTransaction saga = sagaRepo.findById(sagaId)
            .orElse(new SagaTransaction(sagaId));

        try {
            for (SagaStep step : steps) {
                if (saga.getCompletedSteps().contains(step.getName())) {
                    continue; // Already completed
                }

                saga.setCurrentStep(step.getName());
                saga.setStatus(SagaStatus.IN_PROGRESS);
                sagaRepo.save(saga);

                // Execute step
                step.execute();

                saga.getCompletedSteps().add(step.getName());
                sagaRepo.save(saga);
            }

            saga.setStatus(SagaStatus.COMPLETED);
            sagaRepo.save(saga);

        } catch (Exception e) {
            compensateSaga(sagaId);
            throw e;
        }
    }

    @Transactional
    public void compensateSaga(String sagaId) {
        SagaTransaction saga = sagaRepo.findById(sagaId)
            .orElseThrow(() -> new IllegalArgumentException("SAGA not found"));

        saga.setStatus(SagaStatus.COMPENSATING);
        sagaRepo.save(saga);

        // Compensate in reverse order
        List<String> stepsToCompensate = new ArrayList<>(saga.getCompletedSteps());
        Collections.reverse(stepsToCompensate);

        for (String stepName : stepsToCompensate) {
            if (saga.getCompensatedSteps().contains(stepName)) {
                continue;
            }

            try {
                SagaStep step = findStepByName(stepName);
                step.compensate();
                saga.getCompensatedSteps().add(stepName);
                sagaRepo.save(saga);
            } catch (Exception e) {
                log.error("Compensation failed for step: " + stepName, e);
                saga.setStatus(SagaStatus.FAILED);
                sagaRepo.save(saga);
                return;
            }
        }

        saga.setStatus(SagaStatus.COMPENSATED);
        sagaRepo.save(saga);
    }
}
Go SAGA Implementation
// SAGA state machine in Go
package saga

import (
    "context"
    "encoding/json"
    "fmt"
    "time"

    "gorm.io/gorm"
)

type SagaStatus string

const (
    StatusStarted     SagaStatus = "STARTED"
    StatusInProgress  SagaStatus = "IN_PROGRESS"
    StatusCompleted   SagaStatus = "COMPLETED"
    StatusCompensating SagaStatus = "COMPENSATING"
    StatusCompensated SagaStatus = "COMPENSATED"
    StatusFailed      SagaStatus = "FAILED"
)

type SagaTransaction struct {
    ID               string     `gorm:"primarykey"`
    Status           SagaStatus
    CurrentStep      string
    CompletedSteps   string // JSON array
    CompensatedSteps string // JSON array
    ContextData      string // JSON context
    CreatedAt        time.Time
    UpdatedAt        time.Time
}

type SagaStep interface {
    Name() string
    Execute(ctx context.Context, sagaContext map[string]interface{}) error
    Compensate(ctx context.Context, sagaContext map[string]interface{}) error
}

type SagaOrchestrator struct {
    db *gorm.DB
}

func NewSagaOrchestrator(db *gorm.DB) *SagaOrchestrator {
    return &SagaOrchestrator{db: db}
}

func (o *SagaOrchestrator) ExecuteSaga(ctx context.Context, sagaID string, steps []SagaStep, context map[string]interface{}) error {
    return o.db.Transaction(func(tx *gorm.DB) error {
        var saga SagaTransaction
        if err := tx.First(&saga, "id = ?", sagaID).Error; err != nil {
            if err == gorm.ErrRecordNotFound {
                // Create new saga
                contextJSON, _ := json.Marshal(context)
                saga = SagaTransaction{
                    ID:          sagaID,
                    Status:      StatusStarted,
                    ContextData: string(contextJSON),
                }
                if err := tx.Create(&saga).Error; err != nil {
                    return err
                }
            } else {
                return err
            }
        }

        // Parse completed steps
        var completedSteps []string
        if saga.CompletedSteps != "" {
            json.Unmarshal([]byte(saga.CompletedSteps), &completedSteps)
        }

        completedMap := make(map[string]bool)
        for _, step := range completedSteps {
            completedMap[step] = true
        }

        // Execute steps
        for _, step := range steps {
            if completedMap[step.Name()] {
                continue // Already completed
            }

            saga.CurrentStep = step.Name()
            saga.Status = StatusInProgress
            if err := tx.Save(&saga).Error; err != nil {
                return err
            }

            // Parse saga context
            var sagaContext map[string]interface{}
            json.Unmarshal([]byte(saga.ContextData), &sagaContext)

            // Execute step
            if err := step.Execute(ctx, sagaContext); err != nil {
                // Start compensation
                return o.compensateSaga(ctx, tx, sagaID, steps[:len(completedSteps)])
            }

            // Mark step as completed
            completedSteps = append(completedSteps, step.Name())
            completedJSON, _ := json.Marshal(completedSteps)
            saga.CompletedSteps = string(completedJSON)

            // Update context if modified
            updatedContext, _ := json.Marshal(sagaContext)
            saga.ContextData = string(updatedContext)

            if err := tx.Save(&saga).Error; err != nil {
                return err
            }
        }

        saga.Status = StatusCompleted
        return tx.Save(&saga).Error
    })
}

func (o *SagaOrchestrator) compensateSaga(ctx context.Context, tx *gorm.DB, sagaID string, completedSteps []SagaStep) error {
    var saga SagaTransaction
    if err := tx.First(&saga, "id = ?", sagaID).Error; err != nil {
        return err
    }

    saga.Status = StatusCompensating
    if err := tx.Save(&saga).Error; err != nil {
        return err
    }

    // Parse compensated steps
    var compensatedSteps []string
    if saga.CompensatedSteps != "" {
        json.Unmarshal([]byte(saga.CompensatedSteps), &compensatedSteps)
    }

    compensatedMap := make(map[string]bool)
    for _, step := range compensatedSteps {
        compensatedMap[step] = true
    }

    // Compensate in reverse order
    for i := len(completedSteps) - 1; i >= 0; i-- {
        step := completedSteps[i]

        if compensatedMap[step.Name()] {
            continue
        }

        var sagaContext map[string]interface{}
        json.Unmarshal([]byte(saga.ContextData), &sagaContext)

        if err := step.Compensate(ctx, sagaContext); err != nil {
            saga.Status = StatusFailed
            tx.Save(&saga)
            return fmt.Errorf("compensation failed for step %s: %w", step.Name(), err)
        }

        compensatedSteps = append(compensatedSteps, step.Name())
        compensatedJSON, _ := json.Marshal(compensatedSteps)
        saga.CompensatedSteps = string(compensatedJSON)

        if err := tx.Save(&saga).Error; err != nil {
            return err
        }
    }

    saga.Status = StatusCompensated
    return tx.Save(&saga).Error
}

// Concrete step implementations
type CreateOrderStep struct {
    orderService *OrderService
    request      CreateOrderRequest
}

func (s *CreateOrderStep) Name() string {
    return "CREATE_ORDER"
}

func (s *CreateOrderStep) Execute(ctx context.Context, sagaContext map[string]interface{}) error {
    order, err := s.orderService.CreateOrder(ctx, s.request)
    if err != nil {
        return err
    }

    // Store order ID in context for later steps
    sagaContext["orderId"] = order.ID
    return nil
}

func (s *CreateOrderStep) Compensate(ctx context.Context, sagaContext map[string]interface{}) error {
    if orderID, exists := sagaContext["orderId"]; exists {
        return s.orderService.CancelOrder(ctx, orderID.(uint))
    }
    return nil
}

// Usage
func ProcessOrderWithSaga(ctx context.Context, orchestrator *SagaOrchestrator, request CreateOrderRequest) error {
    sagaID := uuid.New().String()

    steps := []SagaStep{
        &CreateOrderStep{orderService, request},
        &ProcessPaymentStep{paymentService, request.CustomerID, request.TotalAmount},
        &ReserveInventoryStep{inventoryService, request.Items},
    }

    context := map[string]interface{}{
        "customerId": request.CustomerID,
        "requestId":  request.RequestID,
    }

    return orchestrator.ExecuteSaga(ctx, sagaID, steps, context)
}
The Dual-Write Problem: Database + Events
One of the most insidious transaction problems occurs when you need to both update the database and publish an event. I’ve debugged countless production issues where customers received order confirmations but no order existed in the database, or orders were created but notification events never fired.
The Anti-Pattern: Sequential Operations
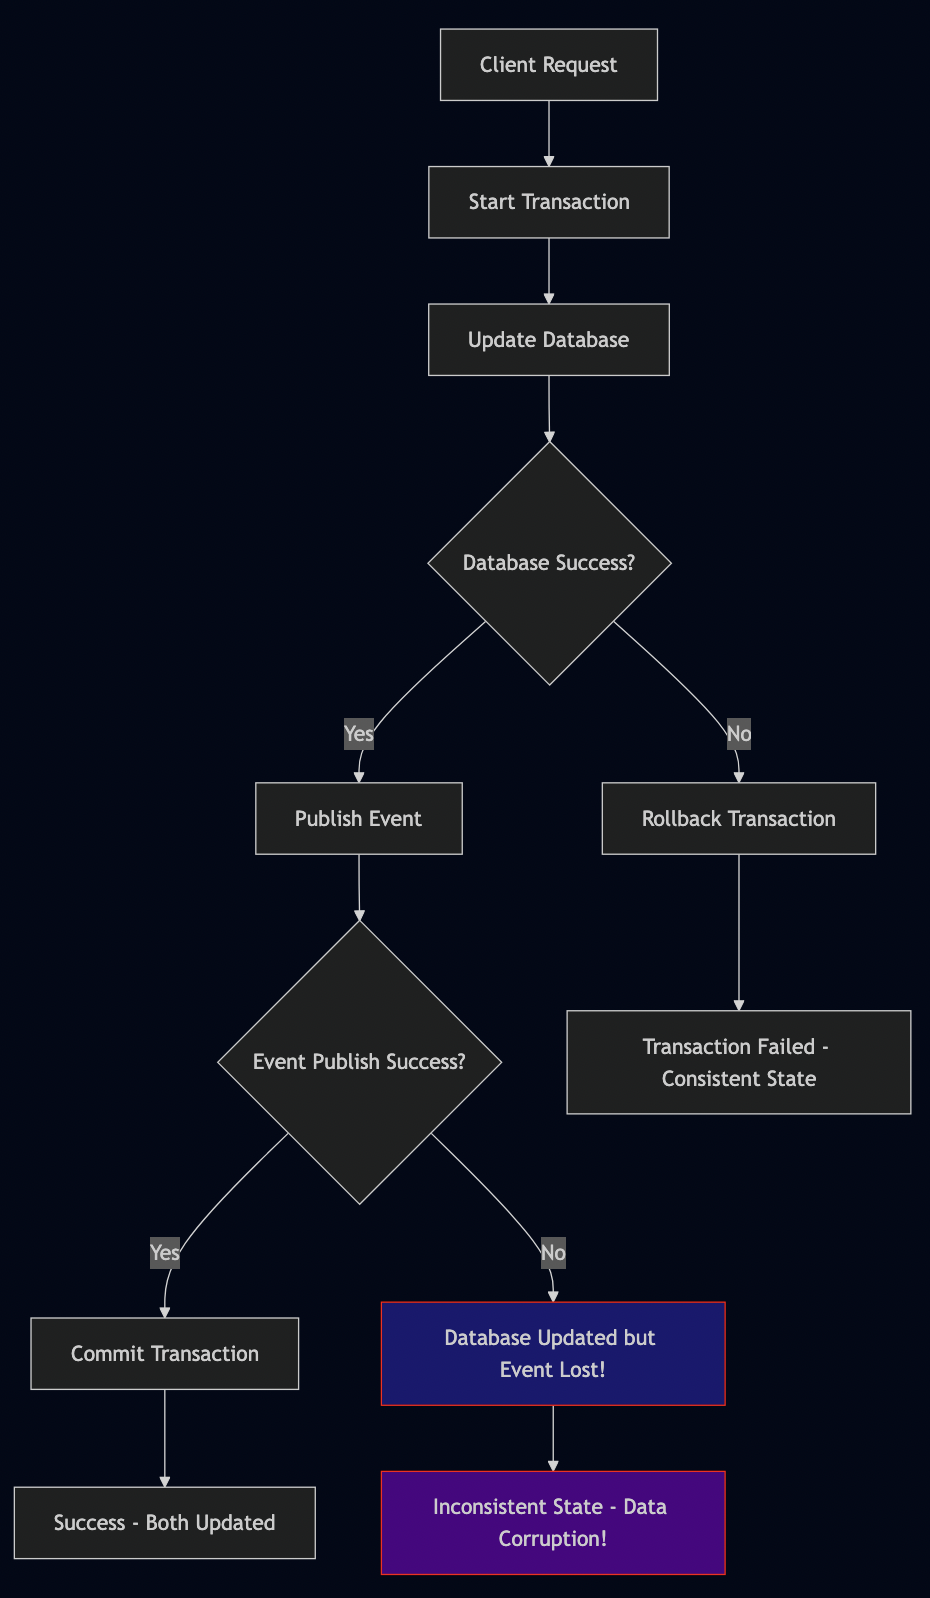
// THIS IS FUNDAMENTALLY BROKEN - DON'T DO THIS
@Service
public class BrokenOrderService {

    @Transactional
    public void processOrder(CreateOrderRequest request) {
        Order order = orderRepository.save(new Order(request));

        // DANGER: Event published outside transaction boundary
        eventPublisher.publishEvent(new OrderCreatedEvent(order));

        // What if this line throws an exception?
        // Event is already published but transaction will rollback!
    }

    // ALSO BROKEN: Event first, then database
    @Transactional
    public void processOrderEventFirst(CreateOrderRequest request) {
        Order order = new Order(request);

        // DANGER: Event published before persistence
        eventPublisher.publishEvent(new OrderCreatedEvent(order));

        // What if database save fails?
        // Event consumers will query for order that doesn't exist!
        orderRepository.save(order);
    }
}
Solution 1: Transactional Outbox Pattern
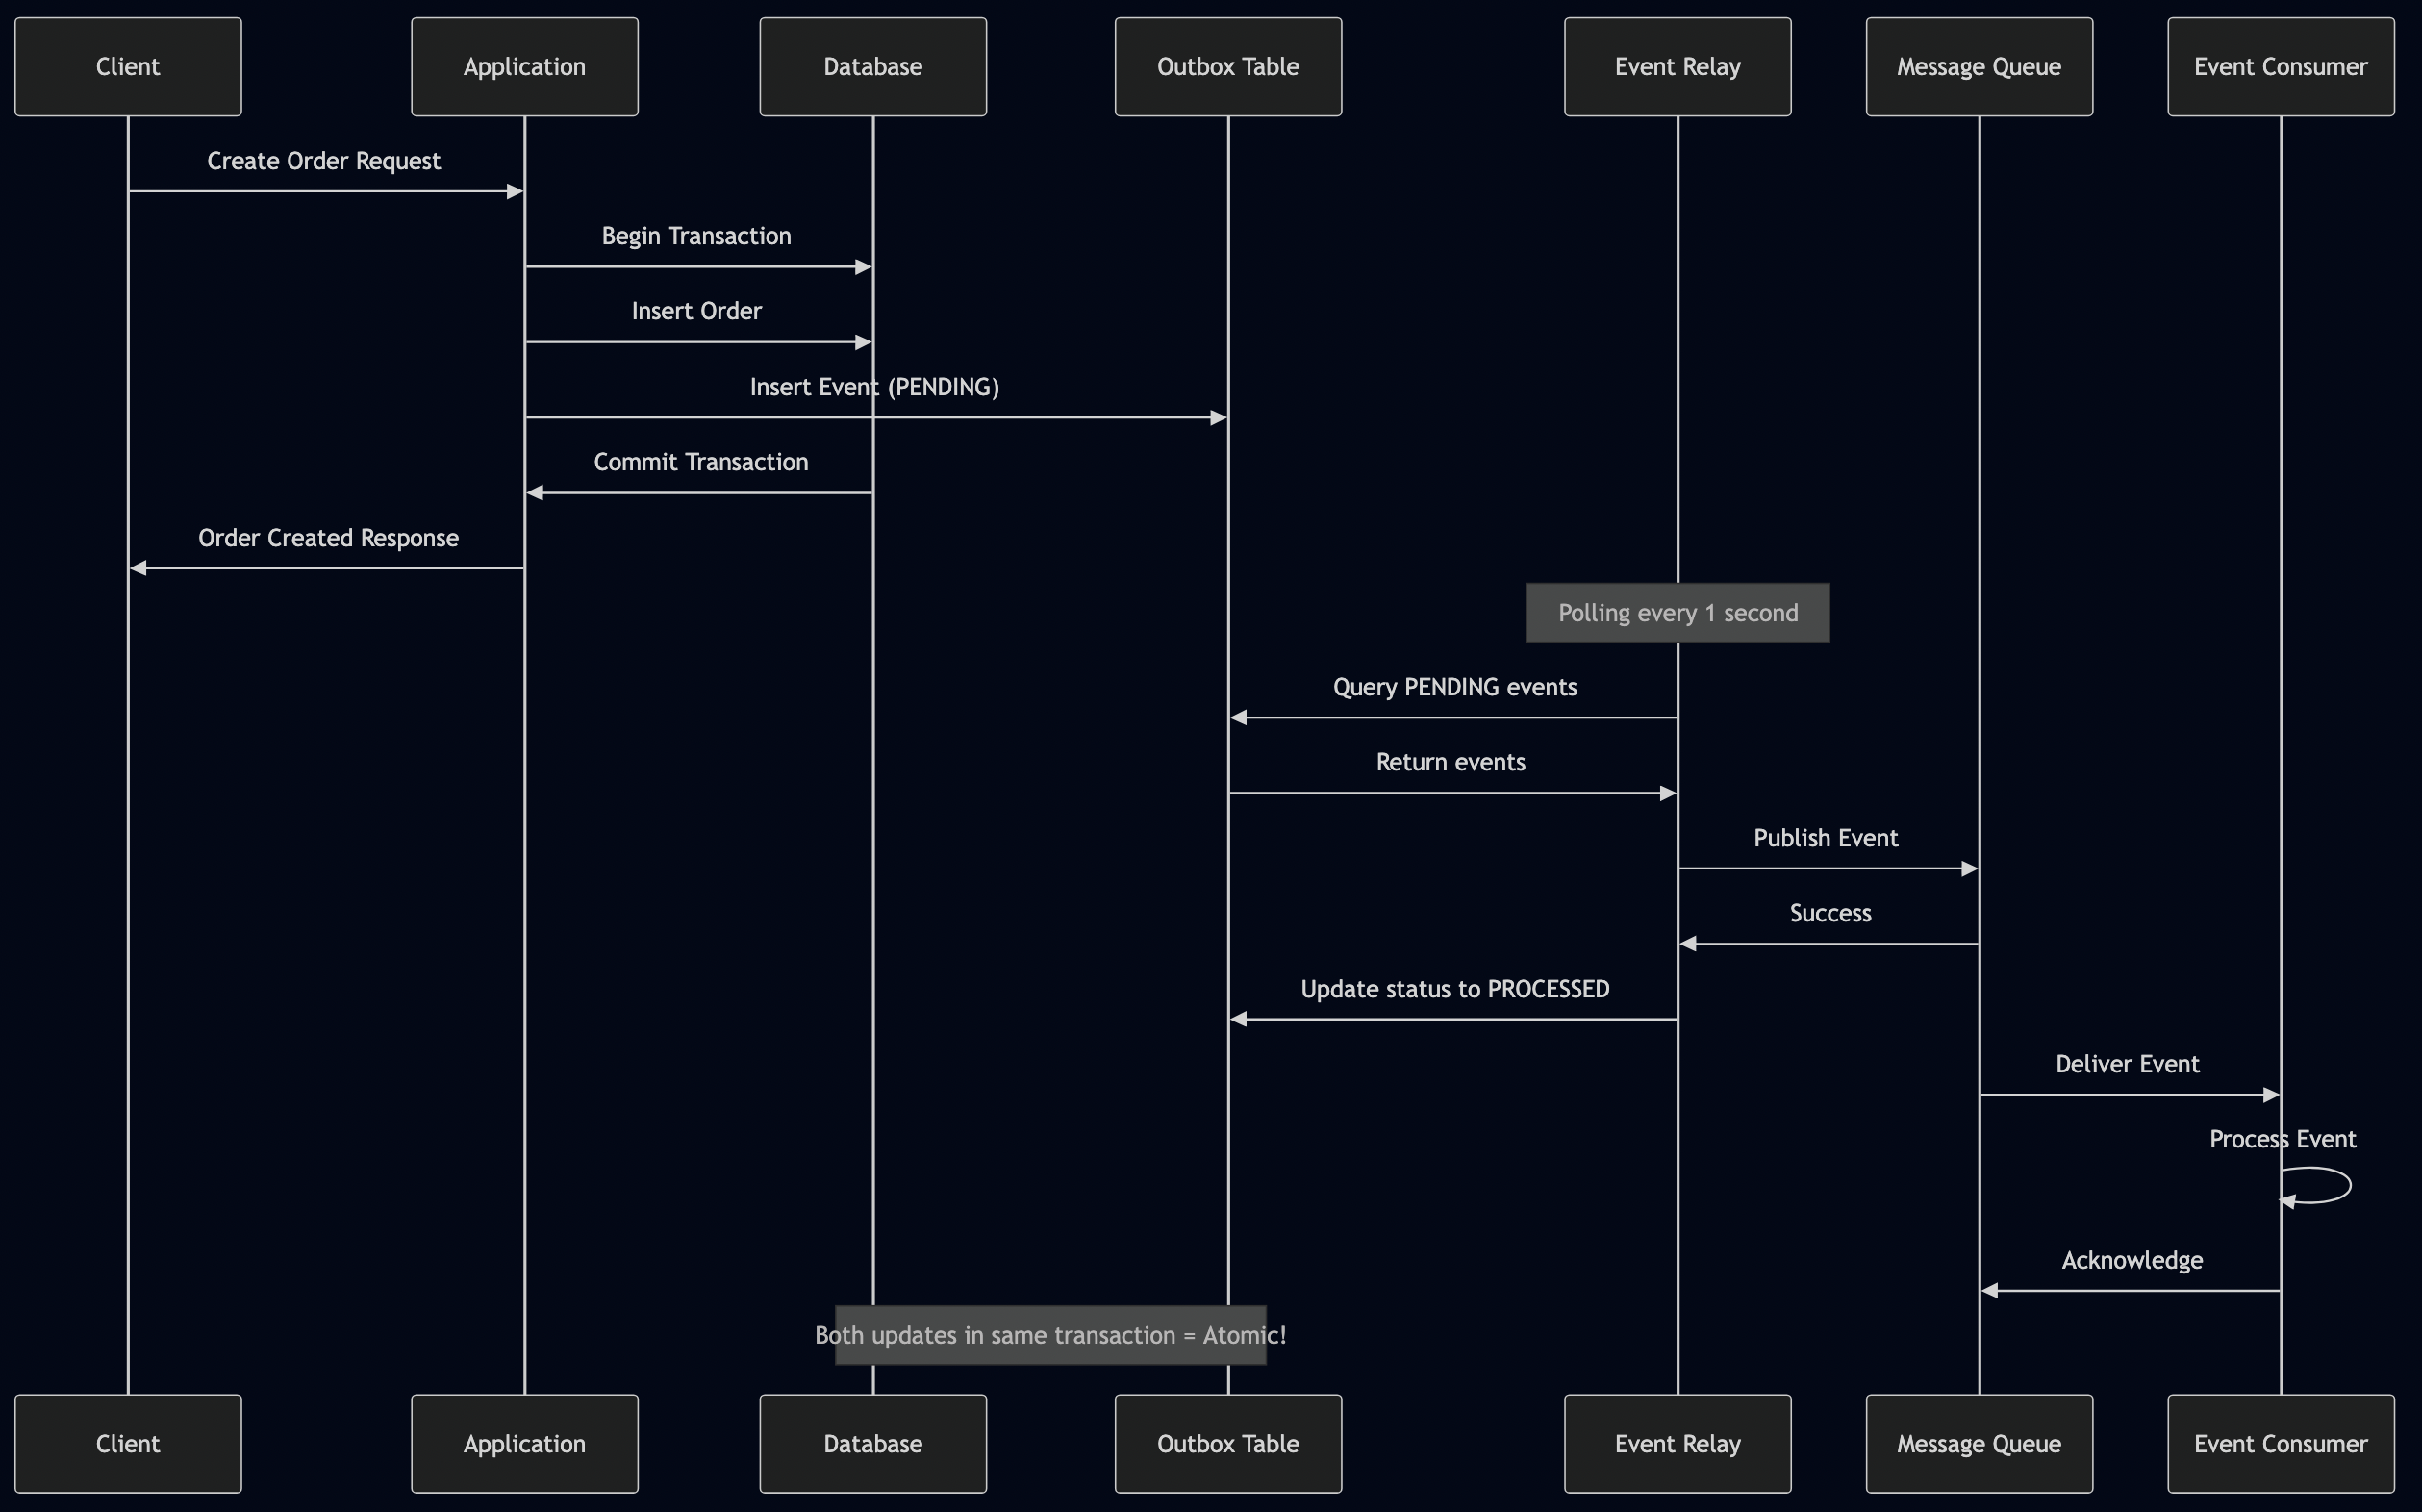
I have used Outbox pattern in a number of applications especially for sending notifications to users where instead of directly sending an event to a queue, the messages are stored in the database and then relayed to external service like Apple Push Notification Service (APNs) or Google Push Notification Service (FCM).
// Outbox event entity
@Entity
@Table(name = "outbox_events")
public class OutboxEvent {
    @Id
    private String id;

    @Column(name = "event_type")
    private String eventType;

    @Column(name = "payload", columnDefinition = "TEXT")
    private String payload;

    @Column(name = "created_at")
    private Instant createdAt;

    @Column(name = "processed_at")
    private Instant processedAt;

    @Enumerated(EnumType.STRING)
    private OutboxStatus status;

    // constructors, getters, setters...
}

public enum OutboxStatus {
    PENDING, PROCESSED, FAILED
}

// Outbox repository
@Repository
public interface OutboxEventRepository extends JpaRepository<OutboxEvent, String> {
    @Query("SELECT e FROM OutboxEvent e WHERE e.status = :status ORDER BY e.createdAt ASC")
    List<OutboxEvent> findByStatusOrderByCreatedAt(@Param("status") OutboxStatus status);

    @Modifying
    @Query("UPDATE OutboxEvent e SET e.status = :status, e.processedAt = :processedAt WHERE e.id = :id")
    void updateStatus(@Param("id") String id, @Param("status") OutboxStatus status, @Param("processedAt") Instant processedAt);
}

// Corrected order service using outbox
@Service
public class TransactionalOrderService {

    @Autowired
    private OrderRepository orderRepository;

    @Autowired
    private OutboxEventRepository outboxRepository;

    @Transactional
    public void processOrder(CreateOrderRequest request) {
        // 1. Process business logic
        Order order = new Order(request);
        order = orderRepository.save(order);

        // 2. Store event in same transaction
        OutboxEvent event = new OutboxEvent(
            UUID.randomUUID().toString(),
            "OrderCreated",
            serializeEvent(new OrderCreatedEvent(order)),
            Instant.now(),
            OutboxStatus.PENDING
        );
        outboxRepository.save(event);

        // Both order and event are committed atomically!
    }

    private String serializeEvent(Object event) {
        try {
            return objectMapper.writeValueAsString(event);
        } catch (JsonProcessingException e) {
            throw new RuntimeException("Event serialization failed", e);
        }
    }
}

// Event relay service
@Component
public class OutboxEventRelay {

    @Autowired
    private OutboxEventRepository outboxRepository;

    @Autowired
    private ApplicationEventPublisher eventPublisher;

    @Scheduled(fixedDelay = 1000) // Poll every second
    @Transactional
    public void processOutboxEvents() {
        List<OutboxEvent> pendingEvents = outboxRepository
            .findByStatusOrderByCreatedAt(OutboxStatus.PENDING);

        for (OutboxEvent outboxEvent : pendingEvents) {
            try {
                // Deserialize and publish the event
                Object event = deserializeEvent(outboxEvent.getEventType(), outboxEvent.getPayload());
                eventPublisher.publishEvent(event);

                // Mark as processed
                outboxRepository.updateStatus(
                    outboxEvent.getId(),
                    OutboxStatus.PROCESSED,
                    Instant.now()
                );

            } catch (Exception e) {
                log.error("Failed to process outbox event: " + outboxEvent.getId(), e);
                outboxRepository.updateStatus(
                    outboxEvent.getId(),
                    OutboxStatus.FAILED,
                    Instant.now()
                );
            }
        }
    }
}
Go Implementation: Outbox Pattern with GORM
// Outbox event model
type OutboxEvent struct {
    ID          string     `gorm:"primarykey"`
    EventType   string     `gorm:"not null"`
    Payload     string     `gorm:"type:text;not null"`
    CreatedAt   time.Time
    ProcessedAt *time.Time
    Status      OutboxStatus `gorm:"type:varchar(20);default:'PENDING'"`
}

type OutboxStatus string

const (
    OutboxStatusPending   OutboxStatus = "PENDING"
    OutboxStatusProcessed OutboxStatus = "PROCESSED"
    OutboxStatusFailed    OutboxStatus = "FAILED"
)

// Service with outbox pattern
type OrderService struct {
    db           *gorm.DB
    eventRelay   *OutboxEventRelay
}

func (s *OrderService) ProcessOrder(ctx context.Context, request CreateOrderRequest) (*Order, error) {
    var order *Order

    err := s.db.Transaction(func(tx *gorm.DB) error {
        // 1. Create order
        order = &Order{
            CustomerID:  request.CustomerID,
            TotalAmount: request.TotalAmount,
            Status:      "CONFIRMED",
        }

        if err := tx.Create(order).Error; err != nil {
            return fmt.Errorf("failed to create order: %w", err)
        }

        // 2. Store event in same transaction
        eventPayload, err := json.Marshal(OrderCreatedEvent{
            OrderID:     order.ID,
            CustomerID:  order.CustomerID,
            TotalAmount: order.TotalAmount,
        })
        if err != nil {
            return fmt.Errorf("failed to serialize event: %w", err)
        }

        outboxEvent := &OutboxEvent{
            ID:        uuid.New().String(),
            EventType: "OrderCreated",
            Payload:   string(eventPayload),
            CreatedAt: time.Now(),
            Status:    OutboxStatusPending,
        }

        if err := tx.Create(outboxEvent).Error; err != nil {
            return fmt.Errorf("failed to store outbox event: %w", err)
        }

        return nil
    })

    return order, err
}

// Event relay service
type OutboxEventRelay struct {
    db            *gorm.DB
    eventPublisher EventPublisher
    ticker         *time.Ticker
    done           chan bool
}

func NewOutboxEventRelay(db *gorm.DB, publisher EventPublisher) *OutboxEventRelay {
    return &OutboxEventRelay{
        db:             db,
        eventPublisher: publisher,
        ticker:         time.NewTicker(1 * time.Second),
        done:           make(chan bool),
    }
}

func (r *OutboxEventRelay) Start(ctx context.Context) {
    go func() {
        for {
            select {
            case <-r.ticker.C:
                r.processOutboxEvents(ctx)
            case <-r.done:
                return
            case <-ctx.Done():
                return
            }
        }
    }()
}

func (r *OutboxEventRelay) processOutboxEvents(ctx context.Context) {
    var events []OutboxEvent

    // Find pending events
    if err := r.db.Where("status = ?", OutboxStatusPending).
        Order("created_at ASC").
        Limit(100).
        Find(&events).Error; err != nil {
        log.Printf("Failed to fetch outbox events: %v", err)
        return
    }

    for _, event := range events {
        if err := r.processEvent(ctx, event); err != nil {
            log.Printf("Failed to process event %s: %v", event.ID, err)

            // Mark as failed
            now := time.Now()
            r.db.Model(&event).Updates(OutboxEvent{
                Status:      OutboxStatusFailed,
                ProcessedAt: &now,
            })
        } else {
            // Mark as processed
            now := time.Now()
            r.db.Model(&event).Updates(OutboxEvent{
                Status:      OutboxStatusProcessed,
                ProcessedAt: &now,
            })
        }
    }
}

func (r *OutboxEventRelay) processEvent(ctx context.Context, event OutboxEvent) error {
    // Deserialize and publish the event
    switch event.EventType {
    case "OrderCreated":
        var orderEvent OrderCreatedEvent
        if err := json.Unmarshal([]byte(event.Payload), &orderEvent); err != nil {
            return err
        }
        return r.eventPublisher.Publish(ctx, orderEvent)

    default:
        return fmt.Errorf("unknown event type: %s", event.EventType)
    }
}
Rust Implementation: Outbox with Diesel
// Outbox event model
use diesel::prelude::*;
use serde::{Deserialize, Serialize};
use chrono::{DateTime, Utc};

#[derive(Debug, Clone, Queryable, Insertable, Serialize, Deserialize)]
#[diesel(table_name = outbox_events)]
pub struct OutboxEvent {
    pub id: String,
    pub event_type: String,
    pub payload: String,
    pub created_at: DateTime<Utc>,
    pub processed_at: Option<DateTime<Utc>>,
    pub status: OutboxStatus,
}

#[derive(Debug, Clone, Serialize, Deserialize, diesel_derive_enum::DbEnum)]
#[ExistingTypePath = "crate::schema::sql_types::OutboxStatus"]
pub enum OutboxStatus {
    Pending,
    Processed,
    Failed,
}

// Service with outbox
impl OrderService {
    transactional! {
        fn process_order_with_outbox(request: CreateOrderRequest) -> Order {
            use crate::schema::orders::dsl::*;
            use crate::schema::outbox_events::dsl::*;

            // 1. Create order
            let new_order = NewOrder {
                customer_id: &request.customer_id,
                total_amount: request.total_amount,
                status: "CONFIRMED",
            };

            let order: Order = diesel::insert_into(orders)
                .values(&new_order)
                .get_result(conn)
                .map_err(TransactionError::Database)?;

            // 2. Create event in same transaction
            let event_payload = serde_json::to_string(&OrderCreatedEvent {
                order_id: order.id,
                customer_id: order.customer_id.clone(),
                total_amount: order.total_amount,
            }).map_err(|e| TransactionError::Business(format!("Event serialization failed: {}", e)))?;

            let outbox_event = OutboxEvent {
                id: uuid::Uuid::new_v4().to_string(),
                event_type: "OrderCreated".to_string(),
                payload: event_payload,
                created_at: Utc::now(),
                processed_at: None,
                status: OutboxStatus::Pending,
            };

            diesel::insert_into(outbox_events)
                .values(&outbox_event)
                .execute(conn)
                .map_err(TransactionError::Database)?;

            Ok(order)
        }
    }
}

// Event relay service
pub struct OutboxEventRelay {
    pool: Pool<ConnectionManager<PgConnection>>,
    event_publisher: Arc<dyn EventPublisher>,
}

impl OutboxEventRelay {
    pub async fn start(&self, mut shutdown: tokio::sync::broadcast::Receiver<()>) {
        let mut interval = tokio::time::interval(Duration::from_secs(1));

        loop {
            tokio::select! {
                _ = interval.tick() => {
                    if let Err(e) = self.process_outbox_events().await {
                        tracing::error!("Failed to process outbox events: {}", e);
                    }
                }
                _ = shutdown.recv() => {
                    tracing::info!("Outbox relay shutting down");
                    break;
                }
            }
        }
    }

    async fn process_outbox_events(&self) -> Result<(), Box<dyn std::error::Error>> {
        use crate::schema::outbox_events::dsl::*;

        let mut conn = self.pool.get()?;

        let pending_events: Vec<OutboxEvent> = outbox_events
            .filter(status.eq(OutboxStatus::Pending))
            .order(created_at.asc())
            .limit(100)
            .load(&mut conn)?;

        for event in pending_events {
            match self.process_single_event(&event).await {
                Ok(_) => {
                    // Mark as processed
                    let now = Utc::now();
                    diesel::update(outbox_events.filter(id.eq(&event.id)))
                        .set((
                            status.eq(OutboxStatus::Processed),
                            processed_at.eq(Some(now))
                        ))
                        .execute(&mut conn)?;
                }
                Err(e) => {
                    tracing::error!("Failed to process event {}: {}", event.id, e);
                    let now = Utc::now();
                    diesel::update(outbox_events.filter(id.eq(&event.id)))
                        .set((
                            status.eq(OutboxStatus::Failed),
                            processed_at.eq(Some(now))
                        ))
                        .execute(&mut conn)?;
                }
            }
        }

        Ok(())
    }
}
Solution 2: Change Data Capture (CDC)
I have used this pattern extensively for high-throughput systems where polling-based outbox patterns couldn’t keep up with the data volume. My first implementation was in the early 2000s when building an intelligent traffic management system, where I used CDC to synchronize data between two subsystems—all database changes were captured and published to a JMS queue, with consumers updating their local databases in near real-time. In subsequent projects, I used CDC to publish database changes directly to Kafka topics, enabling downstream services to build analytical systems, populate data lakes, and power real-time reporting dashboards.
As CDC eliminates the polling overhead entirely, this approach can be scaled to millions of transactions per day while maintaining sub-second latency for downstream consumers.
// CDC-based event publisher using Debezium
@Component
public class CDCEventHandler {

    @Autowired
    private KafkaTemplate<String, String> kafkaTemplate;

    @KafkaListener(topics = "dbserver.public.orders")
    public void handleOrderChange(ConsumerRecord<String, String> record) {
        try {
            // Parse CDC event
            JsonNode changeEvent = objectMapper.readTree(record.value());
            String operation = changeEvent.get("op").asText(); // c=create, u=update, d=delete

            if ("c".equals(operation)) {
                JsonNode after = changeEvent.get("after");

                OrderCreatedEvent event = OrderCreatedEvent.builder()
                    .orderId(after.get("id").asLong())
                    .customerId(after.get("customer_id").asText())
                    .totalAmount(after.get("total_amount").asLong())
                    .build();

                // Publish to business event topic
                kafkaTemplate.send("order-events",
                    event.getOrderId().toString(),
                    objectMapper.writeValueAsString(event));
            }

        } catch (Exception e) {
            log.error("Failed to process CDC event", e);
        }
    }
}
Solution 3: Event Sourcing
I have often used this pattern with financial systems in conjunction with CQRS, where all changes are stored as immutable events and can be replayed if needed. This approach is particularly valuable in financial contexts because it provides a complete audit trail—every account balance change, every trade, every adjustment can be traced back to its originating event.
For systems where events are the source of truth:
// Event store as the primary persistence
@Entity
public class EventStore {
    @Id
    private String eventId;

    private String aggregateId;
    private String eventType;
    private String eventData;
    private Long version;
    private Instant timestamp;

    // getters, setters...
}

@Service
public class EventSourcedOrderService {

    @Transactional
    public void processOrder(CreateOrderRequest request) {
        String orderId = UUID.randomUUID().toString();

        // Store event - this IS the transaction
        OrderCreatedEvent event = new OrderCreatedEvent(orderId, request);

        EventStore eventRecord = new EventStore(
            UUID.randomUUID().toString(),
            orderId,
            "OrderCreated",
            objectMapper.writeValueAsString(event),
            1L,
            Instant.now()
        );

        eventStoreRepository.save(eventRecord);

        // Publish immediately - event is already persisted
        eventPublisher.publishEvent(event);

        // Read model is updated asynchronously via event handlers
    }
}
Database Connection Pooling & Transaction Isolation
One of the most overlooked sources of transaction problems is the mismatch between application threads and database connections. I’ve debugged production deadlocks that turned out to be caused by connection pool starvation rather than actual database contention.
The Thread-Pool vs Connection-Pool Mismatch

// DANGEROUS CONFIGURATION - This will cause deadlocks
@Configuration
public class ProblematicDataSourceConfig {

    @Bean
    public DataSource dataSource() {
        HikariConfig config = new HikariConfig();
        config.setMaximumPoolSize(10);        // Only 10 connections
        config.setConnectionTimeout(30000);   // 30 second timeout
        return new HikariDataSource(config);
    }

    @Bean
    public Executor taskExecutor() {
        ThreadPoolTaskExecutor executor = new ThreadPoolTaskExecutor();
        executor.setCorePoolSize(50);         // 50 threads!
        executor.setMaxPoolSize(100);         // Up to 100 threads!
        return executor;
    }
}

// This service will cause connection pool starvation
@Service
public class ProblematicBulkService {

    @Async
    @Transactional
    public CompletableFuture<Void> processBatch(List<Order> orders) {
        // 100 threads trying to get 10 connections = deadlock
        for (Order order : orders) {
            // Long-running transaction holds connection
            processOrder(order);

            // Calling another transactional method = needs another connection
            auditService.logOrderProcessing(order); // DEADLOCK RISK!
        }
        return CompletableFuture.completedFuture(null);
    }
}
Correct Connection Pool Configuration
@Configuration
public class OptimalDataSourceConfig {

    @Value("${app.database.max-connections:20}")
    private int maxConnections;

    @Bean
    public DataSource dataSource() {
        HikariConfig config = new HikariConfig();

        // Rule of thumb: connections >= active threads + buffer
        config.setMaximumPoolSize(maxConnections);
        config.setMinimumIdle(5);

        // Prevent connection hoarding
        config.setConnectionTimeout(5000);     // 5 seconds
        config.setIdleTimeout(300000);         // 5 minutes
        config.setMaxLifetime(1200000);        // 20 minutes

        // Detect leaked connections
        config.setLeakDetectionThreshold(60000); // 1 minute

        return new HikariDataSource(config);
    }

    @Bean
    public Executor taskExecutor() {
        ThreadPoolTaskExecutor executor = new ThreadPoolTaskExecutor();
        // Keep thread pool smaller than connection pool
        executor.setCorePoolSize(maxConnections - 5);
        executor.setMaxPoolSize(maxConnections);
        executor.setQueueCapacity(100);
        executor.setRejectedExecutionHandler(new ThreadPoolExecutor.CallerRunsPolicy());
        return executor;
    }
}

// Connection-aware bulk processing
@Service
public class OptimalBulkService {

    @Transactional
    public void processBatchOptimized(List<Order> orders) {
        int batchSize = 50; // Tune based on connection pool size

        for (int i = 0; i < orders.size(); i += batchSize) {
            List<Order> batch = orders.subList(i, Math.min(i + batchSize, orders.size()));

            // Process batch in single transaction
            processBatchInternal(batch);

            // Flush and clear to prevent memory issues
            entityManager.flush();
            entityManager.clear();
        }
    }

    private void processBatchInternal(List<Order> batch) {
        // Bulk operations to reduce connection time
        orderRepository.saveAll(batch);

        // Batch audit logging
        List<AuditLog> auditLogs = batch.stream()
            .map(order -> new AuditLog("ORDER_PROCESSED", order.getId()))
            .collect(Collectors.toList());
        auditRepository.saveAll(auditLogs);
    }
}
ETL Transaction Boundaries: The Performance Killer
Object-Relational (OR) mapping and automated transactions simplify development, but I have encountered countless performance issues where the same patterns were used for ETL processing or importing data. For example, I’ve seen code where developers used Hibernate to import millions of records, and it took hours to process data that should have completed in minutes. In other cases, I saw transactions committed after inserting each record—an import job that should have taken an hour ended up running for days.
These performance issues stem from misunderstanding the fundamental differences between OLTP (Online Transaction Processing) and OLAP/ETL (Online Analytical Processing) workloads. OLTP patterns optimize for individual record operations with strict ACID guarantees, while ETL patterns optimize for bulk operations with relaxed consistency requirements. Care must be taken to understand these tradeoffs and choose the right approach for each scenario.
// WRONG - Each record in its own transaction (SLOW!)
@Service
public class SlowETLService {

    public void importOrders(InputStream csvFile) {
        try (BufferedReader reader = new BufferedReader(new InputStreamReader(csvFile))) {
            String line;
            while ((line = reader.readLine()) != null) {
                processOrderRecord(line); // Each call = new transaction!
            }
        }
    }

    @Transactional // New transaction per record = DISASTER
    private void processOrderRecord(String csvLine) {
        Order order = parseOrderFromCsv(csvLine);
        orderRepository.save(order);
        // Commit happens here - thousands of commits!
    }
}

// CORRECT - Batch processing with optimal transaction boundaries
@Service
public class FastETLService {

    @Value("${etl.batch-size:1000}")
    private int batchSize;

    public void importOrdersOptimized(InputStream csvFile) {
        try (BufferedReader reader = new BufferedReader(new InputStreamReader(csvFile))) {
            List<Order> batch = new ArrayList<>(batchSize);
            String line;

            while ((line = reader.readLine()) != null) {
                Order order = parseOrderFromCsv(line);
                batch.add(order);

                if (batch.size() >= batchSize) {
                    processBatch(batch);
                    batch.clear();
                }
            }

            // Process remaining records
            if (!batch.isEmpty()) {
                processBatch(batch);
            }
        }
    }

    @Transactional
    private void processBatch(List<Order> orders) {
        // Single transaction for entire batch
        orderRepository.saveAll(orders);

        // Bulk validation and error handling
        validateBatch(orders);

        // Bulk audit logging
        createAuditEntries(orders);
    }
}
Go Connection Pool Management
// Connection pool configuration with proper sizing
func setupDatabase() *gorm.DB {
    dsn := "host=localhost user=postgres password=secret dbname=orders port=5432 sslmode=disable"

    db, err := gorm.Open(postgres.Open(dsn), &gorm.Config{})
    if err != nil {
        log.Fatal("Failed to connect to database:", err)
    }

    sqlDB, err := db.DB()
    if err != nil {
        log.Fatal("Failed to get SQL DB:", err)
    }

    // Critical: Match pool size to application concurrency
    sqlDB.SetMaxOpenConns(20)        // Maximum connections
    sqlDB.SetMaxIdleConns(5)         // Idle connections
    sqlDB.SetConnMaxLifetime(time.Hour) // Connection lifetime
    sqlDB.SetConnMaxIdleTime(time.Minute * 30) // Idle timeout

    return db
}

// ETL with proper batching
type ETLService struct {
    db        *gorm.DB
    batchSize int
}

func (s *ETLService) ImportOrders(csvFile io.Reader) error {
    scanner := bufio.NewScanner(csvFile)
    batch := make([]*Order, 0, s.batchSize)

    for scanner.Scan() {
        order, err := s.parseOrderFromCSV(scanner.Text())
        if err != nil {
            log.Printf("Failed to parse order: %v", err)
            continue
        }

        batch = append(batch, order)

        if len(batch) >= s.batchSize {
            if err := s.processBatch(batch); err != nil {
                return fmt.Errorf("batch processing failed: %w", err)
            }
            batch = batch[:0] // Reset slice but keep capacity
        }
    }

    // Process remaining orders
    if len(batch) > 0 {
        return s.processBatch(batch)
    }

    return scanner.Err()
}

func (s *ETLService) processBatch(orders []*Order) error {
    return s.db.Transaction(func(tx *gorm.DB) error {
        // Batch insert for performance
        if err := tx.CreateInBatches(orders, len(orders)).Error; err != nil {
            return err
        }

        // Bulk audit logging in same transaction
        auditLogs := make([]*AuditLog, len(orders))
        for i, order := range orders {
            auditLogs[i] = &AuditLog{
                Action:    "ORDER_IMPORTED",
                OrderID:   order.ID,
                Timestamp: time.Now(),
            }
        }

        return tx.CreateInBatches(auditLogs, len(auditLogs)).Error
    })
}
Deadlock Detection and Resolution
Deadlocks are inevitable in high-concurrency systems. The key is detecting and handling them gracefully:
Database-Level Deadlock Prevention

@Service
public class DeadlockAwareAccountService {

    @Retryable(
        value = {CannotAcquireLockException.class, DeadlockLoserDataAccessException.class},
        maxAttempts = 3,
        backoff = @Backoff(delay = 100, multiplier = 2, random = true)
    )
    @Transactional(isolation = Isolation.READ_COMMITTED)
    public void transferFunds(String fromAccountId, String toAccountId, BigDecimal amount) {

        // CRITICAL: Always acquire locks in consistent order to prevent deadlocks
        String firstId = fromAccountId.compareTo(toAccountId) < 0 ? fromAccountId : toAccountId;
        String secondId = fromAccountId.compareTo(toAccountId) < 0 ? toAccountId : fromAccountId;

        // Lock accounts in alphabetical order
        Account firstAccount = accountRepository.findByIdForUpdate(firstId);
        Account secondAccount = accountRepository.findByIdForUpdate(secondId);

        // Determine which is from/to after locking
        Account fromAccount = fromAccountId.equals(firstId) ? firstAccount : secondAccount;
        Account toAccount = fromAccountId.equals(firstId) ? secondAccount : firstAccount;

        if (fromAccount.getBalance().compareTo(amount) < 0) {
            throw new InsufficientFundsException();
        }

        fromAccount.setBalance(fromAccount.getBalance().subtract(amount));
        toAccount.setBalance(toAccount.getBalance().add(amount));

        accountRepository.save(fromAccount);
        accountRepository.save(toAccount);
    }
}

// Custom repository with explicit locking
@Repository
public interface AccountRepository extends JpaRepository<Account, String> {

    @Query("SELECT a FROM Account a WHERE a.id = :id")
    @Lock(LockModeType.PESSIMISTIC_WRITE)
    Account findByIdForUpdate(@Param("id") String id);

    // Timeout-based locking to prevent indefinite waits
    @QueryHints({@QueryHint(name = "javax.persistence.lock.timeout", value = "5000")})
    @Query("SELECT a FROM Account a WHERE a.id = :id")
    @Lock(LockModeType.PESSIMISTIC_WRITE)
    Account findByIdForUpdateWithTimeout(@Param("id") String id);
}
Application-Level Deadlock Detection
// Deadlock-aware service with timeout and retry
type AccountService struct {
    db           *gorm.DB
    lockTimeout  time.Duration
    retryAttempts int
}

func (s *AccountService) TransferFundsWithDeadlockHandling(
    ctx context.Context,
    fromAccountID, toAccountID string,
    amount int64,
) error {

    for attempt := 0; attempt < s.retryAttempts; attempt++ {
        err := s.attemptTransfer(ctx, fromAccountID, toAccountID, amount)

        if err == nil {
            return nil // Success
        }

        // Check if it's a deadlock or timeout error
        if s.isRetryableError(err) {
            // Exponential backoff with jitter
            backoff := time.Duration(attempt+1) * 100 * time.Millisecond
            jitter := time.Duration(rand.Intn(100)) * time.Millisecond

            select {
            case <-time.After(backoff + jitter):
                continue // Retry
            case <-ctx.Done():
                return ctx.Err()
            }
        }

        return err // Non-retryable error
    }

    return fmt.Errorf("transfer failed after %d attempts", s.retryAttempts)
}

func (s *AccountService) attemptTransfer(
    ctx context.Context,
    fromAccountID, toAccountID string,
    amount int64,
) error {

    // Set transaction timeout
    timeoutCtx, cancel := context.WithTimeout(ctx, s.lockTimeout)
    defer cancel()

    return s.db.WithContext(timeoutCtx).Transaction(func(tx *gorm.DB) error {
        // Lock in consistent order
        firstID, secondID := fromAccountID, toAccountID
        if fromAccountID > toAccountID {
            firstID, secondID = toAccountID, fromAccountID
        }

        var fromAccount, toAccount Account

        // Lock first account
        if err := tx.Set("gorm:query_option", "FOR UPDATE NOWAIT").
            Where("id = ?", firstID).First(&fromAccount).Error; err != nil {
            return err
        }

        // Lock second account
        if err := tx.Set("gorm:query_option", "FOR UPDATE NOWAIT").
            Where("id = ?", secondID).First(&toAccount).Error; err != nil {
            return err
        }

        // Ensure we have the right accounts
        if fromAccount.ID != fromAccountID {
            fromAccount, toAccount = toAccount, fromAccount
        }

        if fromAccount.Balance < amount {
            return fmt.Errorf("insufficient funds")
        }

        fromAccount.Balance -= amount
        toAccount.Balance += amount

        if err := tx.Save(&fromAccount).Error; err != nil {
            return err
        }

        return tx.Save(&toAccount).Error
    })
}

func (s *AccountService) isRetryableError(err error) bool {
    errStr := strings.ToLower(err.Error())

    // Common deadlock/timeout indicators
    retryablePatterns := []string{
        "deadlock detected",
        "lock timeout",
        "could not obtain lock",
        "serialization failure",
        "concurrent update",
    }

    for _, pattern := range retryablePatterns {
        if strings.Contains(errStr, pattern) {
            return true
        }
    }

    return false
}
CQRS: Separating Read and Write Transaction Models
I have also used Command Query Responsibility Segregation pattern in some financial applications that allows different transaction strategies for reads vs writes:
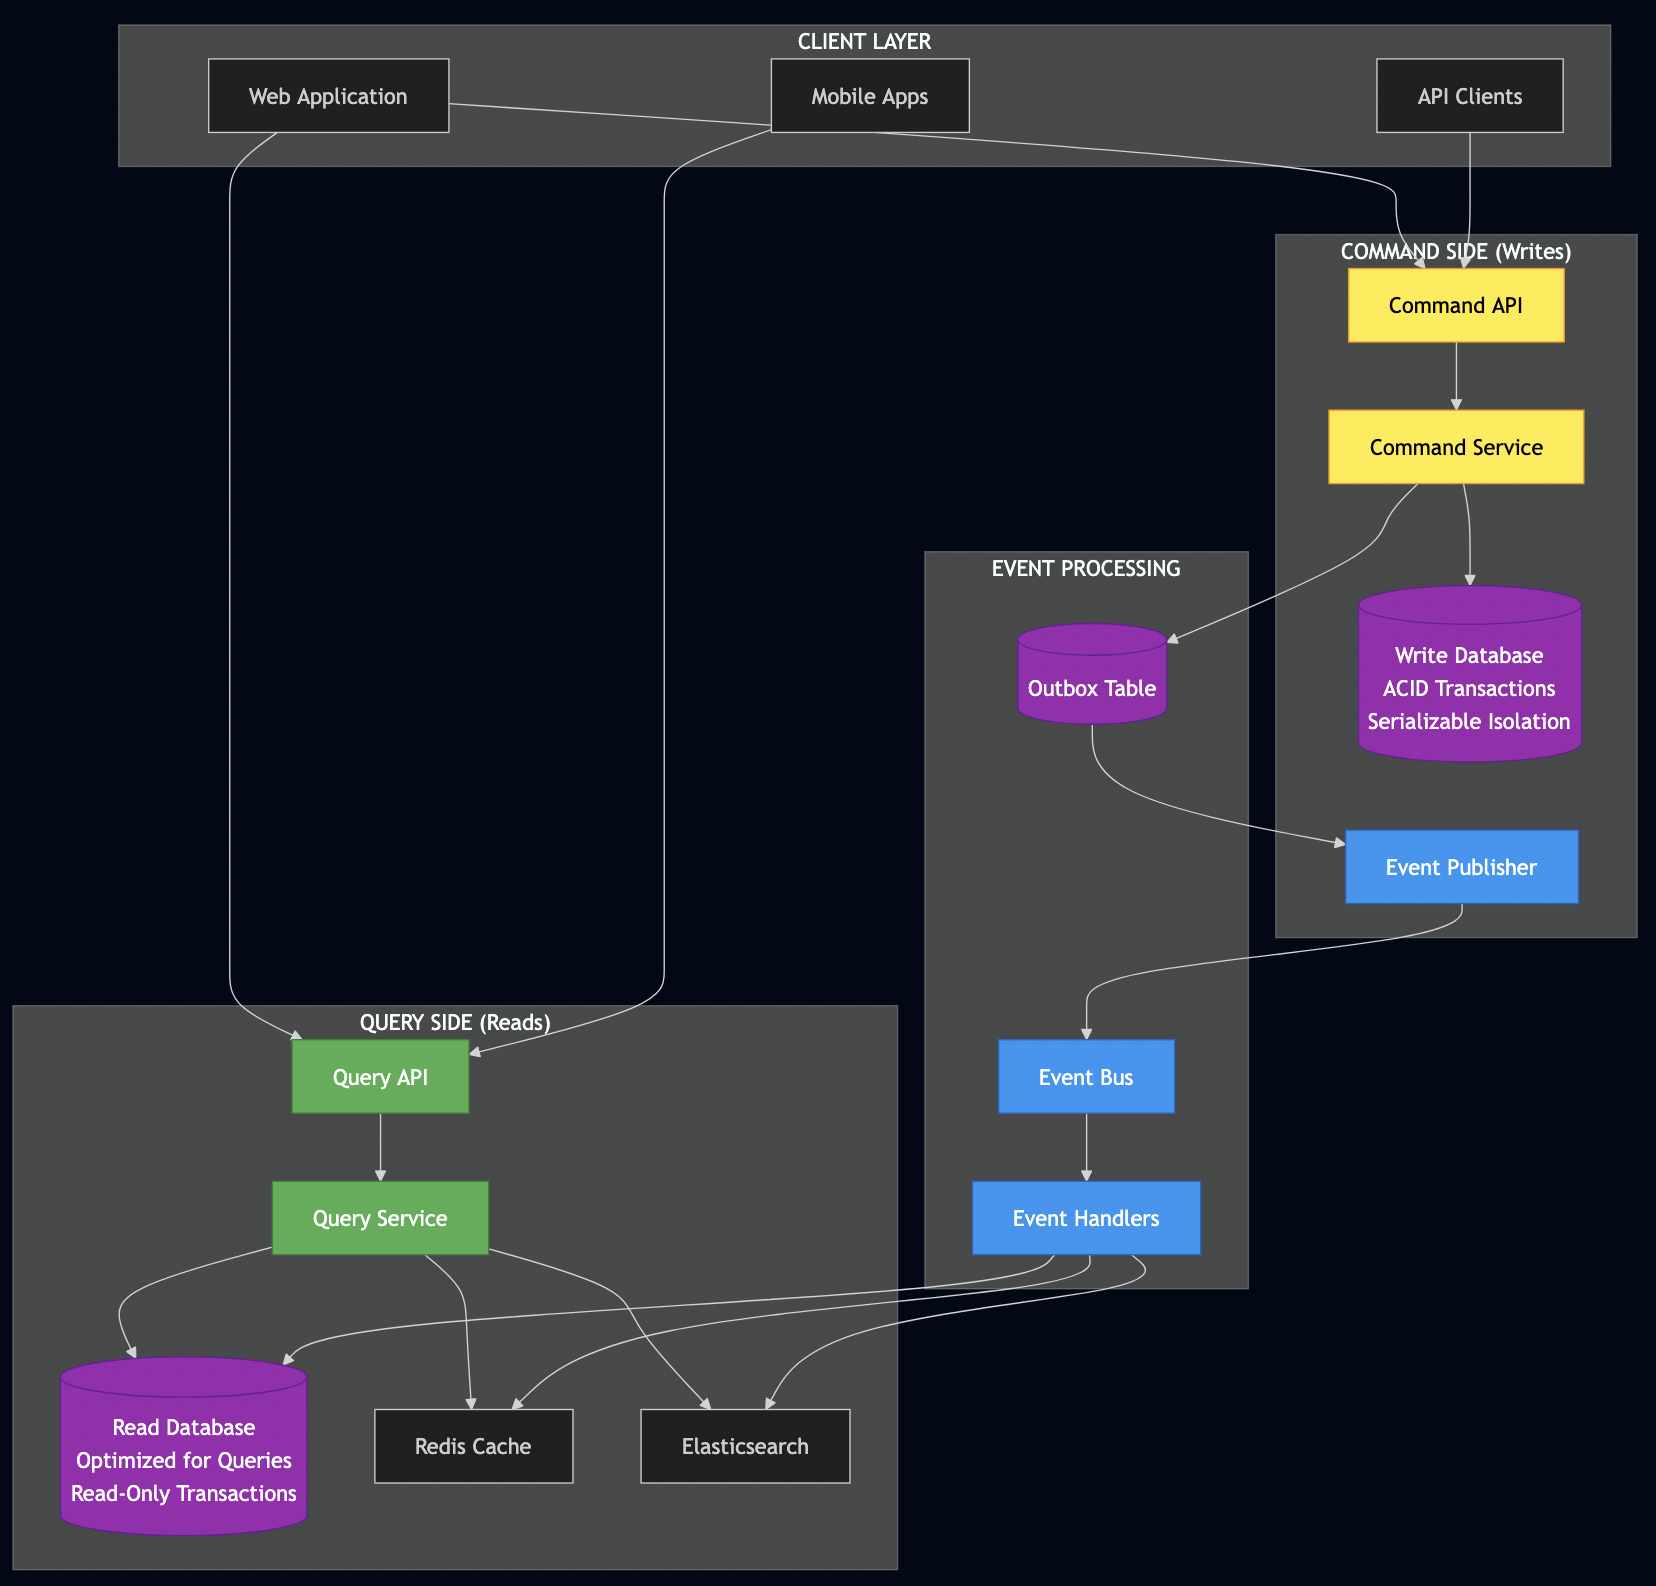
Java CQRS Implementation
// Command side - strict ACID transactions
@Service
public class OrderCommandService {

    @Autowired
    private OrderRepository orderRepository;

    @Autowired
    private EventPublisher eventPublisher;

    @Transactional(isolation = Isolation.SERIALIZABLE)
    public void createOrder(CreateOrderCommand command) {
        // Validate command
        validateOrderCommand(command);

        Order order = new Order(command);
        order = orderRepository.save(order);

        // Publish event for read model update
        eventPublisher.publish(new OrderCreatedEvent(order));
    }

    @Transactional(isolation = Isolation.READ_COMMITTED)
    public void updateOrderStatus(UpdateOrderStatusCommand command) {
        Order order = orderRepository.findById(command.getOrderId())
            .orElseThrow(() -> new OrderNotFoundException());

        order.updateStatus(command.getNewStatus());
        orderRepository.save(order);

        eventPublisher.publish(new OrderStatusChangedEvent(order));
    }
}

// Query side - optimized for reads, eventual consistency
@Service
public class OrderQueryService {

    @Autowired
    private OrderReadModelRepository readModelRepository;

    // Read-only transaction for consistency within the query
    @Transactional(readOnly = true)
    public OrderSummary getOrderSummary(String customerId) {
        List<OrderReadModel> orders = readModelRepository
            .findByCustomerId(customerId);

        return OrderSummary.builder()
            .totalOrders(orders.size())
            .totalAmount(orders.stream()
                .mapToLong(OrderReadModel::getTotalAmount)
                .sum())
            .recentOrders(orders.stream()
                .sorted((o1, o2) -> o2.getCreatedAt().compareTo(o1.getCreatedAt()))
                .limit(10)
                .collect(Collectors.toList()))
            .build();
    }

    // No transaction needed for simple lookups
    public List<OrderReadModel> searchOrders(OrderSearchCriteria criteria) {
        return readModelRepository.search(criteria);
    }
}

// Event handler updates read model asynchronously
@Component
public class OrderReadModelUpdater {

    @EventHandler
    @Async
    @Transactional
    public void handle(OrderCreatedEvent event) {
        OrderReadModel readModel = OrderReadModel.builder()
            .orderId(event.getOrderId())
            .customerId(event.getCustomerId())
            .totalAmount(event.getTotalAmount())
            .status(event.getStatus())
            .createdAt(event.getCreatedAt())
            .build();

        readModelRepository.save(readModel);
    }

    @EventHandler
    @Async
    @Transactional
    public void handle(OrderStatusChangedEvent event) {
        readModelRepository.updateStatus(
            event.getOrderId(),
            event.getNewStatus(),
            event.getUpdatedAt()
        );
    }
}
Data Locality and Performance Considerations
Data locality is critical to performance issues and I have seen a number of performance issues where data-source was not colocated with the data processing APIs resulting in higher network latency and poor performance:
Multi-Region Database Strategy
@Configuration
public class MultiRegionDataSourceConfig {

    // Primary database in same region
    @Bean
    @Primary
    @ConfigurationProperties("spring.datasource.primary")
    public DataSource primaryDataSource() {
        return DataSourceBuilder.create().build();
    }

    // Read replica in same availability zone
    @Bean
    @ConfigurationProperties("spring.datasource.read-replica")
    public DataSource readReplicaDataSource() {
        return DataSourceBuilder.create().build();
    }

    // Cross-region backup for disaster recovery
    @Bean
    @ConfigurationProperties("spring.datasource.cross-region")
    public DataSource crossRegionDataSource() {
        return DataSourceBuilder.create().build();
    }
}

@Service
public class LocalityAwareOrderService {

    @Autowired
    @Qualifier("primaryDataSource")
    private DataSource writeDataSource;

    @Autowired
    @Qualifier("readReplicaDataSource")
    private DataSource readDataSource;

    // Writes go to primary in same region
    @Transactional("primaryTransactionManager")
    public void createOrder(CreateOrderRequest request) {
        // Fast writes - same AZ latency ~1ms
        Order order = new Order(request);
        orderRepository.save(order);
    }

    // Reads from local replica
    @Transactional(value = "readReplicaTransactionManager", readOnly = true)
    public List<Order> getOrderHistory(String customerId) {
        // Even faster reads - same rack latency ~0.1ms
        return orderRepository.findByCustomerId(customerId);
    }

    // Critical path optimization
    @Transactional(timeout = 5) // Fail fast if network issues
    public void processUrgentOrder(UrgentOrderRequest request) {
        // Use connection pooling and keep-alive for predictable latency
        processOrder(request);
    }
}
Go with Regional Database Selection
type RegionalDatabaseConfig struct {
    primaryDB    *gorm.DB
    readReplica  *gorm.DB
    crossRegion  *gorm.DB
}

func NewRegionalDatabaseConfig(region string) *RegionalDatabaseConfig {
    // Select database endpoints based on current region
    primaryDSN := fmt.Sprintf("host=%s-primary.db user=app", region)
    readDSN := fmt.Sprintf("host=%s-read.db user=app", region)
    backupDSN := fmt.Sprintf("host=%s-backup.db user=app", getBackupRegion(region))

    return &RegionalDatabaseConfig{
        primaryDB:   connectWithLatencyOptimization(primaryDSN),
        readReplica: connectWithLatencyOptimization(readDSN),
        crossRegion: connectWithLatencyOptimization(backupDSN),
    }
}

func connectWithLatencyOptimization(dsn string) *gorm.DB {
    db, err := gorm.Open(postgres.Open(dsn), &gorm.Config{})
    if err != nil {
        log.Fatal("Database connection failed:", err)
    }

    sqlDB, _ := db.DB()

    // Optimize for low-latency
    sqlDB.SetMaxOpenConns(20)
    sqlDB.SetMaxIdleConns(20)        // Keep connections alive
    sqlDB.SetConnMaxIdleTime(0)      // Never close idle connections
    sqlDB.SetConnMaxLifetime(time.Hour) // Rotate connections hourly

    return db
}

type OrderService struct {
    config *RegionalDatabaseConfig
}

func (s *OrderService) CreateOrder(ctx context.Context, request CreateOrderRequest) error {
    // Use primary database for writes
    return s.config.primaryDB.WithContext(ctx).Transaction(func(tx *gorm.DB) error {
        order := &Order{
            CustomerID:  request.CustomerID,
            TotalAmount: request.TotalAmount,
            Status:      "PENDING",
        }

        return tx.Create(order).Error
    })
}

func (s *OrderService) GetOrderHistory(ctx context.Context, customerID string) ([]Order, error) {
    var orders []Order

    // Use read replica for queries - better performance
    err := s.config.readReplica.WithContext(ctx).
        Where("customer_id = ?", customerID).
        Order("created_at DESC").
        Find(&orders).Error

    return orders, err
}
Understanding Consistency: ACID vs CAP vs Linearizability
One of the most confusing aspects of distributed systems is that “consistency” means different things in different contexts. The C in ACID has nothing to do with the C in CAP, and this distinction is crucial for designing reliable systems.
The Three Faces of Consistency
// ACID Consistency: Data integrity constraints
@Entity
public class BankAccount {
    @Id
    private String accountId;

    @Column(nullable = false)
    @Min(0) // ACID Consistency: Balance cannot be negative
    private BigDecimal balance;

    @Version
    private Long version;
}

// CAP Consistency: Linearizability across distributed nodes
@Service
public class DistributedAccountService {

    // This requires coordination across all replicas
    @Transactional
    public void withdraw(String accountId, BigDecimal amount) {
        // All replicas must see this change at the same logical time
        // = CAP Consistency (Linearizability)

        BankAccount account = accountRepository.findById(accountId);
        if (account.getBalance().compareTo(amount) < 0) {
            throw new InsufficientFundsException(); // ACID Consistency violated
        }
        account.setBalance(account.getBalance().subtract(amount));
        accountRepository.save(account); // Maintains ACID invariants
    }
}
ACID Consistency ensures your data satisfies business rules and constraints – balances can’t be negative, foreign keys must reference valid records, etc. It’s about data integrity within a single database.
CAP Consistency (Linearizability) means all nodes in a distributed system see the same data at the same time – as if there’s only one copy of the data. It’s about coordination across multiple machines.
Consistency Models in Distributed Systems
Here’s how different NoSQL systems handle consistency:

DynamoDB: Tunable Consistency
I have used DynamoDB extensively in a number of systems, especially when I worked for a large cloud provider. DynamoDB provides both strongly consistent and eventually consistent reads, but when using strongly consistent reads, all requests go to the leader node, which limits performance and scalability and is also more costly from a financial perspective. We had to carefully evaluate each use case to configure proper consistency settings to balance performance requirements with financial costs.
Additionally, NoSQL databases like DynamoDB don’t typically enforce ACID transactions across multiple items or support normal foreign key constraints, though they do support global secondary indexes. This means you have to manually handle compensating transactions and maintain referential integrity in your application code.
// DynamoDB allows you to choose consistency per operation
@Service
public class DynamoConsistencyService {

    @Autowired
    private DynamoDBClient dynamoClient;

    // Eventually consistent read - faster, cheaper, may be stale
    public Order getOrder(String orderId) {
        GetItemRequest request = GetItemRequest.builder()
            .tableName("Orders")
            .key(Map.of("orderId", AttributeValue.builder().s(orderId).build()))
            .consistentRead(false) // Eventually consistent
            .build();

        return dynamoClient.getItem(request);
    }

    // Strongly consistent read - slower, more expensive, always latest
    public Order getOrderStrong(String orderId) {
        GetItemRequest request = GetItemRequest.builder()
            .tableName("Orders")
            .key(Map.of("orderId", AttributeValue.builder().s(orderId).build()))
            .consistentRead(true) // Strongly consistent = linearizable
            .build();

        return dynamoClient.getItem(request);
    }

    // Quorum-based tunable consistency
    public void updateOrderWithQuorum(String orderId, String newStatus) {
        // W + R > N guarantees consistency
        // W=2, R=2, N=3 means writes must succeed on 2 nodes,
        // reads must check 2 nodes, guaranteeing overlap

        UpdateItemRequest request = UpdateItemRequest.builder()
            .tableName("Orders")
            .key(Map.of("orderId", AttributeValue.builder().s(orderId).build()))
            .updateExpression("SET #status = :status")
            .expressionAttributeNames(Map.of("#status", "status"))
            .expressionAttributeValues(Map.of(":status", AttributeValue.builder().s(newStatus).build()))
            .build();

        dynamoClient.updateItem(request);
    }
}
Distributed Locking with DynamoDB
Building on my experience implementing distributed locks with DynamoDB, here’s how to prevent double spending in a distributed NoSQL environment:
// Distributed lock implementation for financial operations
@Service
public class DynamoDistributedLockService {

    @Autowired
    private DynamoDBClient dynamoClient;

    private static final String LOCK_TABLE = "distributed_locks";
    private static final int LOCK_TIMEOUT_SECONDS = 30;

    public boolean acquireTransferLock(String fromAccount, String toAccount, String requestId) {
        // Always lock accounts in consistent order to prevent deadlocks
        List<String> sortedAccounts = Arrays.asList(fromAccount, toAccount)
            .stream()
            .sorted()
            .collect(Collectors.toList());

        String lockKey = String.join(":", sortedAccounts);
        long expiryTime = System.currentTimeMillis() + (LOCK_TIMEOUT_SECONDS * 1000);

        try {
            PutItemRequest request = PutItemRequest.builder()
                .tableName(LOCK_TABLE)
                .item(Map.of(
                    "lock_key", AttributeValue.builder().s(lockKey).build(),
                    "owner", AttributeValue.builder().s(requestId).build(),
                    "expires_at", AttributeValue.builder().n(String.valueOf(expiryTime)).build(),
                    "accounts", AttributeValue.builder().ss(sortedAccounts).build()
                ))
                .conditionExpression("attribute_not_exists(lock_key) OR expires_at < :current_time")
                .expressionAttributeValues(Map.of(
                    ":current_time", AttributeValue.builder().n(String.valueOf(System.currentTimeMillis())).build()
                ))
                .build();

            dynamoClient.putItem(request);
            return true;

        } catch (ConditionalCheckFailedException e) {
            return false; // Lock already held
        }
    }

    public void releaseLock(String fromAccount, String toAccount, String requestId) {
        List<String> sortedAccounts = Arrays.asList(fromAccount, toAccount)
            .stream()
            .sorted()
            .collect(Collectors.toList());

        String lockKey = String.join(":", sortedAccounts);

        DeleteItemRequest request = DeleteItemRequest.builder()
            .tableName(LOCK_TABLE)
            .key(Map.of("lock_key", AttributeValue.builder().s(lockKey).build()))
            .conditionExpression("owner = :request_id")
            .expressionAttributeValues(Map.of(
                ":request_id", AttributeValue.builder().s(requestId).build()
            ))
            .build();

        try {
            dynamoClient.deleteItem(request);
        } catch (ConditionalCheckFailedException e) {
            log.warn("Failed to release lock - may have been taken by another process: {}", lockKey);
        }
    }
}

// Usage in financial service
@Service
public class DynamoFinancialService {

    @Autowired
    private DynamoDistributedLockService lockService;

    public TransferResult transferFunds(String fromAccount, String toAccount, BigDecimal amount) {
        String requestId = UUID.randomUUID().toString();

        // Acquire distributed lock to prevent concurrent transfers
        if (!lockService.acquireTransferLock(fromAccount, toAccount, requestId)) {
            return TransferResult.rejected("Another transfer in progress for these accounts");
        }

        try {
            // Now safe to perform transfer with DynamoDB transactions
            Collection<TransactionWriteRequest> actions = new ArrayList<>();

            // Conditional update for from account
            actions.add(TransactionWriteRequest.builder()
                .update(Update.builder()
                    .tableName("accounts")
                    .key(Map.of("account_id", AttributeValue.builder().s(fromAccount).build()))
                    .updateExpression("SET balance = balance - :amount")
                    .conditionExpression("balance >= :amount") // Prevent negative balance
                    .expressionAttributeValues(Map.of(
                        ":amount", AttributeValue.builder().n(amount.toString()).build()
                    ))
                    .build())
                .build());

            // Conditional update for to account
            actions.add(TransactionWriteRequest.builder()
                .update(Update.builder()
                    .tableName("accounts")
                    .key(Map.of("account_id", AttributeValue.builder().s(toAccount).build()))
                    .updateExpression("SET balance = balance + :amount")
                    .expressionAttributeValues(Map.of(
                        ":amount", AttributeValue.builder().n(amount.toString()).build()
                    ))
                    .build())
                .build());

            // Execute atomic transaction
            TransactWriteItemsRequest txRequest = TransactWriteItemsRequest.builder()
                .transactItems(actions)
                .build();

            dynamoClient.transactWriteItems(txRequest);
            return TransferResult.success();

        } catch (TransactionCanceledException e) {
            return TransferResult.rejected("Transfer failed - likely insufficient funds");
        } finally {
            lockService.releaseLock(fromAccount, toAccount, requestId);
        }
    }
}
The CAP Theorem in Practice
// Real-world CAP tradeoffs in microservices
@Service
public class CAPAwareOrderService {

    // Partition tolerance is mandatory in distributed systems
    // So you choose: Consistency OR Availability

    // CP System: Choose Consistency over Availability
    @CircuitBreaker(fallbackMethod = "fallbackCreateOrder")
    public OrderResponse createOrderCP(CreateOrderRequest request) {
        try {
            // All replicas must acknowledge - may fail if partition occurs
            return orderService.createOrderWithQuorum(request);
        } catch (PartitionException e) {
            // System becomes unavailable during partition
            throw new ServiceUnavailableException("Cannot guarantee consistency during partition");
        }
    }

    // AP System: Choose Availability over Consistency
    public OrderResponse createOrderAP(CreateOrderRequest request) {
        try {
            // Try strong consistency first
            return orderService.createOrderWithQuorum(request);
        } catch (PartitionException e) {
            // Fall back to available replicas - may create conflicts
            log.warn("Partition detected, falling back to eventual consistency");
            return orderService.createOrderEventual(request);
        }
    }

    // Fallback for CP system
    public OrderResponse fallbackCreateOrder(CreateOrderRequest request, Exception ex) {
        // Return cached response or friendly error
        return OrderResponse.builder()
            .status("DEFERRED")
            .message("Order will be processed when system recovers")
            .build();
    }
}
This distinction between ACID consistency and CAP consistency is fundamental to designing distributed systems. ACID gives you data integrity within a single node, while CAP forces you to choose between strong consistency and availability when networks partition. Understanding these tradeoffs lets you make informed architectural decisions based on your business requirements.
CAP Theorem and Financial Consistency
The CAP theorem creates fundamental challenges for financial systems. You cannot have both strong consistency and availability during network partitions, which forces difficult architectural decisions:
// CP System: Prioritize Consistency over Availability
@Service
public class FinancialConsistencyService {

    @CircuitBreaker(fallbackMethod = "rejectTransaction")
    @Transactional(isolation = Isolation.SERIALIZABLE)
    public TransferResult transferFunds(String fromAccount, String toAccount, BigDecimal amount) {
        // Requires consensus across all replicas
        // May become unavailable during partitions

        if (!distributedLockService.acquireLock(fromAccount, toAccount)) {
            throw new ServiceUnavailableException("Cannot acquire distributed lock");
        }

        try {
            // This operation requires strong consistency across all nodes
            Account from = accountService.getAccountWithQuorum(fromAccount);
            Account to = accountService.getAccountWithQuorum(toAccount);

            if (from.getBalance().compareTo(amount) < 0) {
                throw new InsufficientFundsException();
            }

            // Both updates must succeed on majority of replicas
            accountService.updateWithQuorum(fromAccount, from.getBalance().subtract(amount));
            accountService.updateWithQuorum(toAccount, to.getBalance().add(amount));

            return TransferResult.success();

        } finally {
            distributedLockService.releaseLock(fromAccount, toAccount);
        }
    }

    public TransferResult rejectTransaction(String fromAccount, String toAccount,
                                          BigDecimal amount, Exception ex) {
        // During partitions, reject rather than risk double spending
        return TransferResult.rejected("Cannot guarantee consistency during network partition");
    }
}
NoSQL Transaction Limitations: DynamoDB and Compensating Transactions
NoSQL databases often lack ACID guarantees, requiring different strategies:
DynamoDB Optimistic Concurrency
// DynamoDB with optimistic locking using version fields
@DynamoDBTable(tableName = "Orders")
public class DynamoOrder {

    @DynamoDBHashKey
    private String orderId;

    @DynamoDBAttribute
    private String customerId;

    @DynamoDBAttribute
    private Long totalAmount;

    @DynamoDBAttribute
    private String status;

    @DynamoDBVersionAttribute
    private Long version; // DynamoDB handles optimistic locking

    // getters, setters...
}

@Service
public class DynamoOrderService {

    @Autowired
    private DynamoDBMapper dynamoMapper;

    // Optimistic concurrency with retry
    @Retryable(
        value = {ConditionalCheckFailedException.class},
        maxAttempts = 3,
        backoff = @Backoff(delay = 100, multiplier = 2)
    )
    public void updateOrderStatus(String orderId, String newStatus) {
        try {
            // Get current version
            DynamoOrder order = dynamoMapper.load(DynamoOrder.class, orderId);
            if (order == null) {
                throw new OrderNotFoundException();
            }

            // Update with version check
            order.setStatus(newStatus);
            dynamoMapper.save(order); // Fails if version changed

        } catch (ConditionalCheckFailedException e) {
            // Another process modified the record - retry
            throw e;
        }
    }

    // Multi-item transaction using DynamoDB transactions (limited)
    public void transferOrderItems(String fromOrderId, String toOrderId, List<String> itemIds) {
        Collection<TransactionWriteRequest> actions = new ArrayList<>();

        // Read both orders first
        DynamoOrder fromOrder = dynamoMapper.load(DynamoOrder.class, fromOrderId);
        DynamoOrder toOrder = dynamoMapper.load(DynamoOrder.class, toOrderId);

        // Prepare conditional updates
        fromOrder.removeItems(itemIds);
        toOrder.addItems(itemIds);

        actions.add(new TransactionWriteRequest()
            .withConditionCheck(new ConditionCheck()
                .withTableName("Orders")
                .withKey(Collections.singletonMap("orderId", new AttributeValue(fromOrderId)))
                .withConditionExpression("version = :version")
                .withExpressionAttributeValues(Collections.singletonMap(":version",
                    new AttributeValue().withN(fromOrder.getVersion().toString())))))

        actions.add(new TransactionWriteRequest()
            .withUpdate(new Update()
                .withTableName("Orders")
                .withKey(Collections.singletonMap("orderId", new AttributeValue(fromOrderId)))
                .withUpdateExpression("SET #items = :items, version = version + :inc")
                .withConditionExpression("version = :currentVersion")
                .withExpressionAttributeNames(Collections.singletonMap("#items", "items"))
                .withExpressionAttributeValues(Map.of(
                    ":items", new AttributeValue().withSS(fromOrder.getItems()),
                    ":inc", new AttributeValue().withN("1"),
                    ":currentVersion", new AttributeValue().withN(fromOrder.getVersion().toString())
                ))));

        // Execute transaction
        dynamoClient.transactWriteItems(new TransactWriteItemsRequest()
            .withTransactItems(actions));
    }
}
Compensating Transactions for NoSQL
// SAGA pattern for NoSQL databases without transactions
@Service
public class NoSQLOrderSaga {

    @Autowired
    private DynamoOrderService orderService;

    @Autowired
    private MongoInventoryService inventoryService;

    @Autowired
    private CassandraPaymentService paymentService;

    public void processOrderWithCompensation(CreateOrderRequest request) {
        CompensatingTransactionManager saga = new CompensatingTransactionManager();

        try {
            // Step 1: Create order in DynamoDB
            String orderId = saga.execute("CREATE_ORDER",
                () -> orderService.createOrder(request),
                (orderId) -> orderService.deleteOrder(orderId)
            );

            // Step 2: Reserve inventory in MongoDB
            String reservationId = saga.execute("RESERVE_INVENTORY",
                () -> inventoryService.reserveItems(request.getItems()),
                (reservationId) -> inventoryService.releaseReservation(reservationId)
            );

            // Step 3: Process payment in Cassandra
            String paymentId = saga.execute("PROCESS_PAYMENT",
                () -> paymentService.processPayment(request.getPaymentInfo()),
                (paymentId) -> paymentService.refundPayment(paymentId)
            );

            // All steps successful - confirm order
            orderService.confirmOrder(orderId, paymentId, reservationId);

        } catch (Exception e) {
            // Compensate all executed steps
            saga.compensateAll();
            throw new OrderProcessingException("Order processing failed", e);
        }
    }
}

// Generic compensating transaction manager
public class CompensatingTransactionManager {

    private final List<CompensatingAction> executedActions = new ArrayList<>();

    public <T> T execute(String stepName, Supplier<T> action, Consumer<T> compensation) {
        try {
            T result = action.get();
            executedActions.add(new CompensatingAction<>(stepName, result, compensation));
            return result;
        } catch (Exception e) {
            log.error("Step {} failed: {}", stepName, e.getMessage());
            throw e;
        }
    }

    public void compensateAll() {
        // Compensate in reverse order
        for (int i = executedActions.size() - 1; i >= 0; i--) {
            CompensatingAction action = executedActions.get(i);
            try {
                action.compensate();
                log.info("Compensated step: {}", action.getStepName());
            } catch (Exception e) {
                log.error("Compensation failed for step: {}", action.getStepName(), e);
                // In production, you'd send to dead letter queue
            }
        }
    }

    @AllArgsConstructor
    private static class CompensatingAction<T> {
        private final String stepName;
        private final T result;
        private final Consumer<T> compensationAction;

        public void compensate() {
            compensationAction.accept(result);
        }

        public String getStepName() {
            return stepName;
        }
    }
}
Real-World Considerations
After implementing transaction management across dozens of production systems, here are the lessons that only come from battle scars:
Performance vs. Consistency Tradeoffs
// Different strategies for different use cases
@Service
public class OrderService {

    // High-consistency financial operations
    @Transactional(isolation = Isolation.SERIALIZABLE)
    public void processPayment(PaymentRequest request) {
        // Strict ACID guarantees
    }

    // Analytics operations can be eventually consistent
    @Transactional(readOnly = true, isolation = Isolation.READ_COMMITTED)
    public OrderAnalytics generateAnalytics(String customerId) {
        // Faster reads, acceptable if slightly stale
    }

    // Bulk operations need careful batching
    @Transactional
    public void processBulkOrders(List<CreateOrderRequest> requests) {
        int batchSize = 100;
        for (int i = 0; i < requests.size(); i += batchSize) {
            int end = Math.min(i + batchSize, requests.size());
            List<CreateOrderRequest> batch = requests.subList(i, end);

            for (CreateOrderRequest request : batch) {
                processOrder(request);
            }

            // Flush changes to avoid memory issues
            entityManager.flush();
            entityManager.clear();
        }
    }
}
Monitoring and Observability
Transaction boundaries are invisible until they fail. Proper monitoring is crucial:
@Component
public class TransactionMetrics {

    private final MeterRegistry meterRegistry;

    @EventListener
    public void handleTransactionCommit(TransactionCommitEvent event) {
        Timer.Sample sample = Timer.start(meterRegistry);
        sample.stop(Timer.builder("transaction.duration")
                .tag("status", "commit")
                .tag("name", event.getTransactionName())
                .register(meterRegistry));
    }

    @EventListener
    public void handleTransactionRollback(TransactionRollbackEvent event) {
        Counter.builder("transaction.rollback")
                .tag("reason", event.getRollbackReason())
                .register(meterRegistry)
                .increment();
    }
}
Testing Transaction Boundaries
@TestConfiguration
static class TransactionTestConfig {

    @Bean
    @Primary
    public PlatformTransactionManager testTransactionManager() {
        // Use test-specific transaction manager that tracks state
        return new TestTransactionManager();
    }
}

@Test
public void testTransactionRollbackOnFailure() {
    // Given
    CreateOrderRequest request = createValidOrderRequest();

    // Mock payment service to fail
    when(paymentService.processPayment(any(), any()))
        .thenThrow(new PaymentException("Payment failed"));

    // When
    assertThatThrownBy(() -> orderService.processOrder(request))
        .isInstanceOf(PaymentException.class);

    // Then
    assertThat(orderRepository.count()).isEqualTo(0); // No order created
    assertThat(inventoryRepository.findBySku("TEST_SKU").getQuantity())
        .isEqualTo(100); // Inventory not decremented
}
Conclusion
Transaction management isn’t just about preventing data corruption—it’s about building systems that you can reason about, debug, and trust. Whether you’re using Spring’s elegant annotations, Go’s explicit transaction handling, or building custom macros in Rust, the key principles remain the same:
- Make transaction boundaries explicit – Either through annotations, function signatures, or naming conventions
- Fail fast and fail clearly – Don’t let partial failures create zombie states
- Design for compensation – In distributed systems, rollback isn’t always possible
- Monitor transaction health – You can’t improve what you don’t measure
- Test failure scenarios – Happy path testing doesn’t catch transaction bugs
The techniques we’ve covered—from basic ACID transactions to sophisticated SAGA patterns—form a spectrum of tools. Choose the right tool for your consistency requirements, performance needs, and operational complexity. Remember, the best transaction strategy is the one that lets you sleep soundly at night, knowing your data is safe and your system is predictable.
