I have written design docs in large organizations where they were mandatory, and in startups where nobody asked for them. I still wrote them in because I hate expensive surprises. A good design doc is the cheapest place to catch bad assumptions. It is where you discover that the problem is not what the team thinks it is, that the current system is ugly for a reason, that the migration is harder than the redesign.
A bad design doc does the opposite. It makes the solution sound inevitable, skips trade-offs, and pushes the hard questions into implementation. That feels fast right up until production starts collecting interest on every shortcut. Years ago, many teams overdesigned everything. Then Agile arrived, BDUF became taboo, and that correction was needed. But like most pendulum swings in software, we overcorrected. “Don’t overdesign” slowly became “don’t think too much.” That is usually how bad design docs fail: not in review, but later, in production. This post is about those failures.
A design doc is not documentation
A design doc is not a status update. It is not proof that architecture was “discussed” and we can start coding. A design doc is a decision document. It should answer a small number of questions clearly:
What problem are we solving?
What is wrong with the current system?
What options did we consider?
Why is this option better?
What does it cost us?
How will it behave in production?
How will we deploy it, test it, observe it, and back it out?
If the document cannot answer those questions, it is not a design doc. It is a sales pitch. Because the biggest value of a design doc is that it forces a clarity. Full sentences are harder to write than bullets. They expose fuzzy thinking. They expose fake trade-offs. If you cannot explain the problem crisply in prose, you probably do not understand it well enough to build the solution.
Not every task needs a design doc.
I am not arguing for a memo before every commit. But if the change has a large blast radius, touches customer-facing behavior, takes weeks or months to implement, adds new dependencies, changes the operational model, then skipping the design doc is usually just deferred thinking. A proof of concept can help explore a technology. It cannot make the design decision for you.
That is another trap teams fall into. They build a small prototype, get something working, and then quietly promote the prototype into the architecture. A PoC can answer whether something is possible. It rarely answers whether it is the right choice once requirements, scale, operations, migration, and failure modes enter the picture.
Common design document anti-patterns
1. The doc starts with the solution
This is the most common failure. The title says:
“Move to Event-Driven Architecture”
“Build a Shared Workflow Engine”
“Adopt gRPC Internally”
By page two, the author is trying to invent a problem that justifies the answer already chosen. That is not design. That is confirmation bias. A real design doc starts with pain:
what is broken,
who feels it,
how often it happens,
what it costs,
and why now matters.
If the first section cannot explain the problem without naming the preferred technology, the doc is already weak.
2. The problem statement is vague
Bad docs hide behind words like: scalable, flexible, reliable, modern, future-proof. Those words mean nothing without numbers and constraints. Scalable to what? Reliable under what failure mode? A good design doc can explain the problem in one simple sentence. That sentence does not need to be clever. It needs to be clear.
3. No current-state analysis
A surprising number of redesigns are written as if the current system is too embarrassing to discuss. That is a mistake. Before proposing change, the document must explain:
what exists today,
what works,
what does not,
what improvements were already tried,
and which constraints came from history rather than incompetence.
Otherwise the new design floats in empty space. Reviewers cannot judge whether the proposal is necessary, proportional, or even safer than what exists now. I have seen teams rebuild old mistakes in new codebases because nobody bothered to explain why the old system looked the way it did.
4. No explicit decision points
One of the easiest ways to waste a review is to make nobody sure what decision is actually needed. You invite ten people. You walk through twelve pages. You get comments on naming, schemas, and edge cases. Then the meeting ends with “good discussion.” Good discussion about what? A strong design doc names the decisions up front:
Should this stay synchronous or become asynchronous?
Should we improve the current system or replace it?
Should we optimize for near-term delivery or long-term reuse?
Should this roll out in phases or all at once?
If reviewers do not know what they are approving, the meeting is not a design review. It is architecture theater.
5. Only one option is presented
A doc with one option is not doing design. It is asking for permission. A real alternatives section should compare at least:
the current system,
an incremental improvement,
a larger redesign.
And it should evaluate each one with the same criteria like complexity, delivery time, migration cost, operational risk, long-term fit, rollback difficulty, etc. Weak alternatives are easy to spot. They exist only to make the preferred answer look inevitable. That is not analysis. That is stage lighting.
6. The doc is all diagrams and no behavior
The bad architecture diagram looks clean because it omits every painful thing.
What is missing?
retries/timeouts,
queues,
failure paths,
consistency model,
startup/shutdown behavior,
observability,
rollout boundaries.
A useful design doc explains system behavior, not just topology.
A diagram should force the hard questions, not hide them.
7. “Flexible” is used to hide indecision
This shows up everywhere like generic workflow engine, abstraction layer, configurable state machine, future-proof resource model, plugin architecture, etc. Flexibility is not free. It adds code, states, tests, docs, and future confusion. If the document argues for flexibility, it should name the exact variation it is buying. Otherwise “flexible” usually means “we do not want to decide yet.”
8. No stakeholders, only authors
A design doc written as if only the authors matter is usually missing half the constraints. A strong document names:
customers/downstream consumers,
partner teams,
SRE or operations owners,
security and compliance reviewers,
migration owners,
and the people who will actually operate the result.
9. No supporting data
Many bad docs are built entirely on intuition like ”customers want this”, “performance is a concern”, “the current solution does not scale”, etc. Maybe but show me. Use data where it matters:
latency numbers,
failure rates,
support burden,
cost profile,
customer pain,
migration friction,
adoption gaps.
And if the data is incomplete, say so. Honest uncertainty beats fake precision every time.
10. The document ignores requirements and jumps to implementation
A lot of docs rush into endpoints, services, queues, schemas, state machines, etc. Before they have separated:
business requirements,
technical requirements,
non-requirements,
and nice-to-haves.
That is how teams build the implementation they like instead of the system the problem actually requires. A good design doc works backward from requirements. It does not reverse-engineer requirements from the chosen design.
11. Functional requirements are detailed, non-functional ones are hand-wavy
This is one of the most expensive mistakes in design docs. The author carefully explains resource models and workflows. Then non-functional requirements get three weak lines like must be secure, must be scalable, must be observable. A serious design doc must be concrete about:
latency and performance,
availability and recovery,
scale assumptions,
capacity limits,
security boundaries,
privacy impact,
cost,
testing,
operations,
visibility,
monitoring,
alarming,
and release strategy.
Most painful incidents come from things that were “out of scope” in design but very much in scope in reality.
12. Observability is missing or lacking
This is the fastest path to production blindness. Bad docs do not define:
what metrics matter,
what logs matter,
what traces matter,
what dashboards must exist,
what alerts page on-call,
how operators diagnose dependencies, latency, or error spikes.
If the document cannot answer, “How will on-call debug this at 2 a.m.?” it is incomplete.
13. No test plan
“Unit tests will cover this” is not a test strategy. A real design doc should say how the change will be validated across:
unit tests,
integration tests,
end-to-end tests,
load tests,
canaries,
failure injection,
rollback validation,
and game days where appropriate.
A system that cannot be tested safely cannot be changed safely.
14. No deployment or release plan
The code path is described. The rollout path is not. Bad docs ignore:
phased rollout,
canaries,
feature flags,
cell or region rollout,
migration sequencing,
readiness checks,
automatic rollback,
launch criteria,
and customer onboarding gates.
Good design does not stop at build-time behavior. It includes how the system gets to production without hurting customers.
15. No rollback story
A deployment section without a rollback section is half a design. What happens if:
the canary regresses latency,
the schema change is wrong,
the queue backs up,
downstream clients fail,
or the new workflow leaves resources in a mixed state?
Every risky design needs a big red button. Not a vague hope. A real action:
stop traffic,
disable the feature,
revert the config,
drain the workers,
route to a degraded path,
return a controlled error,
or restore the last known good state.
If rollback is an afterthought, the rollout plan is fiction.
16. The doc describes the steady state but not the failure state
Most architecture docs assume every dependency is healthy and every component behaves. Real systems do not. A strong design doc explains:
what happens when a dependency times out,
when startup occurs during an outage,
when shutdown interrupts in-flight work,
when a rollout fails halfway,
and when rollback itself is imperfect.
17. The document is too long because it has no spine
Some docs are not too detailed. They are simply undisciplined. They include: screenshots, random notes, every edge case ever mentioned, and multiple separable topics jammed into one review. If the document cannot be read and discussed in one serious session, it is probably trying to do too much. Split the deep dives. Split the migration plan. Split the deployment details. Keep the core decision document focused on the actual decision.
18. The appendix carries the real argument
The main doc is vague. The important material is buried in appendices or links. That is backwards. The appendix should support the argument, not contain it. If reviewers need four extra docs to understand the recommendation, the author has not done the work.
19. The writing is vague because the thinking is vague
This is where writing quality matters more than most engineers admit. Weak design docs hide behind passive voice, overloaded jargon, bullets that dump unrelated ideas, and paragraphs that never land a clear point. Bad writing is often a design smell. The fastest way to discover a weak design is often to force it into full sentences. Full sentences make you commit to claims, assumptions, and trade-offs. They remove the hiding place. Writing is not separate from design. Writing is where the design proves whether it makes sense.
20. The review process is treated as ceremony
This is another place where teams lose value. They schedule a review too early, or too late. They invite the wrong people. They do not define the decisions needed. They edit the document while people are reading it. They leave without summarizing outcomes. Then they schedule a second review without properly addressing the first. A review should have a point:
what decision needs to be made,
who must be in the room,
what feedback is blocking,
what can be handled offline,
and what the next step is.
Reviewer time is expensive. Churn is self-inflicted damage.
21. No path forward after approval
Another common failure: the document ends at “approved.” No phases, milestones, follow-up docs, migration steps. Approval is not the end of the design. It is the start of accountable execution. A design doc should leave the reader knowing what happens next.
22. No ADRs or recorded decisions
Despite design discussions for tradeoffs and acceptance of a few choices are accepted, if the decisions are not recorded then nobody will remember why they were made. That is how architecture drifts.
If a decision matters enough to debate, it matters enough to record. A common tool for this is an Architecture Decision Record (ADR). An ADR is a short document, usually one page, that captures a single decision: the context that forced it, the options considered, the choice made, and the consequences. It is not a design doc. It is a permanent note attached to the decision so that future engineers can read why the system is the way it is.
23. The doc has no long-term point of view
This appears in two forms. The first is naive short-termism: the document solves the immediate issue but never explains where the architecture is heading. The second is fake future-proofing: the design becomes bloated with speculative flexibility. The right middle is simple:
say what this design intentionally does not solve,
state how it fits long-term goals,
and explain whether it can evolve in stages.
24. The document reads like it is trying to get approved, not trying to be right
This is the meta anti-pattern behind all the others. You can feel it when reading because the tone is too certain, the trade-offs are too clean, the unknowns are hidden. the alternatives are weak, etc. The best docs do not sound like that. They sound like real engineering:
here is the problem,
here is the current state,
here are the options,
here is why I prefer this one,
here is what it costs,
here is what can go wrong,
and here is what I still do not know.
That tone earns trust. The polished sales pitch does not.
The essential sections every good design doc should include
This is the part too many teams skip or dilute. If these sections are weak, the design is weak.
1. Executive summary and purpose
Keep it short. State the problem, the proposed direction, and the exact decision needed. This section should make it obvious why the reviewer is reading the document.
2. Background, problem statement, and current state
Explain what led to this proposal, what is working, what is not, what previous attempts were made, and why the current system is no longer enough.
3. Proposal, stakeholders, and supporting data
This is the core decision section. It should include the preferred option, stakeholders, supporting evidence, assumptions, constraints, risks, and whether the decision is reversible or one-way.
4. Architecture
This section should include a diagram, but also explain components, interactions, dependencies, data flow, control flow, consistency boundaries, and failure paths.
5. Alternatives
Compare the chosen approach with real alternatives: current state, incremental improvement, broader redesign. Use the same criteria for all of them. Be candid about the downsides of your preferred option.
6. Functional requirements
This section should cover interfaces, workflows, dependencies, data model or schema changes, lifecycle states, scalability assumptions, and reasons for adopting new technologies.
7. Non-functional requirements
This section should include performance, scale, availability, fault tolerance, rollback and recovery, security, privacy, compliance, testing, cost, operations, visibility, monitoring, and on-call support.
8. Future plans, release plan, and appendices
It should close with phased delivery, rollout gates, migration plan, open questions, references, FAQ, glossary, and a change log. Do not use appendices to smuggle in major new arguments. Use them to support the story the main document already told.
9. Decision log
A design doc captures the proposal. An ADR captures each significant choice that came out of the review. After approval, for every decision that was seriously contested or has long-term consequences, write a one-page ADR. A minimal ADR has five fields:
# ADR-[number]: [Short title of the decision]

**Date:** YYYY-MM-DD
**Status:** Proposed | Accepted | Deprecated | Superseded by ADR-[n]
**Deciders:** [Names or teams]

## Context
What forced this decision? What constraints, requirements, or failure modes made this a real choice?

## Decision
What was decided? State it as a single clear sentence.

## Alternatives considered
What else was on the table? Why was each rejected?

## Consequences
What does this decision cost? What does it enable? What is harder now?
That is enough. Do not over-engineer the template. The goal is that an engineer two years from now can read this and understand why the system is shaped the way it is, without having to find the original author.
Writing advice most engineers ignore
This part matters because bad writing usually exposes bad thinking.
Keep the narrative tight: A design doc should read like an argument, not like a paste dump. The table of contents should tell a story: problem, current state, options, recommendation, trade-offs, rollout. If the table of contents itself is confused, the design probably is too.
Use full sentences: Bullets are useful. They are not enough. Full sentences force the author to commit to claims, assumptions, and trade-offs. They expose fuzzy logic faster than any architecture diagram.
Keep it short enough to review: If the document cannot be read and discussed in one serious session, split it. High-level design, deep dives, migration strategy, deployment details, and error-handling internals do not always belong in the same review.
Use diagrams carefully: Diagrams should reduce ambiguity, not add decoration. Name them, keep them consistent, and use them to show boundaries and flows.
Define acronyms once: Every team overestimates how obvious its vocabulary is. The doc should not require tribal knowledge to parse it.
Do not hide the hard part in links: Links reduce clutter. They do not replace the core argument. The main decisions must be understandable from the document itself.
What good looks like
A good design doc is not flashy. It is specific, honest and operational. It makes trade-offs visible. It gives reviewers something real to approve or reject. Most importantly, it treats writing as engineering work. The quality of the writing often exposes the quality of the thinking. If the problem is fuzzy, the writing will be fuzzy. If the decision is weak, the language will hide behind buzzwords. If the architecture has no operational model, the document will go strangely quiet around deployment, monitoring, and rollback.
Final thought
People say design docs slow teams down. Bad ones, ceremonial ones, bloated ones do. Good design docs save time because they move the expensive mistakes earlier, when they are still cheap. The real waste is not spending an extra day writing a serious design doc. The real waste is spending eighteen months undoing a design that nobody challenged properly because the document never forced the right conversation. That is how not to write a design document. And the second most expensive waste is spending months figuring out why a past decision was made because nobody wrote it down. That is what ADRs are for.
I’ve spent the last year building AI agents in enterprise environments. During this time, I’ve extensively applied emerging standards like Model Context Protocol (MCP) from Anthropic and the more recent Agent-to-Agent (A2A) Protocol for agent communication and coordination. What I’ve learned: there’s a massive gap between building a quick proof-of-concept with these protocols and deploying a production-grade system. The concerns that get overlooked in production deployments are exactly what will take you down at 3 AM:
Multi-tenant isolation with row-level security (because one leaked document = lawsuit)
JWT-based authentication across microservices (no shared sessions, fully stateless)
Real-time observability of agent actions (when agents misbehave, you need to know WHY)
Cost tracking and budgeting per user and model (because OpenAI bills compound FAST)
Graceful degradation when embeddings aren’t available (real data is messy)
Integration testing against real databases (mocks lie to you)
Disregarding security concerns can lead to incidents like the Salesloft breach where their AI chatbot inadvertently stored authentication tokens for hundreds of services, which exposed customer data across multiple platforms. More recently in October 2025, Filevine (a billion-dollar legal AI platform) exposed 100,000+ confidential legal documents through an unauthenticated API endpoint that returned full admin tokens to their Box filesystem. No authentication required, just a simple API call. I’ve personally witnessed security issues from inadequate AuthN/AuthZ controls and cost overruns exceeding hundreds of thousands of dollars, which are preventable with proper security and budget enforcement.
The good news is that MCP and A2A protocols provide the foundation to solve these problems. Most articles treat these as competing standards but they are complementary. In this guide, I’ll show you exactly how to combine MCP and A2A to build a system that handles real production concerns: multi-tenancy, authentication, cost control, and observability.
Reference Implementation
To demonstrate these concepts in action, I’ve built a reference implementation that showcases production-ready patterns.
Architecture Philosophy:
Three principles guided every decision:
Go for servers, Python for workflows – Use the right tool for each job. Go handles high-throughput protocol servers. Python handles AI workflows.
Database-level security – Multi-tenancy enforced via PostgreSQL row-level security (RLS), not application code. Impossible to bypass accidentally.
Stateless everything – Every service can scale horizontally. No sticky sessions, no shared state, no single points of failure.
All containerized, fully tested, and ready for production deployment.
But before we dive into the implementation, let’s understand the fundamental problem these protocols solve and why you need both.
Part 1: Understanding MCP and A2A
The Core Problem: Integration Chaos
Prior to MCP protocol in 2024, you had to build custom integration with LLM providers, data sources and AI frameworks. Every AI application had to reinvent authentication, data access, and orchestration, whichdoesn’t scale. MCP and A2A emerged to solve different aspects of this chaos:
The MCP Side: Standardized Tool Execution
Think of MCP as a standardized toolbox for AI models. Instead of every AI application writing custom integrations for databases, APIs, and file systems, MCP provides a JSON-RPC 2.0 protocol that models use to:
“MCP excels at synchronous, stateless tool execution. It’s perfect when you need an AI model to retrieve information, execute a function, and return results immediately.”
The server executes the tool and returns results. Simple, stateless, fast.
Why JSON-RPC 2.0? Because it’s:
Language-agnostic – Works with any language that speaks HTTP
Batch-capable – Multiple requests in one HTTP call
Error-standardized – Consistent error codes across implementations
Widely adopted – 20+ years of production battle-testing
The A2A Side: Stateful Workflow Orchestration
A2A handles what MCP doesn’t: multi-step, stateful workflows where agents collaborate. From the A2A Protocol docs:
“A2A is designed for asynchronous, stateful orchestration of complex tasks that require multiple steps, agent coordination, and long-running processes.”
A2A provides:
Task creation and management with persistent state
Real-time streaming of progress updates (Server-Sent Events)
Agent coordination across multiple services
Artifact management for intermediate results
Why Both Protocols Matter
Here’s a real scenario from my fintech work that illustrates why you need both:
Use Case: Compliance analyst needs to research a company across 10,000 documents, verify regulatory compliance, cross-reference with SEC filings, and generate an audit-ready report.
“Use MCP when you need fast, stateless tool execution. Use A2A when you need complex, stateful orchestration. Use both when building production systems.”
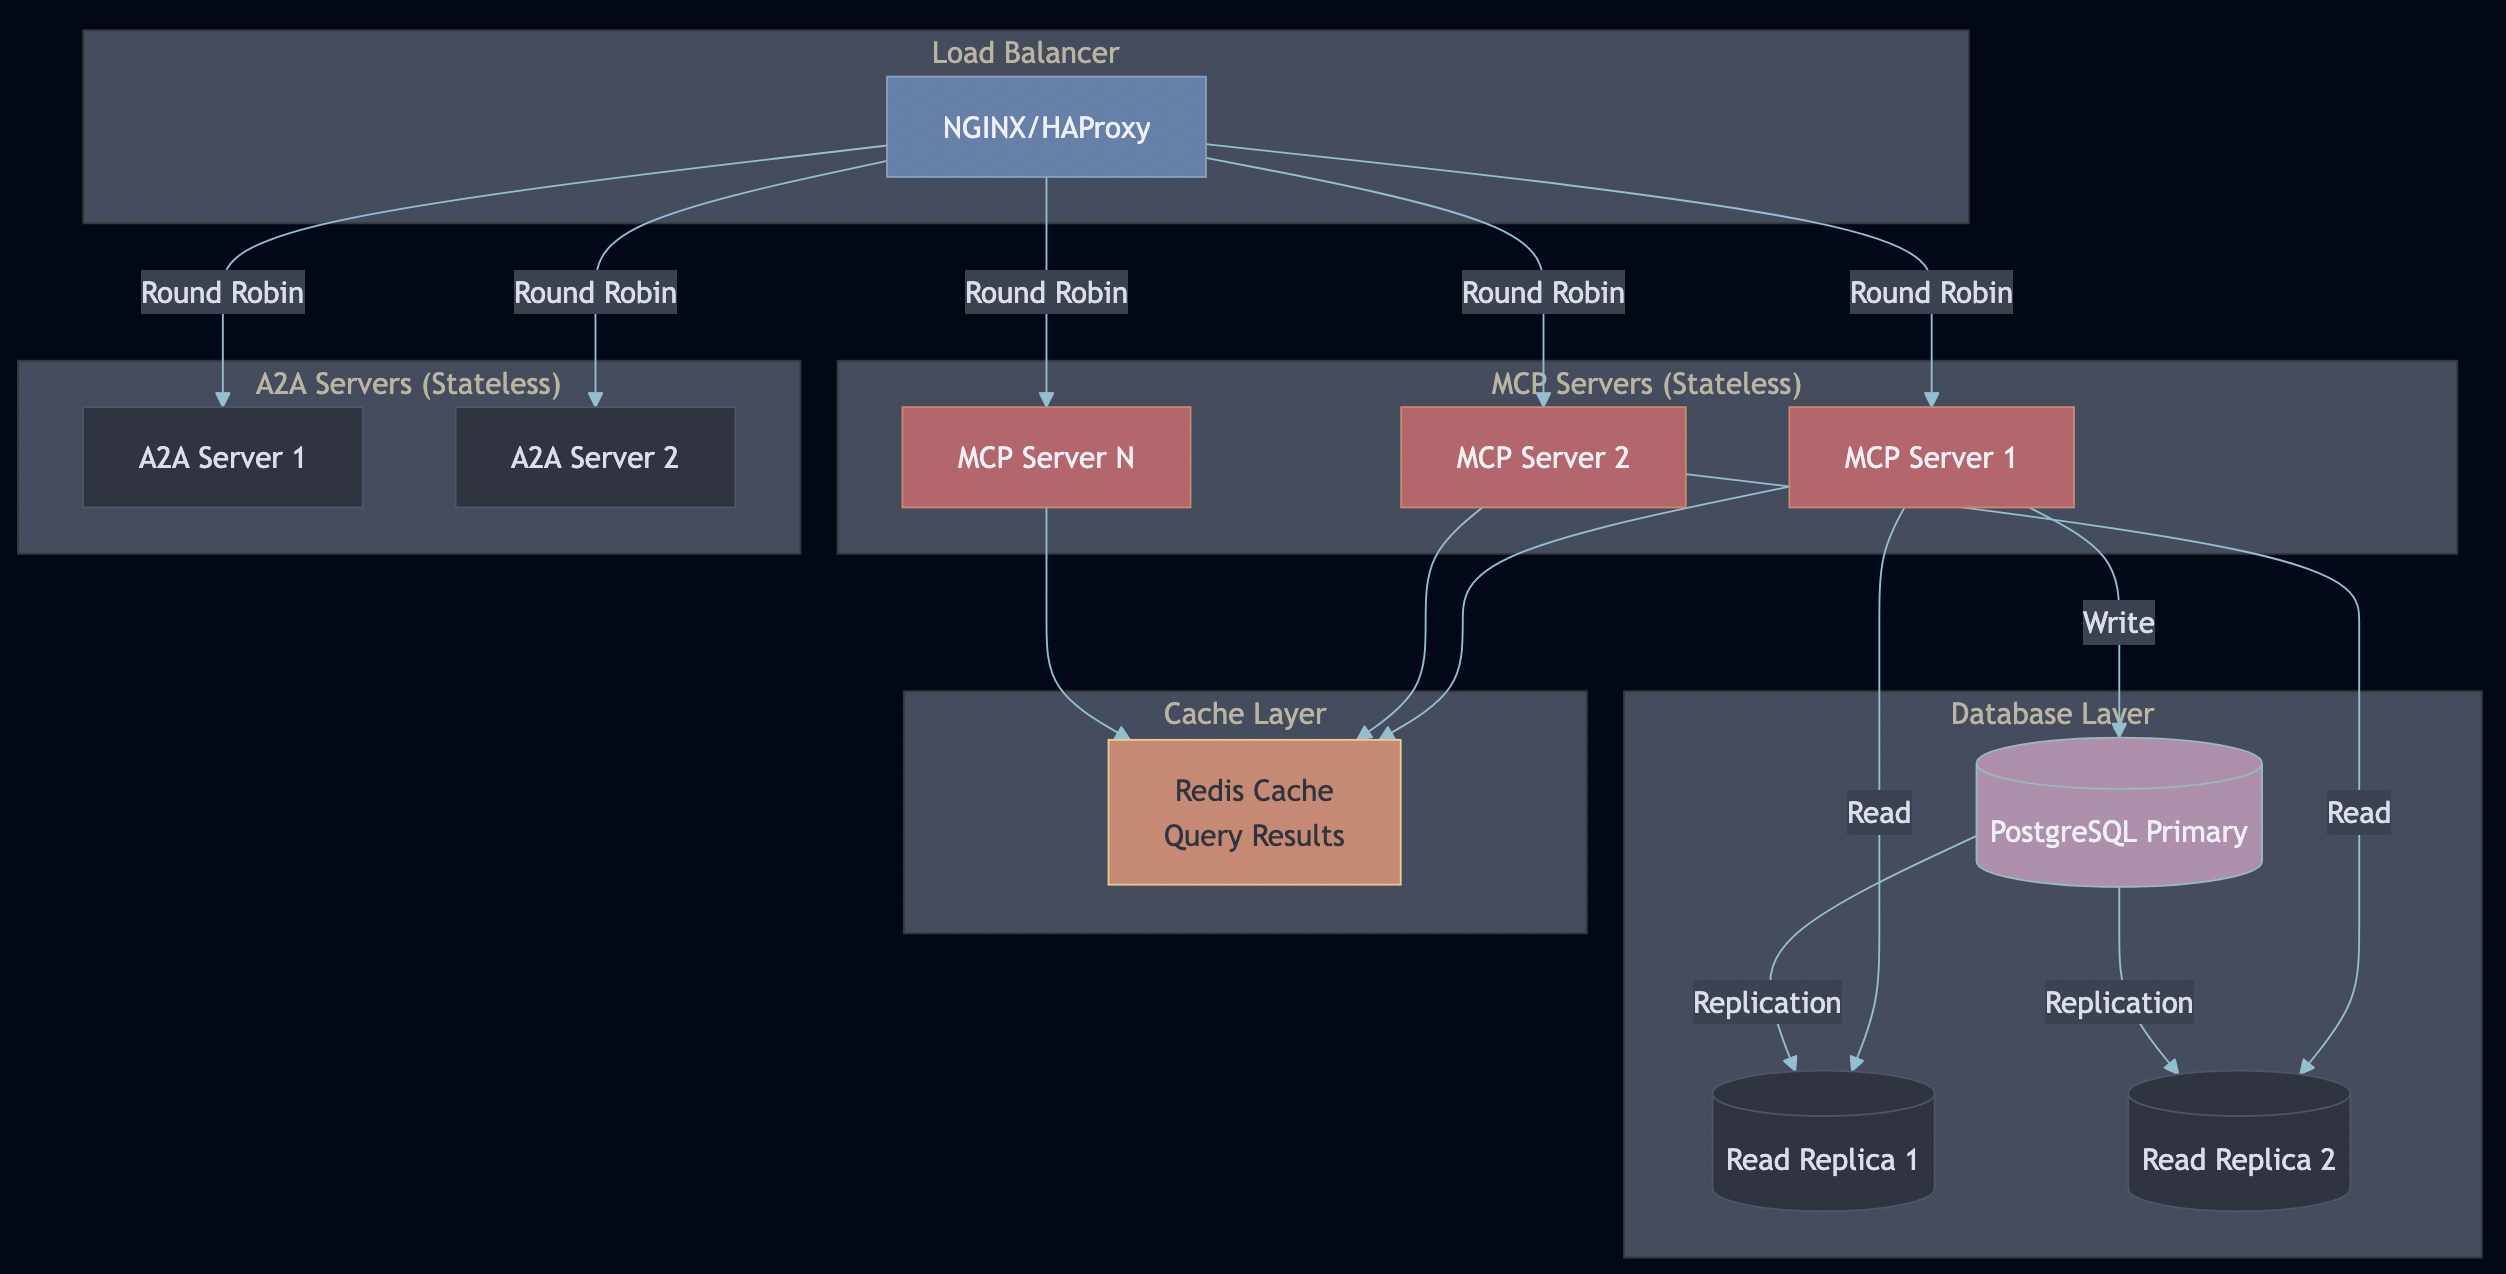
Part 2: Architecture
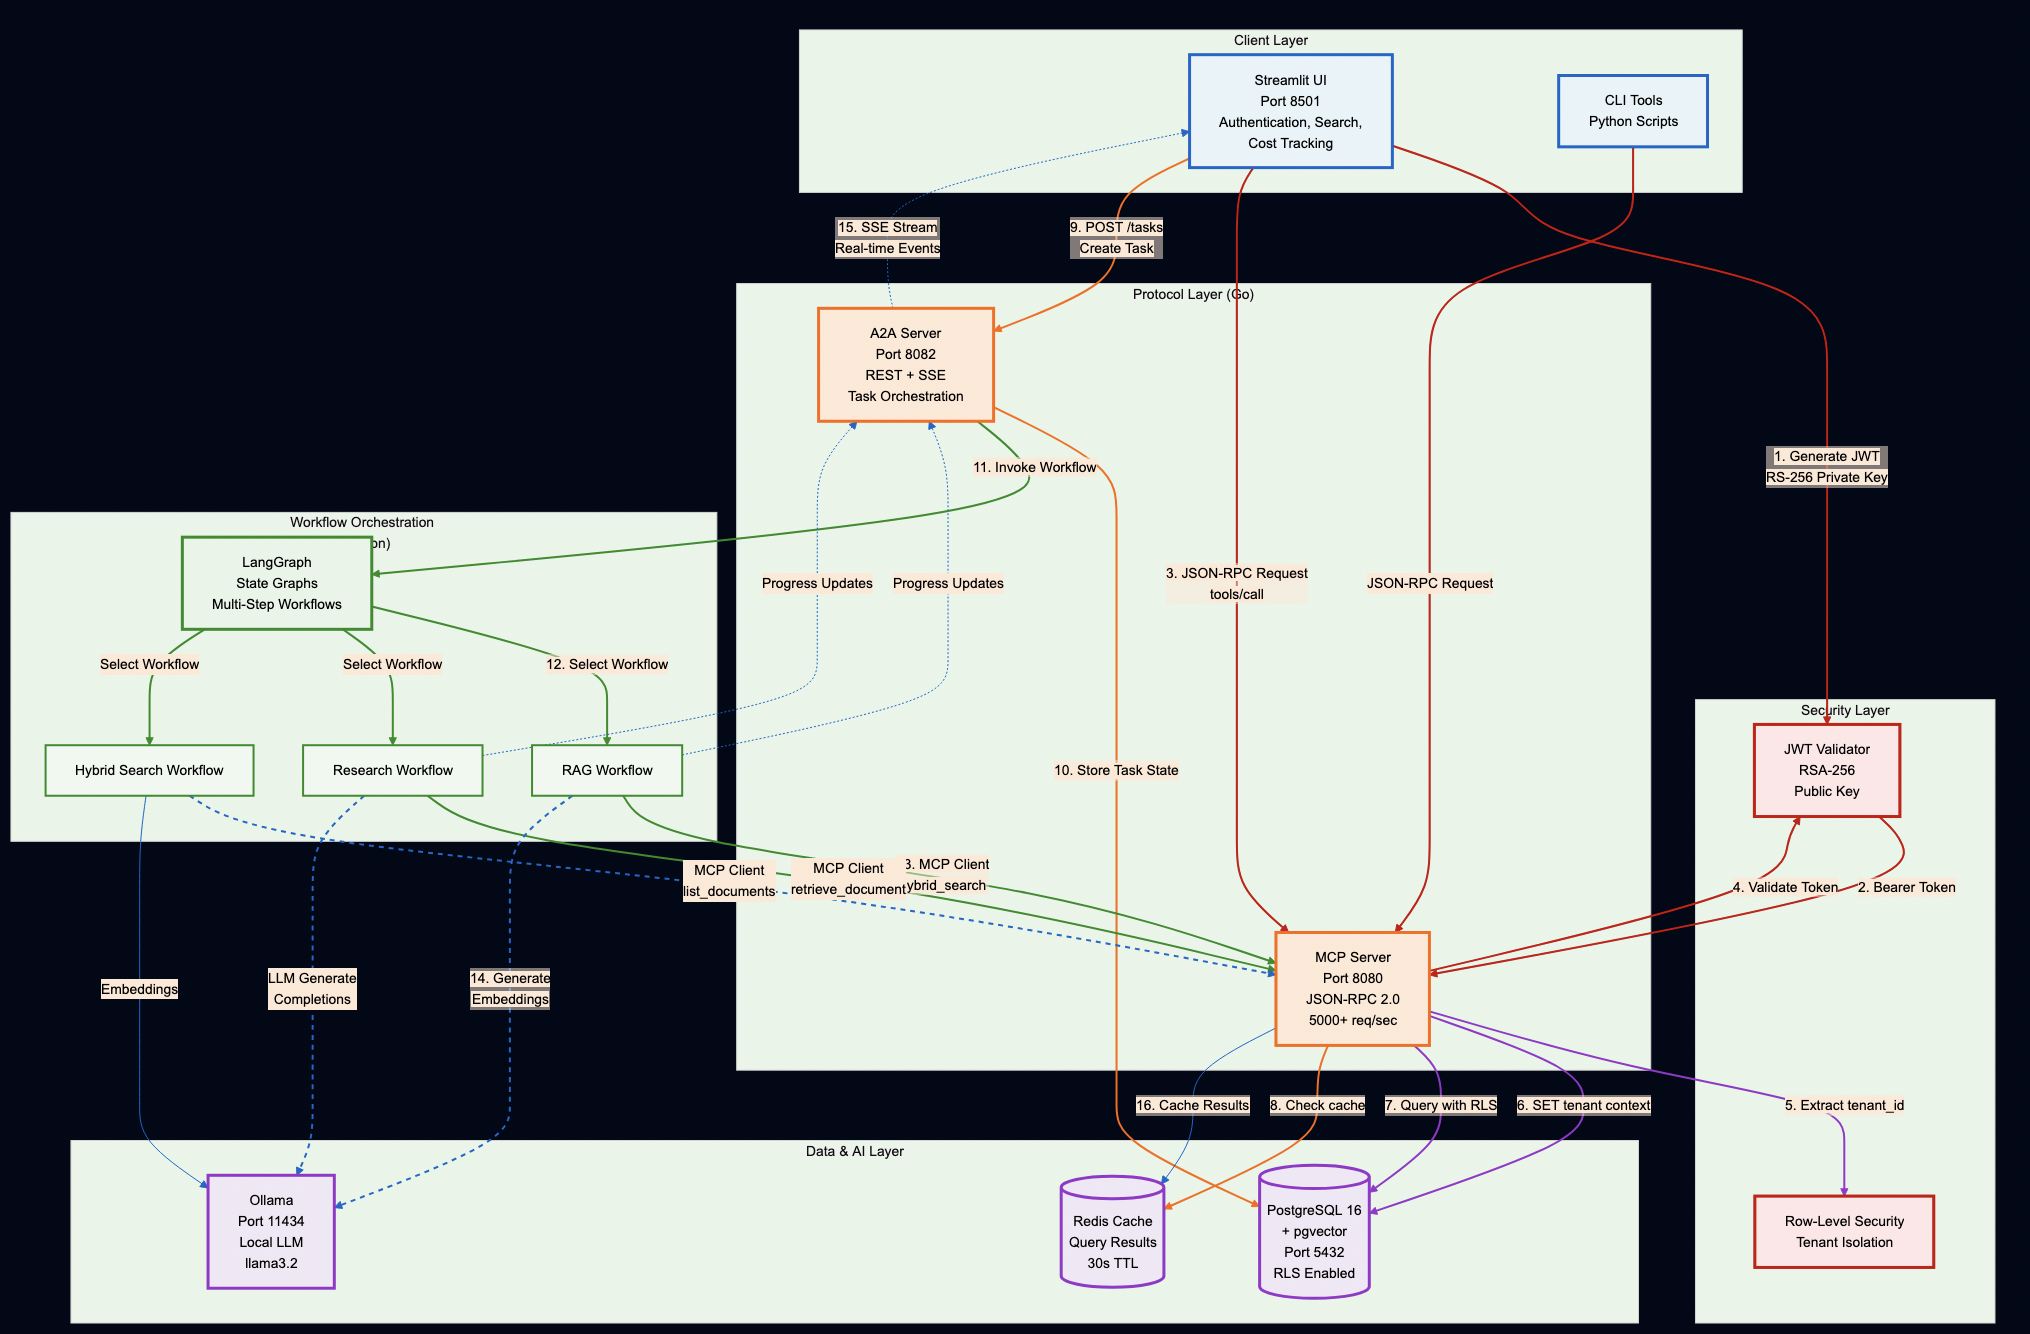
System Overview
Key Design Decisions
Protocol Servers (Go):
MCP Server – Secure document retrieval with pgvector and hybrid search. Go’s concurrency model handles 5,000+ req/sec, and its type safety catches integration bugs at compile time (not at runtime).
A2A Server – Multi-step workflow orchestration with Server-Sent Events for real-time progress tracking. Stateless design enables horizontal scaling.
AI Workflows (Python):
LangGraph Workflows – RAG, research, and hybrid pipelines. Python was the right choice here because the AI ecosystem (LangChain, embeddings, model integrations) lives in Python.
PostgreSQL with pgvector – Multi-tenant document storage with row-level security policies enforced at the database level (not application level)
Ollama – Local LLM inference for development and testing (no OpenAI API keys required)
DatabaseSecurity:
Application-level tenant filtering for database is not enough so row-level security policies are enforced:
// ? BAD: Application-level filtering (can be bypassed)
func GetDocuments(tenantID string) ([]Document, error) {
    query := "SELECT * FROM documents WHERE tenant_id = ?"
    // What if someone forgets the WHERE clause?
    // What if there's a SQL injection?
    // What if a bug skips this check?
}
-- ? GOOD: Database-level Row-Level Security (impossible to bypass)
ALTER TABLE documents ENABLE ROW LEVEL SECURITY;

CREATE POLICY tenant_isolation ON documents
    USING (tenant_id = current_setting('app.current_tenant_id')::uuid);
Every query automatically filters by tenant so there is no way to accidentally leak data. Even if your application has a bug, the database enforces isolation.
JWT Authentication
MCP server and UI share RSA keys for token verification, which provides:
Asymmetric: MCP server only needs public key (can’t forge tokens)
Rotation: Rotate private key without redeploying services
The reference implementation (hybrid_search.go) uses PostgreSQL’s full-text search (BM25-like) combined with pgvector:
// Hybrid search query using Reciprocal Rank Fusion
query := `
    WITH bm25_results AS (
        SELECT
            id,
            ts_rank_cd(
                to_tsvector('english', title || ' ' || content),
                plainto_tsquery('english', $1)
            ) AS bm25_score,
            ROW_NUMBER() OVER (ORDER BY ts_rank_cd(...) DESC) AS bm25_rank
        FROM documents
        WHERE to_tsvector('english', title || ' ' || content) @@ plainto_tsquery('english', $1)
    ),
    vector_results AS (
        SELECT
            id,
            1 - (embedding <=> $2) AS vector_score,
            ROW_NUMBER() OVER (ORDER BY embedding <=> $2) AS vector_rank
        FROM documents
        WHERE embedding IS NOT NULL
    ),
    combined AS (
        SELECT
            COALESCE(b.id, v.id) AS id,
            -- Reciprocal Rank Fusion score
            (
                COALESCE(1.0 / (60 + b.bm25_rank), 0) * $3 +
                COALESCE(1.0 / (60 + v.vector_rank), 0) * $4
            ) AS combined_score
        FROM bm25_results b
        FULL OUTER JOIN vector_results v ON b.id = v.id
    )
    SELECT * FROM combined
    ORDER BY combined_score DESC
    LIMIT $7
`
Why Reciprocal Rank Fusion (RRF)? Because:
Score normalization: BM25 scores and vector similarities aren’t comparable
Rank-based: Uses position, not raw scores
Research-backed: Used by search engines (Elasticsearch, Vespa)
Tunable: Adjust k parameter (60 in our case) for different behaviors
Part 3: The MCP Server – Secure Document Retrieval
Understanding JSON-RPC 2.0
Before we dive into implementation, let’s understand why MCP chose JSON-RPC 2.0.
Here’s the complete hybrid search tool (hybrid_search.go) implementation with detailed comments:
// mcp-server/internal/tools/hybrid_search.go
type HybridSearchTool struct {
    db database.Store
}

func (t *HybridSearchTool) Execute(ctx context.Context, args map[string]interface{}) (protocol.ToolCallResult, error) {
    // 1. AUTHENTICATION: Extract tenant from JWT claims
    //    This happens at middleware level, but we verify here
    tenantID, ok := ctx.Value(auth.ContextKeyTenantID).(string)
    if !ok {
        return protocol.ToolCallResult{IsError: true}, fmt.Errorf("tenant ID not found in context")
    }

    // 2. PARAMETER PARSING: Extract and validate arguments
    query, _ := args["query"].(string)
    if query == "" {
        return protocol.ToolCallResult{IsError: true}, fmt.Errorf("query is required")
    }

    limit, _ := args["limit"].(float64)
    if limit <= 0 {
        limit = 10 // default
    }
    if limit > 50 {
        limit = 50 // max cap
    }

    bm25Weight, _ := args["bm25_weight"].(float64)
    vectorWeight, _ := args["vector_weight"].(float64)

    // 3. WEIGHT NORMALIZATION: Ensure weights sum to 1.0
    if bm25Weight == 0 && vectorWeight == 0 {
        bm25Weight = 0.5
        vectorWeight = 0.5
    }

    // 4. EMBEDDING GENERATION: Using Ollama for query embedding
    var embedding []float32
    if vectorWeight > 0 {
        embedding = generateEmbedding(query) // Calls Ollama API
    }

    // 5. DATABASE QUERY: Execute hybrid search with RLS
    params := database.HybridSearchParams{
        Query:        query,
        Embedding:    embedding,
        Limit:        int(limit),
        BM25Weight:   bm25Weight,
        VectorWeight: vectorWeight,
    }

    results, err := t.db.HybridSearch(ctx, tenantID, params)
    if err != nil {
        return protocol.ToolCallResult{IsError: true}, err
    }

    // 6. RESPONSE FORMATTING: Convert to JSON for client
    jsonData, _ := json.Marshal(results)
    return protocol.ToolCallResult{
        Content: []protocol.ContentBlock{{Type: "text", Text: string(jsonData)}},
        IsError: false,
    }, nil
}
The NULL Embedding Problem
Real-world data is messy. Not every document has an embedding. Here’s what happened:
Initial Implementation (Broken):
// ? This crashes with NULL embeddings
var embedding pgvector.Vector

err = tx.QueryRow(ctx, query, docID).Scan(
    &doc.ID,
    &doc.TenantID,
    &doc.Title,
    &doc.Content,
    &doc.Metadata,
    &embedding, // CRASH: can't scan <nil> into pgvector.Vector
    &doc.CreatedAt,
    &doc.UpdatedAt,
)
Error:
can't scan into dest[5]: unsupported data type: <nil>
The Fix (Correct):
// ? Use pointer types for nullable fields
var embedding *pgvector.Vector // Pointer allows NULL

err = tx.QueryRow(ctx, query, docID).Scan(
    &doc.ID,
    &doc.TenantID,
    &doc.Title,
    &doc.Content,
    &doc.Metadata,
    &embedding, // Can be NULL now
    &doc.CreatedAt,
    &doc.UpdatedAt,
)

// Handle NULL embeddings gracefully
if embedding != nil && embedding.Slice() != nil {
    doc.Embedding = embedding.Slice()
} else {
    doc.Embedding = nil // Explicitly set to nil
}

return doc, nil
Hybrid search handles this elegantly—documents without embeddings get vector_score = 0 but still appear in results if they match BM25:
-- Hybrid search handles NULL embeddings gracefully
WITH bm25_results AS (
    SELECT id, ts_rank(to_tsvector('english', content), query) AS bm25_score
    FROM documents
    WHERE to_tsvector('english', content) @@ query
),
vector_results AS (
    SELECT id, 1 - (embedding <=> $1) AS vector_score
    FROM documents
    WHERE embedding IS NOT NULL  -- ? Skip NULL embeddings
)
SELECT
    d.*,
    COALESCE(b.bm25_score, 0) AS bm25_score,
    COALESCE(v.vector_score, 0) AS vector_score,
    ($2 * COALESCE(b.bm25_score, 0) + $3 * COALESCE(v.vector_score, 0)) AS combined_score
FROM documents d
LEFT JOIN bm25_results b ON d.id = b.id
LEFT JOIN vector_results v ON d.id = v.id
WHERE COALESCE(b.bm25_score, 0) > 0 OR COALESCE(v.vector_score, 0) > 0
ORDER BY combined_score DESC
LIMIT $4;
Why this matters:
? Documents without embeddings still searchable (BM25)
? New documents usable immediately (embeddings generated async)
? System degrades gracefully (not all-or-nothing)
? Zero downtime for embedding model updates
Tenant Isolation in Action
Every MCP request sets the tenant context at the database transaction level:
// mcp-server/internal/database/postgres.go
func (db *DB) SetTenantContext(ctx context.Context, tx pgx.Tx, tenantID string) error {
    // Note: SET commands don't support parameter binding
    // TenantID is validated as UUID by JWT validator, so this is safe
    query := fmt.Sprintf("SET LOCAL app.current_tenant_id = '%s'", tenantID)
    _, err := tx.Exec(ctx, query)
    return err
}
Combined with RLS policies, this ensures complete tenant isolation at the database level.
Real-world security test:
// Integration test: Verify tenant isolation
func TestTenantIsolation(t *testing.T) {
    // Create documents for two tenants
    tenant1Doc := createDocument(t, db, "tenant-1", "Secret Data A")
    tenant2Doc := createDocument(t, db, "tenant-2", "Secret Data B")

    // Query as tenant-1
    ctx1 := contextWithTenant(ctx, "tenant-1")
    results1, _ := db.ListDocuments(ctx1, "tenant-1", ListParams{Limit: 100})

    // Query as tenant-2
    ctx2 := contextWithTenant(ctx, "tenant-2")
    results2, _ := db.ListDocuments(ctx2, "tenant-2", ListParams{Limit: 100})

    // Assertions
    assert.Contains(t, results1, tenant1Doc)
    assert.NotContains(t, results1, tenant2Doc) // ? Cannot see other tenant

    assert.Contains(t, results2, tenant2Doc)
    assert.NotContains(t, results2, tenant1Doc) // ? Cannot see other tenant
}
Part 4: The A2A Server – Workflow Orchestration
Task Lifecycle
A2A manages stateful tasks through their entire lifecycle:
Server-Sent Events for Real-Time Updates
Why SSE instead of WebSockets?
Feature
SSE
WebSocket
Unidirectional
? Yes (server?client)
? No (bidirectional)
HTTP/2 multiplexing
? Yes
? No
Automatic reconnection
? Built-in
? Manual
Firewall-friendly
? Yes (HTTP)
?? Sometimes blocked
Complexity
? Simple
? Complex
Browser support
? All modern
? All modern
SSE is perfect for agent progress updates because:
One-way communication (server pushes updates)
Simple implementation
Automatic reconnection
Works through corporate firewalls
SSE provides real-time streaming without WebSocket complexity:
// a2a-server/internal/handlers/tasks.go
func (h *TaskHandler) StreamEvents(w http.ResponseWriter, r *http.Request) {
    taskID := chi.URLParam(r, "taskId")

    // Set SSE headers
    w.Header().Set("Content-Type", "text/event-stream")
    w.Header().Set("Cache-Control", "no-cache")
    w.Header().Set("Connection", "keep-alive")
    w.Header().Set("Access-Control-Allow-Origin", "*")

    flusher, ok := w.(http.Flusher)
    if !ok {
        http.Error(w, "Streaming not supported", http.StatusInternalServerError)
        return
    }

    // Stream task events
    for {
        event := h.taskManager.GetNextEvent(taskID)
        if event == nil {
            break // Task complete
        }

        // Format as SSE event
        data, _ := json.Marshal(event)
        fmt.Fprintf(w, "event: task_update\n")
        fmt.Fprintf(w, "data: %s\n\n", data)
        flusher.Flush()

        if event.Status == "completed" || event.Status == "failed" {
            break
        }
    }
}
Client-side consumption is trivial:
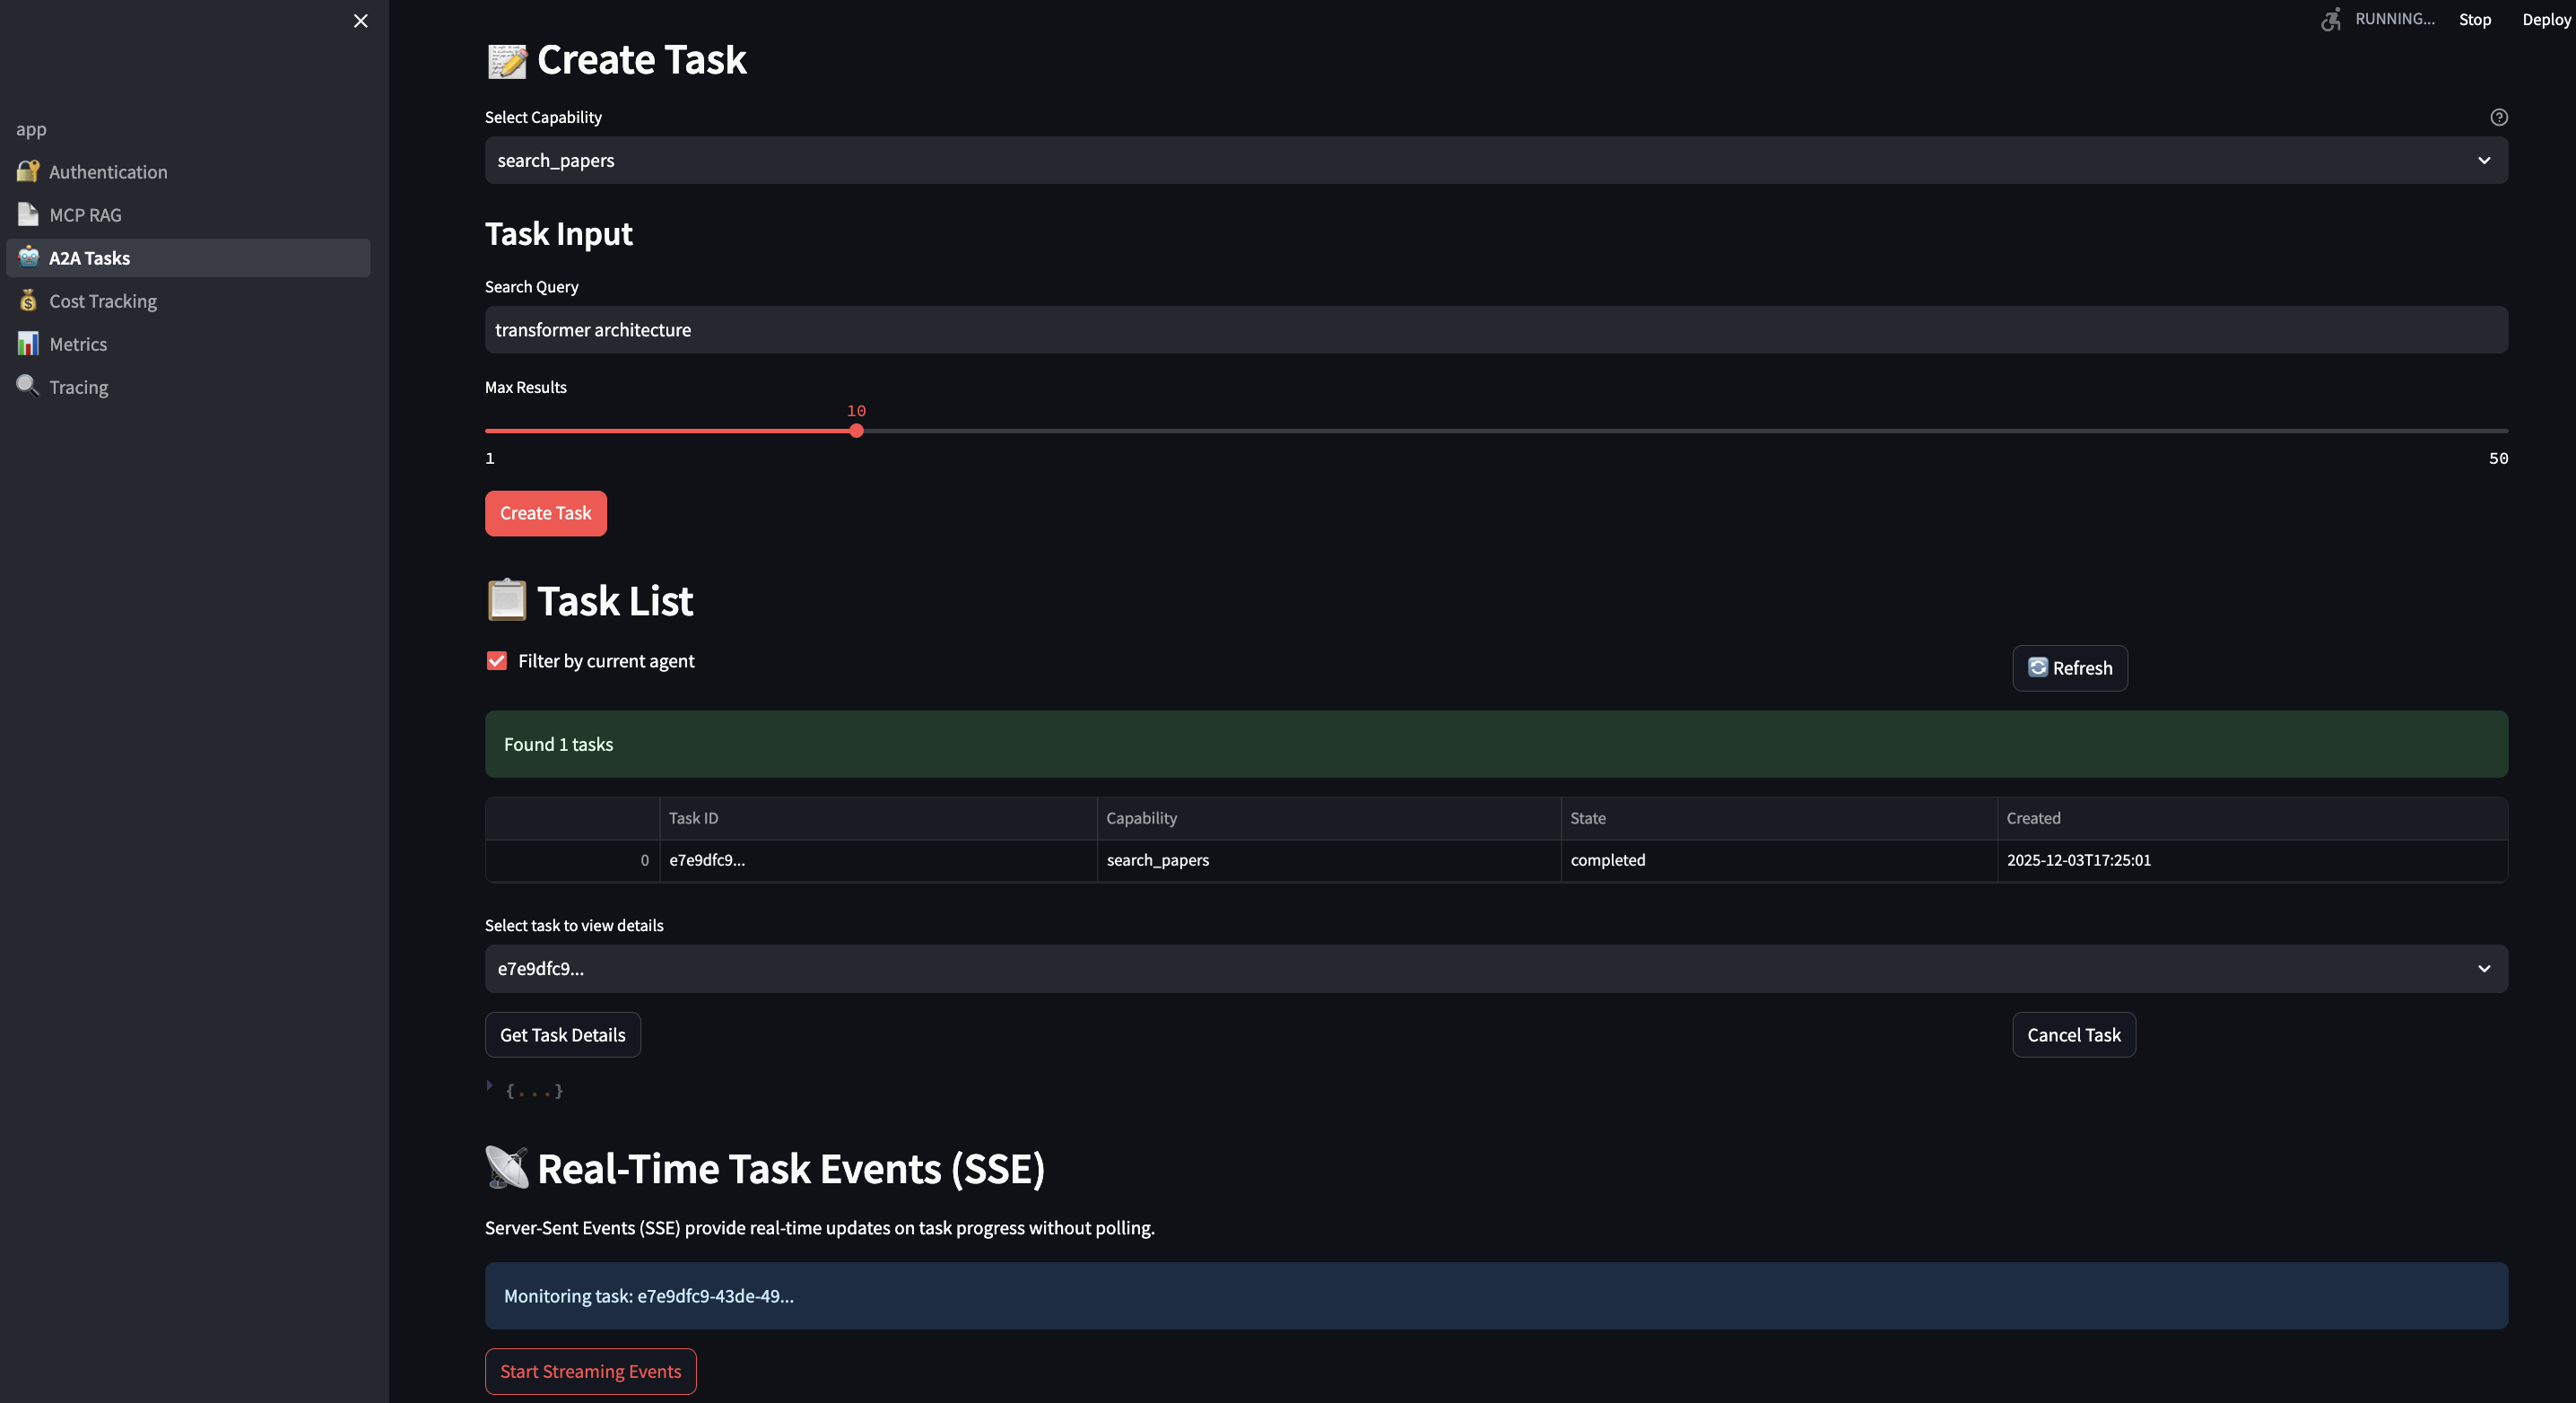
# streamlit-ui/pages/3_?_A2A_Tasks.py
def stream_task_events(task_id: str):
    url = f"{A2A_BASE_URL}/tasks/{task_id}/events"

    with requests.get(url, stream=True) as response:
        for line in response.iter_lines():
            if line.startswith(b'data:'):
                data = json.loads(line[5:])
                st.write(f"Update: {data['message']}")
                yield data
LangGraph Workflow Integration
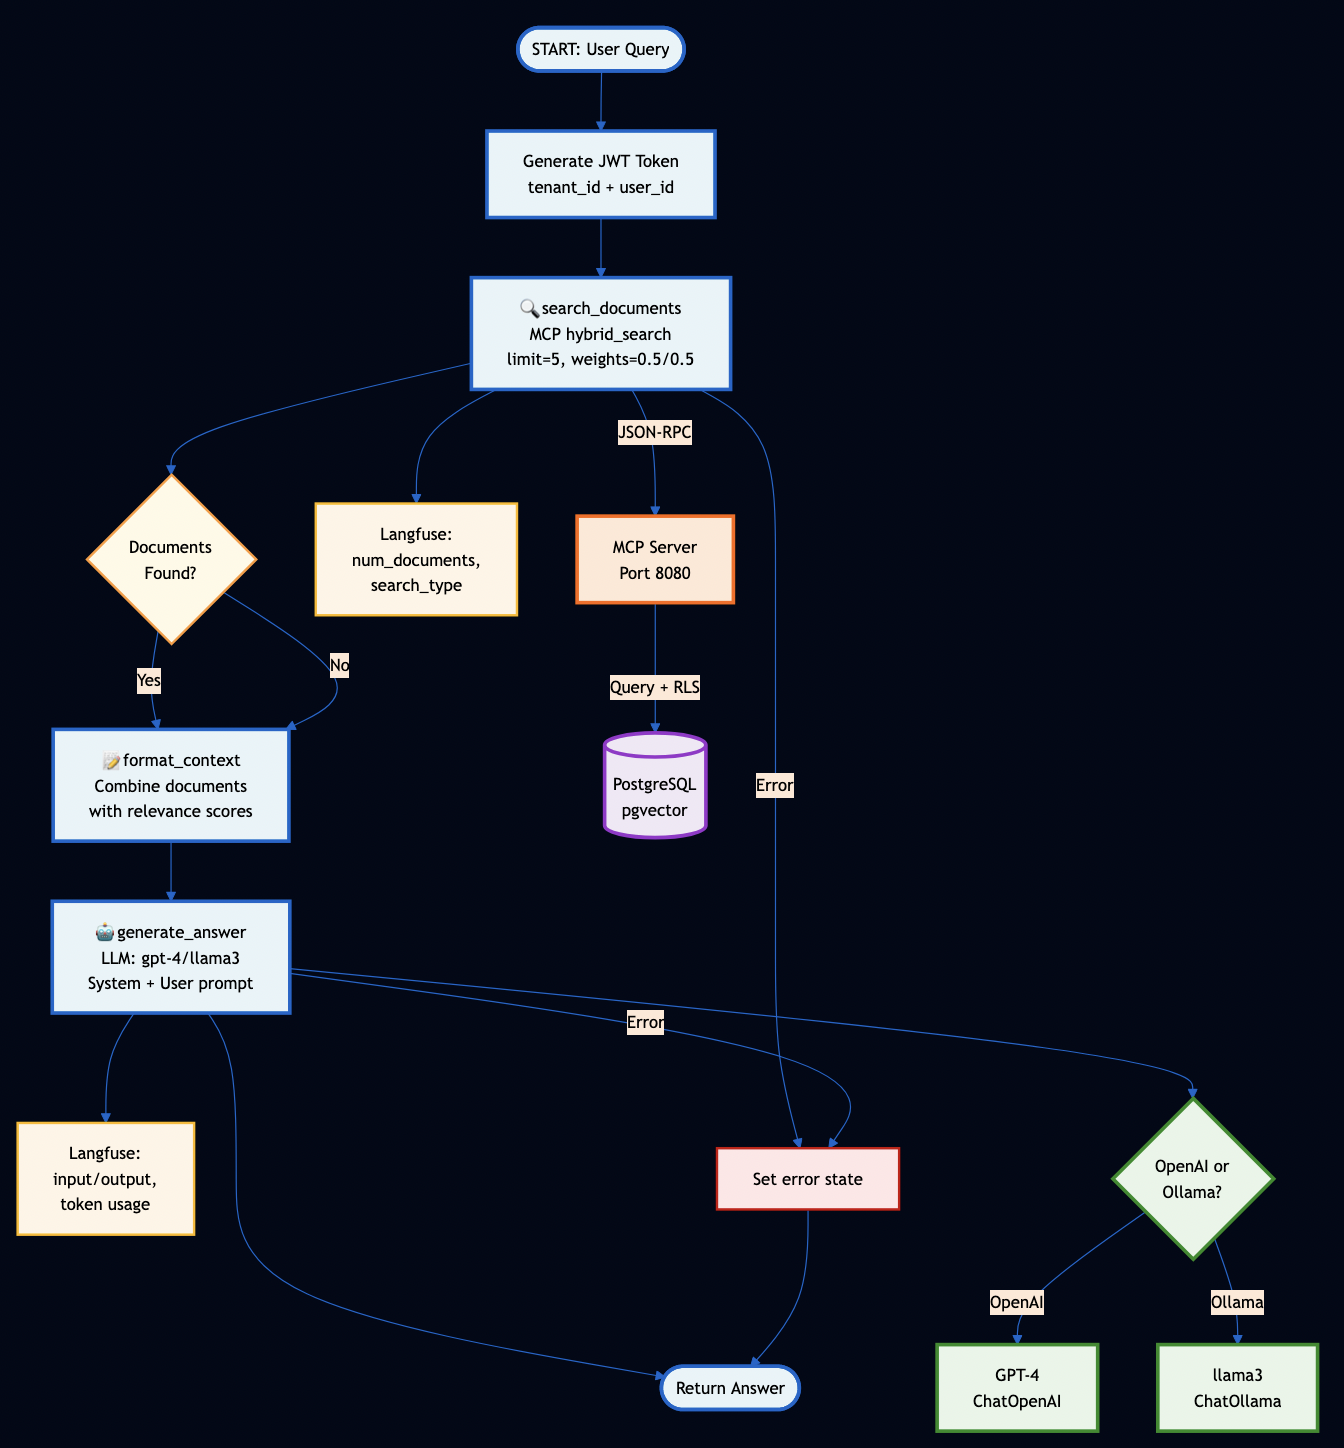
LangGraph workflows call MCP tools through the A2A server:
# orchestration/workflows/rag_workflow.py
class RAGWorkflow:
    def __init__(self, mcp_url: str):
        self.mcp_client = MCPClient(mcp_url)
        self.workflow = self.build_workflow()

    def build_workflow(self) -> StateGraph:
        workflow = StateGraph(RAGState)

        # Define workflow steps
        workflow.add_node("search", self.search_documents)
        workflow.add_node("rank", self.rank_results)
        workflow.add_node("generate", self.generate_answer)
        workflow.add_node("verify", self.verify_sources)

        # Define edges (workflow graph)
        workflow.add_edge(START, "search")
        workflow.add_edge("search", "rank")
        workflow.add_edge("rank", "generate")
        workflow.add_edge("generate", "verify")
        workflow.add_edge("verify", END)

        return workflow.compile()

    def search_documents(self, state: RAGState) -> RAGState:
        """Search for relevant documents using MCP hybrid search"""
        # This is where MCP and A2A integrate!
        results = self.mcp_client.hybrid_search(
            query=state["query"],
            limit=10,
            bm25_weight=0.5,
            vector_weight=0.5
        )

        state["documents"] = results
        state["progress"] = f"Found {len(results)} documents"

        # Emit progress event via A2A
        emit_progress_event(state["task_id"], "search_complete", state["progress"])

        return state

    def rank_results(self, state: RAGState) -> RAGState:
        """Rank results by combined score"""
        docs = sorted(
            state["documents"],
            key=lambda x: x["score"],
            reverse=True
        )[:5]

        state["ranked_docs"] = docs
        state["progress"] = "Ranked top 5 documents"

        emit_progress_event(state["task_id"], "ranking_complete", state["progress"])

        return state

    def generate_answer(self, state: RAGState) -> RAGState:
        """Generate answer using retrieved context"""
        context = "\n\n".join([
            f"Document: {doc['title']}\n{doc['content']}"
            for doc in state["ranked_docs"]
        ])

        prompt = f"""Based on the following documents, answer the question.

Context:
{context}

Question: {state['query']}

Answer:"""

        # Call Ollama for local inference
        response = ollama.generate(
            model="llama3.2",
            prompt=prompt
        )

        state["answer"] = response["response"]
        state["progress"] = "Generated final answer"

        emit_progress_event(state["task_id"], "generation_complete", state["progress"])

        return state

    def verify_sources(self, state: RAGState) -> RAGState:
        """Verify sources are accurately cited"""
        # Check each cited document exists in ranked_docs
        cited_docs = extract_citations(state["answer"])
        verified = all(doc in state["ranked_docs"] for doc in cited_docs)

        state["verified"] = verified
        state["progress"] = "Verified sources" if verified else "Source verification failed"

        emit_progress_event(state["task_id"], "verification_complete", state["progress"])

        return state
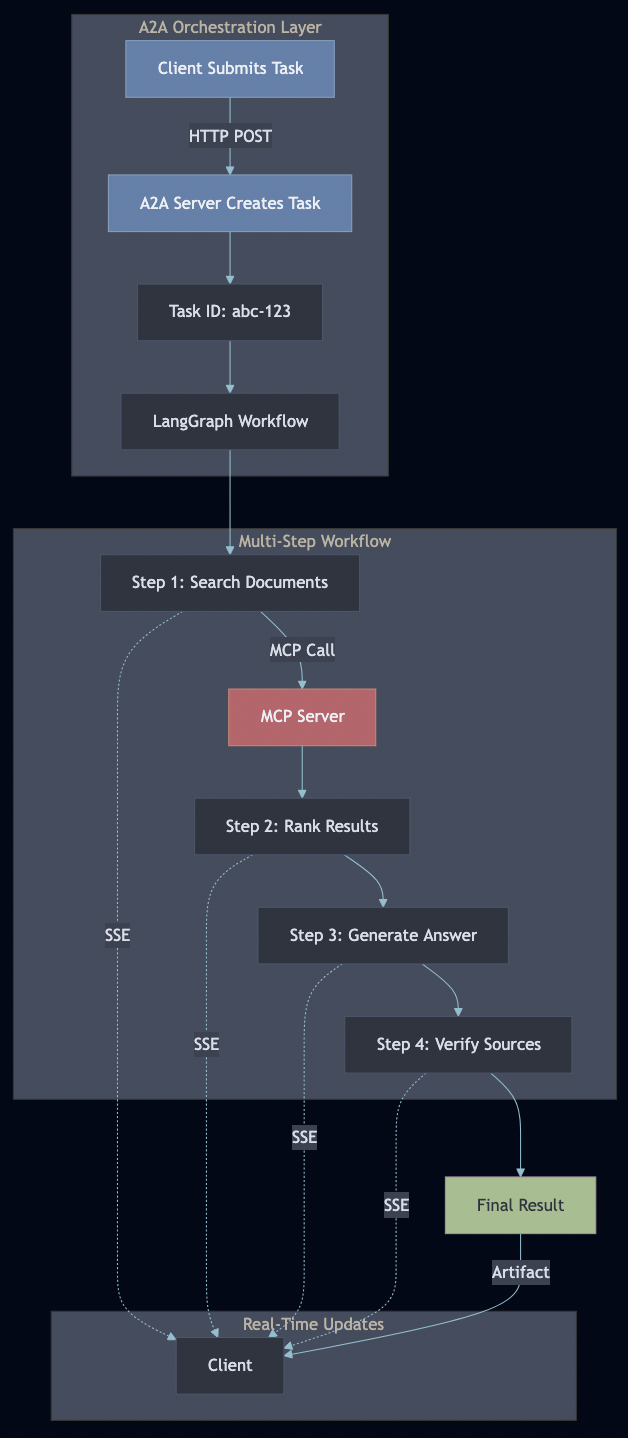
The workflow executes as a multi-step pipeline, with each step:
Calling MCP tools for data access
Updating state
Emitting progress events via A2A
Handling errors gracefully
Part 5: Production-Grade Features
1. Authentication & Security
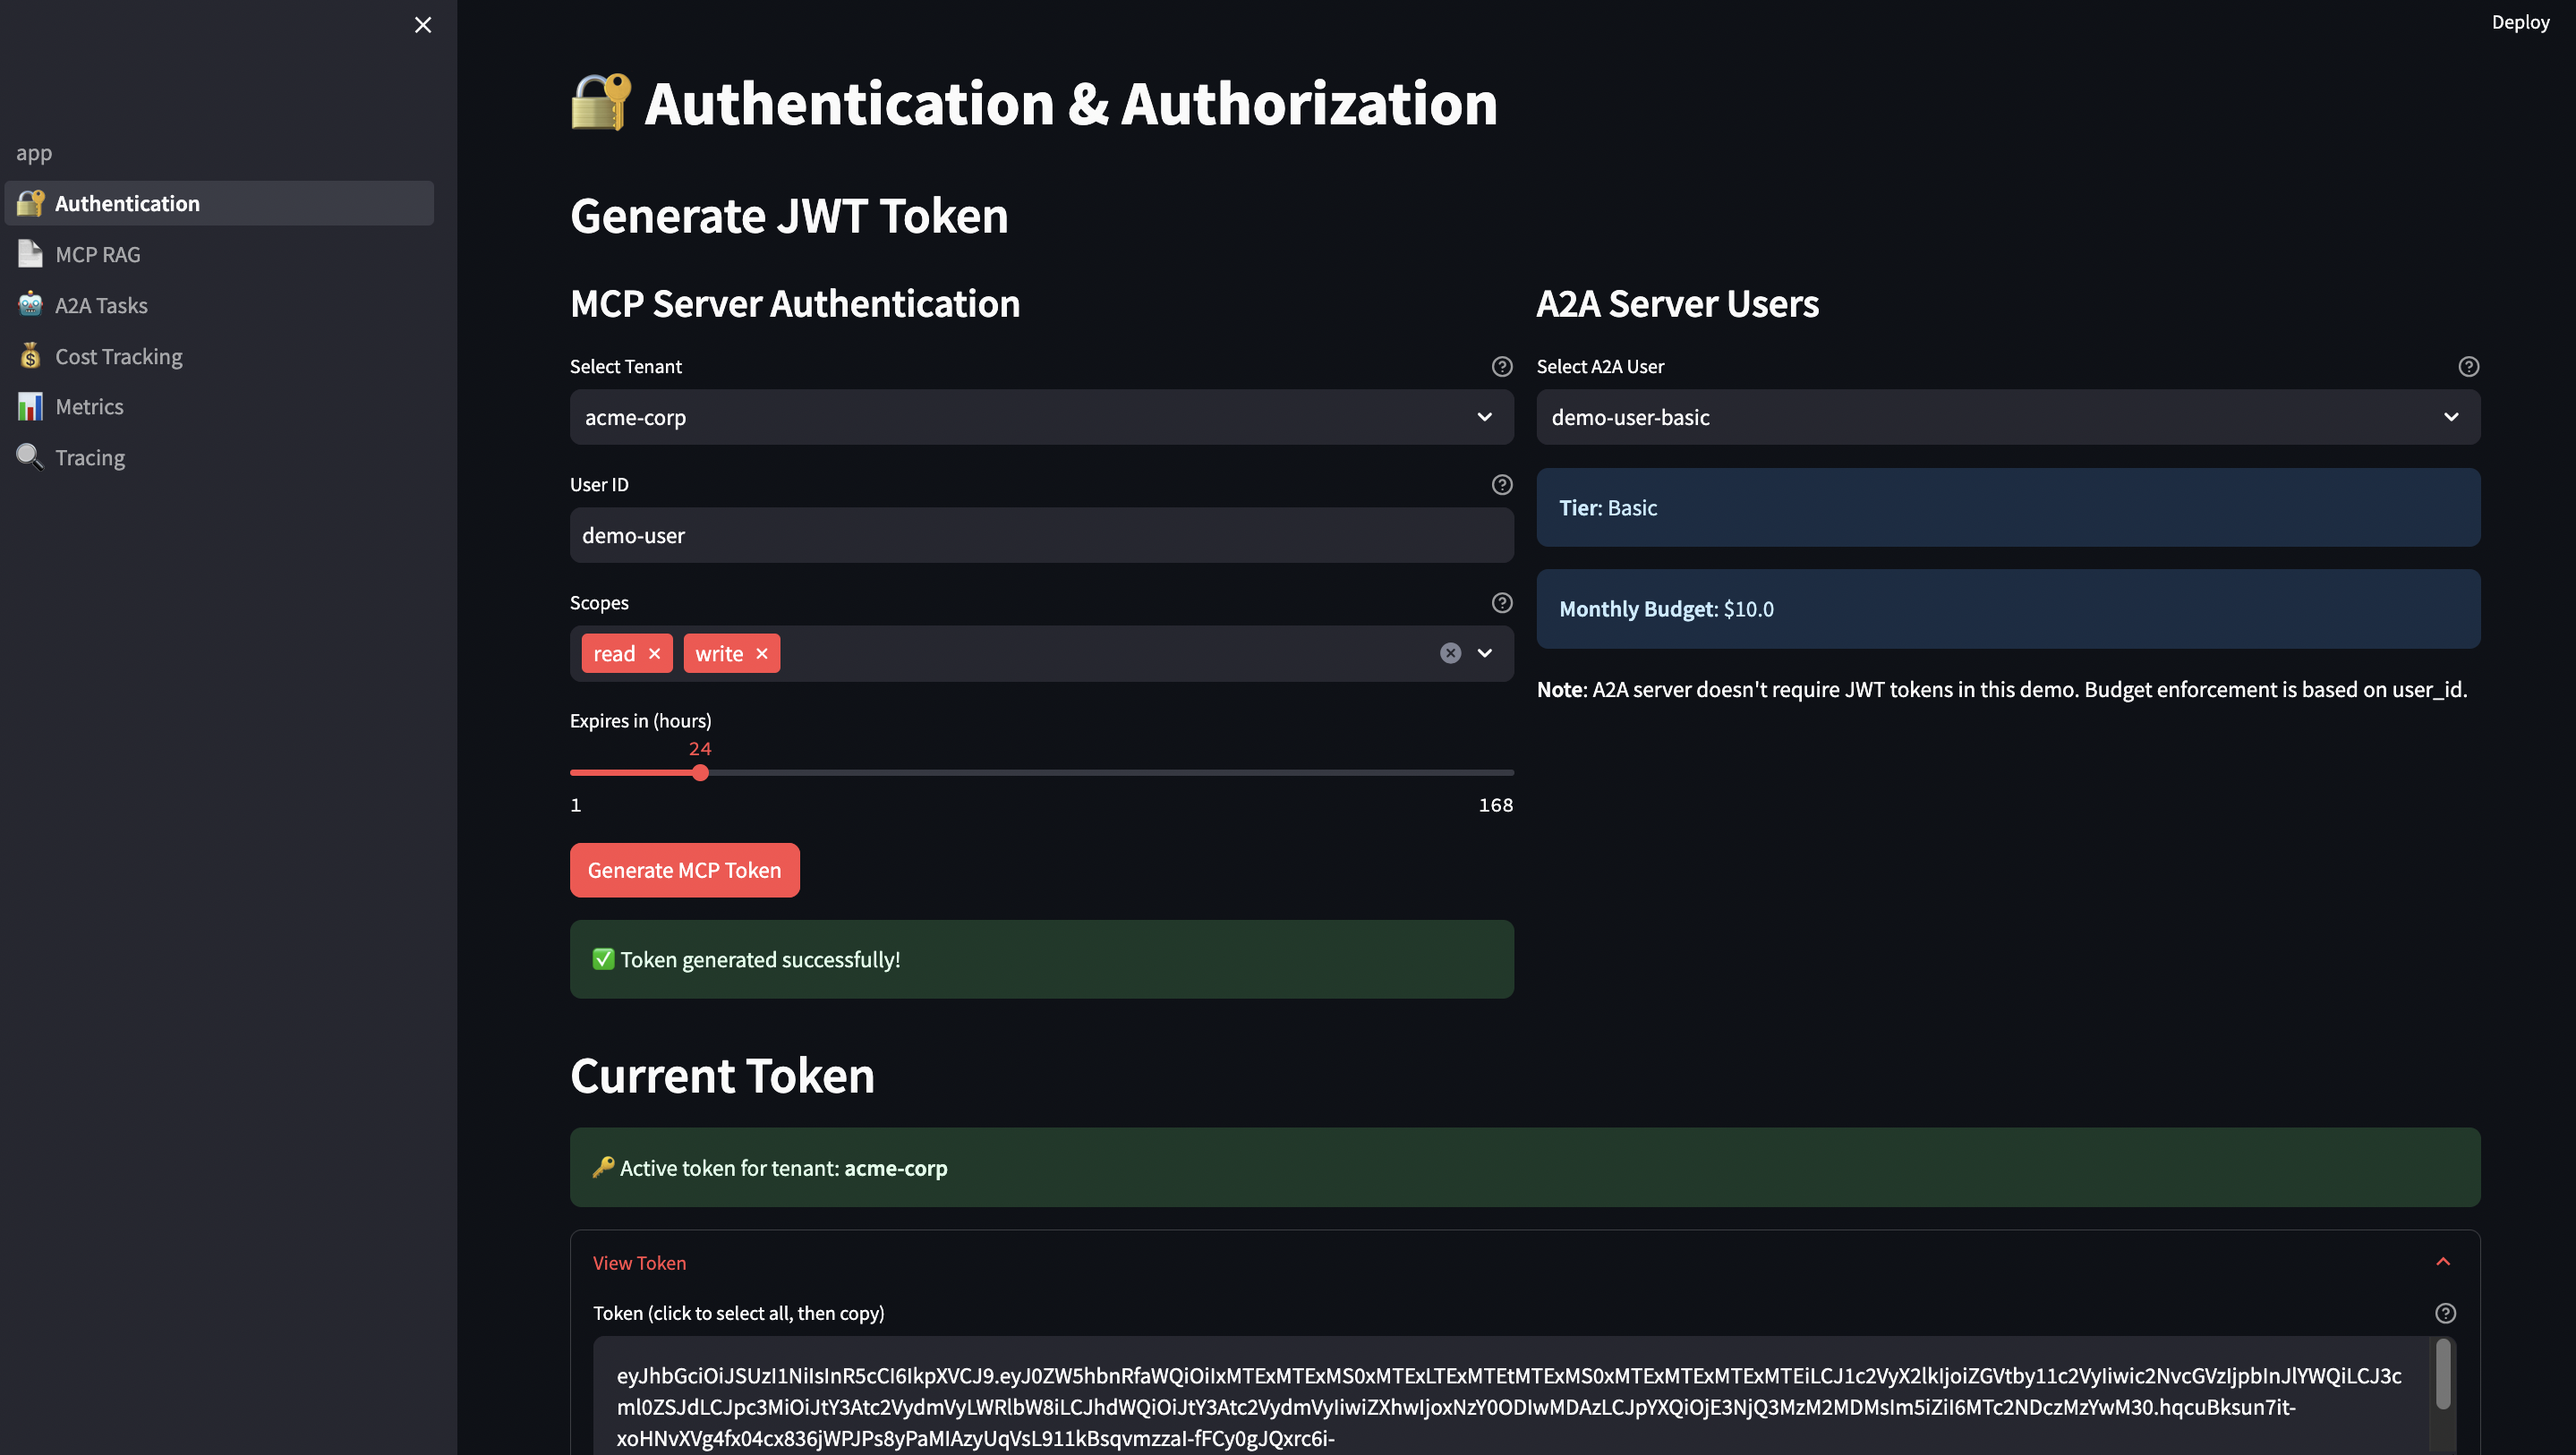
JWT Token Generation (Streamlit UI):
# streamlit-ui/pages/1_?_Authentication.py
def generate_jwt_token(tenant_id: str, user_id: str, ttl: int = 3600) -> str:
    """Generate RS256 JWT token with proper claims"""
    now = datetime.now(timezone.utc)

    payload = {
        "tenant_id": tenant_id,
        "user_id": user_id,
        "iat": now,              # Issued at
        "exp": now + timedelta(seconds=ttl),  # Expiration
        "nbf": now,              # Not before
        "jti": str(uuid.uuid4()), # JWT ID (for revocation)
        "iss": "mcp-demo-ui",    # Issuer
        "aud": "mcp-server"      # Audience
    }

    # Sign with RSA private key
    with open("/app/certs/private_key.pem", "rb") as f:
        private_key = serialization.load_pem_private_key(
            f.read(),
            password=None
        )

    token = jwt.encode(payload, private_key, algorithm="RS256")
    return token
OpenTelemetry excels at infrastructure observability but lacks LLM-specific context. Langfuse provides deep LLM insights but doesn’t trace service-to-service calls. Together, they provide complete visibility.
Example: End-to-End Trace
Python Workflow (OpenTelemetry + Langfuse):
from opentelemetry import trace
from langfuse.decorators import observe

class RAGWorkflow:
    def __init__(self):
        # OTel for distributed tracing
        self.tracer = setup_otel_tracing("rag-workflow")
        # Langfuse for LLM tracking
        self.langfuse = Langfuse(...)

    @observe(name="search_documents")  # Langfuse tracks this
    def _search_documents(self, state):
        # OTel: Create span for MCP call
        with self.tracer.start_as_current_span("mcp.hybrid_search") as span:
            span.set_attribute("search.query", state["query"])
            span.set_attribute("search.top_k", 5)

            # HTTP request auto-instrumented, propagates trace context
            result = self.mcp_client.hybrid_search(
                query=state["query"],
                limit=5
            )

            span.set_attribute("search.result_count", len(documents))
        return state
MCP Client (W3C Trace Context Propagation):
from opentelemetry.propagate import inject

def _make_request(self, method: str, params: Any = None):
    headers = {'Content-Type': 'application/json'}

    # Inject trace context into HTTP headers
    inject(headers)  # Adds 'traceparent' header

    response = self.session.post(
        f"{self.base_url}/mcp",
        json=payload,
        headers=headers  # Trace continues in Go server
    )
# Unit tests (fast, no dependencies)
cd mcp-server
go test -v ./...

# Integration tests (requires PostgreSQL)
./scripts/run-integration-tests.sh
The integration test script:
Checks if PostgreSQL is running
Waits for database ready
Runs all integration tests
Reports coverage
Output:
? Running MCP Server Integration Tests
========================================
? PostgreSQL is ready

? Running integration tests...

=== RUN   TestGetDocument_WithNullEmbedding
--- PASS: TestGetDocument_WithNullEmbedding (0.05s)
=== RUN   TestGetDocument_WithEmbedding
--- PASS: TestGetDocument_WithEmbedding (0.04s)
=== RUN   TestHybridSearch_HandlesNullEmbeddings
--- PASS: TestHybridSearch_HandlesNullEmbeddings (0.12s)
=== RUN   TestTenantIsolation
--- PASS: TestTenantIsolation (0.08s)
=== RUN   TestConcurrentRetrievals
--- PASS: TestConcurrentRetrievals (2.34s)

PASS
coverage: 95.3% of statements
ok  	github.com/bhatti/mcp-a2a-go/mcp-server/internal/database	3.456s

? Integration tests completed!
Part 7: Real-World Use Cases
Use Case 1: Enterprise RAG Search
Scenario: Consulting firm managing 50,000+ contract documents across multiple clients. Each client (tenant) must have complete data isolation. Legal team needs to:
Search with exact terms (case citations, contract clauses)
Find semantically similar clauses (non-obvious connections)
Track who accessed what (audit trail)
Enforce budget limits per client matter
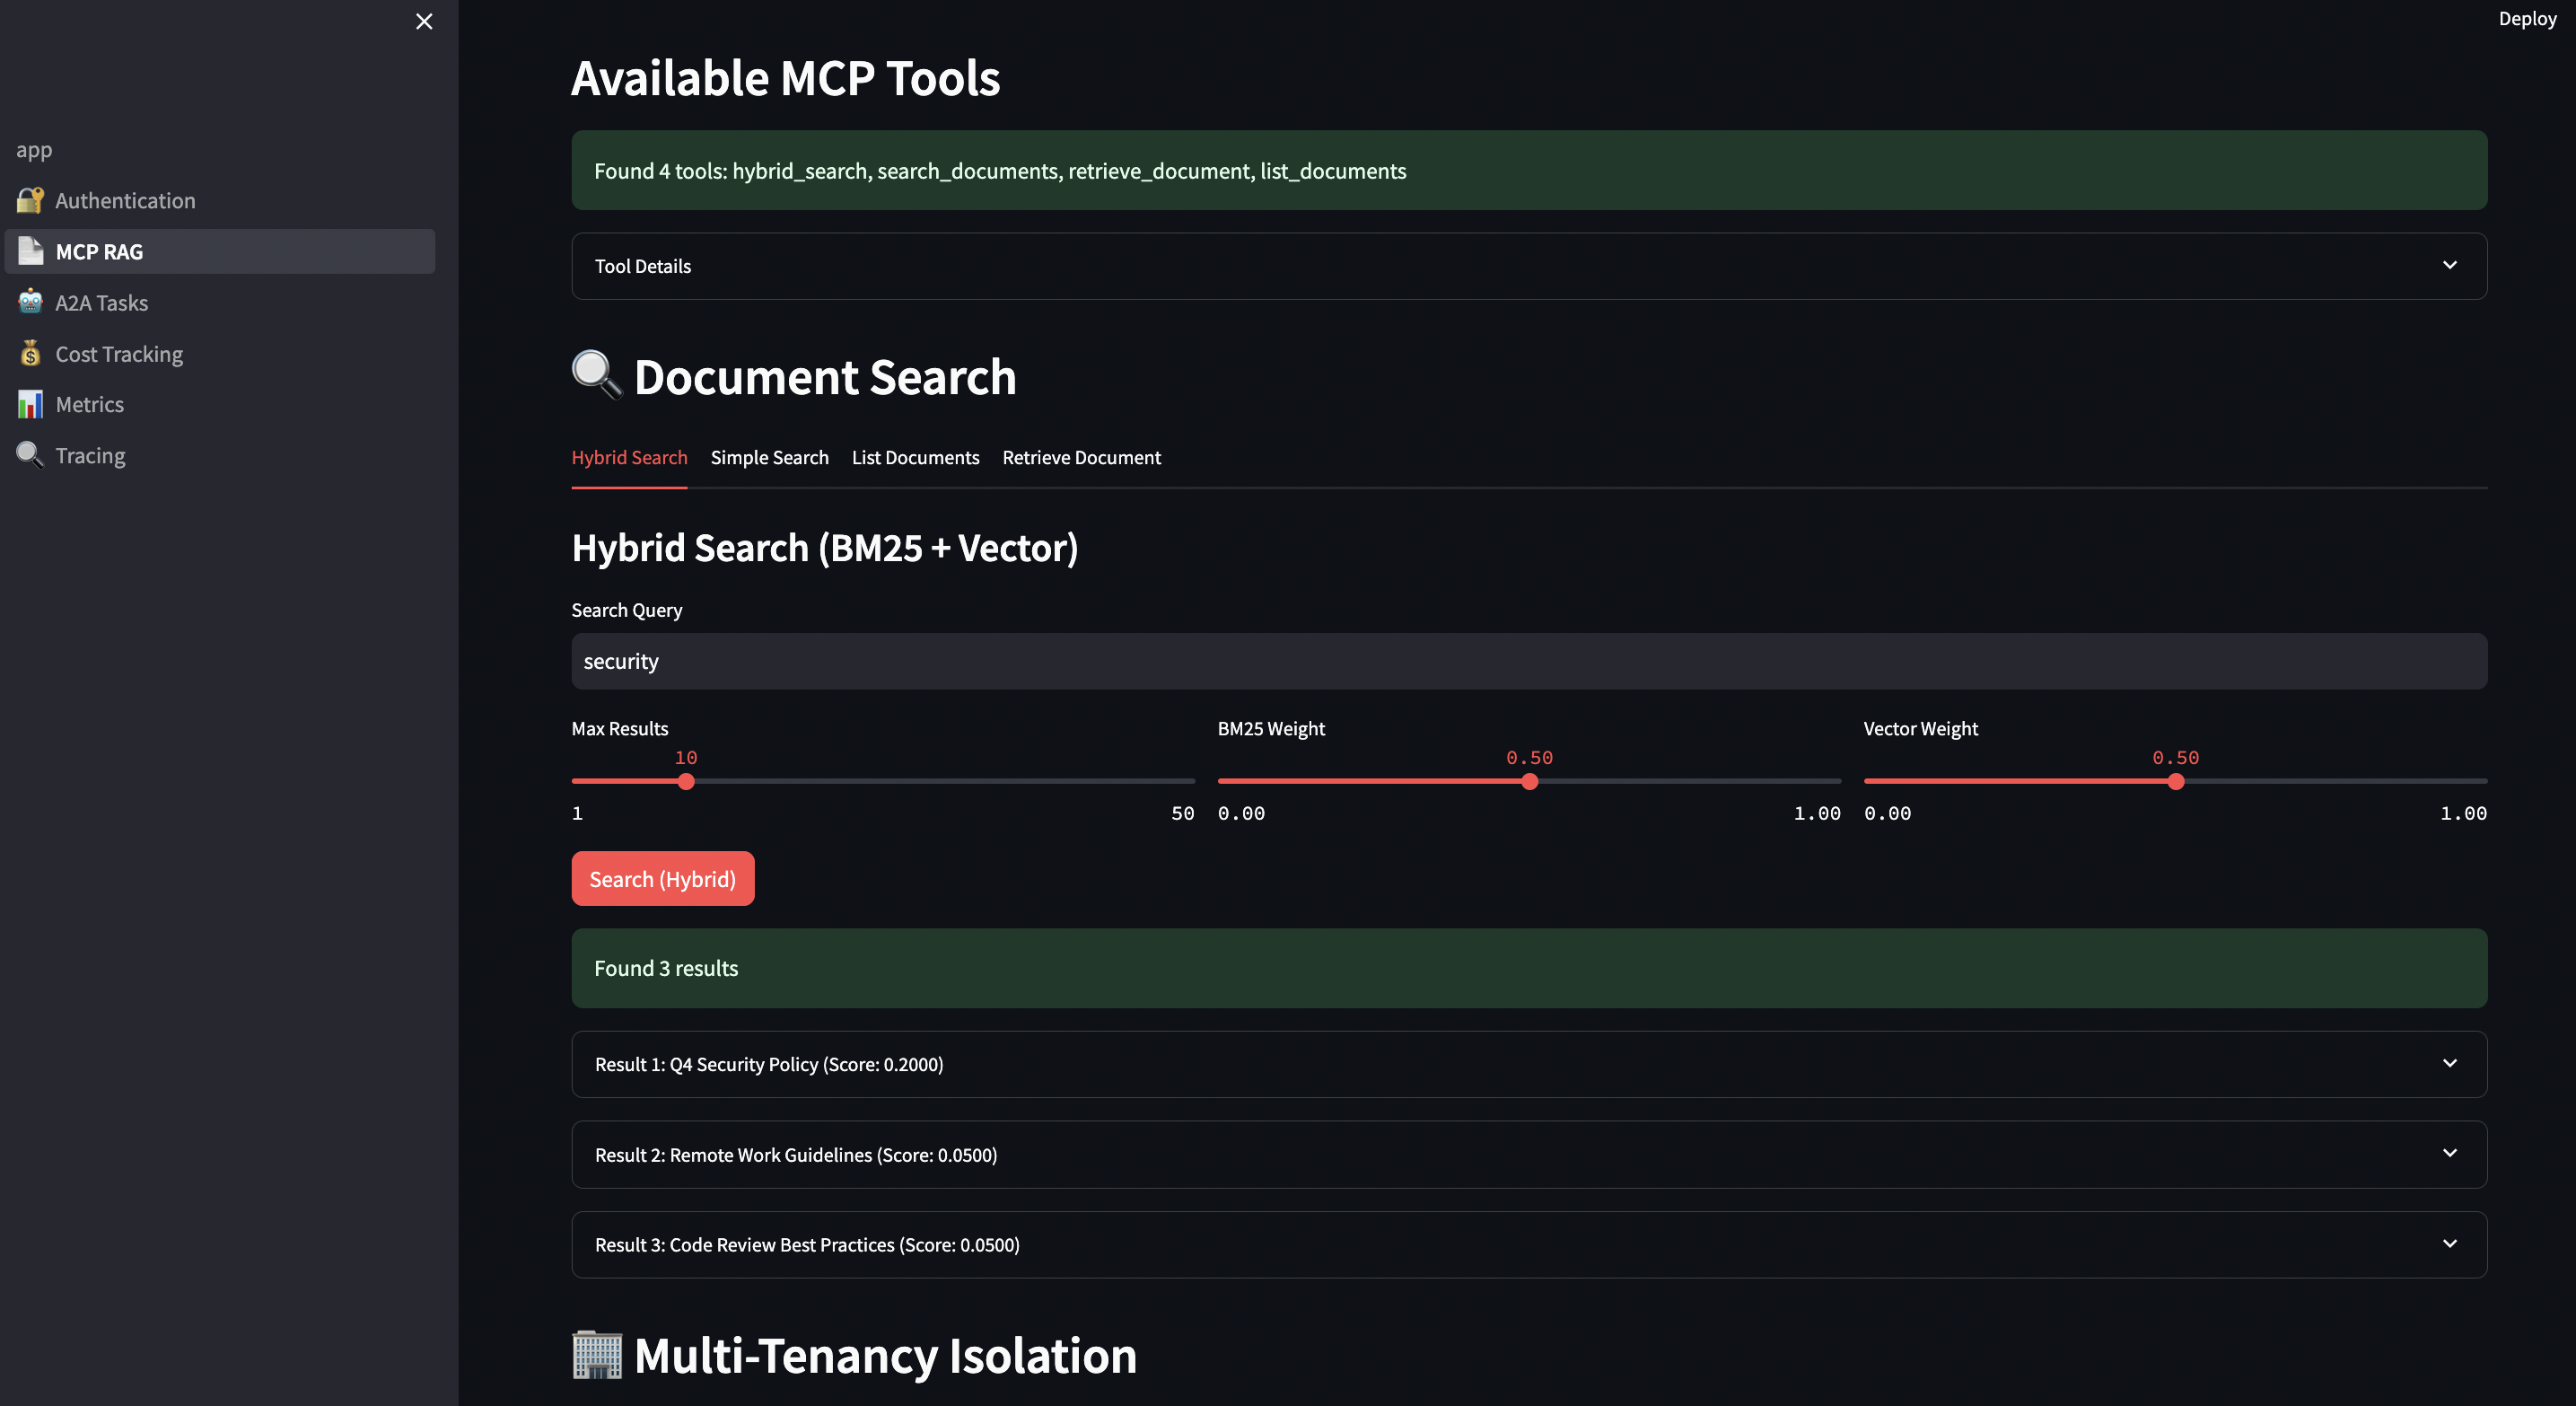
Solution: Hybrid search combining BM25 (keywords) and vector similarity (semantics).
# Client code
results = mcp_client.hybrid_search(
    query="data breach notification requirements GDPR Article 33",
    limit=10,
    bm25_weight=0.6,  # Favor exact keyword matches for legal terms
    vector_weight=0.4  # But include semantic similarity
)

for result in results:
    print(f"Document: {result['title']}")
    print(f"BM25 Score: {result['bm25_score']:.2f}")
    print(f"Vector Score: {result['vector_score']:.2f}")
    print(f"Combined: {result['score']:.2f}")
    print(f"Tenant: {result['tenant_id']}")
    print("---")
? Finds documents with exact terms (“GDPR”, “Article 33”)
? Surfaces semantically similar docs (“privacy breach”, “data protection”)
? Tenant isolation ensures Client A can’t see Client B’s contracts
? Audit trail via structured logging
? Cost tracking per client matter
Use Case 2: Multi-Step Research Workflows
Scenario: Investment analyst needs to research a company across multiple data sources:
Company filings (10-K, 10-Q, 8-K)
Competitor analysis
Market trends
Financial metrics
Regulatory filings
News sentiment
Traditional RAG: Query each source separately, manually synthesize results.
With A2A + MCP: Orchestrate multi-step workflow with progress tracking.
# orchestration/workflows/research_workflow.py
class ResearchWorkflow:
    def build_workflow(self):
        workflow = StateGraph(ResearchState)

        # Define research steps
        workflow.add_node("search_company", self.search_company_docs)
        workflow.add_node("search_competitors", self.search_competitors)
        workflow.add_node("search_financials", self.search_financial_data)
        workflow.add_node("analyze_trends", self.analyze_market_trends)
        workflow.add_node("verify_facts", self.verify_with_sources)
        workflow.add_node("generate_report", self.generate_final_report)

        # Define workflow graph
        workflow.add_edge(START, "search_company")
        workflow.add_edge("search_company", "search_competitors")
        workflow.add_edge("search_competitors", "search_financials")
        workflow.add_edge("search_financials", "analyze_trends")
        workflow.add_edge("analyze_trends", "verify_facts")
        workflow.add_edge("verify_facts", "generate_report")
        workflow.add_edge("generate_report", END)

        return workflow.compile()

    def search_company_docs(self, state: ResearchState) -> ResearchState:
        """Step 1: Search company documents via MCP"""
        company = state["company_name"]

        # Call MCP hybrid search
        results = self.mcp_client.hybrid_search(
            query=f"{company} business operations revenue products",
            limit=20,
            bm25_weight=0.5,
            vector_weight=0.5
        )

        state["company_docs"] = results
        state["progress"] = f"Found {len(results)} company documents"

        # Emit progress via A2A SSE
        emit_progress("search_company_complete", state["progress"])

        return state

    def search_competitors(self, state: ResearchState) -> ResearchState:
        """Step 2: Identify and search competitors"""
        company = state["company_name"]

        # Extract competitors from company docs
        competitors = self.extract_competitors(state["company_docs"])

        # Search each competitor
        competitor_data = {}
        for competitor in competitors:
            results = self.mcp_client.hybrid_search(
                query=f"{competitor} market share products revenue",
                limit=10
            )
            competitor_data[competitor] = results

        state["competitors"] = competitor_data
        state["progress"] = f"Analyzed {len(competitors)} competitors"

        emit_progress("search_competitors_complete", state["progress"])

        return state

    def search_financial_data(self, state: ResearchState) -> ResearchState:
        """Step 3: Extract financial metrics"""
        company = state["company_name"]

        # Search for financial documents
        results = self.mcp_client.hybrid_search(
            query=f"{company} revenue earnings profit margin cash flow",
            limit=15,
            bm25_weight=0.7,  # Favor exact financial terms
            vector_weight=0.3
        )

        # Extract key metrics
        metrics = self.extract_financial_metrics(results)

        state["financials"] = metrics
        state["progress"] = f"Extracted {len(metrics)} financial metrics"

        emit_progress("search_financials_complete", state["progress"])

        return state

    def verify_facts(self, state: ResearchState) -> ResearchState:
        """Step 5: Verify all facts with sources"""
        # Check each claim has supporting document
        claims = self.extract_claims(state["report_draft"])

        verified_claims = []
        for claim in claims:
            sources = self.find_supporting_docs(claim, state)
            if sources:
                verified_claims.append({
                    "claim": claim,
                    "sources": sources,
                    "verified": True
                })

        state["verified_claims"] = verified_claims
        state["progress"] = f"Verified {len(verified_claims)} claims"

        emit_progress("verification_complete", state["progress"])

        return state
Benefits:
? Multi-step orchestration with state management
? Real-time progress via SSE (analyst sees each step)
? Intermediate results saved as artifacts
? Each step calls MCP tools for data retrieval
? Final report with verified sources
? Cost tracking across all steps
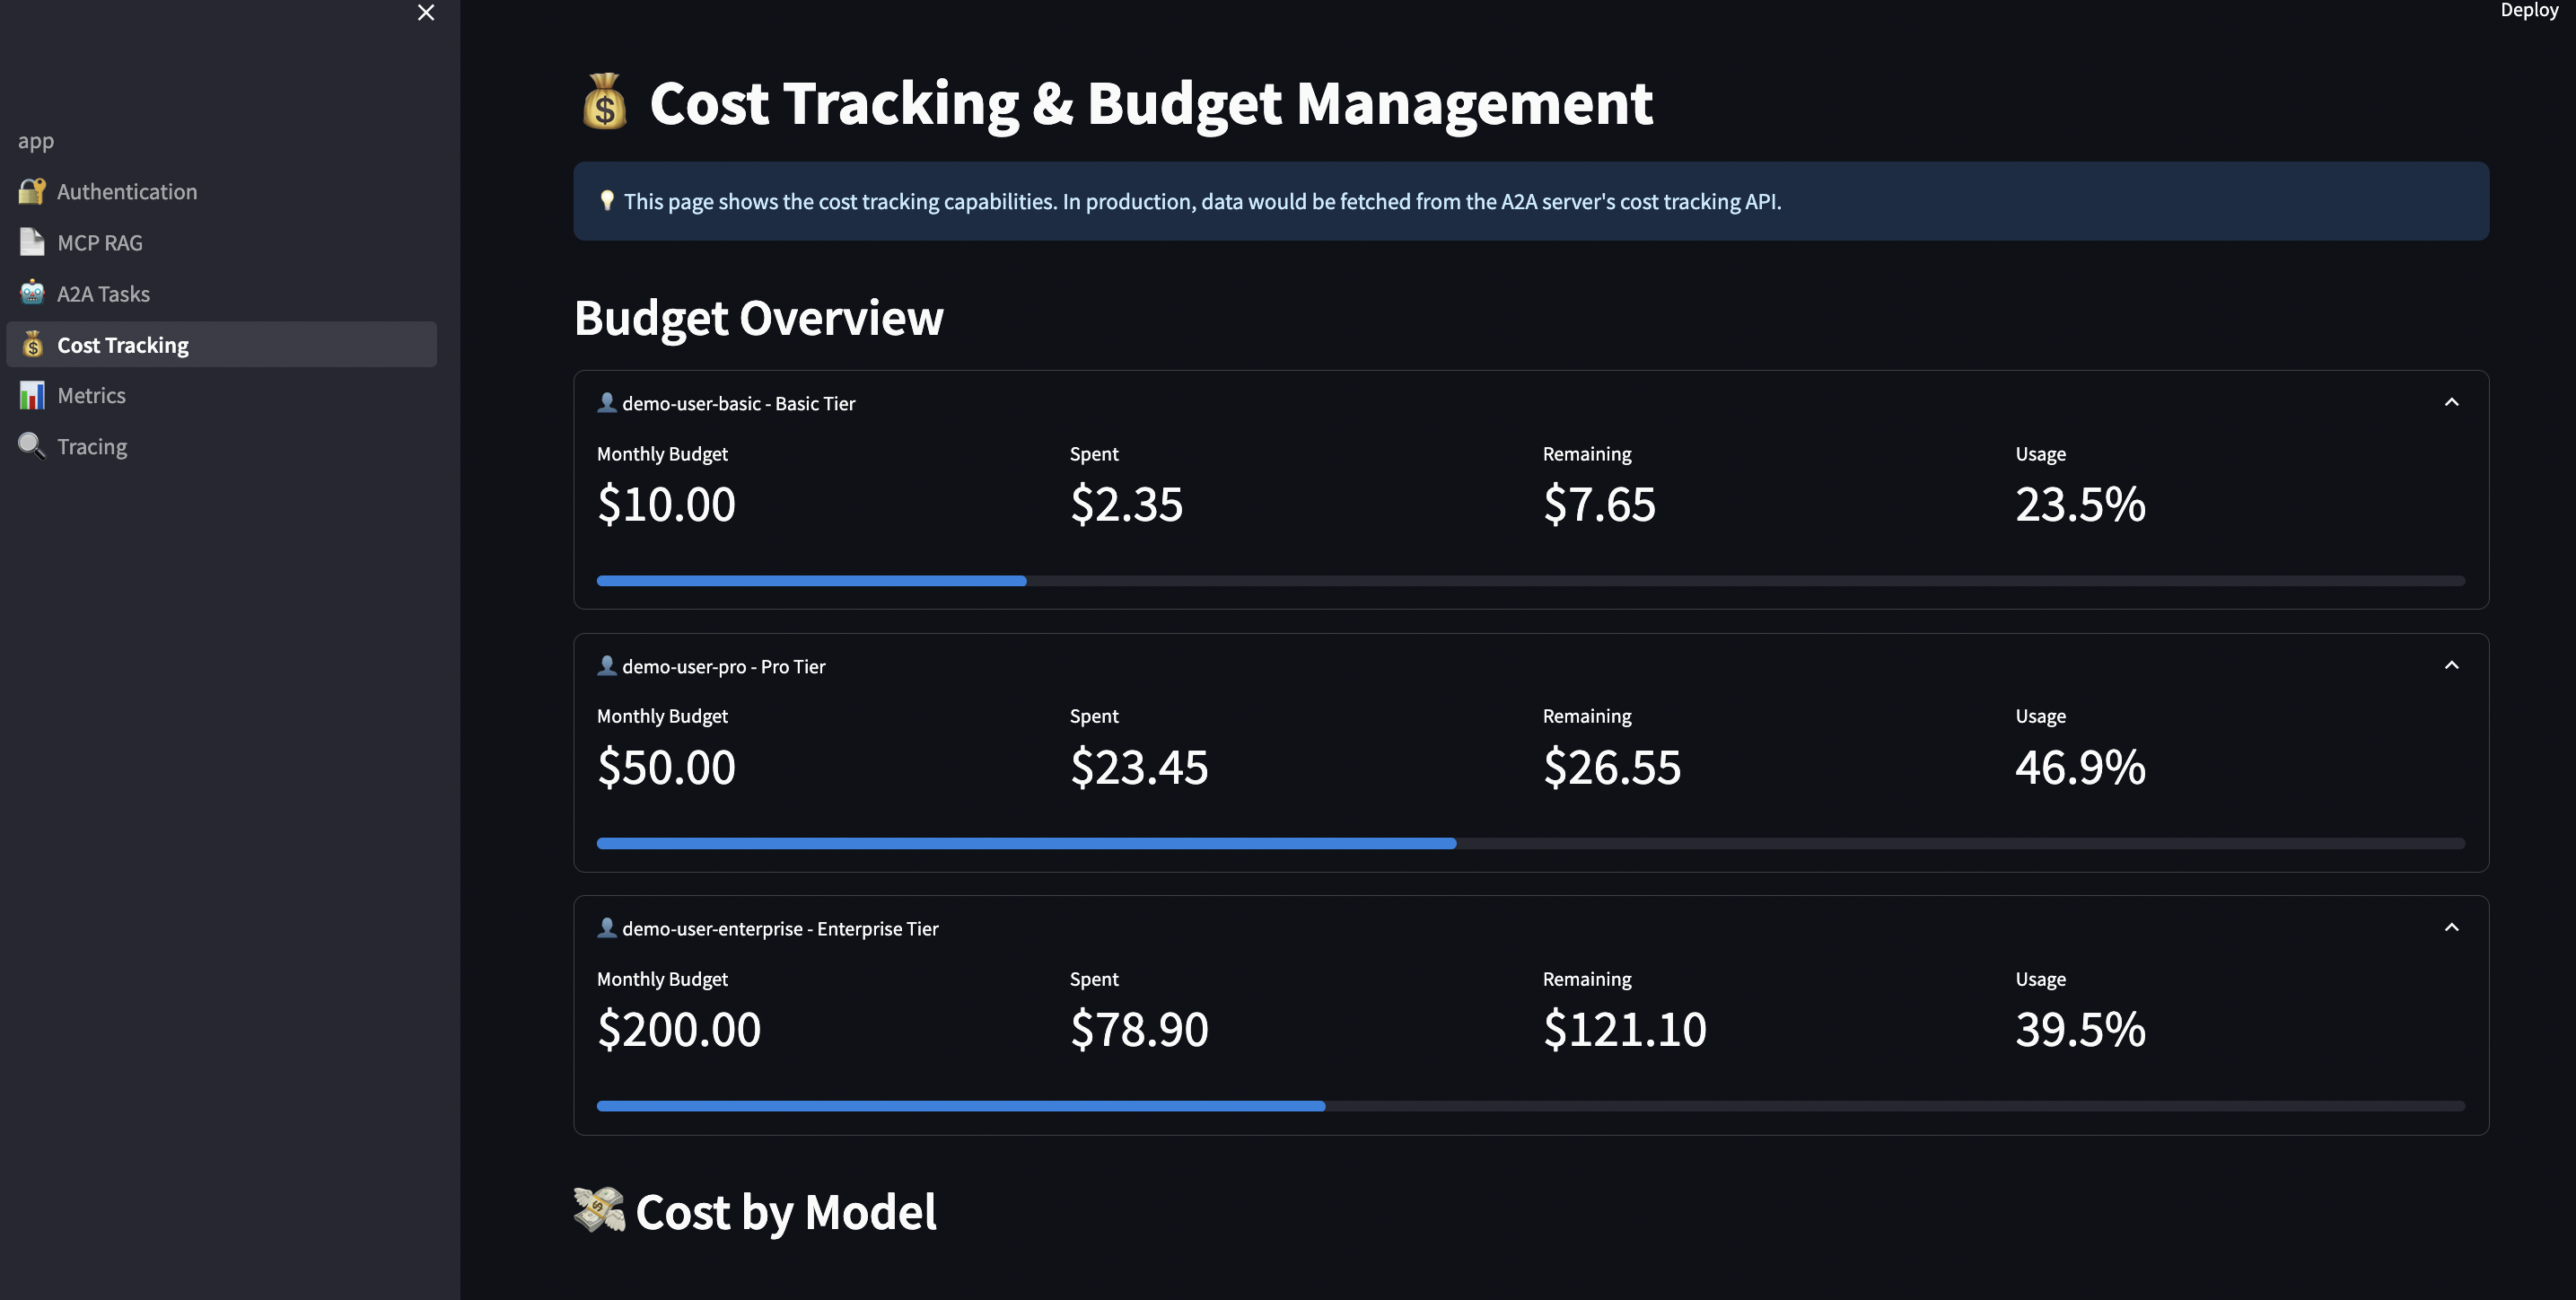
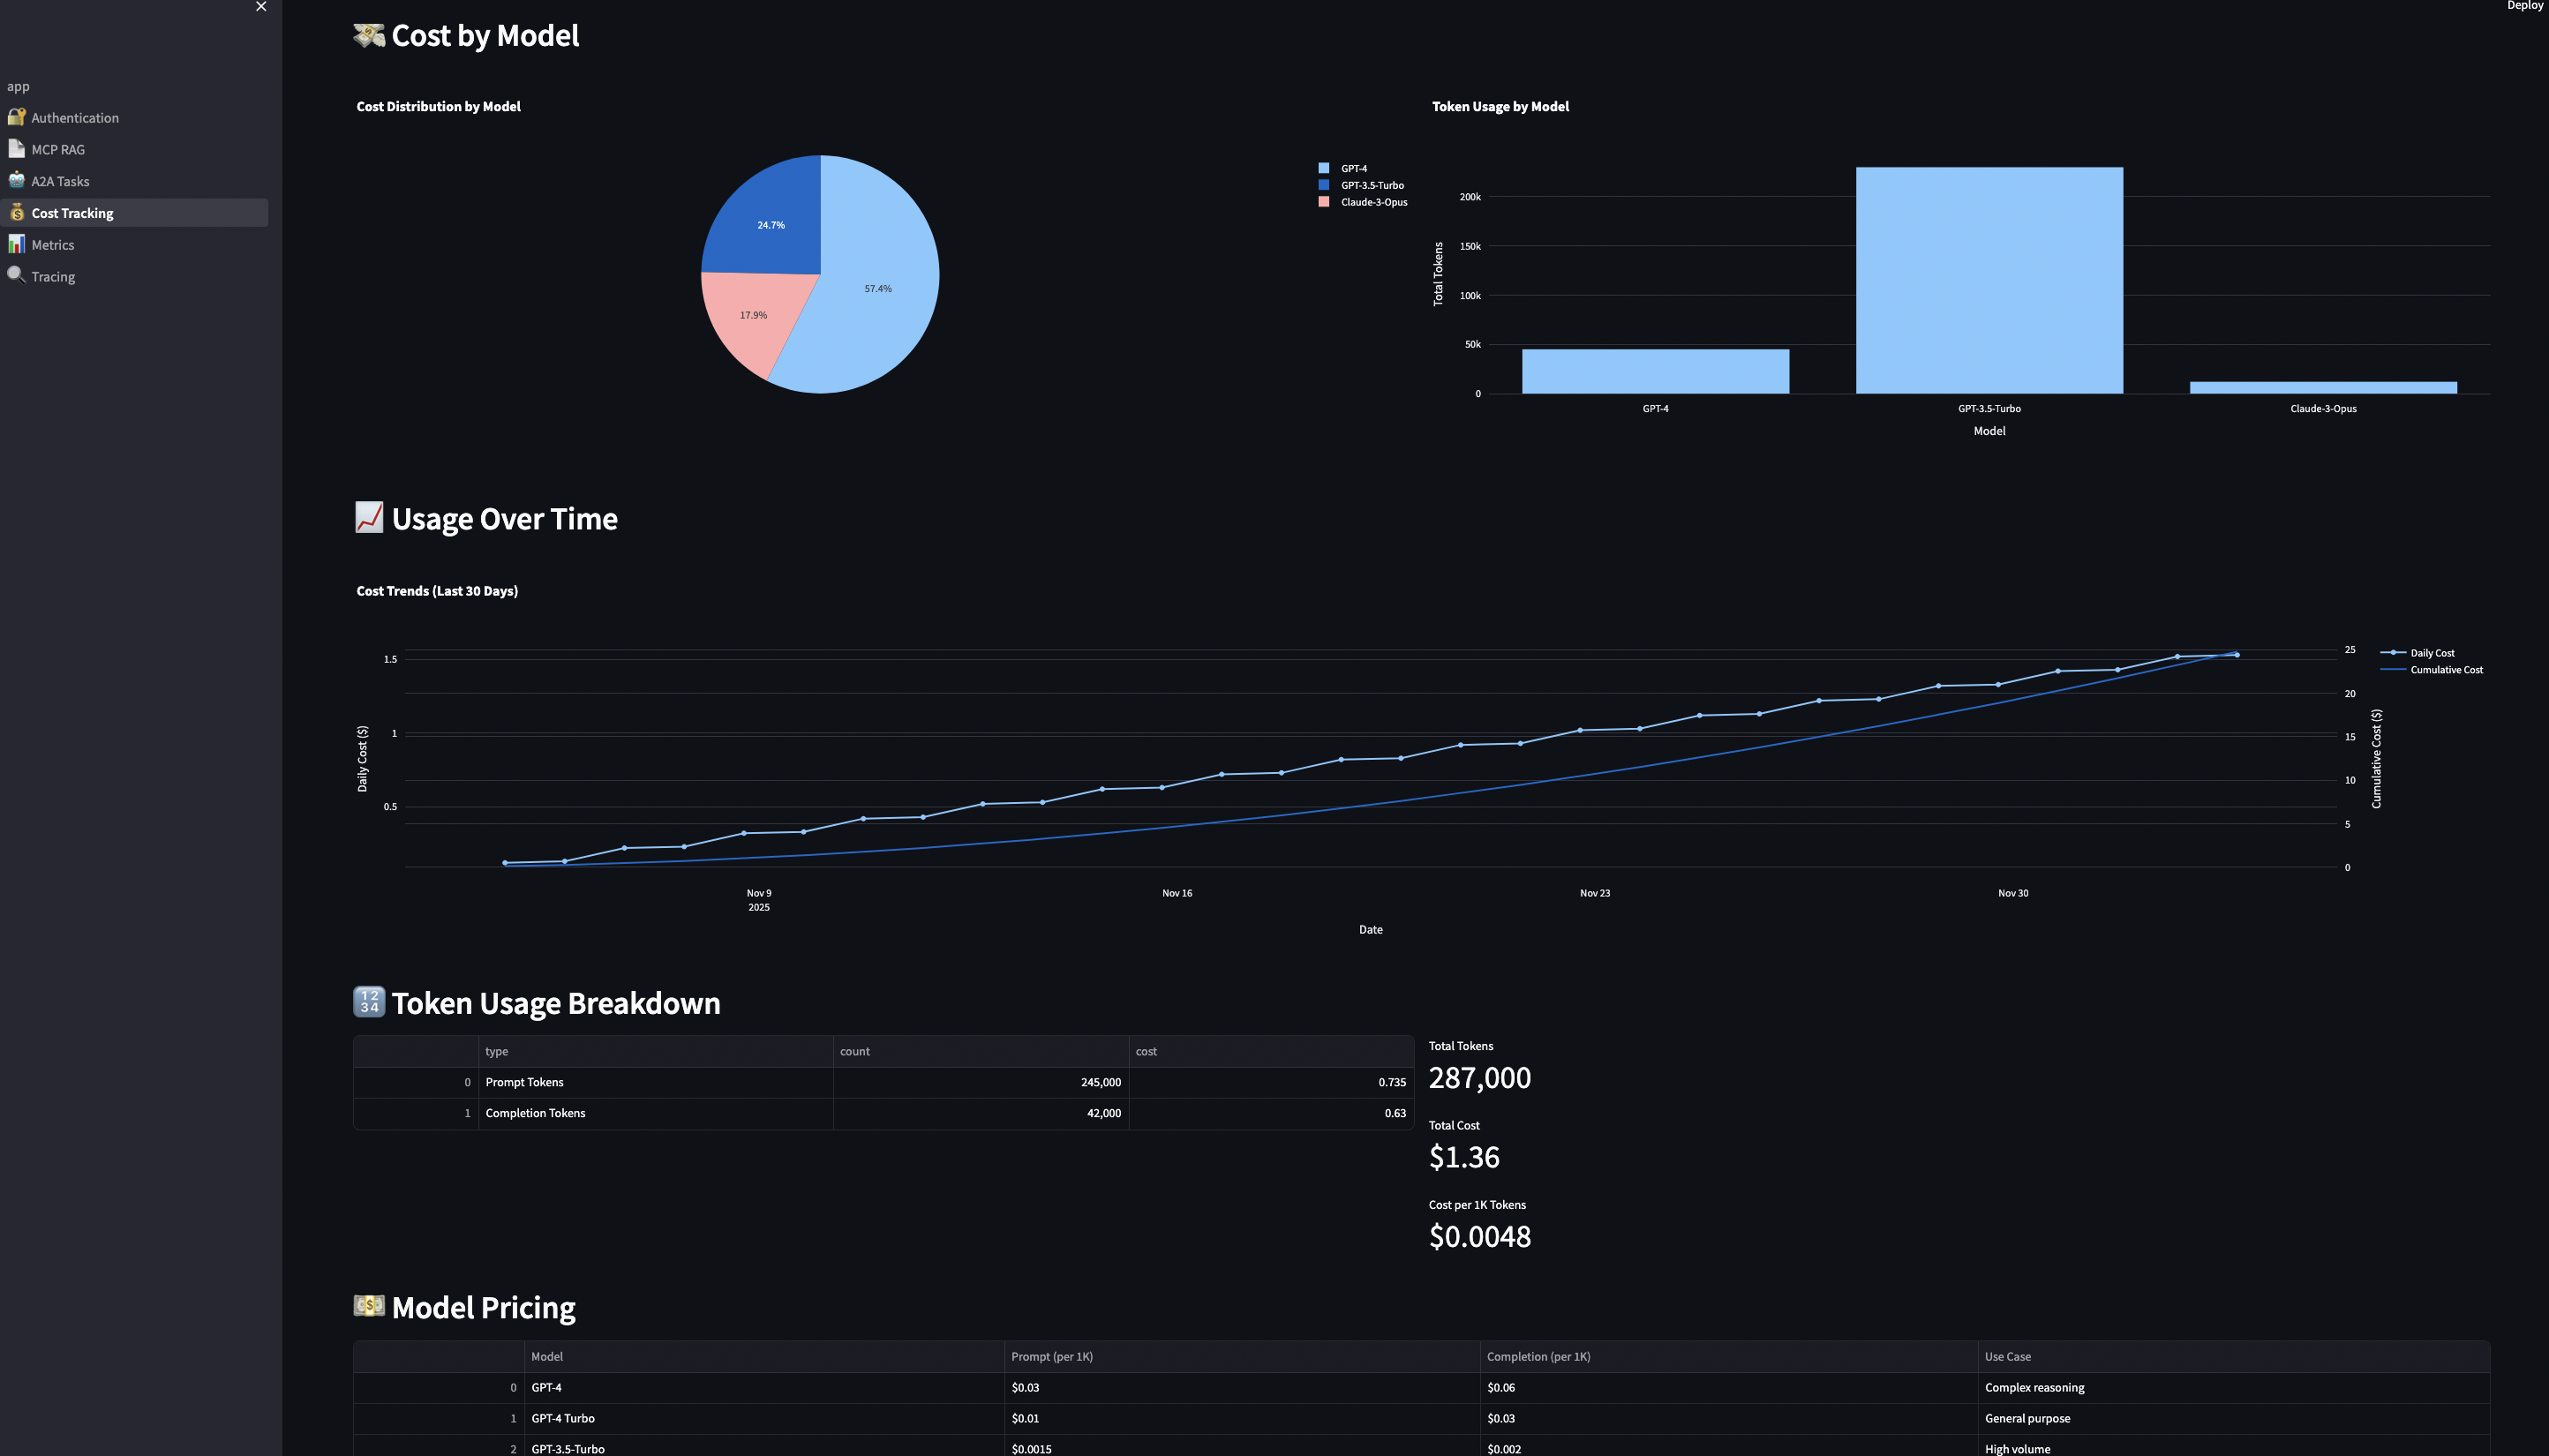
Use Case 3: Budget-Controlled AI Assistance
Scenario: SaaS company (e.g., document management platform) offers AI features to customers based on tiered subscription: Without budget control: Customer on free tier makes 10,000 queries in one day.
With budget control:
# Before each request
tier = get_user_tier(user_id)
budget = BUDGET_TIERS[tier]["monthly_budget"]
allowed, remaining = cost_tracker.check_budget(user_id, budget)

if not allowed:
    raise BudgetExceededError(
        f"Monthly budget of ${budget} exceeded. "
        f"Upgrade to {next_tier} for higher limits."
    )

# Track the request
response = llm.generate(prompt)
cost = cost_tracker.track_request(
    user_id=user_id,
    model="llama3.2",
    input_tokens=len(prompt.split()),
    output_tokens=len(response.split())
)

# Alert when approaching limit
if remaining < 5.0:  # $5 remaining
    send_alert(user_id, f"Budget alert: ${remaining:.2f} remaining")
Real-world budget enforcement:
# streamlit-ui/pages/4_?_Cost_Tracking.py
def enforce_budget_limits():
    """Check budget before task creation"""

    user_tier = st.session_state.get("user_tier", "free")
    budget = BUDGET_TIERS[user_tier]["monthly_budget"]

    # Calculate current spend
    spent = cost_tracker.get_total_cost(user_id)
    remaining = budget - spent

    # Display budget status
    col1, col2, col3 = st.columns(3)

    with col1:
        st.metric("Budget", f"${budget:.2f}")

    with col2:
        st.metric("Spent", f"${spent:.2f}",
                 delta=f"-${spent:.2f}", delta_color="inverse")

    with col3:
        progress = (spent / budget) * 100
        st.metric("Remaining", f"${remaining:.2f}")
        st.progress(progress / 100)

    # Block if exceeded
    if remaining <= 0:
        st.error("? Monthly budget exceeded. Upgrade to continue.")
        st.button("Upgrade to Pro ($25/month)", on_click=upgrade_tier)
        return False

    # Warn if close
    if remaining < 5.0:
        st.warning(f"?? Budget alert: Only ${remaining:.2f} remaining this month")

    return True
Benefits:
? Prevent cost overruns per customer
? Fair usage enforcement across tiers
? Export data for billing/accounting
? Different limits per tier
? Automatic alerts before limits
? Graceful degradation (local models for free tier)
5,000+ req/sec means 432 million requests/day per instance
<100ms search means interactive UX
52MB memory means cost-effective scaling
Load Testing Results
# Using hey (HTTP load generator)
hey -n 10000 -c 100 -m POST \
    -H "Authorization: Bearer $TOKEN" \
    -H "Content-Type: application/json" \
    -d '{"jsonrpc":"2.0","id":1,"method":"tools/call","params":{"name":"hybrid_search","arguments":{"query":"machine learning","limit":10}}}' \
    http://localhost:8080/mcp

Summary:
  Total:        19.8421 secs
  Slowest:      0.2847 secs
  Fastest:      0.0089 secs
  Average:      0.1974 secs
  Requests/sec: 503.98

  Status code distribution:
    [200]	10000 responses

Latency distribution:
  10% in 0.0234 secs
  25% in 0.0456 secs
  50% in 0.1842 secs
  75% in 0.3123 secs
  90% in 0.4234 secs
  95% in 0.4867 secs
  99% in 0.5634 secs
Scaling Strategy
Horizontal Scaling:
MCP and A2A servers are stateless—scale with container replicas
Database read replicas for read-heavy workloads (search queries)
Redis cache for frequently accessed queries (30-second TTL)
Load balancer distributes requests (sticky sessions not needed)
Vertical Scaling:
Increase PostgreSQL resources for larger datasets
Add pgvector HNSW indexes for faster vector search
Tune connection pool sizes (PgBouncer)
When to scale what:
Symptom
Solution
High MCP server CPU
Add more MCP replicas
Slow database queries
Add read replicas
High memory on MCP
Check for memory leaks, add replicas
Cache misses
Increase Redis memory, tune TTL
Slow embeddings
Deploy dedicated embedding service
Part 10: Lessons Learned & Best Practices
1. Go for Protocol Servers
Go’s performance and type safety provides a good support for AI deployment in production.
2. PostgreSQL Row-Level Security
Database-level tenant isolation is non-negotiable for enterprise. Application-level filtering is too easy to screw up. With RLS, even if your application has a bug, the database enforces isolation.
3. Integration Tests Against Real Databases
Unit tests with mocks didn’t catch the NULL embedding issues. Integration tests did. Test against production-like environments.
4. Optional Langfuse
Making Langfuse optional (try/except imports) lets developers run locally without complex setup while enabling full observability in production.
5. Comprehensive Documentation
Document your design and testing process from day one.
Use both Langfuse and OpenTelemetry. OTel traces service flow, Langfuse tracks LLM behavior. They complement, not replace each other.
OpenTelemetry for infrastructure: Trace context propagation across Python ? Go ? Database gave complete visibility into request flow. The traceparent header auto-propagation through requests/httpx made it seamless.
Langfuse for LLM calls: Token counts, costs, and prompt tracking. Essential for budget control and debugging LLM behavior.
Prometheus + Jaeger: Prometheus for metrics dashboards (query “What’s our P95 latency?”), Jaeger for debugging specific slow traces (“Why was this request slow?”).
That’s 10 layers of production concerns. Miss one, and you have a security incident waiting to happen.
Distributed Systems Lessons Apply Here
AI agents are distributed systems. The problems from microservices apply, because agents make autonomous decisions with potentially unbounded costs. From my fault tolerance article, these patterns are essential:
Without timeouts:
embedding = ollama.embed(text) # Ollama down ? hangs forever ? system freezes
Tenant A: 10,000 req/sec ? Database crashes ? ALL tenants down
With rate limiting:
if !rateLimiter.Allow(tenantID) {
    return ErrRateLimitExceeded  // Other tenants unaffected
}
The Bottom Line
MCP and A2A are excellent protocols. They solve real problems:
? MCP standardizes tool execution
? A2A standardizes agent coordination
But protocols are not products. Building on MCP/A2A is like building on HTTP—the protocol is solved, but you still need web servers, frameworks, security layers, and monitoring tools.
This repository shows the other 90%:
Real authentication (not “TODO: add auth”)
Real multi-tenancy (database RLS, not app filtering)
Real observability (Langfuse integration, not “we should add logging”)
Real testing (integration tests, not just mocks)
Real deployment (K8s manifests, not “works on my laptop”)
Get Started
git clone https://github.com/bhatti/mcp-a2a-go
cd mcp-a2a-go
docker compose up -d
./scripts/run-integration-tests.sh
open http://localhost:8501
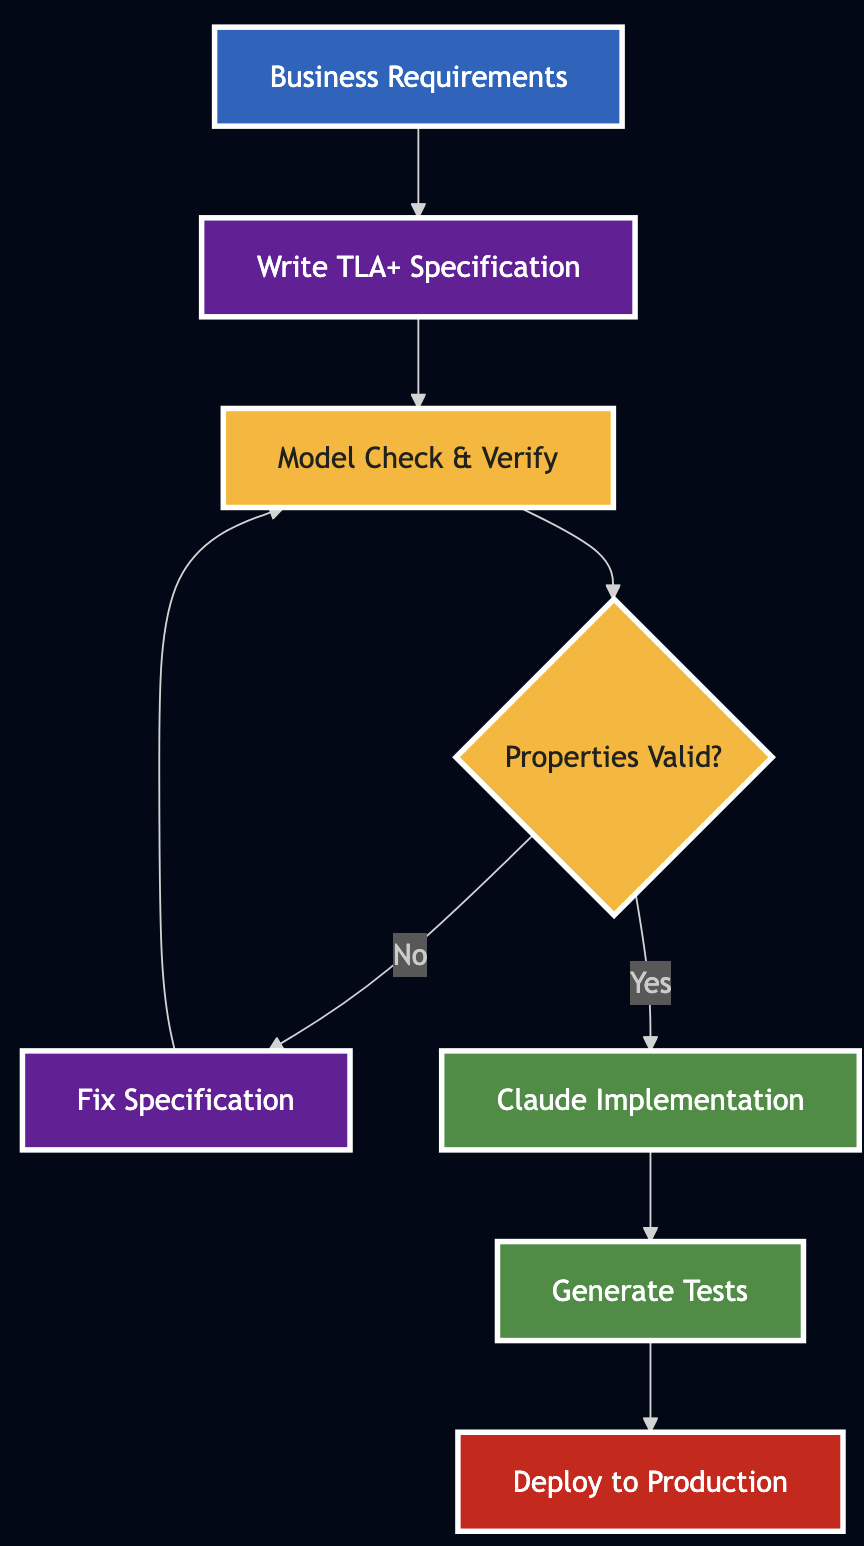
Problem: AI-assisted coding fails when modifying existing systems because we give AI vague specifications.
Solution: Use TLA+ formal specifications as precise contracts that Claude can implement reliably.
Result: Transform Claude from a code generator into a reliable engineering partner that reasons about complex systems.
After months of using Claude for development, I discovered most AI-assisted coding fails not because the AI isn’t smart enough, but because we’re asking it to work from vague specifications. This post shows you how to move beyond “vibe coding” using executable specifications that turn Claude into a reliable engineering partner.
Here’s what changes when you use TLA+ with Claude:
Before (Vibe Coding):
“Create a task management API”
Claude guesses at requirements
Inconsistent behavior across edge cases
Bugs in corner cases
After (TLA+ Specifications):
Precise mathematical specification
Claude implements exactly what you specified
All edge cases defined upfront
Properties verified before deployment
The Vibe Coding Problem
AI assistants like Claude are primarily trained on greenfield development patterns. They excel at:
Writing new functions from scratch
Implementing well-known algorithms
Creating boilerplate code
But they struggle with:
Understanding implicit behavioral contracts in existing code
Maintaining invariants across system modifications
The solution isn’t better prompts – it’s better specifications.
Enter Executable Specifications
An executable specification is a formal description of system behavior that can be:
Verified – Checked for logical consistency
Validated – Tested against real-world scenarios
Executed – Run to generate test cases or even implementations
I’ve tried many approaches to precise specifications over the years:
UML and Model Driven Development (2000s-2010s): I used tools like Rational Rose and Visual Paradigm in early 2000s that promised complete code generation from UML models. The reality was different:
Visual complexity: UML diagrams became unwieldy for anything non-trivial
Tool lock-in: Proprietary formats and expensive tooling
Impedance mismatch: The gap between UML models and real code was huge
Maintenance nightmare: Keeping models and code synchronized was nearly impossible
Model checking: Explores all possible execution paths
Tool independence: Plain text specifications, open source tools
Behavioral focus: Designed specifically for concurrent and distributed systems
Why TLA+ with Claude?
The magic happens when you combine TLA+’s precision with Claude’s implementation capabilities:
TLA+ eliminates ambiguity – There’s only one way to interpret a formal specification
Claude can read TLA+ – It understands the formal syntax and can translate it to code
Verification catches design flaws – TLA+ model checking finds edge cases you’d miss
Generated traces become tests – TLA+ execution paths become your test suite
Setting Up Your Claude and TLA+ Environment
Installing Claude Desktop
First, let’s get Claude running on your machine:
# Install via Homebrew (macOS)
brew install --cask claude

# Or download directly from Anthropic
# https://claude.ai/download
Set up project-specific contexts in ~/.claude/
Create TLA+ syntax rules for better code generation
Configure memory settings for specification patterns
Configuring Your Workspace
Once installed, I recommend creating a dedicated workspace structure. Here’s what works for me:
# Create a Claude workspace directory
mkdir -p ~/claude-workspace/{projects,templates,context}

# Add a context file for your coding standards
cat > ~/claude-workspace/context/coding-standards.md << 'EOF'
# My Coding Standards

- Use descriptive variable names
- Functions should do one thing well
- Write tests for all new features
- Handle errors explicitly
- Document complex logic
EOF
Installing TLA+ Tools
Choose based on your workflow
GUI users: TLA+ Toolbox for visual model checking
CLI users: tla2tools.jar for CI integration
Both: VS Code extension for syntax highlighting
# Download TLA+ Tools from https://github.com/tlaplus/tlaplus/releases
# Or use Homebrew on macOS
brew install --cask tla-plus-toolbox

# For command-line usage (recommended for CI)
wget https://github.com/tlaplus/tlaplus/releases/download/v1.8.0/tla2tools.jar
VS Code Extension
Install the TLA+ extension for syntax highlighting and basic validation:
code --install-extension alygin.vscode-tlaplus
Your First TLA+ Specification
Let’s start with a simple example to understand the syntax:
--------------------------- MODULE TaskManagement ---------------------------
EXTENDS Integers, Sequences, FiniteSets, TLC

CONSTANTS
    Users,          \* Set of users
    MaxTasks,       \* Maximum number of tasks
    MaxTime,        \* Maximum time value for simulation
    Titles,         \* Set of possible task titles
    Descriptions    \* Set of possible task descriptions

VARIABLES
    tasks,          \* Function from task ID to task record
    userTasks,      \* Function from user ID to set of task IDs
    nextTaskId,     \* Counter for generating unique task IDs
    currentUser,    \* Currently authenticated user
    clock,          \* Global clock for timestamps
    sessions        \* Active user sessions

\* Task states enumeration with valid transitions
TaskStates == {"pending", "in_progress", "completed", "cancelled", "blocked"}

\* Priority levels
Priorities == {"low", "medium", "high", "critical"}

\* Valid state transitions
ValidTransitions == {
    <<"pending", "in_progress">>,
    <<"pending", "cancelled">>,
    <<"pending", "blocked">>,
    <<"in_progress", "completed">>,
    <<"in_progress", "cancelled">>,
    <<"in_progress", "blocked">>,
    <<"in_progress", "pending">>,      \* Allow reverting to pending
    <<"blocked", "pending">>,
    <<"blocked", "in_progress">>,
    <<"blocked", "cancelled">>
}


TaskRecord == [
    id: Nat,
    title: STRING,
    description: STRING,
    status: TaskStates,
    priority: {"low", "medium", "high"},
    assignee: Users,
    createdAt: Nat,
    dueDate: Nat \cup {NULL}
]

\* Type invariants
TypeInvariant ==
    /\ tasks \in [Nat -> TaskRecord]
    /\ userTasks \in [Users -> SUBSET Nat]
    /\ nextTaskId \in Nat
    /\ currentUser \in Users \cup {NULL}
Now comes the magic. Instead of vague natural language, we give Claude the precise TLA+ specification:
My prompt to Claude:
Using this TLA+ specification for a task management system, implement a Go REST API
that satisfies all the specified behaviors and properties.

[Include the full TLA+ specification here]

Requirements:
1. Implement all actions defined in the TLA+ spec
2. Ensure all safety properties hold at runtime
3. Use Go's type system to enforce the data structures
4. Include comprehensive tests that cover the execution traces
5. Add proper error handling for violation of preconditions

Focus on behavioral correctness over performance optimization.
// Package domain contains the core business entities matching the TLA+ specification
package domain

import (
	"fmt"
	"time"
)

// TaskID represents a unique task identifier (maps to TLA+ task ID)
type TaskID int

// UserID represents a user identifier (maps to TLA+ Users set)
type UserID string

// TaskStatus represents the state of a task (maps to TLA+ TaskStates)
type TaskStatus string

const (
	StatusPending    TaskStatus = "pending"
	StatusInProgress TaskStatus = "in_progress"
	StatusCompleted  TaskStatus = "completed"
	StatusCancelled  TaskStatus = "cancelled"
	StatusBlocked    TaskStatus = "blocked"
)

// Priority represents task priority levels (maps to TLA+ Priorities)
type Priority string

const (
	PriorityLow      Priority = "low"
	PriorityMedium   Priority = "medium"
	PriorityHigh     Priority = "high"
	PriorityCritical Priority = "critical"
)

// Tag represents task categories (maps to TLA+ tags subset)
type Tag string

const (
	TagBug           Tag = "bug"
	TagFeature       Tag = "feature"
	TagEnhancement   Tag = "enhancement"
	TagDocumentation Tag = "documentation"
)

// Task represents a task entity (maps to TLA+ task record)
type Task struct {
	ID           TaskID            `json:"id"`
	Title        string            `json:"title"`
	Description  string            `json:"description"`
	Status       TaskStatus        `json:"status"`
	Priority     Priority          `json:"priority"`
	Assignee     UserID            `json:"assignee"`
	CreatedBy    UserID            `json:"created_by"`
	CreatedAt    time.Time         `json:"created_at"`
	UpdatedAt    time.Time         `json:"updated_at"`
	DueDate      *time.Time        `json:"due_date,omitempty"`
	Tags         []Tag             `json:"tags"`
	Dependencies map[TaskID]bool   `json:"dependencies"`
}

// ValidTransition represents a valid state transition (maps to TLA+ ValidTransitions)
type ValidTransition struct {
	From TaskStatus
	To   TaskStatus
}

// ValidTransitions defines all allowed state transitions
var ValidTransitions = map[ValidTransition]bool{
	{StatusPending, StatusInProgress}:    true,
	{StatusPending, StatusCancelled}:     true,
	{StatusPending, StatusBlocked}:       true,
	{StatusInProgress, StatusCompleted}:  true,
	{StatusInProgress, StatusCancelled}:  true,
	{StatusInProgress, StatusBlocked}:    true,
	{StatusInProgress, StatusPending}:    true, // Allow reverting
	{StatusBlocked, StatusPending}:       true,
	{StatusBlocked, StatusInProgress}:    true,
	{StatusBlocked, StatusCancelled}:     true,
}

// IsValidTransition checks if a state transition is valid (maps to TLA+ IsValidTransition)
func IsValidTransition(from, to TaskStatus) bool {
	return ValidTransitions[ValidTransition{From: from, To: to}]
}

// CanDelete checks if a task can be deleted (only completed or cancelled)
func (t *Task) CanDelete() bool {
	return t.Status == StatusCompleted || t.Status == StatusCancelled
}

// IsBlocked checks if task should be blocked based on dependencies
func (t *Task) IsBlocked(allTasks map[TaskID]*Task) bool {
	if len(t.Dependencies) == 0 {
		return false
	}

	for depID := range t.Dependencies {
		if dep, exists := allTasks[depID]; exists {
			if dep.Status != StatusCompleted {
				return true
			}
		}
	}
	return false
}

// ShouldUnblock checks if a blocked task can be unblocked
func (t *Task) ShouldUnblock(allTasks map[TaskID]*Task) bool {
	if t.Status != StatusBlocked {
		return false
	}

	for depID := range t.Dependencies {
		if dep, exists := allTasks[depID]; exists {
			if dep.Status != StatusCompleted {
				return false
			}
		}
	}
	return true
}

// Validate performs domain validation on the task
func (t *Task) Validate() error {
	if t.Title == "" {
		return fmt.Errorf("task title cannot be empty")
	}
	if t.Description == "" {
		return fmt.Errorf("task description cannot be empty")
	}
	if !isValidStatus(t.Status) {
		return fmt.Errorf("invalid task status: %s", t.Status)
	}
	if !isValidPriority(t.Priority) {
		return fmt.Errorf("invalid task priority: %s", t.Priority)
	}
	if t.Assignee == "" {
		return fmt.Errorf("task must have an assignee")
	}
	if t.CreatedBy == "" {
		return fmt.Errorf("task must have a creator")
	}
	if t.CreatedAt.After(t.UpdatedAt) {
		return fmt.Errorf("created time cannot be after updated time")
	}
	for _, tag := range t.Tags {
		if !isValidTag(tag) {
			return fmt.Errorf("invalid tag: %s", tag)
		}
	}
	return nil
}

func isValidStatus(status TaskStatus) bool {
	switch status {
	case StatusPending, StatusInProgress, StatusCompleted, StatusCancelled, StatusBlocked:
		return true
	default:
		return false
	}
}

func isValidPriority(priority Priority) bool {
	switch priority {
	case PriorityLow, PriorityMedium, PriorityHigh, PriorityCritical:
		return true
	default:
		return false
	}
}

func isValidTag(tag Tag) bool {
	switch tag {
	case TagBug, TagFeature, TagEnhancement, TagDocumentation:
		return true
	default:
		return false
	}
}
// Package usecase implements the TLA+ actions as use cases
package usecase

import (
	"crypto/rand"
	"encoding/hex"
	"fmt"
	"time"

	"github.com/bhatti/sample-task-management/internal/domain"
	"github.com/bhatti/sample-task-management/internal/repository"
)

// TaskUseCase implements task-related TLA+ actions
type TaskUseCase struct {
	uow              repository.UnitOfWork
	invariantChecker InvariantChecker
}

// InvariantChecker interface for runtime invariant validation
type InvariantChecker interface {
	CheckAllInvariants(state *domain.SystemState) error
	CheckTaskInvariants(task *domain.Task, state *domain.SystemState) error
	CheckTransitionInvariant(from, to domain.TaskStatus) error
}

// NewTaskUseCase creates a new task use case
func NewTaskUseCase(uow repository.UnitOfWork, checker InvariantChecker) *TaskUseCase {
	return &TaskUseCase{
		uow:              uow,
		invariantChecker: checker,
	}
}

// Authenticate implements TLA+ Authenticate action
func (uc *TaskUseCase) Authenticate(userID domain.UserID) (*domain.Session, error) {
	// Preconditions from TLA+:
	// - user \in Users
	// - ~sessions[user]

	user, err := uc.uow.Users().GetUser(userID)
	if err != nil {
		return nil, fmt.Errorf("user not found: %w", err)
	}

	// Check if user already has an active session
	existingSession, _ := uc.uow.Sessions().GetSessionByUser(userID)
	if existingSession != nil && existingSession.IsValid() {
		return nil, fmt.Errorf("user %s already has an active session", userID)
	}

	// Create new session
	token := generateToken()
	session := &domain.Session{
		UserID:    user.ID,
		Token:     token,
		Active:    true,
		CreatedAt: time.Now(),
		ExpiresAt: time.Now().Add(24 * time.Hour),
	}

	// Update state
	if err := uc.uow.Sessions().CreateSession(session); err != nil {
		return nil, fmt.Errorf("failed to create session: %w", err)
	}

	if err := uc.uow.SystemState().SetCurrentUser(&userID); err != nil {
		return nil, fmt.Errorf("failed to set current user: %w", err)
	}

	// Check invariants
	state, _ := uc.uow.SystemState().GetSystemState()
	if err := uc.invariantChecker.CheckAllInvariants(state); err != nil {
		uc.uow.Rollback()
		return nil, fmt.Errorf("invariant violation: %w", err)
	}

	return session, nil
}


// CreateTask implements TLA+ CreateTask action
func (uc *TaskUseCase) CreateTask(
	title, description string,
	priority domain.Priority,
	assignee domain.UserID,
	dueDate *time.Time,
	tags []domain.Tag,
	dependencies []domain.TaskID,
) (*domain.Task, error) {
	// Preconditions from TLA+:
	// - currentUser # NULL
	// - currentUser \in Users
	// - nextTaskId <= MaxTasks
	// - deps \subseteq DOMAIN tasks
	// - \A dep \in deps : tasks[dep].status # "cancelled"

	currentUser, err := uc.uow.SystemState().GetCurrentUser()
	if err != nil || currentUser == nil {
		return nil, fmt.Errorf("authentication required")
	}

	// Check max tasks limit
	nextID, err := uc.uow.SystemState().GetNextTaskID()
	if err != nil {
		return nil, fmt.Errorf("failed to get next task ID: %w", err)
	}

	if nextID > domain.MaxTasks {
		return nil, fmt.Errorf("maximum number of tasks (%d) reached", domain.MaxTasks)
	}

	// Validate dependencies
	allTasks, err := uc.uow.Tasks().GetAllTasks()
	if err != nil {
		return nil, fmt.Errorf("failed to get tasks: %w", err)
	}

	depMap := make(map[domain.TaskID]bool)
	for _, depID := range dependencies {
		depTask, exists := allTasks[depID]
		if !exists {
			return nil, fmt.Errorf("dependency task %d does not exist", depID)
		}
		if depTask.Status == domain.StatusCancelled {
			return nil, fmt.Errorf("cannot depend on cancelled task %d", depID)
		}
		depMap[depID] = true
	}

	// Check for cyclic dependencies
	if err := uc.checkCyclicDependencies(nextID, depMap, allTasks); err != nil {
		return nil, err
	}

	// Determine initial status based on dependencies
	status := domain.StatusPending
	if len(dependencies) > 0 {
		// Check if all dependencies are completed
		allCompleted := true
		for depID := range depMap {
			if allTasks[depID].Status != domain.StatusCompleted {
				allCompleted = false
				break
			}
		}
		if !allCompleted {
			status = domain.StatusBlocked
		}
	}

	// Create task
	task := &domain.Task{
		ID:           nextID,
		Title:        title,
		Description:  description,
		Status:       status,
		Priority:     priority,
		Assignee:     assignee,
		CreatedBy:    *currentUser,
		CreatedAt:    time.Now(),
		UpdatedAt:    time.Now(),
		DueDate:      dueDate,
		Tags:         tags,
		Dependencies: depMap,
	}

	// Validate task
	if err := task.Validate(); err != nil {
		return nil, fmt.Errorf("task validation failed: %w", err)
	}

	// Save task
	if err := uc.uow.Tasks().CreateTask(task); err != nil {
		return nil, fmt.Errorf("failed to create task: %w", err)
	}

	// Increment next task ID
	if _, err := uc.uow.SystemState().IncrementNextTaskID(); err != nil {
		return nil, fmt.Errorf("failed to increment task ID: %w", err)
	}

	// Check invariants
	state, _ := uc.uow.SystemState().GetSystemState()
	if err := uc.invariantChecker.CheckAllInvariants(state); err != nil {
		uc.uow.Rollback()
		return nil, fmt.Errorf("invariant violation after task creation: %w", err)
	}

	return task, nil
}

// UpdateTaskStatus implements TLA+ UpdateTaskStatus action
func (uc *TaskUseCase) UpdateTaskStatus(taskID domain.TaskID, newStatus domain.TaskStatus) error {
	// Preconditions from TLA+:
	// - currentUser # NULL
	// - TaskExists(taskId)
	// - taskId \in GetUserTasks(currentUser)
	// - IsValidTransition(tasks[taskId].status, newStatus)
	// - newStatus = "in_progress" => all dependencies completed

	currentUser, err := uc.uow.SystemState().GetCurrentUser()
	if err != nil || currentUser == nil {
		return fmt.Errorf("authentication required")
	}

	task, err := uc.uow.Tasks().GetTask(taskID)
	if err != nil {
		return fmt.Errorf("task not found: %w", err)
	}

	// Check user owns the task
	userTasks, err := uc.uow.SystemState().GetUserTasks(*currentUser)
	if err != nil {
		return fmt.Errorf("failed to get user tasks: %w", err)
	}

	hasTask := false
	for _, id := range userTasks {
		if id == taskID {
			hasTask = true
			break
		}
	}

	if !hasTask {
		return fmt.Errorf("user does not have access to task %d", taskID)
	}

	// Check valid transition
	if !domain.IsValidTransition(task.Status, newStatus) {
		return fmt.Errorf("invalid transition from %s to %s", task.Status, newStatus)
	}

	// Check dependencies if moving to in_progress
	if newStatus == domain.StatusInProgress {
		allTasks, _ := uc.uow.Tasks().GetAllTasks()
		for depID := range task.Dependencies {
			if depTask, exists := allTasks[depID]; exists {
				if depTask.Status != domain.StatusCompleted {
					return fmt.Errorf("cannot start task: dependency %d is not completed", depID)
				}
			}
		}
	}

	// Update status
	task.Status = newStatus
	task.UpdatedAt = time.Now()

	if err := uc.uow.Tasks().UpdateTask(task); err != nil {
		return fmt.Errorf("failed to update task: %w", err)
	}

	// Check invariants
	state, _ := uc.uow.SystemState().GetSystemState()
	if err := uc.invariantChecker.CheckAllInvariants(state); err != nil {
		uc.uow.Rollback()
		return fmt.Errorf("invariant violation: %w", err)
	}

	return nil
}
...
Step 6: TLA+ Generated Tests
The real power comes when we use TLA+ execution traces to generate comprehensive tests:
My prompt to Claude:
Generate Go tests that verify the implementation satisfies the TLA+ specification.
Create test cases that:

1. Test all TLA+ actions with valid preconditions
2. Test safety property violations
3. Test edge cases from the TLA+ model boundary conditions
4. Use property-based testing where appropriate

Include tests that would catch the execution traces TLA+ model checker explores.
Graduate To: Multi-service interactions, complex business logic
2. Properties Drive Design
Writing TLA+ properties often reveals design flaws before implementation:
\* This property might fail, revealing a design issue
ConsistencyProperty ==
    \A user \in Users:
        \A taskId \in userTasks[user]:
            /\ taskId \in DOMAIN tasks
            /\ tasks[taskId].assignee = user
            /\ tasks[taskId].status # "deleted"  \* Soft delete consideration
3. Model Checking Finds Edge Cases
TLA+ model checking explores execution paths you’d never think to test:
# TLA+ finds this counterexample:
# Step 1: User1 creates Task1
# Step 2: User1 deletes Task1
# Step 3: User2 creates Task2 (gets same ID due to reuse)
# Step 4: User1 tries to update Task1 -> Security violation!
This led to using UUIDs instead of incrementing integers for task IDs.
4. Generated Tests Are Comprehensive
TLA+ execution traces become your regression test suite. When Claude implements based on TLA+ specs, you get:
Complete coverage – All specification paths tested
Edge case detection – Boundary conditions from model checking
Behavioral contracts – Tests verify actual system properties
Documentation Generation
Prompt to Claude:
Generate API documentation from this TLA+ specification that includes:
1. Endpoint descriptions derived from TLA+ actions
2. Request/response schemas from TLA+ data structures
3. Error conditions from TLA+ preconditions
4. Behavioral guarantees from TLA+ properties
Code Review Guidelines
With TLA+ specifications, code reviews become more focused:
? Asking Claude to “fix the TLA+ to match the code”
The spec is the truth – fix the code to match the spec
? Asking Claude to “implement this TLA+ specification correctly”
? Specification scope creep: Starting with entire system architecture ? Incremental approach: Begin with one core workflow, expand gradually
2. Claude Integration Pitfalls
? “Fix the spec to match my code”: Treating specifications as documentation ? “Fix the code to match the spec”: Specifications are the source of truth
3. The Context Overload Trap
Problem: Dumping too much information at once Solution: Break complex features into smaller, focused requests
4. The “Fix My Test” Antipattern
Problem: When tests fail, asking Claude to modify the test instead of the code Solution: Always fix the implementation, not the test (unless the test is genuinely wrong)
5. The Blind Trust Mistake
Problem: Accepting generated code without understanding it Solution: Always review and understand the code before committing
Proven Patterns
1. Save effective prompts:
# ~/.claude/tla-prompts/implementation.md
Implement [language] code that satisfies this TLA+ specification:

[SPEC]

Requirements:
- All TLA+ actions become functions/methods
- All preconditions become runtime checks
- All data structures match TLA+ types
- Include comprehensive tests covering specification traces
Before asking Claude to implement something complex, I ask for an explanation:
Explain how you would implement real-time task updates using WebSockets.
What are the trade-offs between Socket.io and native WebSockets?
What state management challenges should I consider?
3. The “Progressive Enhancement” Pattern
Start simple, then add complexity:
1. First: "Create a basic task model with CRUD operations"
2. Then: "Add validation and error handling"
3. Then: "Add authentication and authorization"
4. Finally: "Add real-time updates and notifications"
4. The “Code Review” Pattern
After implementation, I ask Claude to review its own code:
Review the task API implementation for:
- Security vulnerabilities
- Performance issues
- Code style consistency
- Missing error cases

Be critical and suggest improvements.
What’s Next
As I’ve developed this TLA+/Claude workflow, I’ve realized we’re approaching something profound: specifications as the primary artifact. Instead of writing code and hoping it’s correct, we’re defining correct behavior formally and letting AI generate the implementation. This inverts the traditional relationship between specification and code.
Implications for Software Engineering
Design-first development becomes natural
Bug prevention replaces bug fixing
Refactoring becomes re-implementation from stable specs
Documentation is always up-to-date (it’s the spec)
I’m currently experimenting with:
TLA+ to test case generation – Automated comprehensive testing
Multi-language implementations – Same spec, different languages
Specification composition – Building larger systems from verified components
Quint specifications – A modern executable specification language with simpler syntax than TLA+
Conclusion: The End of Vibe Coding
After using TLA+ with Claude, I can’t go back to vibe coding. The precision, reliability, and confidence that comes from executable specifications has transformed how I build software. The complete working example—TLA+ specs, Go implementation, comprehensive tests, and CI/CD pipeline—is available at github.com/bhatti/sample-task-management.
Yes, there’s a learning curve. Yes, writing TLA+ specifications takes time upfront. But the payoff—in terms of correctness, maintainability, and development speed—is extraordinary. Claude becomes not just a code generator, but a reliable engineering partner that can reason about complex systems precisely because we’ve given it precise specifications to work from. We’re moving from “code and hope” to “specify and know”—and that changes everything.
The code maintenance and readability are important aspects of writing software systems and the “Code That Fits in Your Head” comes with a lot of practical advice for writing maintainable code. Following are a few important heuristics from the book:
1. Art or Science
In the first chapter, the author compares software development with other fields such as Civil engineering that deals with design, construction, and maintenance of components. Though, software development has these phases among others but the design and construction phases in it are intimately connected and requires continuous iteration. Another metaphor discussed in the book is thinking software development as a living organism like garden, which makes more sense as like pruning weeds in garden, you have to refactor the code base and manage technical debt. Another metaphor described in the book is software craftsmanship and software developer may progress from apprentice, journeyman to master. Though, these perspectives help but software doesn’t quite fit the art metaphor and author suggests heuristics and guidelines for programming. The author introduces software engineering that allows a structured framework for development activities.
2. Checklists
A lot of professions such as airplane pilots and doctors follow a checklist for accomplishing a complex task. You may use similar checklist for setting up a new code-base such as using Git, automating the build, enabling all compiler error messages, using linters, static analysis, etc. Though, software engineering is more than following a checklist but these measures help make small improvements.
3. Tackling Complexity
This chapter defines sustainability and quality as the purpose for the book as the software may exists for decades and it needs to sustain its organization. The software exists to provide a value, though in some cases the value may not be immediate. This means at times, worse technology succeeds because it provides faster path to the value and companies which are too focus on perfection can run out of business. Richard Gabriel coined the aphorism that worse is better. The sustainability chooses middle ground by moving in right direction with checklists and balanced software development practices. The author compares computer with human brain and though this comparison is not fair and working memory of humans is much smaller that can hold from four to seven pieces of information. This number is important when writing a code as you spend more time reading the code and a code with large number of variables or conditional logic can make it harder to understand. The author refers to the work of Daniel Kahneman who suggested model of thoughts comprising two systems: System 1 and System 2. When a programmer is in the zone or in a flow, the system 1 always active and try to understand the code. This means that writing modular code with a fewer dependencies, variables and decisions is easier to understand and maintain. The human brain can deal with limited memory and if the code handles more than seven things at once then it will lead to the complexity.
4. Vertical Slice and Walking Skeleton
This chapter recommends starting and deploying a vertical slice of the application to get to the working software. A vertical slice may consists of multiple layers but it gives an early feedback and is a working software. A number of software development methodologies such as Test-driven development, Behavioral-driven development, Domain-driven design, Type-driven development and Property-driven development help building fine-grained implementations with tests. For example, if you don’t have tests then you can use characterization test to describe the behavior of existing software. The tests generally follow Arranage-Act-Assert phases where the arrange phase prepares the test, the act phase invokes the operation under test and the assert phase verifies the actual outcome. The documentation can further explain why decisions in the code were made. The walking skeleton helps vertical slice by using acceptance-test-driven development or outside-in-test-driven development. For example, you can pick a simplest feature to implement that aims for the happy path to demonstrate that the system has a specific capability. The unit-tests will test this feature by using Fake Object, data-transfer-object (DTO) and interfaces (e.g. RepositoryInterface). The dependencies are injected into tests with this mock behavior. The real objects that are difficult tests can use a Humble Object pattern and drain the object of branching logic. Making small improvements that are continuously delivered also keep stakeholders updated so that they know when you will be done.
5. Encapsulation
The encapsulation hides details by defining a contract that describes the valid interactions between objects and callers. The parameterized tests can capture the desired behavior and assert the invariants. The incremental changes can be added using test-driven development that uses red-green-refactor where you first write a failing test, then make the test pass and then refactor to improve the code. When using a contract to capture the interactions, you can use Postel’s law to build resilient systems, i.e.,
Be conservative in what you send, be liberal in what you accept.
The encapsulation guarantees that an object is always valid, e.g. you can use a constructor to validate all invariants including pre-conditions and post-conditions.
6. Triangulation
As the working memory for humans is very small, you have to decompose and compartmentalize the code structure into smaller chunks that can be easily understood. The author describes a devil’s advocate technique for validating behavior in the unit tests where you try to pass the tests with incomplete implementation, which tells you that you need more test cases. This process can be treated as kind of triangulation:
As the tests get more specific, the code gets more generic
7. Decomposition
The code rot occurs because no one pays attention to the overall quality when making small changes. You can use metrics to track gradual decay such as cyclomatic complexity should be below seven. In order to improve the code readability, the author suggests using 80/24 rule where you limit a method size to be no more than 24 lines and width of each line to be no more than 80 characters. The author also suggests hex flower rule:
No more than seven things should be going on in a single piece of code.
The author defines abstraction to capture essence of an object, i.e.,
Abstraction is the elimination of the irrelevant and the amplification of the essential.
Another factor that influences decomposition is cohesion so that code that works on the same data structure or all of its attributes is defined in the same module or class. The author cautions against the feature envy to decrease the complexity and you may need to refactor the code to another method or class. The author refers to a technique “parse, don’t validate” when validating an object so that the validate method takes less-structured input and produces more-structured output. Next, author describes fractal architecture where a large system is decomposed into smaller chunks and each chunk hides details but can be zoomed in to see the structure. The fractal architecture helps organize the code so that lower-level details are captured in a single abstract chunk and can easily fit in your brain.
8. API Design
This chapter describes principles of API design such as affordance, which uses encapsulation to preserve the invariants of objects involved in the API. The affordance allows a caller to invoke an API only when preconditions are met. The author strengthen the affordance with a poka-yoke (mistake proof) analogy, which means a good interface design should be hard to misuse. Other techniques in the chapter includes: write code for the readers; favor well-named code over comments; and X out names. The X out names replaces API name with xxx and sees if a reader can guess what the API does. For example, you may identify APIs for command-query separation where a method structure like void xxx() can be considered as command with a side effect. In order to communicate the intent of an API, the author describes a hierarchy of communication such as using API’s distinct types, helpful names, good comments, automated tests, helpful commit messages and good documentation.
9. Teamwork
In this chapter, the author provides tips for teamwork and communication with other team mates such as writing good Git commit messages using 50/72 rule where you first write a summary no wider than 50 characters, followed by a blank line and then detailed text with no wider than 72 characters. Other techniques include Continuous Integration that generally use trunk or main branch for all commits and developers make small changes optionally with feature-flags that are frequently merged. The developers are encouraged to make small commits and the code ownership is collective to decrease the bus factor. The author refers to pair programming and mob programming for collaboration within the team. In order to facilitate the collaboration, the author suggests reducing code review latency and rejecting any large change set. The reviewers should be asking whether they can maintain the code, is the code intent clear and could it be further simplified, etc. You can also pull down the code and test it locally to further gain the insight.
10. Augmenting Code
This chapter focuses on refactoring existing code for adding new functionality, enhancing existing behavior and bug fixes. The author suggests using feature-flags when deploying incomplete code. The author describes the strangler pattern for refactoring with incremental changes and suggests:
For any significant change, don’t make it in-place; make it side-by-side.
The strangler pattern can be applied at method-level where you may add a new method instead of making in-place change to an existing method and then remove the original method. Similarly, you can use class-level strangler to introduce new data structure and then remove old references. The author suggests using semantic versioning so that you can support backward compatible or breaking changes.
11. Editing Unit Tests
Though, with an automated test suite, you can refactor production code safely but there is no safety net when making changes to the test code. You can add additional tests, supplement new assertions to existing tests or change unit tests to parametersized tests without affecting existing behavior. Though, some programmers follow a single assertion per test and consider multiple assertions an Assertion Roulette but author suggests strengthening the postconditions in unit tests with additional assertions, which is somewhat similar to the Liskov Substitution Principle that says that subtypes may weaken precondition and strengthen postconditions. The author suggests separating refactoring of test and production code and use IDE’s supported refactoring tools such as rename, extract or move method when possible.
12. Troubleshooting
When troubleshooting, you first have to understand what’s going on. This chapter suggests using scientific method to make a hypothesis, performing the experiment and comparing the outcome to prediction. The author also suggests simplifying and removing the code to check if a problem goes away. Other ways to simplify the code include composing an object graph in code instead of using complex dependency injection; using pure functions instead of using mock objects; merging often instead of using complex diff tools; learning SQL instead of using convoluted object-relational mapping, etc. Another powerful technique for troubleshooting is rubber ducking where you try to explain the problem and gain a new insight in the process. In order to build quality, you should aim to reduce defects to zero. The tests also help with troubleshooting by writing an automated test to reproduce defects before fixing so that they serve as a regression test. The author cautions against slow tests and non-deterministic defects due race conditions. Finally, the author suggests using bisection that uses a binary search for finding the root cause where you reproduce the defect in half of the code and continue until you find the problem. You can also use bisection feature of Git to find the commit that introduced the defect.
13. Separation of Concerns
The author describes Kent Beck’s aphorism:
Things that change at the same rate belong together. Things that change at different rates belong apart.
The principle of separation of concerns can be used for decomposing working software into smaller parts, which can be decomposed further with nested composition. The author suggests using command query separation principle to keep side effects separated from the query operations. Object-oriented composition tends to focus on composing side effects together such as Composite design pattern, which lead to complex code. The author describes Sequential Composition that chains methods together and Referential Transparency to define a deterministic method without side effects. Next, the author describes cross cutting concerns such as logging, performance monitoring, auditing, metering, instrumentation, caching, fault tolerance, and security. The author finally describes Decorator pattern to enhance functionality, e.g., you can add logging to existing code without changing it and log actions from impure functions.
14. Rhythm
This chapter describes daily and recurring practices that software development teams follow such as daily stand-ups. The personal rhythm includes time-boxing or using Pomodoro technique; taking a break; using time deliberately; and touch type. The team rhythm includes updating dependencies regularly, scheduling other things such as checking certificates. The author describes Conway’s law:
Any organization that design a system […] will inevitably produce a design whose structure is a copy of the organization’s communication structure.
You can use this law to organize the work that impacts the code base.
15. The Usual Suspects
This chapter covers usual suspects of software engineering: architecture, algorithms, performance, security and other approaches. For example, performance is often a critical aspect but premature optimization can be wasteful. Instead correctness, an effort to reduce complexity and defects should be priority. In order to implement security, the author suggests STRIDE threat modelling, which includes Spoofing, Tempering, Repudiation, Information disclosure, Denial of service and Elevation of privilege. Other techniques include property-based testing and Behavioral code analysis can be used to extract information from Git to identify patterns and problems.
16. Tour
In this last chapter, the author shows tips on understanding an unfamiliar code by navigating to the main method and finding the way around. You can check if the application uses broader patterns such as Fractal architecture, Model-View-Controller and understands authentication, authorization, routing, etc. The author provides a few suggestions about code structure and file organization such as putting files in one directory though it’s a contestable advice. The author refers to the Hex flower and fractal architecture where you can zoom in to see more details. When using a monolithic architecture, the entire production code compiles to a single executable file that makes it harder to reuse parts of the code in new ways. Another drawback of monolithic architecture is that dependencies can be hard to manage and abstraction can be coupled with implementation, which violates the Dependency Inversion Principle. Further in order to prevent cyclic dependencies, you will need to detect and prevent Acyclic Dependency Principle. Finally, you can use test suite to learn about the system.
Summary
The book is full of practical advice on writing maintainable code such as:
50/72 Rule for Git commit messages
80/24 Rule for writing small blocks of code
Tests based on Arrange-Act-Assert and Red-Green Refactor
Bisection for troubleshooting
Checklists for a new codebase
Command Query Separation
Cyclomatic Complexity and Counting the Variables
Decorators for cross-cutting concerns
Devil’s advocate for improving assertions
Feature flags
Functional core and imperative shell
Hierarchy of communication
Parse, don’t validate
Postel’s law to maintain invariants
Regularly update dependencies
Reproduce defects as Tests
Review code
Semantic Versioning
Separate refactoring of test and production code
Strangler pattern
Threat modeling using STRIDE
Transformation priority premise to make small changes and keeping the code in working condition
X-driven development by using unit-tests, static code analysis, etc.
X out of Names
These heuristics help make the software development sustainable so that the team can make incremental changes to the code while maintaining high quality.
I recently needed a way to control access to shared resources in a distributed system for concurrency control. Though, you may use Consul or Zookeeper (or low-level Raft / Paxos implementations if you are brave) for managing distributed locks but I wanted to reuse existing database without adding another dependency to my tech stack. Most databases support transactions or conditional updates with varying degree of support for transactional guarantees, but they can’t be used for distributed locks if the business logic you need to protect resides outside the databases. I found a lock client library based on AWS Databases but it didn’t support semaphores. The library implementation was tightly coupled with concerns of lock management and database access and it wasn’t easy to extend it easily. For example, following diagram shows how cyclic dependencies in the code:
class diagram
Due to above deficiencies in existing solutions, I decided to implement my own implementation of distributed locks in Rust with following capabilities:
Allow creating lease based locks that can either protect a single shared resource with a Mutex lock or protect a finite set of shared resources with a Semaphore lock.
Allow renewing leases based on periodic intervals so that stale locks can be acquired by other users.
Allow releasing Mutex and semaphore locks explicitly after the user performs a critical action.
CRUD APIs to manage Mutex and Semaphore entities in the database.
Multi-tenancy support for different clients in case the database is shared by multiple users.
Fair locks to support first-come and first serve based access grant when acquiring same lock concurrently.
Scalable solution for supporting tens of thousands concurrent mutexes and semaphores.
Support multiple data stores such as relational databases such as MySQL, PostgreSQL, Sqlite and as well as NoSQL/Cache data stores such as AWS Dynamo DB and Redis.
High-level Design
I chose Rust to build the library for managing distributed locks due to strict performance and correctness requirements. Following diagram shows the high-level components in the new library:
LockManager Interface
The client interacts with the LockManager that defines following operations to acquire, release, renew lock leases and manage lifecycle of Mutexes and Semaphores:
#[async_trait]
pub trait LockManager {
    // Attempts to acquire a lock until it either acquires the lock, or a specified additional_time_to_wait_for_lock_ms is
    // reached. This method will poll database based on the refresh_period. If it does not see the lock in database, it
    // will immediately return the lock to the caller. If it does see the lock, it will note the lease expiration on the lock. If
    // the lock is deemed stale, (that is, there is no heartbeat on it for at least the length of its lease duration) then this
    // will acquire and return it. Otherwise, if it waits for as long as additional_time_to_wait_for_lock_ms without acquiring the
    // lock, then it will return LockError::NotGranted.
    //
    async fn acquire_lock(&self, opts: &AcquireLockOptions) -> LockResult<MutexLock>;

    // Releases the given lock if the current user still has it, returning true if the lock was
    // successfully released, and false if someone else already stole the lock. Deletes the
    // lock item if it is released and delete_lock_item_on_close is set.
    async fn release_lock(&self, opts: &ReleaseLockOptions) -> LockResult<bool>;

    // Sends a heartbeat to indicate that the given lock is still being worked on.
    // This method will also set the lease duration of the lock to the given value.
    // This will also either update or delete the data from the lock, as specified in the options
    async fn send_heartbeat(&self, opts: &SendHeartbeatOptions) -> LockResult<MutexLock>;

    // Creates mutex if doesn't exist
    async fn create_mutex(&self, mutex: &MutexLock) -> LockResult<usize>;

    // Deletes mutex lock if not locked
    async fn delete_mutex(&self,
                          other_key: &str,
                          other_version: &str,
                          other_semaphore_key: Option<String>) -> LockResult<usize>;

    // Finds out who owns the given lock, but does not acquire the lock. It returns the metadata currently associated with the
    // given lock. If the client currently has the lock, it will return the lock, and operations such as release_lock will work.
    // However, if the client does not have the lock, then operations like releaseLock will not work (after calling get_lock, the
    // caller should check mutex.expired() to figure out if it currently has the lock.)
    async fn get_mutex(&self, mutex_key: &str) -> LockResult<MutexLock>;

    // Creates or updates semaphore with given max size
    async fn create_semaphore(&self, semaphore: &Semaphore) -> LockResult<usize>;

    // Returns semaphore for the key
    async fn get_semaphore(&self, semaphore_key: &str) -> LockResult<Semaphore>;

    // find locks by semaphore
    async fn get_semaphore_mutexes(&self,
                                   other_semaphore_key: &str,
    ) -> LockResult<Vec<MutexLock>>;

    // Deletes semaphore if all associated locks are not locked
    async fn delete_semaphore(&self,
                              other_key: &str,
                              other_version: &str,
    ) -> LockResult<usize>;
}
The LockManager interacts with LockStore to access mutexes and semaphores, which delegate to implementation of mutex and semaphore repositories for lock management. The library defines two implementation of LockStore: first, DefaultLockStore that supports mutexes and semaphores where mutexes are used to acquire a singular lock whereas semaphores are used to acquire a lock from a set of finite shared resources. The second, FairLockStore uses a Redis specific implementation of fair semaphores for managing lease based semaphores that support first-come and first-serve order. The LockManager supports waiting for the lock to be available if lock is not immediately available where it periodically checks for the availability of mutex or semaphore based lock. Due to this periodic polling, the fair semaphore algorithm won’t support FIFO order if a new client requests a lock while previous lock request is waiting for next polling interval.
Create Lock Manager
You can instantiate a Lock Manager with relational database store as follows:
let config = LocksConfig::new("test_tenant");
let mutex_repo = factory::build_mutex_repository(RepositoryProvider::Rdb, &config)
	.await.expect("failed to build mutex repository");
let semaphore_repo = factory::build_semaphore_repository(
  	RepositoryProvider::Rdb, &config)
	.await.expect("failed to build semaphore repository");
let store = Box::new(DefaultLockStore::new(&config, mutex_repo, semaphore_repo));

let locks_manager = LockManagerImpl::new(
  	&config, store, &default_registry()).expect("failed to initialize lock manager");
Alternatively, you can choose AWS Dynamo DB as follows:
let mutex_repo = factory::build_mutex_repository(
  	RepositoryProvider::Ddb, &config).await.expect("failed to build mutex repository");
let semaphore_repo = factory::build_semaphore_repository(
  	RepositoryProvider::Ddb, &config).await.expect("failed to build semaphore repository");
let store = Box::new(DefaultLockStore::new(&config, mutex_repo, semaphore_repo));
Or Redis based data-store as follows:
let mutex_repo = factory::build_mutex_repository(
  	RepositoryProvider::Redis, &config).await.expect("failed to build mutex repository");
let semaphore_repo = factory::build_semaphore_repository(
  	RepositoryProvider::Redis, &config).await.expect("failed to build semaphore repository");
let store = Box::new(DefaultLockStore::new(&config, mutex_repo, semaphore_repo));
Note: The AWS Dynamo DB uses strongly consistent reads feature as by default it is eventually consistent reads.
Acquiring a Mutex Lock
You will need to build options for acquiring with key name and lease period in milliseconds and then acquire it:
let opts = AcquireLockOptionsBuilder::new("mylock")
	.with_lease_duration_secs(10).build();
let lock = lock_manager.acquire_lock(&opts)
	.expect("should acquire lock");
The acquire_lock operation will automatically create mutex lock if it doesn’t exist otherwise it will wait for the period of lease-time if the lock is not available. This will return a structure for mutex lock that includes:
A lock is only available for the duration specified in lease_duration period, but you can renew it periodically if needed:
let opts = SendHeartbeatOptionsBuilder::new("one", "258d513e-bae4-4d91-8608-5d500be27593")
                .with_lease_duration_secs(15)
                .build();

let updated_lock = lock_manager.send_heartbeat(&opts)
					.expect("should renew lock");
Note: The lease renewal will also update the version of lock so you will need to use the updated version to renew or release the lock.
Releasing the lease of Lock
You can build options for releasing from the lock returned by above API as follows and then release it:
let opts = ReleaseLockOptionsBuilder::new("one", "258d513e-bae4-4d91-8608-5d500be27593")
                .build();
lock_manager.release_lock(&release_opts)
				.expect("should release lock");
Acquiring a Semaphore based Lock
The semaphores allow you to define a set of locks for a resource with a maximum size. The operation for acquiring semaphore is similar to acquiring regular lock except you specify semaphore size, e.g.:
let opts = AcquireLockOptionsBuilder::new("my_pool")
                    .with_lease_duration_secs(15)
                    .with_semaphore_max_size(10)
                    .build();
let lock = lock_manager.acquire_lock(&opts)
				.expect("should acquire semaphore lock");
The acquire_lock operation will automatically create semaphore if it doesn’t exist and it will then check for available locks and wait if all the locks are busy. This will return a structure for lock that includes:
The fair semaphores is only available for Redis due to internal implementation, and it requires enabling it via fair_semaphore configuration option, otherwise its usage is similar to above operations, e.g.:
let mut config = LocksConfig::new("test_tenant");
config.fair_semaphore = Some(fair_semaphore);
let fair_semaphore_repo = factory::build_fair_semaphore_repository(
RepositoryProvider::Redis, &config)
.await.expect("failed to create fair semaphore");
let store = Box::new(FairLockStore::new(&config, fair_semaphore_repo));
let locks_manager = LockManagerImpl::new(
&config, store, &default_registry())
.expect("failed to initialize lock manager");
Then acquire lock similar to the semaphore syntax as before:
let opts = AcquireLockOptionsBuilder::new("my_pool")
.with_lease_duration_secs(15)
.with_semaphore_max_size(10)
.build();
let lock = lock_manager.acquire_lock(&opts)
.expect("should acquire semaphore lock");
The acquire_lock operation will automatically create semaphore if it doesn’t exist and it will then check for available locks and wait if all the locks are busy. This will return a structure for lock that includes:
The fair semaphore lock does not use mutexes internally but for the API compatibility, it builds a mutex with a key based on combination of semaphore-key and version. You can then query semaphore state as follows:
let semaphore = locks_manager.get_semaphore("one").await
                .expect("failed to find semaphore");
In addition to a Rust based interface, the distributed locks library also provides a command line interface for managing mutex and semaphore based locks, e.g.:
Mutexes and Semaphores based Distributed Locks with databases.

Usage: db-locks [OPTIONS] [PROVIDER] <COMMAND>

Commands:
  acquire

  heartbeat

  release

  get-mutex

  delete-mutex

  create-mutex

  create-semaphore

  get-semaphore

  delete-semaphore

  get-semaphore-mutexes

  help
          Print this message or the help of the given subcommand(s)

Arguments:
  [PROVIDER]
          Database provider [default: rdb] [possible values: rdb, ddb, redis]

Options:
  -t, --tenant <TENANT>
          tentant-id for the database [default: local-host-name]
  -f, --fair-semaphore <FAIR_SEMAPHORE>
          fair semaphore lock [default: false] [possible values: true, false]
  -j, --json-output <JSON_OUTPUT>
          json output of result from action [default: false] [possible values: true, false]
  -c, --config <FILE>
          Sets a custom config file
  -h, --help
          Print help information
  -V, --version
          Print version information
For example, you can acquire fair semaphore lock as follows:
% REDIS_URL=redis://192.168.1.102 cargo run -- --fair-semaphore true --json-output true redis acquire --key one --semaphore-max-size 10
You can run following command for renewing above lock:
% REDIS_URL=redis://192.168.1.102 cargo run -- --fair-semaphore true --json-output true redis heartbeat --key one_69816448-7080-40f3-8416-ede1b0d90e80 --semaphore-key one --version 69816448-7080-40f3-8416-ede1b0d90e80
And then release it as follows:
% REDIS_URL=redis://192.168.1.102 cargo run -- --fair-semaphore true --json-output true redis release --key one_69816448-7080-40f3-8416-ede1b0d90e80 --semaphore-key one --version 69816448-7080-40f3-8416-ede1b0d90e80
Summary
I was able to meet the initial goals for implementing distributed locks and though this library is early in development. You can download and try it from https://github.com/bhatti/db-locks. Feel free to send your feedback or contribute to this library.
I recently read Sam Newman’s book on Monolithic to Microservices architecture. I had read his previous book on Building Microservices on related topic that focused more on design and implementation of microservices but there is some overlap of topics in these books.
Chapter 1 – Just Enough Microservices
The first chapter defines how microservices can be designed to be deployed independently by modeling around a business domain.
Benefits
The major benefits of microservices include:
Independent Deployability
Modeled Around a Business Domain
The author explains one of common reason for three-tier architecture with UI/Business-Logic/Database is so common is due to Conway’s law that predicates that system design mimics organization’s communication structure.
Own Their Own Data
In order to keep reduce coupling, author recommends against sharing data with microservices.
Problems
Though, microservices provide you isolation and flexibility but they also add complexity that comes with network communication such as higher latencies, distributed transactions, and handling network failures. Other problems include:
User Interface
The author also cautions against focusing only on the server side and leaving UI as monolithic.
Technology
The author also cautions against chasing shiny new technologies instead of leveraging what you already know.
Size
The size of a microservice depends on the context but just having a small-size should not be the primary concern.
Ownership
The microservices architecture allows strong ownership but it requires that they are designed around the business domain and product lines.
Monolith
The author explains monolithic apps where all code is packaged into a single process.
Modular Monolith
In modular monolith, the code can be broken into different modules and is for deployment.
Distributed Monolith
If boundaries of microservices are not loosely coupled, they can result in distributed monolith that has disadvantages of monolithic and microservices.
Challenges and Benefits of Monolith
The author explains that monolithic design is not necessarily a legacy but a choice that depends on the context.
Cohesion and Coupling
He uses cohesion and coupling when defining microservices where stable systems encourage high cohesion and low coupling that provides independent deployment and minimize chatty services.
Implementation Coupling
The implementation coupling may be caused by sharing domain or database.
Temporal Coupling
The temporal coupling using synchronous APIs to perform an operation.
Deployment Coupling
The deployment coupling adds risk of adding unchanged modules to the deployment.
Domain Coupling
The domain coupling is caused by sharing full domain object instead of events or reducing unrelated information.
Domain-Driven Design
The author reviews domain-driven design concepts such as aggregate and bounded context.
Aggregate
In DDD, an aggregate uses a state machine to manage lifecycle of a grouped object that can be used to design a microservice so that it handles the lifecycle and storage of those aggregates.
Bounded Context
Bounded context represents a boundary of business domain that may contain one or more aggregates. These concepts can be used to define service boundaries so that each service is cohesive with a well-defined interface.
Chapter 2 – Planning a Migration
The chapter two defines a migration path for micro-services by defining goals for the migration and why you should adopt a microservice architecture.
Why Might You Choose Microservices
Common reasons for such architecture includes:
improving autonomy
reduce time to market
scaling independently
improving robustness
scaling the number of developers while minimizing coordination
embracing new technologies
When Might Microservices Be a Bad Idea?
The author also describes scenarios when a microservice architecture is a bad idea such as:
when business domain is unclear
early adopting microservices in startups
customer-installed software.
Changing Organizations
The author describes some of ways organizations can be persuaded to adopt this architecture using Dr. John Kottler’s eight-step process:
establishing a sense of urgency
creating the guided coalition
developing a vision and strategy
communicating the change vision
empowering employees
generating short-term wins.
Importance of Incremental Migration
Incremental migration for microservice architecture is important so that you can release these services to the production and learn from the actual use.
Cost of Change
The author explains cost of change in terms of reversible and irreversible decisions commonly used at Amazon.
Domain Driven Design
The author goes over domain-driven design again and shows how bounded context can define boundaries of the microservices. You can use event storming to define a shared domain model where participants define first domain events and then group those domain events. You can then pick a context that has few in-bound dependencies to start with and using strangler fig pattern for incremental migration. The author also shows two-axis model for service decomposition by comparing benefit vs ease of decomposition.
Reorganizing Teams
The chapter then reviews team restructure so that you can reassign responsibilities towards cross-functional model who can fully own and operate specific microservices.
How Will You Know if the Transition is Working?
You can determine if the transition is working by:
having regular checkpoints
quantitative measures
Qualitative measures
Avoiding the sunk cost fallacy.
Chapter 3 – Splitting the Monolith
The chapter three describes how to split the monolith in small steps.
To change the Monolith or Not?
You will have to decide whether to move existing code as is or reimplement.
Refactoring the Monolith
A key blocker in breaking the monolith might be tightly coupled design that requires some refactoring before the migration. The next step in this process might be a modular monolith where you have a single unit of deployment but with statically linked modules.
Pattern: Stranger Fig Application
The Strangler Fig Application incrementally migrates existing code by moving modules to external microservices. In some cases those microservices may need to invoke other common behavior in the monolith.
HTTP Proxy
If the monolith is using an HTTP reverse proxy to intercept incoming calls, it can be extended to redirect requests for the new service. If the new service chooses to implement a new protocol, it may require other changes to the proxy layer that could add risk and goes against general recommendation of “Keep the pipes dumb, the endpoints smart.” One way to remediate is to create a layer for converting protocol from the legacy to the new format such as REST to gRPC.
Service Mesh
Instead of a centralized proxy, you can use service meshes such as Envoy that is deployed as a control-plane along with each service that acts as a proxy for communicating with the service.
Message Interception and Content-based Routing
If a monolith is using messaging, you can intercept messages and use a content-based router to send messages to the new service
Pattern: UI Composition
The UI composition looks at how user interface can be migrated from monolithic backend to microservice architecture.
Page Composition
The page-composition migrates one page at a time based on product verticals to ensure that old page links are replaced with the new URLs when they are changed. You can choose a low-risk vertical for UI migration to reduce the risk of breaking functionality.
Widget Composition
The widget composition reduces the UI migration risk by just replacing a single widget at a time. For example, you may use Edge-Side Includes (ESI) to define a template in the web page and a web server splices in this content. Though, this technique is less common these days due to browser can make requests to populate a widget. This technique was used by Orbitz to render UI modules from a central orchestration service but due to its monolithic design, it became a bottleneck for coordinating changes. The central orchestration service was then migrated to microservices incrementally.
Mobile Applications
These UI composition changes can also be applied to mobile apps, however mobile app is a monolith and whole application needs to be deployed. Some organizations such as Spotify allow dynamic changes from the server side.
Micro Frontends
Modern web browsers and standards such as Web Component specification to help build single page apps and micro frontends by using widget-based composition.
The UI composition is highly effective when migrating vertical slices and you have the ability to change the existing user interface.
Pattern: Branch by Abstraction
The “Branch by Abstraction” can be used with incremental migration using Strangler Fig when the functionality is deeply nested and other developers may be making changes to the same codebase. In order to prevent merge conflicts from large changes and to keep minimal disruption for developers, you create an abstraction for the functionality to be replaced. This abstraction can then be implemented by both existing code and new implementation. You can then switch over the abstraction to new implementation once you are done and clean up old implementation.
Step1: Create abstraction
Create an abstraction using “Extract Interface” refactoring.
Step2: Use abstraction
Refactor the existing clients to use the new abstraction point.
Step3: Create new implementation
Implement the abstraction to call the external service inside the monolith. You may simply return “Not Implemented” errors in the new implementation and deploy code into production as this new service isn’t actually being called.
Step4: Switch implementation
Once the new implementation is done, you can switch the abstraction to point to the new implementation. You may also use feature flags to toggle back and forth quickly.
Step5: Clean up
Once the new implementation is fully working, the old implementation can be removed and you may also remove the abstraction if needed.
Fallback Mechanism
A variation of the branch by abstraction pattern called verify branch by abstraction can be used to implement a live verification where if the new implementation fails, then the old implementation could be used instead.
Overall, branch by abstraction is a fairly general-purpose pattern and useful in most cases where you can change the existing code.
Pattern: Parallel Run
As the strangler fig pattern and branch by abstraction pattern allow both old and new implementations to coexist in production, you can use parallel runs to call both implementations and compare results. Typically, the old implementation is considered the source of truth until the new implementation can be verified (Examples: new pricing system, FTP upload).
N-Version Programming
Critical control systems such as air flight systems use redundant subsystems to interpret signals and then use quorum to find the results.
Verification Techniques
In addition to simply comparing results, you may also need to compare nonfunctional aspects such as latency and failure rate.
Using Spies
A spy is used with unit testing to stub a piece of functionality such as communication with an external service and verify the results (Examples: sending an email or remote notification). Spy is generally run as external process and you may use record/play to replay the events for testing. GitHub’s Scientist is a notable library for this pattern.
Dark Launching and Canary Releasing
The parallel run can be combined with canary release to test the new implementation before releasing to all users. Similarly, dark launching allows enabling the new implementation to only selected users (A/B testing).
Parallel run requires a lot of effort so care must be taken when it’s used.
Pattern: Decorating Collaborator
If you need to trigger some behavior inside the monolith, you can use decorating collaborator pattern to attach new functionality (Example: Loyalty Program – earn points on orders). You may use proxy to intercept the request and add new functionality. On the downside, this may require additional data, which adds more complexity and latency.
This is a simple and elegant approach but it works best the required information can be extracted from the request.
Pattern: Change Data Capture
This pattern allows reacting to changes made in a datastore instead of intercepting the calls. This underlying capture system is coupled with the monolithic datastore (Example: Issue Loyalty Cards – trigger on insert that calls Loyalty Card Printing service).
Implementing Change Data Capture
Database triggers
For example, defining triggers on relational database that calls a service when a record is inserted.
Transaction log pollers
The transactional logs from transactional databases can be inspected by external tools to capture data changes and then pass this data to message brokers or other services.
Batch delta copier
This simply scans the database on a regular schedule for the data that has changed and copies this data to the destination.
The change data capture has a lot of implementation challenges so its use must be kept to minimal.
Chapter 4 – Decomposing the Database
This chapter reviews patterns for managing a single shared database:
Pattern: The Shared Database
The implementation coupling is generally caused by the shared database because the ownership or usage of the database schema is not clear. This weakens the cohesion of business logic because the behavior is spread across multiple services. The author points that the only two situations where you may share the database are when using database for read-only static reference data or when a service is directly exposing a database to handle multiple consumers (Database as a service interface). Also, in some cases the work involved with splitting the database might be too large for incremental migration where you may use some coping patterns to manage the shared database.
Pattern: Database View
When sharing a database, you may define database views for different services to limit the data that is visible to the service.
The Database as a Public Contract
When sharing a database, it might be difficult who is reading or writing the data especially when different applications use the same credentials. This also prevent changing the database schema because some of the applications might not be actively maintained.
Views to Present
One way to change schema without breaking existing application is to define views that looks like old schema. The database view may also just project limited information to implement a form of information hiding. In some cases you may need a materialized view to improve performance. You should use this pattern only when existing monolithic schema can’t be decomposed.
Pattern: Database Wrapping Service
The database wrapping service hides the database behind a service. This can be used when the underlying schema can’t be broken down. This provides better support for customized projection and read/write than the database views.
Pattern: Database-as-a-Service Interface
In cases when you just need to query the database, you may create a dedicated reporting database that can be exposed as a read-only endpoint. A mapping engine can listen for changes in the internal database and then persist them in the reporting database for query purpose by internal/external consumers.
Implementing a Mapping Engine
You may use a change data capture system (Debezium), a batch process to copy the data or a message broker to listen for data events. This allows presenting data in different database technology and provides more flexibility than the database views.
Pattern: Aggregate Exposing Monolith
When a microservice needs a data inside the monolith database, you can expose a service endpoint to provide the access to the domain aggregate. This pattern allows exposing the information in a well defined interface and is safer than exposing the shared database despite additional work.
Pattern: Change Data Ownership
If the monolith needs to access the data in a shared database that should belong to the new microservice, then monolith can be updated to call the new service and treat it as a source of truth.
Database Synchronization
As a strangler fig pattern allows switching back to monolith if we find an issue in the microservice but it requires that the data between the monolith and the new service remains in sync. You may use database view and a shared database for short term until the migration is successfully completed. Alternatively, you may sync both databases via code but it requires some careful thoughts.
Pattern: Synchronize Data in Application
Migrating data from one database to another requires performing synchronization between two data sources.
Step 1: Bulk Synchronize Data
You may take a snapshot of the source data and import it into the new data source while the existing system is kept running. As the source data might be changed while the import process is running, a change data capture process can be implemented to import the changes since the import. You can then deploy new version of the application after this process.
Step 2: Synchronize on Write, Read from Old Schema
Once both databases are in sync, the new application writes all data to both databases while reading from the old database.
Step 3: Synchronize on Write, Read from New Schema
Once, you verify the reads from new database work, you can switch the application to switch the new database as a source of truth.
Pattern: Trace Write
This is a variation of the synchronize data in application pattern where the source of truth is moved incrementally and both sources are considered sources of truth during migration. For example, you may just migrate one domain aggregate at a time and other services may use either data source depending on the information they need.
Data Synchronization
If data is duplicated inconsistency, you may need to apply following options:
Write to one source – data to the other source of truths is synchronized after the write.
Send writes to both sources – The client makes a call to both sources or use an intermediary to broadcast the request.
Send writes to either source – the data is synchronized behind the scene.
The last option should be avoided as it requires two way synchronization. In other cases, there will be some delay in the data being consistent (eventual consistency).
Splitting Apart the Database
Physical versus Logical Database Separation
A physical database can host multiple logically separated schemas so migration to separate physical databases can be planned later to improve robustness and throughput/latency. A single physical database can become a single point of failure but it can be remedied by using multi-primary database modes.
Splitting the Database First, or the Code?
Split the Database First
This may cause multiple database calls instead of one action such as SELECT statement or break transactional integrity so you can detect performance problems earlier. However, it won’t yield much short-term benefits.
Pattern: Repository per bounded context
Breaking down the repositories along the boundaries of bounded context help understand dependencies and coupling between tables.
Pattern: Database per bounded context
This allows you to decompose database around the lines of bounded context so that each bounded context uses a distinct schema. This pattern can be applied in startups when the requirements may change drastically so you can keep multiple schemas while using monolithic architecture.
Split the Code First
This allows understanding data dependencies in the new service and benefit of independent deployment thus offering the short-term improvements.
Pattern: Monolith as data access layer
This allows creating an API in the monolith to provide access to the data.
Pattern: Multi-schema storage
When adding new tables while migrating from the monolith, add new tables to its own schema.
Split Database and Code Together
This split the code and data at once but it takes more effort.
Pattern: Split Table
This splits a single shared table into multiple tables based on boundaries of bounded contexts. However, this may break database transactions.
Pattern: Move Foreign-Key Relationship to Code
Moving the Join
Instead of using database join but in the new service, you will need to query the data from another service.
Database Consistency
As you can’t rely on the referential integrity enforced by the database with multiple schemas, you may need to enforce it in the application such as:
check before deletion or existence but it can be error prone.
handle deletion gracefully – such as not showing missing information and services may also subscribe to add/delete events for related data (recommended).
don’t allow deletion
Shared Static Data
Duplicate static reference data
This will result in some data inconsistencies.
Pattern: Dedicated reference data schema
However, you may need to share the physical database.
Pattern: Static reference data library
This may not be suitable when using different programming languages and you will have to support multiple versions of the library.
Pattern: Static reference data service
This will add another dependency but it can be cached at the client side with update events to sync the local cache.
Transactions
ACID Transactions
This will be hard with multiple schemas but you may use state such as PENDING/VERIFIED to manage atomicity.
Two-Phase Commits
This breaks transaction into voting and commit phases and rollback message is sent if any worker doesn’t vote for commit.
Distributed Transactions – just say No
Sagas
A saga or long-lived transactions use an algorithm that can coordinate multiple changes in state but avoid locking resources. It breaks down LLT into a sequence of transactions that can occur independently as a short-lived.
Saga Failure Modes
Saga provides backward and forward recovery where backward recovery reverts the failure by using compensating transactions. The forward recovery allows continuation from the failure by retrying it.
Note: The rollback will undo all previously executed transactions. You can move forward the steps that are most likely to fail to avoid triggering compensating transactions on large number of steps.
Implementing Sagas
orchestrated sags – You may use multiple orchestration to break down the saga using BPM or other tools.
Choreographed sagas – This broadcasts events using a message broker. However, the scope of saga transaction may not be apparently visible.
Chapter 5 – Growing Pains
More Services, More Pain
Ownership at Scale
Strong code ownership – large scale microservices
Weak code ownership
Collective code ownership
Breaking Changes
A change in a microservice may break backward compatibility or other changes for consumers. You can ensure that you don’t break contracts when making changes to the services by using explicit schemas and maintaining semantics. You may also support multiple versions of the service if you need to break backward compatibility and allow existing clients to migrate to the new version.
Reporting
A monolithic database simplifies reporting but with different schemas and databases, you may need to build a reporting database to aggregate data from different services.
Monitoring and Troubleshooting
A monolithic app is easier to monitor but with multiple microservices you will need to use log aggregation and define a correlation id with tracing tools to see a transaction events from different services.
Test in Production
You may use synthetic transactions to perform end-to-end testing in production.
Observability
You can gather information about the system by tracing, logs and other system events.
Local Developer Experience
When setting up a local environment, you may need to setup a large number of services that can slow down development process. You may need to stub out services or use tools such as Telepresence proxy to call remote services.
Running Too Many Things
You may use Kubernetes to manage the deployment and troubleshooting the microservices.
End-to-End Testing
A microservice architecture increases the scope of end-to-end testing and you have to debug false negative due to environmental issues. You can use following approaches for end-to-end testing:
Limit scope of functional automated tests
Use consumer-driven contracts
Use automated release remediation and progressive delivery
Continually refine your quality feedback cycles
Global versus Local Optimization
You may have to solve same problem with multiple services such as service deployment. You may need to evaluate problems as irreversible or reversible decisions and adopt a broader discussion for irreversible decisions.
Robustness and Resiliency
Distributed systems exhibit a variety of failures so you may need to run redundant services, use asynchronous communication or apply other patterns such as circuit breakers, retries, etc.
Orphaned Services
The orphaned services don’t have clear owners so you can’t immediately fix it if the service stops working. You may need a service registry or other tools to track the services, however some services may predate these tools.
I wrote about support of structured concurrency in Javascript/Typescript, Erlang/Elixir, Go, Rust, Kotlin and Swift last year (Part-I, Part-II, Part-III, Part-IV) but Swift language was still in development for async/await and actors support. The Swift 5.5 will finally have these new concurrency features available, which are described below:
Async/Await
As described in Part-IV, Swift APIs previously used completion handlers for asynchronous methods that suffered from:
Poor error handling because you could not use a single way to handle errors/exceptions instead separate callbacks for errors were needed
Difficult to cancel asynchronous operation or exit early after a timeout.
Requires a global reasoning of shared state in order to prevent race conditions.
Stack traces from the asynchronous thread don’t include the originating request so the code becomes hard to debug.
As Swift/Objective-C runtime uses native threads, creating a lot of background tasks results in expensive thread resources and may cause excessive context switching.
Nested use of completion handlers turn the code into a callback hell.
Following example shows poor use of control flow and deficient error handling when using completion handlers:
func fetchThumbnails(for ids: [String],
    completion handler: @escaping ([String: UIImage]?, Error?) -> Void) {
    guard let id = ids.first else { return handler([:], nil) }
    let request = thumbnailURLRequest(for: id)
    URLSession.shared.dataTask(with: request) { data, response, error in
        guard let response = response,
              let data = data else { return handler(nil, error) } // Poor error handling
        UIImage(data: data)?.prepareThumbnail(of: thumbSize) { image in
            guard let image = image else { return handler(nil, ThumbnailError()) }
        }
        fetchThumbnails(for: Arrays(ids.dropFirst()) { thumbnail, error in
            // cannot use loop
            ...
        }
    }
}
Though, use of Promise libraries help a bit but it still suffers from dichotomy of control flow and error handling. Here is equivalent code using async/await:
func fetchThumbnails(for ids: [String]) async throws -> [String: UIImage] {
	let thumbnails: [String: UIImage] = [:]
    for id in ids {
    	let request = thumbnailURLRequest(for: id)
        let (data, response) = try await URLSession.shared.dataTask(for: request)
        try validateResponse(response)
        guard let image = await UIImage(data: data)?.byPreparingThumbnail(ofSize: thumbSize) else { throw ThumbnailError()) }
        thumbnails[id] = image
    }
    return thumbnails
}
As you can see, above code not only improves control flow and adds uniform error handling but it also enhances readability by removing the nested structure of completion handlers.
Tasks Hierarchy, Priority and Cancellation
When a new task is created using async/await, it inherits the priority and local values of the parent task, which are then passed to the entire hierarchy of child tasks from the parent task. When a parent task is cancelled, the Swift runtime automatically cancels all child tasks, however Swift uses cooperative cancellation so child tasks must check for cancellation state otherwise they may continue to execute, however the results from cancelled tasks are discarded.
Continuations and Scheduling
Swift previously used native threads to schedule background tasks, where new threads were automatically created when a thread is blocked or waiting for another resource. The new Swift runtime creates native threads based on the number of cores and background tasks use continuations to schedule the background task on the native threads. When a task is blocked, its state is saved on the heap and another task is scheduled for processing on the thread. The await syntax suspends current thread and releases control until the child task is completed. This cooperative scheduling requires runtime support for non-blocking I/O operations and system APIs so that native threads are not blocked and continue to work on other background tasks. This also limits background tasks from using semaphores and locks, which are discussed below.
In above example, when a thread is working on a background task “updateDatabase†that starts a child tasks “add†or “saveâ€, it saves the tasks as continuations on heap. However, if current task is suspended then the thread can work on other tasks as shown below:
Multiple Asynchronous Tasks
The async/await in Swift also allows scheduling multiple asynchronous tasks and then awaiting for them later, e.g.
struct MarketData {
    let symbol: String
    let price: Int
    let volume: Int
}

struct HistoryData {
    let symbol: String
    let history: [Int]
    func sum() -> Int {
      history.reduce(0, +)
    }
}

func fetchMarketData(symbol: String) async throws -> MarketData {
    await withCheckedContinuation { c in
        DispatchQueue.main.asyncAfter(deadline: .now() + 1) {
            c.resume(with: .success(MarketData(symbol: symbol, price: 10, volume: 200)))
        }
    }
}

func fetchHistoryData(symbol: String) async throws -> HistoryData {
    await withCheckedContinuation { c in
        DispatchQueue.main.asyncAfter(deadline: .now() + 1) {
            c.resume(with: .success(HistoryData(symbol: symbol, history: [5, 10, 15, 20])))
        }
    }
}

func getMovingAverage(symbol: String) async throws -> Int {
    async let marketData = fetchMarketData(symbol: symbol)
    async let historyData = fetchHistoryData(symbol: symbol)
    let sum = try await marketData.price + historyData.sum()
    return try await sum / (historyData.history.count+1)
}
The async let syntax is called concurrent binding where the child task executes in parallel to the parent task.
Task Groups
The task groups allow dispatching multiple background tasks that are executed concurrently in background and Swift automatically cancels all child tasks when a parent task is cancelled. Following example demonstrates use of group API:
func downloadImage(id: String) async throws -> UIImage {
    await withCheckedContinuation { c in
        DispatchQueue.main.asyncAfter(deadline: .now() + 1) {
            c.resume(with: .success(UIImage(data: [])))
        }
    }
}

func downloadImages(ids: [String]) async throws -> [String: UIImage] {
    var images: [String: UIImage] = [:]
    try await withThrowingTaskGroup(of: (String, UIImage).self) { group in
        for id in ids {
            group.addTask(priority: .background) {
                return (id, try await downloadImage(id: id))
            }
        }
        for try await (id, image) in group {
            images[id] = image
        }
    }
    return images
}
As these features are still in development, Swift has recently changed group.async API to group.addTask. In above example, images are downloaded in parallel and then for try await loop gathers results.
Data Races
Swift compiler will warn you if you try to mutate a shared state from multiple background tasks. In above example, the asynchronous task returns a tuple of image-id and image instead of mutating shared dictionary. The parent task then mutates the dictionary using the results from the child task in for try await loop.
Cancellation
You can also cancel a background task using cancel API or cancel all child tasks of a group using group.cancelAll(), e.g.
group.cancelAll()
The Swift runtime automatically cancels all child tasks if any of the background task fails. You can store reference to a child task in an instance variable if you need to cancel a task in a different method, e.g.
As cancellation in Swift is cooperative, you must check cancellation state explicitly otherwise task will continue to execute but Swift will reject the results, e.g.
if Task.isCancelled {
    return // return early
}
Timeout
The task or async/await APIs don’t directly support timeout so you must implement it manually similar to cooperative cancellation.
Semaphores and Locks
Swift does not recommend using Semaphores and Locks with background tasks because they are suspended when waiting for an external resource and can be later resumed on a different thread. Following example shows incorrect use of semaphores with background tasks:
func updateDatabase(_ asyncUpdateDatabase: @Sendable @escaping () async -> Void {
  let semaphore = DispatchSemaphore(value: 0)
  Task {
    await asyncUpdateDatabase()
    semaphore.signal()
  }
  semaphore.wait() // Do not use unsafe primitives to wait across task boundaries
}
TaskLocal
You can annotate certain properties with TaskLocal, which are stored in the context of Task and is available to the task and all of its children, e.g.
Above tasks and async/await APIs are based on structured concurrency where parent task is not completed until all child background tasks are done with their work. However, Swift allows launching detached tasks that can continue to execute in background without waiting for the results, e.g.
In above example, the getPersistentPosts method used completion-handler and persistPosts method provides a bridge so that you can use async/await syntax. The resume method can only called once for the continuation.
You may also save continuation in an instance variable when you need to resume in another method, e.g.
Following example shows implementation of WebCrawler using async/await described in Part I of the concurrency series:
import Foundation
struct Request {
    let url: String
    let depth: Int
    let deadline: DispatchTime
}
enum CrawlError: Error {
    case timeoutError(String)
}
let MAX_DEPTH = 4
let MAX_URLS = 11
let DOMAINS = [
  "ab.com",
  "bc.com",
  "cd.com",
  "de.com",
  "ef.com",
  "fg.com",
  "gh.com",
  "hi.com",
  "ij.com",
  "jk.com",
  "kl.com",
  "lm.com",
  "mn.com",
  "no.com",
  "op.com",
  "pq.com",
  "qr.com",
  "rs.com",
  "st.com",
  "tu.com",
  "uv.com",
  "vw.com",
  "wx.com",
  "xy.com",
  "yz.com",
];
public func crawl(urls: [String], deadline: DispatchTime) async throws -> Int {
    // Main scope of concurrency begin
    // TODO add timeout using race, e.g. await Task.WhenAny(crawlTask, Task.Delay(deadline)) == crawlTask
    return try await doCrawl(urls: urls, depth: 0, deadline: deadline)
    // Main scope of concurrency end
}
public func crawlWithActors(urls: [String], deadline: DispatchTime) async throws -> Int {
    // Main scope of concurrency begin
    // TODO add timeout using race, e.g. await Task.WhenAny(crawlTask, Task.Delay(deadline)) == crawlTask
    return try await doCrawlWithActors(urls: urls, depth: 0, deadline: deadline)
    // Main scope of concurrency end
}

///////////////// PRIVATE METHODS ////////////////
func doCrawl(urls: [String], depth: Int, deadline: DispatchTime) async throws -> Int {
    if depth >= MAX_DEPTH {
	return 0
    }
    let requests = urls.map { Request(url: $0, depth: depth, deadline: deadline) }
    var totalChildURLs = 0
    try await withThrowingTaskGroup(of: (Request, Int).self) { group in
        for req in requests {
	    group.addTask(priority: .background) {
	        return (req, try await handleRequest(req))
	    }
        }
        for try await (req, childURLs) in group {
	    if totalChildURLs % 10 == 0 {
		print("received request \(req)")
	    }
	    totalChildURLs += childURLs
        }
    }
    return totalChildURLs
}
func doCrawlWithActors(urls: [String], depth: Int, deadline: DispatchTime) async throws -> Int {
    if depth >= MAX_DEPTH {
	return 0
    }
    let requests = urls.map { Request(url: $0, depth: depth, deadline: deadline) }
    var totalChildURLs = 0
    let crawler = CrawlActor()
    for req in requests {
     	let childURLs = try await crawler.handle(req)
	totalChildURLs += childURLs
    }
    return totalChildURLs
}
func handleRequest(_ request: Request) async throws -> Int {
    let contents = try await download(request.url)
    let newContents = try await jsrender(request.url, contents)
    if hasContentsChanged(request.url, newContents) && !isSpam(request.url, newContents) {
        try await index(request.url, newContents)
        let urls = try await parseURLs(request.url, newContents)
        let childURLs = try await doCrawl(urls: urls, depth: request.depth + 1, deadline: request.deadline)
        return childURLs + 1
    } else {
        return 0
    }
}
func download(_ url: String) async throws -> String {
    // TODO check robots.txt and throttle policies
    // TODO add timeout for slow websites and linearize requests to the same domain to prevent denial of service attack
    return randomString(100)
}
func jsrender(_ url: String, _ contents: String) async throws -> String {
    // for SPA apps that use javascript for rendering contents
    return contents
}
func index(_ url: String, _ contents: String) async throws {
    // apply standardize, stem, ngram, etc for indexing
}
func parseURLs(_ url: String, _ contents: String) async throws -> [String] {
    // tokenize contents and extract href/image/script urls
    var urls = [String]()
    for _ in 0..<MAX_URLS {
        urls.append(randomUrl())
    }
    return urls
}
func hasContentsChanged(_ url: String, _ contents: String) -> Bool {
    return true
}
func isSpam(_ url: String, _ contents: String) -> Bool {
    return false
}
func randomUrl() -> String {
    let number = Int.random(in: 0..<WebCrawler.DOMAINS.count)
    return "https://" + WebCrawler.DOMAINS[number] + "/" + randomString(20)
}
func randomString(_ length: Int) -> String {
  let letters = "abcdefghijklmnopqrstuvwxyzABCDEFGHIJKLMNOPQRSTUVWXYZ0123456789"
  return String((0..<length).map{ _ in letters.randomElement()! })
}
The crawl method takes a list of URLs with timeout that invokes doCrawl, which crawls list of URLs in parallel and then waits for results using try await keyword. The doCrawl method recursively crawls child URLs up to MAX_DEPTH limit. The main crawl method defines boundary for concurrency and returns count of child URLs.
Following are major features of the structured concurrency in Swift:
Concurrency scope?—?The async/await defines scope of concurrency where all child background tasks must be completed before returning from the asynchronous function.
The async declared methods in above implementation shows asynchronous code can be easily composed.
Error handling?—?Async-await syntax uses normal try/catch syntax for error checking instead of specialized syntax of Promise or callback functions.
Swift runtime schedules asynchronous tasks on a fixed number of native threads and automatically suspends tasks when they wait for I/O or other resources.
Following are the major shortcomings in Swift for its support of structured concurrency:
The most glaring omission in above implementation is timeout, which is not supported in Swift’s implementation.
Swift runtime manages scheduling of tasks and you cannot pass your own execution dispatcher for scheduling background tasks.
Actors
Actor Model is a classic abstraction from 1970s for managing concurrency where an actor keeps its internal state private and uses message passing for interaction with its state and behavior. An actor can only work on one message at a time, thus it prevents any data races when accessing from multiple background tasks. I have previously written about actors and described them Part II of the concurrency series when covering Erlang and Elixir.
Instead of creating a background task using serial queue such as:
final class Counter {
    private var queue = DispatchQueue(label: "counter.queue")
    private var _count : Int = 0
    var count: Int {
        queue.sync {
            _count
        }
    }

    func incr() {
        queue.async(flags: .barrier) {
            self._count += 1
        }
    }
    func decr() {
        queue.async(flags: .barrier) {
            self._count -= 1
        }
    }
}
The actor syntax simplifies such implementation and removes all boilerplate e.g.
actor Counter {
    var count: Int = 0
    func incr() {
        count += 1
    }
    func decr() {
        count -= 1
    }
}
Above syntax protects direct access to the internal state and you must use await syntax to access the state or behavior, e.g.
Task {
	let c = Counter()
    await withTaskGroup(of: Void.self) { group in
        for i in 0..<100 {
            group.async {
                await c.incr()
            }
        }
    }
    print("count \(await c.count)")
}
Priority Inversion Principle
The dispatch queue API applies priority inversion principle when a high priority task is behind low priority tasks, which bumps up the priority of low priority tasks ahead in the queue. The runtime environment then executes the high priority task after completing those low priority tasks. The actor API instead can choose high priority task directly from the actor’s queue without waiting for completion of the low priority tasks ahead in the queue.
Actor Reentrancy
If an actor invokes another actor or background task in its function, it may get suspended until the background task is completed. In the meantime, another client may invoke the actor and modify its state so you need to check assumptions when changing internal state. A continuation used for the background task may be scheduled on a different thread after resuming the work, you cannot rely on DispatchSemaphore, NSLock, NSRecursiveLock, etc. for synchronizations.
Following code from WWDC-2021 shows how reentrancy can be handled safely:
actor ImageDownloader {
    private enum CacheEntry {
        case inProgress(Task.Handle<Image, Error>)
        case ready(Image)
    }
    private var cache: [URL: CacheEntry] = [:]
    func downloadAndCache(from url: URL) async throws -> Image? {
        if let cached = cache[url] {
            switch cached {
            case .ready(let image):
                return image
            case .inProgress(let handle):
                return try await handle.get()
            }
        }
        let handle = async {
            try await downloadImage(from: url)
        }
        cache[url] = .inProgress(handle)
        do {
            let image = try await handle.get()
            cache[url] = .ready(image)
            return image
        } catch {
            cache[url] = nil
            throw error
        }
    }
}
The ImageDownloader actor in above example downloads and caches the image and while it’s downloading an image. The actor will be suspended while it’s downloding the image but another client can reenter the downloadAndCache method and download the same image. Above code prevents duplicate requests and reuses existing request to serve multiple concurrent clients.
Actor Isolation
The actors in Swift prevent invoking methods directly but you can annotate methods with nonisolated if you need to call them directly but those methods cannot mutate state, e.g.
The actors requires that any data structure used in its internal state are thread safe and implement Sendable protocol such as:
Value types
Actors
Immutable classes
Synchronized classes
@Sendable Functions
struct Book: Sendable {
    var title: String
    var authors: [Author]
}
@MainActor
The UI apps require that all UI updates are performed on the main thread and previously you had to dispatch UI work to DispatchQueue.main queue. Swift now allows marking functions, classes or structs with a special annotations of @MainActor where the functions are automatically executed on the main thread, e.g.
Following example shows how a view-controller can be annotated with the @MainActor annotations:
@MainActor class MyViewController: UIViewController {
  func onPress() .... // implicitly on main-thread
  nonisolated func fetch() async {
    ...
In above example, all methods for MyViewController are executed on the main thread, however you can exclude certain methods via nonisolated keyword.
@globalActor
The @globalActor annotation defines a singleton global actor and @MainActor is a kind of global actor. You can also define your own global actor such as:
@globalActor
public struct GlobalSettings {
  public actor SettingsActor {
     func rememberPassword() -> Bool {
        return UserDefaults.standard.bool(forKey: "rememberPassword")
     }
  }

  public static let shared = SettingsActor()
}

...
let rememberPassword = await GlobalSettings.shared.rememberPassword()
Message Pattern Matching
As actors in Swift use methods to invoke operations on actor, they don’t support pattern matching similar to Erlang/Elixir, which offer selecting next message to process by comparing one or more fields in the message.
Local only
Unlike actors in Erlang or Elixir, actors in Swift can only communicate with other actors in the same process or application and they don’t support distributed communication to remote actors.
Actor Executor/Dispatcher
The actor protocol defines following property to access the executor:
var unownedExecutor: UnownedSerialExecutor
However, unownedExecutor is a read-only property that cannot be changed at this time.
Implementing WebCrawler Using Actors and Tasks
Following example shows implementation of WebCrawler using actors and tasks described in Part I of the concurrency series:
import Foundation
actor CrawlActor {
    public func handle(_ request: Request) async throws -> Int {
	let contents = try await download(request.url)
	let newContents = try await jsrender(request.url, contents)
  	if hasContentsChanged(request.url, newContents) && !isSpam(request.url, newContents) {
    	    try await index(request.url, newContents)
    	    let urls = try await parseURLs(request.url, newContents)
    	    let childURLs = try await doCrawlWithActors(urls: urls, depth: request.depth + 1, deadline: request.deadline)
    	    return childURLs + 1
  	} else {
    	    return 0
  	}
    }
}
Above implementation uses actors for processing crawling requests but it shares other code for parsing and downloading web pages. As an actor provides a serialize access to its state and behavior, you can’t use a single actor to implement a highly concurrent web crawler. Instead, you may divide the web domain that needs to be crawled into a pool of actors that can share the work.
Performance Comparison
Following table from Part-IV summarizes runtime of various implementation of web crawler when crawling 19K URLs that resulted in about 76K messages to asynchronous methods/coroutines/actors discussed in this blog series:
Language
Design
Runtime (secs)
Typescript
Async/Await
0.638
Erlang
Spawning Process
4.636
Erlang
PMAP
4.698
Elixir
Spawning OTP Children
43.5
Elixir
Task async/await
187
Elixir
Worker-pool with queue
97
GO
Go-routine/channels
1.2
Rust
Async/Await
4.3
Kotlin
Async/Await
0.736
Kotlin
Coroutine
0.712
Swift
Async/Await
63
Swift
Actors/Async/Await
65
Note: The purpose of above results was not to run micro-benchmarks but to show rough cost of spawning thousands of asynchronous tasks.
Overall, Swift’s new features for structured concurrency including async/await and actors is a welcome addition to its platform. On the downside, Swift concurrency APIs lack support for timeouts, customized dispatcher/executors and micro benchmarks showed higher overhead than expected. However, on the positive side, the Swift runtime catches errors due to data races and the new async/await/actors syntax prevents bugs that were previously caused by incorrect use of completion handlers and error handling. This will help developers write more robust and responsive apps in the future.
Strict consistency– a strongest consistency level that returns most recent updates when reading a value.
Sequential consistency– a weaker model as defined by Lamport(1979)
Linearizability(atomic)– guarantees sequential consistency with the real-time constraint
Causal consistency– a weaker model than Linearizability that guarantees write operations that are casually related must be seen in the same order
Most NoSQL databases lack ACID transaction guarantees and instead offer tradeoffs in terms of CAP theorem and PACELC, where CAP theorem states that a database can only guarantee two of three properties:
Consistency– Every node in the cluster responds with the most recent data that may require blocking the request until all replicas are updated.
Availability– Every node returns an immediate response even if the response isn’t the most recent data.
Partition Tolerance– The system continues to operate even if a node loses connectivity with other nodes.
Consistency in CAP is different than that of ACID where consistency in ACID means a transaction won’t corrupt the database and guarantees database correctness with transaction order but in CAP, it means maintaining Linearizability property that guarantees having the most up-to-date data. Serialization is highest form of isolation between transactions in ACID model with multi-operation, multi-object, arbitrary total order whereas linearizability is a single-operation, single-object, real-time order that applies to distributed systems.
In the event of a network failure (MTBF, MTTF, MTTR), you must choose Partition Tolerance from , so choice is between AP and CP (availability vs consistency). PACELC theorem extends CAP where you choose between availability (A) and consistency in presence of network partitioning (P) but choose between latency (L) and consistency) otherwise (E). Most NoSQL database choose availability and support Basically Available, Soft State, Eventual Consistency (Base) instead of strict serializability or linearizability. The eventual consistency only guarantees liveness where updates will be observed eventually. Some of modern NoSQL databases also support strong eventual consistency using conflict-free replicated data types.
“Simple architecture for complex enterprises” focuses on tackling complexity in IT systems. There are a number of methodologies such as Zachman, TOGAF and EA but they don’t address how to manage complexity. The author shares following concerns when implementing an enterprise architecture:
Unreliable Enterprise Information – when enterprise cannot access or trust its information
Untimely Enterprise Information – when reliable information is not available in a timely fashion.
New Projects Underway – when building a new complex IT project without understanding its relationship to the business processes.
New Companies Being Acquired
Enterprise Wants to Spin Off Unit
Need to Identify Outsourcing Opportunities
Regulatory Requirements
Need to Automate Relationships with Internal Partners
Need to Automate Relationships with Customers
Poor Relationship Between IT and Business Units
Poor Interoperability of IT Systems
IT Systems Unmanageable – when IT systems are built piecemeal and patched together.
The author defines enterprise architecture as:
“An enterprise architecture is a description of the goals of an organization, how these goals are realized by business processes, and how these business processes can be better served through technology.”
The author asserts need for planning when building enterprise IT systems and argues that complexity hinders success of these systems and cites several examples from Government and business industries. The author defines the Zachman framework for organizing architecture artifacts and design documents. John Zachman proposed six descriptive foci: data, function, network, people, time and motivation in the framework.
The author explains that Zachman framework does not address complexity of the systems. Next, author explains TOGAF (The Open Group Achitecture Framework) that has four categories:
TOGAF defines ADM (Architecture Development Method) as a recipe for creating architecture. The author considers TOGAF as a process instead of framework that can complement Zachman. TOGAF defines following levels of enterprise continuum:
enterprise continuum
foundation architectures
common system architectures
industry architectures
organization architectures (ADM)
TOGAF defines knowledge bases such as TRM (Technical Reference Model) and SIB (Standards Information Base). The ADM defines following phases:
Phase: Prelim – framework and principles
Phase: A – architecture vision (statement of architecture work, architecture vision)
Phase: B – business architecture (input frame stakeholders to get baseline and business objectives)
Phase: C – information system architectures (baseline data architecture, review principles, models, data architecture)
Phase: D – technology architecture – infrastructure
Phase: E – opportunities and solutions
Phase: F – migration planning
Phase: G – implementation governance
Phase: H – architecture change management and then it goes back to Phase A.
TOGAF also lacks complexity management and the author then explains The Federal Enterprise Architecture (FEA) that includes reference models for business, service, components, technical and data. FEA organizes EA into segments of business functionality and enterprise services. FEA creates five reference models:
The Business Reference Model (BRM) – business view
The Component Reference Model (CRM)
The Technical Reference Model (TRM)
The Data Reference Model
The Performance Reference Model
In chapter two, the author explains how complexity affects system, e.g. a Rubik Cube of 2 x 2 x 2 dimensions has 8 interior cubes and 3.7 x 10^6 permutations but a Rubik Cube of 4 x 4 x 4 dimensions has 64 interior cubes and 7.4 x 10^45 permutations. The relative complexity of 4 x 4 x 4 dimensions Rubik Cube is much higher than Rubik Cube of 2 x 2 x 2 dimensions and the author argues that by partitioning 4 x 4 x 4 Rubik Cube into eight 2 x 2 x 2 Rubik Cube, you can lower its complexity. The author defines following five laws of partitions:
Partitions must be true partitions
Partition definitions must be appropriate (e.g. organizing clothing store by color may not be helpful to customers)
Partition subset numbers must be appropriate
Partition subset sizes must be roughly equal
Subset interactions must be minimal and well defined
Further, author suggests simplification to reduce complexity when partitioning by removing partition subsets along with their associated items and removal of other items from one or more partition subsets, leaving the subsets themselves in place. The process of partitioning can be done iteratively by choosing one of the partition subsets and simplifying it. The author narrates story of Jon Boyd who came with the iterative process: observe, orient, plan, act (OOPA) when he was observing how pilots used aircrafts in dogfights at the Air Force. Also, he observed that faster you iterate on OOPA, better your chances of winning the dogfight.
In chapter three, the author shows how mathematics can be used for partitioning. He describes the number of system states as the best measure of complexity and relative complexity of two systems is ratio of the number of states in those systems. For example, a system with two variables, each taking six states can take 6^2 states. i.e,
C = S^v where C is the complexity, V is the number of variables and S is the number of significant states on average.
In business process, the number of paths and decision points within each path is the best measure of complexity, i.e.,
O = P^d where D is the number of decision points and P is the number of paths for each decision points and O is outcome.
The author introduces concept of homomorphism where observing one system make prediction on another system, e.g. relationships between dice systems, software systems and business processes as homomorphic. A system with two six-sided dice has 36 possible states (P^d or 6^2). However, we can reduce number of states by dividing dices into multiple buckets, e.g. two dices with each bucket has 12 states instead of 36. The general formula for the number of states of B buckets with D dices and F faces per dice:
B * F^d
This chapter describes concept of equivalence relations with following properties:
E(a, a) – always true — reflexivity
E(a, b) implies E(b, a) — symmetry
E(a, b) and E(b, c) implies E(a, c) — transitivity
In chapter four, the author explains simple iterative partitions (SIP) to create a diagrammatic overview of the enterprise system that focus on what enterprise does (as opposed to how). The SIP starts with an autonomous business capability (ABC) that represents an equivalence class or one of the set that make up the partition. The ABC model includes process component and technology component including relationships for implementation and deployment. In addition to implementation and deployment, author adds ABC type that is used as a category of ABC such as human resources. These types can also be defined in hierarchical fashion and different implementations of same ABC types are considered siblings. The implementations can also be composed so that one ABC is part of another ABC. Another type of relationship is partner relationships at implementation or deployment levels where one ABC may create information request, information broadcast or work request.
In chapter five, author explains SIP process that has following goals:
Complexity control
Logic-based decisions
Value-driven deliverables
Reproducible results
Verifiable architectures
Flexible methodology
The SIP process consists of following six primary phases:
The phase-0 (enterprise architecture evaluation) addresses following issue:
Unreliable enterprise information
Untimely enterprise information
New complex projects underway
New companies being acquired
Enterprise wants to spin off unit
Need to identify outsourcing opportunities
Regulatory requirements
Need to automate relationships with external partners
Need to automate relationships with customers
Poor relationships between IT and business units
Poor interoperability of IT systems
IT systems unmanageable
The phase-1 (SIP preparation) has following deliverables:
Audit of organizational readiness
Training
Governance model
SIP blend
Enterprise-specific tools
The phase-2 (partitioning) decomposes enterprise into ABC (discrete autonomous business capability) units. The phase-3 (partition simplification) defines five laws of partitions:
Partitions must be true partitions
Partition definitions must be appropriate
Partition numbers must be appropriate
Partition sizes must be roughly equal
Partition interactions must be minimal and well defined.
The phase-4 (ABC prioritization) uses value graph analysis to estimate potential payoff and risk. The value graph analysis addresses following factors:
Market drivers
Cost
Organizational risk
Technical risk
Financial value
Organizational preparedness
Team readiness
Status quo
The phase-5 (ABC iteration) uses iterative approach to simplify architecture.
The chapter six describes NPfit project as a case study in complexity. The NPfit promised integrated system connecting every patient, physician, laboratory, pharmacy and healthcare in the UK. Its infrastructure provided new national network, directory services, care records service (CRS). NPfit is split into five regional groups of patients and it allowed appointment to any facility, prescription fulfillment, and picture archiving. Despite huge budget of $9.8 billion dollars, there were several concerns such as failure to communicate, monolithic approach, stifling of innovation, lack of record confidentiality and quality of shared data. The SIP approach would have helped, e.g. phase-1 audits organizational readiness, training and partitioning. The phase-2 would have addressed complexity dropped multiple regional implementations. The phase-3 would have simplified partitions into subsets such as patient registration, appointment booking, prescriptions, patient records, and lab tests.
The chapter seven focuses on guarding boundaries in technical boundaries. For example two systems may communicate via RPC, shared databases or data access layer but it suggests service-oriented-architecture (SOA) for interoperability for better scalability. The author suggests use of guards or envoy entity for handling outgoing or incoming messages to the system. It defines following rules to encapsulate the software for a given ABC:
Autonomy
Explicit boundaries
Partitioning of functionality
Dependencies defined by policy
Asynchronicity
Partitioning of data
No cross-fortress transactions
Single-point security
Inside trust
Keep it simple
The chapter eight summarizes the book and it explains why complexity is the real enemy and how simplicity pays. It reiterates how SIP architecture can simplify architecture by partitioning system into ABC units.
I recently created a new framework PlexService for serving micro-services. which can be accessed by HTTP, Websockets or JMS interfaces. You can choose these different access mechanism by needs of your services. For example, as JMS services are inherently asynchronous, they provide good foundation for building scalable and reactive services. You may choose http stack for implementing REST services or choose websockets for implementing interactive services.
PlexService framework provides provides basic support for encoding POJO objects into JSON for service consumption. The developers define service configuration via annoations to specify gateway types, encoding scheme, end-points, etc.
PlexService provides support of role-based security, where you can specify list of roles who can access each service. The service providers implement how to verify roles, which are then enforced by PlexService framework.
If you implement all services in JMS, you can easily expose them via HTTP or Websockets by configuring web-to-jms bridge. The bridge routes all requests from HTTP/Websockets to JMS and listen for incoming messages, which are then routed back to web clients.
PlexService provides basic metrics such as latency, invocations, errors, etc., which are exposed via JMX interface. PlexService uses jetty for serving web services. The developers provide JMS containers at runtime if required.
Copy and add jar file manually in your application.
Defining role-based security
PlexService allows developers to define role-based security, which is invoked when accessing services, e.g.
 public class BuggerRoleAuthorizer implements RoleAuthorizer {
     private final UserRepository userRepository;

     public BuggerRoleAuthorizer(UserRepository userRepository) {
       this.userRepository = userRepository;
     }

     @Override
       public void authorize(Request request, String[] roles) throws AuthException {
         String sessionId = request.getSessionId();
         User user = userRepository.getUserBySessionId(sessionId);
         if (user == null) {
           throw new AuthException(Constants.SC_UNAUTHORIZED,
               request.getSessionId(), request.getRemoteAddress(),
               "failed to validate session-id");
         }
         for (String role : roles) {
           if (!user.getRoles().contains(role)) {
             throw new AuthException(Constants.SC_UNAUTHORIZED,
                 request.getSessionId(), request.getRemoteAddress(),
                 "failed to match role");
           }
         }
       }
 }
Typically, login-service will store session-id, which is then passed to the implementation of RoleAuthorizer, e.g.
 @ServiceConfig(gateway = GatewayType.HTTP, requestClass = Void.class, endpoint = "/login", method = Method.POST, codec = CodecType.JSON)
 public class LoginService extends AbstractUserService implements RequestHandler {
   public LoginService(UserRepository userRepository) {
     super(userRepository);
   }

   @Override
   public void handle(Request request) {
     String username = request.getStringProperty("username");
     String password = request.getStringProperty("password");

     User user = userRepository.authenticate(username, password);
     AbstractResponseBuilder responseBuilder = request.getResponseBuilder();
     if (user == null) {
       throw new AuthException(Constants.SC_UNAUTHORIZED,
               request.getSessionId(), request.getRemoteAddress(),
               "failed to authenticate");
     } else {
       responseBuilder.addSessionId(userRepository.getSessionId(user));
       responseBuilder.send(user);
     }
   }
 }
In above example the session-id is added to response upon successful login, which is then passed for future requests. For http services, you may use cookies to store session-ids, otherwise you would need to pass session-id as a parameter.
Here is how you can invoke login-service from curl:
@ServiceConfig(gateway = GatewayType.HTTP, requestClass = User.class,
     rolesAllowed = "Administrator", endpoint = "/users", method = Method.POST,
     codec = CodecType.JSON)
 public class CreateUserService extends AbstractUserService implements
 RequestHandler {
   public CreateUserService(UserRepository userRepository) {
     super(userRepository);
   }

   @Override
     public void handle(Request request) {
       User user = request.getPayload();
       user.validate();
       User saved = userRepository.save(user);
       request.getResponseBuilder().send(saved);
     }
 }
The ServiceConfig annotation defines that this service can be accessed via HTTP at “/users” URI. PlexService will provide encoding from JSON to User object and will ensure that service can be accessed by user who has Administrator role.
Here is how you can invoke this service from curl:
Defining a Web service over Websockets for creating a user
Here is how you can a Websocket based service:
 @ServiceConfig(gateway = GatewayType.WEBSOCKET, requestClass = User.class,
     rolesAllowed = "Administrator", endpoint = "/users", method = Method.POST,
     codec = CodecType.JSON)
 public class CreateUserService extends AbstractUserService implements
 RequestHandler {
   public CreateUserService(UserRepository userRepository) {
     super(userRepository);
   }

   @Override
     public void handle(Request request) {
       User user = request.getPayload();
       user.validate();
       User saved = userRepository.save(user);
       request.getResponseBuilder().send(saved);
     }
 }
The ServiceConfig annotation defines that this service can be accessed via Websocketat “/users” endpoint. However, as opposed to HTTP based service, this endpoint is not enforced in HTTP request and can be in any format as long it’s unique for a service.
Here is how you can access websocket service from javascript:
 var ws = new WebSocket("ws://127.0.0.1:8181/users");
 ws.onopen = function() {
   var req = {"payload":"", "endpoint":"/login", "method":"POST", "username":"scott", "password":"pass"};
   ws.send(JSON.stringify(req));
 };

 ws.onmessage = function (evt) {
   alert("Message: " + evt.data);
 };

 ws.onclose = function() {
 };

 ws.onerror = function(err) {
 };
Note that websockets are not supported by all browsers and above code will work only supported browsers such as IE 11+, FF 31+, Chrome 36+, etc.
Defining a JMS service for creating a user
Here is how you can create JMS service:
 @ServiceConfig(gateway = GatewayType.JMS, requestClass = User.class,
       rolesAllowed = "Administrator", endpoint = "queue:{scope}-create-user-service-queue",
       method = Method.MESSAGE,
       codec = CodecType.JSON)
 public class CreateUserService extends AbstractUserService implements RequestHandler {
     public CreateUserService(UserRepository userRepository) {
     super(userRepository);
     }

     @Override
     public void handle(Request request) {
       User user = request.getPayload();
       user.validate();
       User saved = userRepository.save(user);
       request.getResponseBuilder().send(saved);
     }
 }
Note that the only difference is type of gateway. PlexService also support variables in end-points, which are populated from configurations. For example, you may create scope variable to create different queues/topics for different developers/environments. PlexService will serialize POJO classes into JSON when delivering messages over JMS.
Defining a REST service with parameterized URLs
PlexService allows developers to define URIs for services, that contains variables. These variables are then populated actual requests. These can be used for implementing REST services, e.g.
Here is an example of invoking this service from curl:
curl --cookie cookies.txt -k -H "Content-Type: application/json" -X POST "http://127.0.0.1:8181/projects/2/bugreports" -d "{\"title\":\"As an administrator, I would like to assign roles to users so that they can perform required actions.\",\"description\":\"As an administrator, I would like to assign roles to users so that they can perform required actions.\",\"bugNumber\":\"story-201\",\"assignedTo\":\"mike\",\"developedBy\":\"mike\"}"
Using variables with Websocket based service
You can also create variables for websocket’s endpoints similar to JMS, which are initialized from parameters.
Defining a Streaming Quotes Service over Websockets
Suppose you are building a high performance streaming quote service for providing real-time stock quotes, you can easily build it using PlexService framework, e.g.
@ServiceConfig(gateway = GatewayType.WEBSOCKET, requestClass = Void.class, endpoint = "/quotes", method = Method.MESSAGE, codec = CodecType.JSON)
 public class QuoteServer implements RequestHandler {
     public enum Action {
         SUBSCRIBE, UNSUBSCRIBE
     }

     static final Logger log = LoggerFactory.getLogger(QuoteServer.class);

     private QuoteStreamer quoteStreamer = new QuoteStreamer();

     @Override
     public void handle(Request request) {
         String symbol = request.getProperty("symbol");
         String actionVal = request.getProperty("action");
         log.info("Received " + request);
         ValidationException
                 .builder()
                 .assertNonNull(symbol, "undefined_symbol", "symbol",
                         "symbol not specified")
                 .assertNonNull(actionVal, "undefined_action", "action",
                         "action not specified").end();
         Action action = Action.valueOf(actionVal.toUpperCase());
         if (action == Action.SUBSCRIBE) {
             quoteStreamer.add(symbol, request.getResponseBuilder());
         } else {
             quoteStreamer.remove(symbol, request.getResponseBuilder());
         }
     }

     public static void main(String[] args) throws Exception {
         Configuration config = new Configuration(args[0]);
         QuoteServer service = new QuoteServer();
         Collection<RequestHandler> services = new ArrayList<>();
         services.add(new QuoteServer());
         //
         ServiceRegistry serviceRegistry = new ServiceRegistry(config, services, null);
         serviceRegistry.start();
         Thread.currentThread().join();
     }
 }
Above example defines a service that listen to websockets and responds to subscribe or unsubscribe requests from web clients.
You can define mock QuoteStreamer as follows, which periodically sends quotes to all subscribers:
public class QuoteStreamer extends TimerTask {
     private int delay = 1000;
     private Map<String, Collection<ResponseDispatcher>> subscribers = new ConcurrentHashMap<>();
     private QuoteCache quoteCache = new QuoteCache();
     private final Timer timer = new Timer(true);

     public QuoteStreamer() {
         timer.schedule(this, delay, delay);
     }

     public void add(String symbol, ResponseDispatcher dispatcher) {
         symbol = symbol.toUpperCase();
         synchronized (symbol.intern()) {
             Collection<ResponseDispatcher> dispatchers = subscribers
                     .get(symbol);
             if (dispatchers == null) {
                 dispatchers = new HashSet<ResponseDispatcher>();
                 subscribers.put(symbol, dispatchers);
             }
             dispatchers.add(dispatcher);
         }
     }

     public void remove(String symbol, ResponseDispatcher dispatcher) {
         symbol = symbol.toUpperCase();
         synchronized (symbol.intern()) {
             Collection<ResponseDispatcher> dispatchers = subscribers
                     .get(symbol);
             if (dispatchers != null) {
                 dispatchers.remove(dispatcher);
             }
         }
     }

     @Override
     public void run() {
         for (Map.Entry<String, Collection<ResponseDispatcher>> e : subscribers
                 .entrySet()) {
             Quote q = quoteCache.getLatestQuote(e.getKey());
             Collection<ResponseDispatcher> dispatchers = new ArrayList<>(
                     e.getValue());
             for (ResponseDispatcher d : dispatchers) {
                 try {
                     d.send(q);
                 } catch (Exception ex) {
                     remove(e.getKey(), d);
                 }
             }
         }
     }
 }
Here is a sample javascript/html client, which allows users to subscribe to different stock symbols:
       var ws = new WebSocket("ws://127.0.0.1:8181/quotes");
       ws.onopen = function() {
       };
       var lasts = {};
       ws.onmessage = function (evt) {
         //console.log(evt.data);
         var quote = JSON.parse(evt.data).payload;
         var d = new Date(quote.timestamp);
         $('#time').text(d.toString());
         $('#company').text(quote.company);
         $('#last').text(quote.last.toFixed(2));
         var prev = lasts[quote.company];
         if (prev != undefined) {
           var change = quote.last - prev;
           if (change >= 0) {
             $('#change').css({'background-color':'green'});
           } else {
             $('#change').css({'background-color':'red'});
           }
           $('#change').text(change.toFixed(2));
         } else {
           $('#change').text('N/A');
         }
         lasts[quote.company] = quote.last;
       };

       ws.onclose = function() {
       };

       ws.onerror = function(err) {
       };
       function send(payload) {
         $('#input').text(payload);
         ws.send(payload);
       }
       $(document).ready(function() {
         $("#subscribe").click(function() {
           var symbol = $("#symbol").val();
           var req = {"endpoint":"/quotes", "symbol":symbol, "action":"subscribe"};
           send(JSON.stringify(req));
         });
       });
       $(document).ready(function() {
         $("#unsubscribe").click(function() {
           var symbol = $("#symbol").val();
           var req = {"endpoint":"/quotes", "symbol":symbol, "action":"unsubscribe"};
           send(JSON.stringify(req));
         });
       });
    <script>

   <body>
     <form>
       Symbol:<input type="text" id="symbol" value="AAPL" size="4" />
       <input type="button" id="subscribe" value="Subscribe"/>
       <input type="button" id="unsubscribe" value="Unsubscribe"/>
     </form>

     <br>

     <table id="quotes" class="quote" width="600" border="2" cellpadding="0" cellspacing="3">
       <thead>
         <tr>
           <th>Time</th>
           <th>Company</th>
           <th>Last</th>
           <th>Change</th>
         </tr>
       </thead>
       <tbody>
         <tr>
           <td id="time"></td>
           <td id="company"></td>
           <td id="last"></td>
           <td id="change"></td>
         </tr>
       </tbody>
     </table>
   </body>
PlexService includes this sample code, where you can start streaming quote server by running “quote.sh” command and then open quote.html file in your browser.
Using JMX
PlexService uses JMX to expose key metrics and lifecycle methods to start or stop services. You can use jconsole to access the JMX controls, e.g.
jconsole localhost:9191
Summary
PlexService comes a full-fledged sample application under plexsvc-sample folder and you browse JavaDocs to view APIs.