Alongside that work I have been using agentic coding tools heavily by letting AI write code while I own the architecture and design. I documented that approach in AI Writes Code, You Own the Design, which covers how to use skills with structured methodology files to make AI coding agents produce consistent, reviewable, architecturally sound output instead of chaos.
But there’s a deeper layer of context. Over ten years ago, before GitHub Actions and GitLab Runner existed as concepts, I built a distributed orchestration engine for automating heterogeneous tasks with declarative syntax. It used Docker, Kubernetes, shell scripts, and custom worker types to handle diverse workloads. The core insight then is the same insight that applies now: scheduling, fault tolerance, retries, timeouts, observability, and capacity management are solved problems. Your application should not implement them. That engine became Formicary, which I open-sourced. This post shows how I applied Formicary to automated agentic coding workflows and why enterprises keep making the same expensive mistake.
The Problem I Keep Seeing
When teams build AI coding agents like systems that pick up GitHub issues, plan implementations, write code, run tests, and open PRs, they reach for the obvious approach: a coordinator process, a state machine, custom pollers. The initial version works. Then it accumulates. I have seen enterprises building custom solutions with 50K+ lines of TypeScript. Look inside these systems and you find the same failure modes every time:
No per-phase timeouts. If the AI model hangs during implementation, the process runs until a global job timeout kills it — often 90 minutes later, after consuming an expensive model session and blocking other work.
Silent work drop. When the worker pool fills, the system silently skips newly discovered issues instead of queuing them.
Context loss between phases. The planner writes a plan file. The implementer starts a fresh AI session and re-explores the entire codebase from scratch. The planning work gets thrown away.
Custom DAG reinvention. The state machine handles branching: tests fail -> retry, model blocked -> notify human. This is just a DAG with exit-code routing. It’s already solved, and the custom version is always underpowered.
Crummy restarts. Retry a failed issue and the agent reuses the same branch name. Git conflict. Failure. Start over.
Infrastructure lock-in. You can’t run it on a laptop because it’s tangled with Kubernetes pod lifecycle management.
High cost per new feature. Adding a security review phase means new state transitions, new code, a new deployment takes days of engineering time.
The root mistake is treating orchestration as application logic. These teams write scheduling, capacity management, artifact passing, observability, and retry logic inside their agent code. Every one of those concerns is already solved by mature orchestration frameworks. Stop writing that code.
The Declarative Replace
I have used a 50K+ lines TypeScript agent system in an enterprise environment, which I replaced with a few declarative workflow definitions such as:
ai-gh-issue-picker.yaml   (~100 lines)  — polls GitHub, submits jobs
ai-gh-implement.yaml      (~500 lines)  — plan -> implement -> test -> verify -> PR -> monitor -> learn
ai-gh-cleanup.yaml        (~80 lines)   — stale workspace and branch cleanup
No orchestration code. No state machine. No custom pollers. No retry logic. No timeout management. Formicary handles all of it.
Here is every decision, with the reasoning.
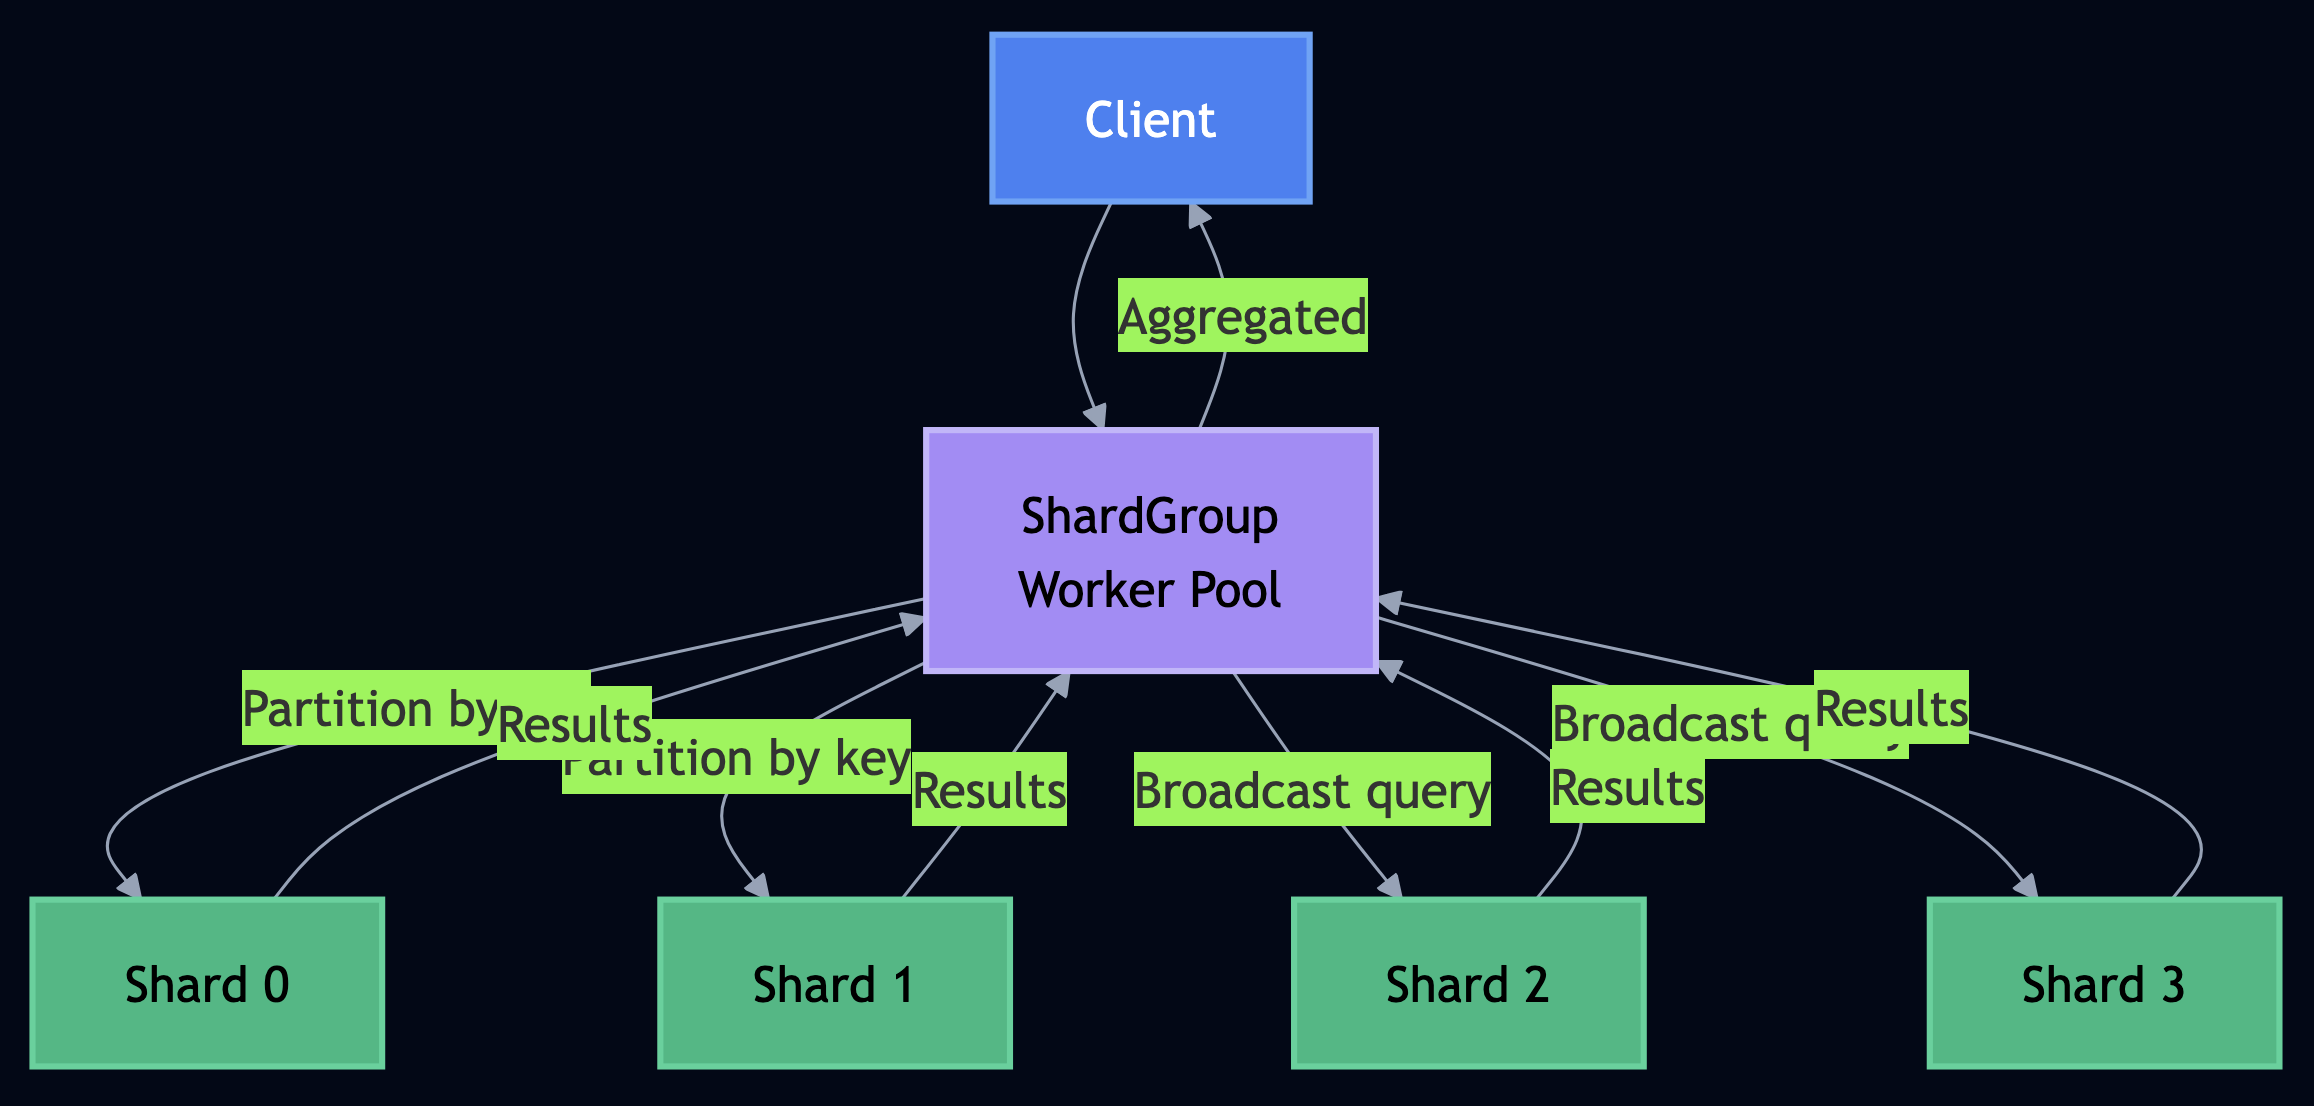
Decision 1: Replace Custom Pollers with a Cron Job
Custom polling processes run continuously, consume resources, and require their own deployment lifecycle. I replaced the GitHub issue poller with a Formicary cron job:
job_type: ai-gh-issue-picker
cron_trigger: "0 * * * * * *"   # every minute (7-field cron)
max_concurrency: 1               # only one picker at a time

skip_if: >-
  {{if ge (CountByJobTypeAndState "ai-gh-implement" "PENDING") 10}} true {{end}}
The skip_if fires at the scheduler level before any worker is allocated, before any task runs. If 10 implement jobs are already pending, Formicary skips the entire picker invocation silently. Zero worker cost.
The gather-issues task fetches GitHub issues labeled ai-ready, moves each label to ai-in-progress, and writes a compact issues.json. I wrote it in Python rather than bash because Python eliminates the jq/base64/subshell-scoping traps that plagued the original version:
import json, os, subprocess

repo = f"{os.environ['GH_ORG']}/{os.environ['GH_REPO']}"

def gh(*args):
    r = subprocess.run(["gh"] + list(args), capture_output=True, text=True)
    return r

r = gh("issue", "list", "-R", repo,
       "--label", os.environ["PICKUP_LABEL"], "--state", "open",
       "--limit", os.environ.get("MAX_PENDING", "10"),
       "--json", "number,title,url")
issues = json.loads(r.stdout) if r.returncode == 0 else []

for issue in issues:
    gh("issue", "edit", str(issue["number"]), "-R", repo,
       "--remove-label", os.environ["PICKUP_LABEL"],
       "--add-label", os.environ["INPROGRESS_LABEL"])

issues_json = json.dumps(issues, separators=(',', ':'))
with open("issues.json", "w") as f:
    f.write(issues_json + "\n")
print(f"::set-output name=IssuesJSON::{issues_json}")
The submit-jobs task uses SubmitJobsFromJSON, a Formicary template function that submits one implement job per issue directly through the DB. A unique index on user_key (keyed as ai-gh-implement-{org}-{repo}-{number}) rejects duplicate submissions at the constraint level. No pre-flight lookups, no race conditions:
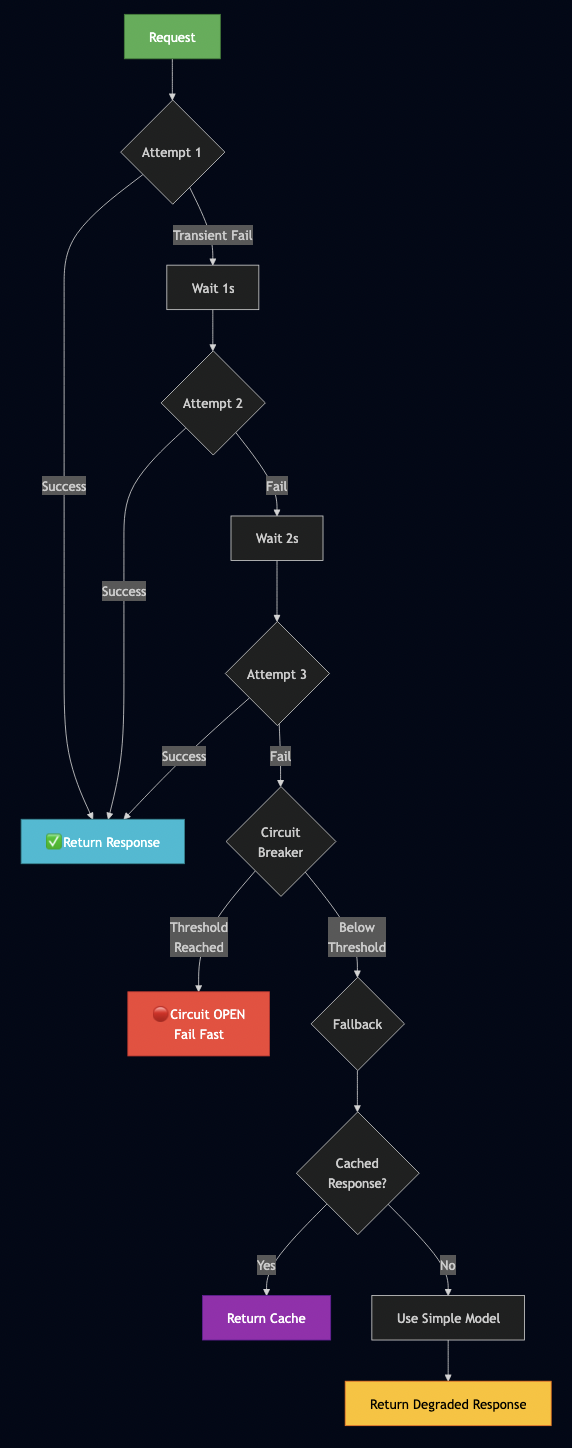
The unit-test task verifies commits exist, shows the diff, then detects and runs the project’s test suite, it checks for Makefile, Cargo.toml, package.json, go.mod, or pytest and runs whichever it finds. If no commits were made, it fails immediately. If tests fail, it routes to fix-tests. The self-verify task runs a separate AI reviewer session that runs tests, checks correctness, checks security, and verifies the implementation matches the issue. A fresh context catches mistakes the implementer’s context was blind to. If self-verify cannot resolve a problem, create-pr still runs but the PR body explicitly states what remains unresolved. Silently creating PRs with known failures is a common failure mode in imperative systems, I designed against it.
Decision 3: Give Every Phase Its Own Timeout
The biggest operational gap in imperative agents is missing per-phase timeouts. I gave every task its own:
- task_type: plan
  timeout: 15m

- task_type: implement
  timeout: 45m

- task_type: unit-test
  timeout: 10m

- task_type: self-verify
  timeout: 15m

- task_type: cleanup
  always_run: true    # runs even if the job fails
  timeout: 1m
always_run: true on cleanup guarantees Formicary removes the workspace and branch regardless of outcome. Without it, stuck jobs leak temporary directories and dead branches indefinitely.
Decision 4: Flow Context Forward Through Artifacts
Imperative bots lose context between phases because each phase is a separate pod with no shared state. The planner’s work gets discarded. I solved this years ago with a shared workspace and an artifact chain:
Each task declares its dependencies and Formicary downloads the upstream artifacts automatically:
- task_type: self-verify
  dependencies:
    - setup       # downloads meta.env
    - implement   # downloads impl_result.json, impl_conversation.txt, impl_diff.patch
  script:
    - |
      TASK_DIR="$PWD"          # capture executor dir before any cd
      source "$TASK_DIR/meta.env"
      cd "$WS/repo"
      # all artifacts available in $TASK_DIR/
One critical detail: save TASK_DIR="$PWD" before any cd. Artifacts must be written back to the executor’s working directory, not to the repo:
TASK_DIR="$PWD"
source "$TASK_DIR/meta.env"
cd "$WS/repo"
# ... do work ...
jq ... > "$TASK_DIR/result.json"   # write to TASK_DIR, not to repo
The implementer now reads PLAN.md that the planner wrote. Context survives across phases.
Decision 5: Use Nonces to Make Restarts Safe
One issue with imperative implementation was that when a job retried a failed issue, it reused the same branch name. Git conflict. In the workflow definition, I added a 4-byte random hex nonce to every branch:
retry: 1 on the implement job submits a fresh attempt with a new nonce -> new branch -> no conflicts. The ai-gh-cleanup job removes stale branches after PR merge.
Decision 6: Stream Output and Extract Structured Status
I need two things simultaneously: real-time visibility of what the agent is doing, and structured status for routing decisions. claude --print streams output through tee, while the prompt instructs Claude to output a JSON status object on its final line:
claude --print --dangerously-skip-permissions --model "$MODEL" --max-turns 100 \
  "$(cat /tmp/impl_prompt.txt)" 2>&1 | tee "$TASK_DIR/impl_conversation.txt"

# Extract the last JSON object with a "status" key
STATUS_JSON=$(grep -oE '\{[^{}]*"status"[^{}]*\}' \
  "$TASK_DIR/impl_conversation.txt" | tail -1)
STATUS=$(echo "$STATUS_JSON" | jq -r '.status // "UNKNOWN"')
[ "$STATUS" = "BLOCKED" ] && exit 2
[ "$STATUS" = "TESTS_FAILING" ] && exit 3
--dangerously-skip-permissions is required. Without it, Claude only produces text describing what it would do, zero file changes, zero commits. With it, Claude actually reads files, writes code, and runs tests. This gives me four things at once: real-time streaming to the Formicary dashboard, exit-code routing from the status field, artifact data for downstream tasks, and the full AI conversation captured as a debuggable artifact.
Decision 7: Encode Methodology in Skills
I don’t ask Claude to “write some code.” I embed skill instructions that encode engineering discipline into every prompt. I wrote about this approach in depth in AI Writes Code, You Own the Design, the core idea is that freeform prompting produces inconsistent output, while skill-encoded prompting produces output that follows a contract.
claude --print --model opus --max-turns 30 \
  "Use the ygs-wbs skill approach:
   1. Explore the codebase
   2. Decompose into vertical-slice tasks
   3. Write PLANS/{issue-slug}-{number}-plan.md with acceptance criteria"
If you-got-skills is installed on the worker, Claude discovers /ygs-wbs as a slash command automatically. The prompt-embedded version works either way, no dependency on the skills package being present.
Atomic commits, tests after each task, scope guardrails
fix-tests
ygs-investigate
Root cause analysis, not symptom masking
self-verify
ygs-code-review
Run tests, check correctness, fix critical issues
Each skill acts as a contract. “Plan vertically, commit atomically, stop when blocked” produces far more consistent and reviewable output than open-ended instructions.
Decision 8: Make the Dashboard Show What’s Happening
Formicary’s job description field accepts markdown. Every submitted implement job carries clickable links to the issue, branch, and PR:
The PRLink starts empty and the create-pr task populates it once the PR exists. Every job in the dashboard now shows exactly what it’s working on with one-click navigation to the relevant GitHub page.
Decision 9: Capture Everything as Artifacts
Every task uploads artifacts with when: always including on failure. This is what makes debugging possible rather than a guessing game:
Artifact
Contents
plan_conversation.txt
Full AI conversation during planning
plan_result.json
Status, complexity, task count, summary
impl_conversation.txt
Full AI conversation during implementation
impl_result.json
Status, files changed, commit count
impl_diff.patch
Complete git diff of all changes
impl_commits.txt
List of commits made
test_output.txt
Test suite output with pass/fail details
verify_result.json
Test pass/fail, critical findings, any fixes
verify_conversation.txt
Full AI conversation during self-verify
Every task also sets report_stdout: true, Formicary streams output to the dashboard websocket in real time. Combined with tee, you see the full AI conversation live as it happens. The workspace also persists locally at ~/claude_workspace/{issue}-{nonce} so you can cd into it after a run and inspect exactly what happened.
Decision 10: Monitor PRs and Capture Learnings
Imperative bots typically run a PR comment poller that fires every few minutes, scanning for mentions. I replaced it with a task inside the implement job that lives as long as the PR stays open:
The monitor-pr task:
Polls for new PR review comments every 2 minutes
Feeds each new comment to Claude, applies the change, commits, and pushes
Replies on the PR confirming the fix
Tracks processed comment IDs in $WS/.processed_comments to avoid re-processing
Exits when the PR merges or closes
The learn task runs after the PR closes. It reviews all PR comments, reviewer feedback, and the implementation conversation, then writes a structured learning entry to ~/claude_workspace/learn_context/ using the ygs-learn skill methodology: what went well, what to improve, patterns to remember for this codebase. Over time the agent gets better at this specific repo, not just better in general.
Decision 11: Support Multiple Trackers with Minimal Changes
The pipeline is intentionally tracker-agnostic. Only two tasks touch the issue tracker API: gather-issues in the picker, and create-pr plus monitor-pr in the implement job. Everything else: plan, implement, unit-test, self-verify, learn works identically regardless of tracker.
To support Jira and Bitbucket, I cloned the YAML files and swapped six commands:
gh api .../comments -> acli bitbucket pr comment list
Result: ai-jira-issue-picker.yaml and ai-jira-implement.yaml, the same complete pipeline, different API calls. Both use the Atlassian CLI (acli) configured at ~/.config/acli/config.json.
What Formicary Gives You Without Writing a Line
When I started applying Formicary to agentic coding, I wasn’t sure it had everything needed. It had almost all of it already:
Cron: scheduling with 7-field syntax (including seconds)
Per-task timeouts: the feature imperative bots most consistently lack
Exit-code routing (on_exit_code): conditional DAG without custom code
always_run: true: guaranteed cleanup regardless of failure
Artifact: passing between tasks via S3
Encrypted secrets: with automatic log redaction
max_concurrency: capacity management declared in YAML
retry + delay_between_retries: automatic backoff
Go template functions: variable substitution in scripts
SHELL executor: runs on a laptop with no Kubernetes
Markdown in job descriptions: visible, clickable in the dashboard
Two additions were made specifically for this use case.
Native Kubernetes secret injection. The naive pattern passes API keys through the orchestrator as template variables, which stores them in the job definition. The new pattern lets the kubelet inject them at pod start time, the value never touches Formicary:
Per-task service accounts work the same way for IRSA on AWS or Workload Identity on GCP:
container:
  service_account: ai-agent-irsa-sa
CountByJobTypeAndState template function. The original capacity check made an HTTP API call requiring a token, an available endpoint, and network round-trip time. The new function queries the job database directly at the scheduler level before any worker is allocated:
If the count hits the threshold, Formicary skips the entire job invocation with zero cost. The script also does a fine-grained check using the configurable MaxPendingJobs variable. Two layers: cheap early termination at the scheduler, tunable limits inside the task.
This is where to start. The SHELL executor runs scripts directly on the host and inherits ~/.claude/settings.json, gh auth login, and all other host credentials automatically, no secrets configuration needed.
# 1. Prerequisites (one-time)
npm install -g @anthropic-ai/claude-code
gh auth login

# 2. Start Formicary (queen + embedded ant worker)
docker pull plexobject/formicary
docker run plexobject/formicary

# 3. Deploy workflow definitions
git clone https://github.com/bhatti/formicary.git
cd docs/examples
./deploy-ai-workflows.sh --mode shell --repo your-org/your-repo --setup-labels

# 4. Set org config so the picker knows where to look
curl -X POST http://localhost:7777/api/orgs/default/configs \
  -H 'Content-Type: application/json' \
  -d '{"name":"GitHubOrg","value":"your-org"}'
curl -X POST http://localhost:7777/api/orgs/default/configs \
  -H 'Content-Type: application/json' \
  -d '{"name":"GitHubRepo","value":"your-repo"}'

# 5. Label an issue — the picker fires within 1 minute
gh issue edit 1 --repo your-org/your-repo --add-label "ai-ready"

# 6. Watch it run
open http://localhost:7777
Option B: Kubernetes with Bedrock via Tailscale
Pods can’t resolve Tailscale hostnames by name, but they can reach the IP. Resolve it once:
Job YAMLs reference it with env_value_from, so the key is injected by the kubelet and never passes through Formicary.
Ten Lessons
Timeouts are not optional. AI models hang. Give every phase its own timeout. A global job timeout is not a substitute when the plan phase hangs, you want to retry that phase, not restart the whole job from scratch.
Structured JSON output unlocks routing. Ask the AI to output {"status": "DONE|BLOCKED|TESTS_FAILING", ...} on its final line. Route on that field. Extract metadata for dashboards.
Flow context forward. If planning and implementation run in separate sessions with no shared artifacts, the implementer re-explores the entire codebase and discards all planning work. Pass PLAN.md as an artifact. Cost and quality both improve.
Use nonces for idempotency. Branch names, workspace paths, artifact names, all need a per-run nonce. Never reuse a name across retry attempts.
Guarantee cleanup. Set always_run: true on cleanup tasks. Workspaces and branches accumulate fast. One stuck job should not leave garbage forever.
Let the orchestrator manage capacity. Set max_concurrency on the job and use skip_if with a scheduler-level DB query. Don’t write custom capacity management code, it will be wrong.
Skills are the real leverage. The quality gap between freeform prompting and methodology-encoded prompting is large. Invest in skill definitions. The skill is a contract: “plan vertically, commit atomically, stop when blocked.” Consistent contracts produce consistent, reviewable output. I covered this in depth in AI Writes Code, You Own the Design.
Declarative wins operationally. Adding a security review phase to the declarative version takes minutes: copy a task block, write a prompt, add an on_completed route. The same change to an imperative system takes days. The asymmetry grows with every phase you add.
Capture everything on failure. Upload artifacts with when: always. When something fails, you want the full AI conversation, the git diff, and the test output — not just “job failed.”
Build a feedback loop. Most AI coding systems run, merge, and forget. The learn task after every PR close gives the agent a memory of what works and what doesn’t in this specific codebase. Over time, that compounds.
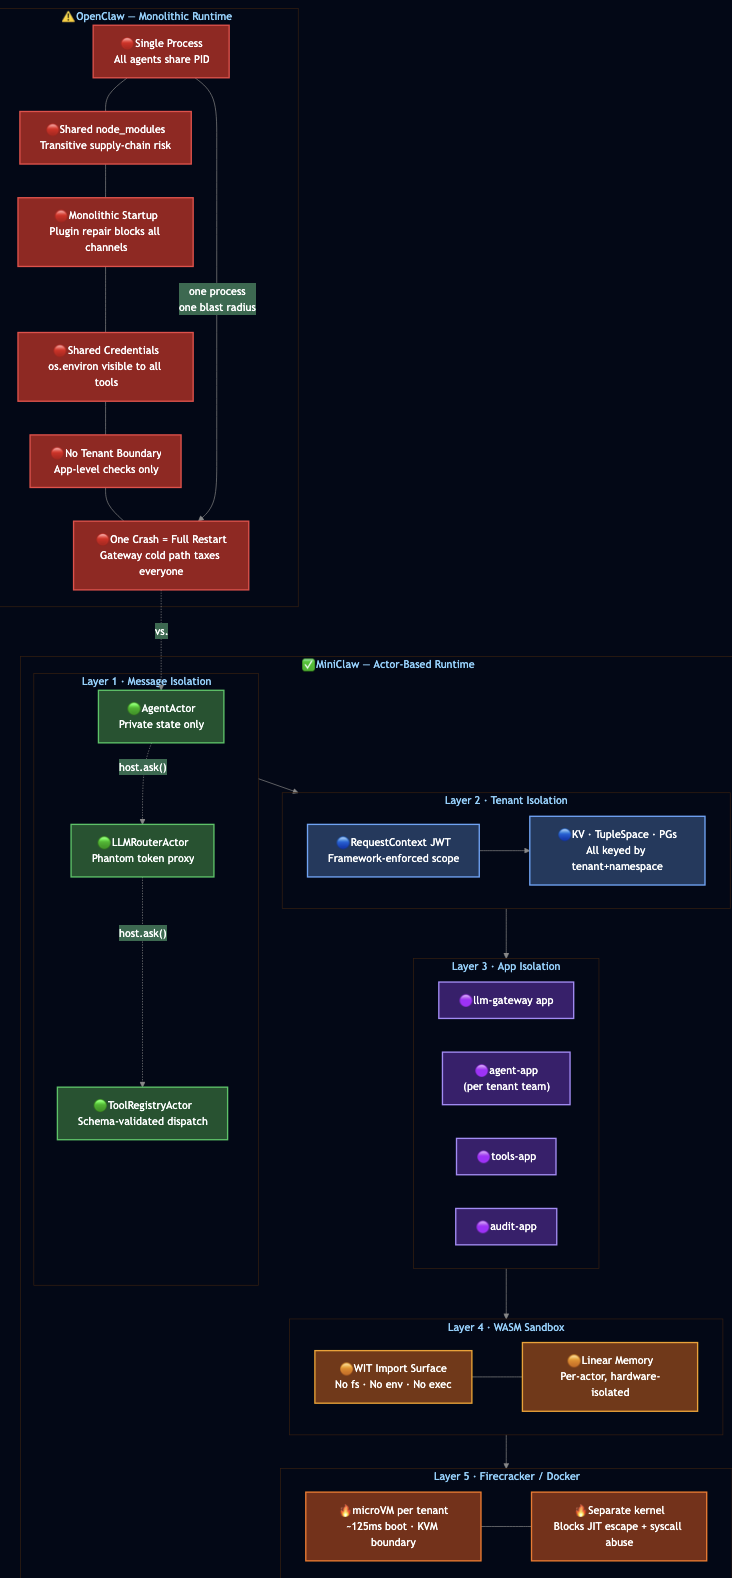
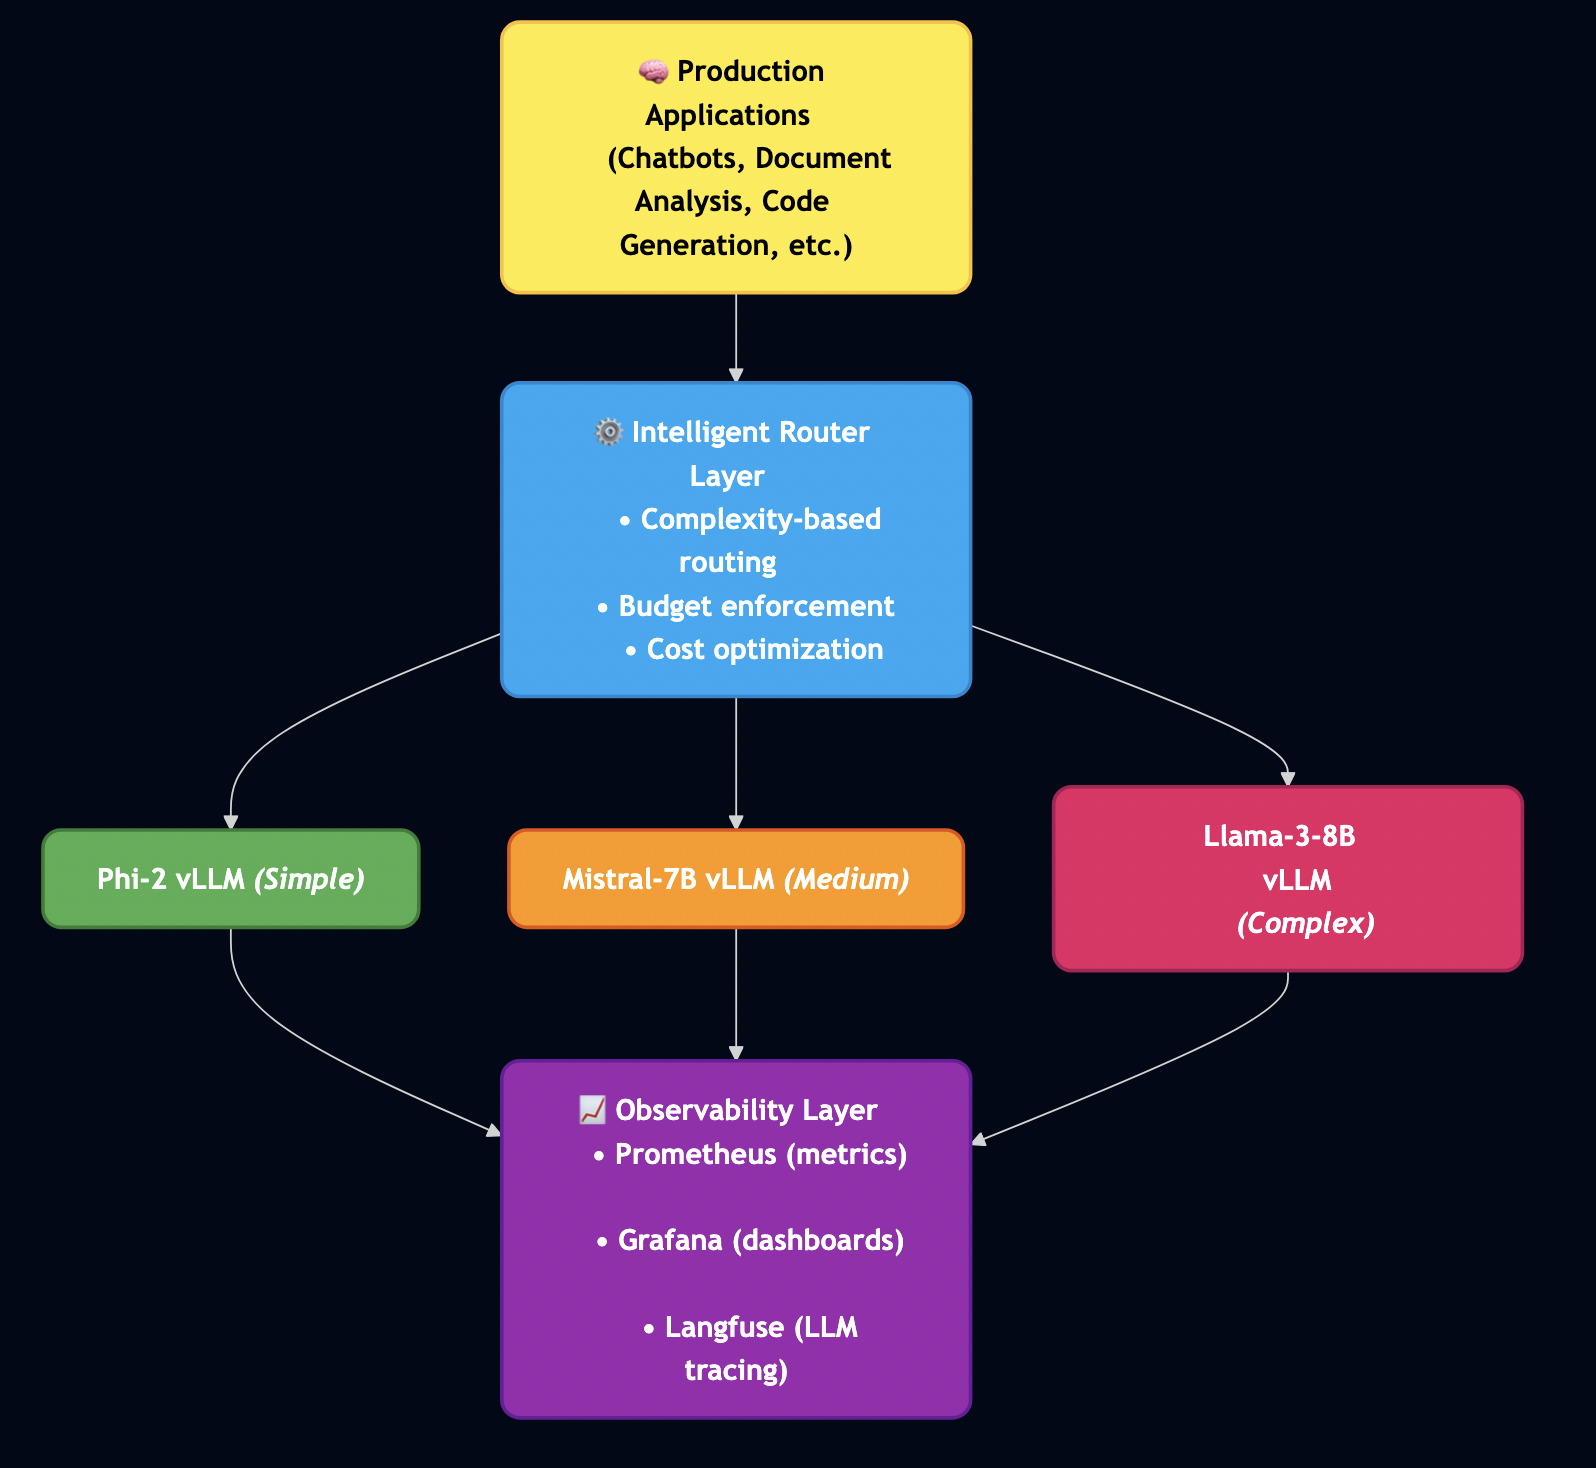
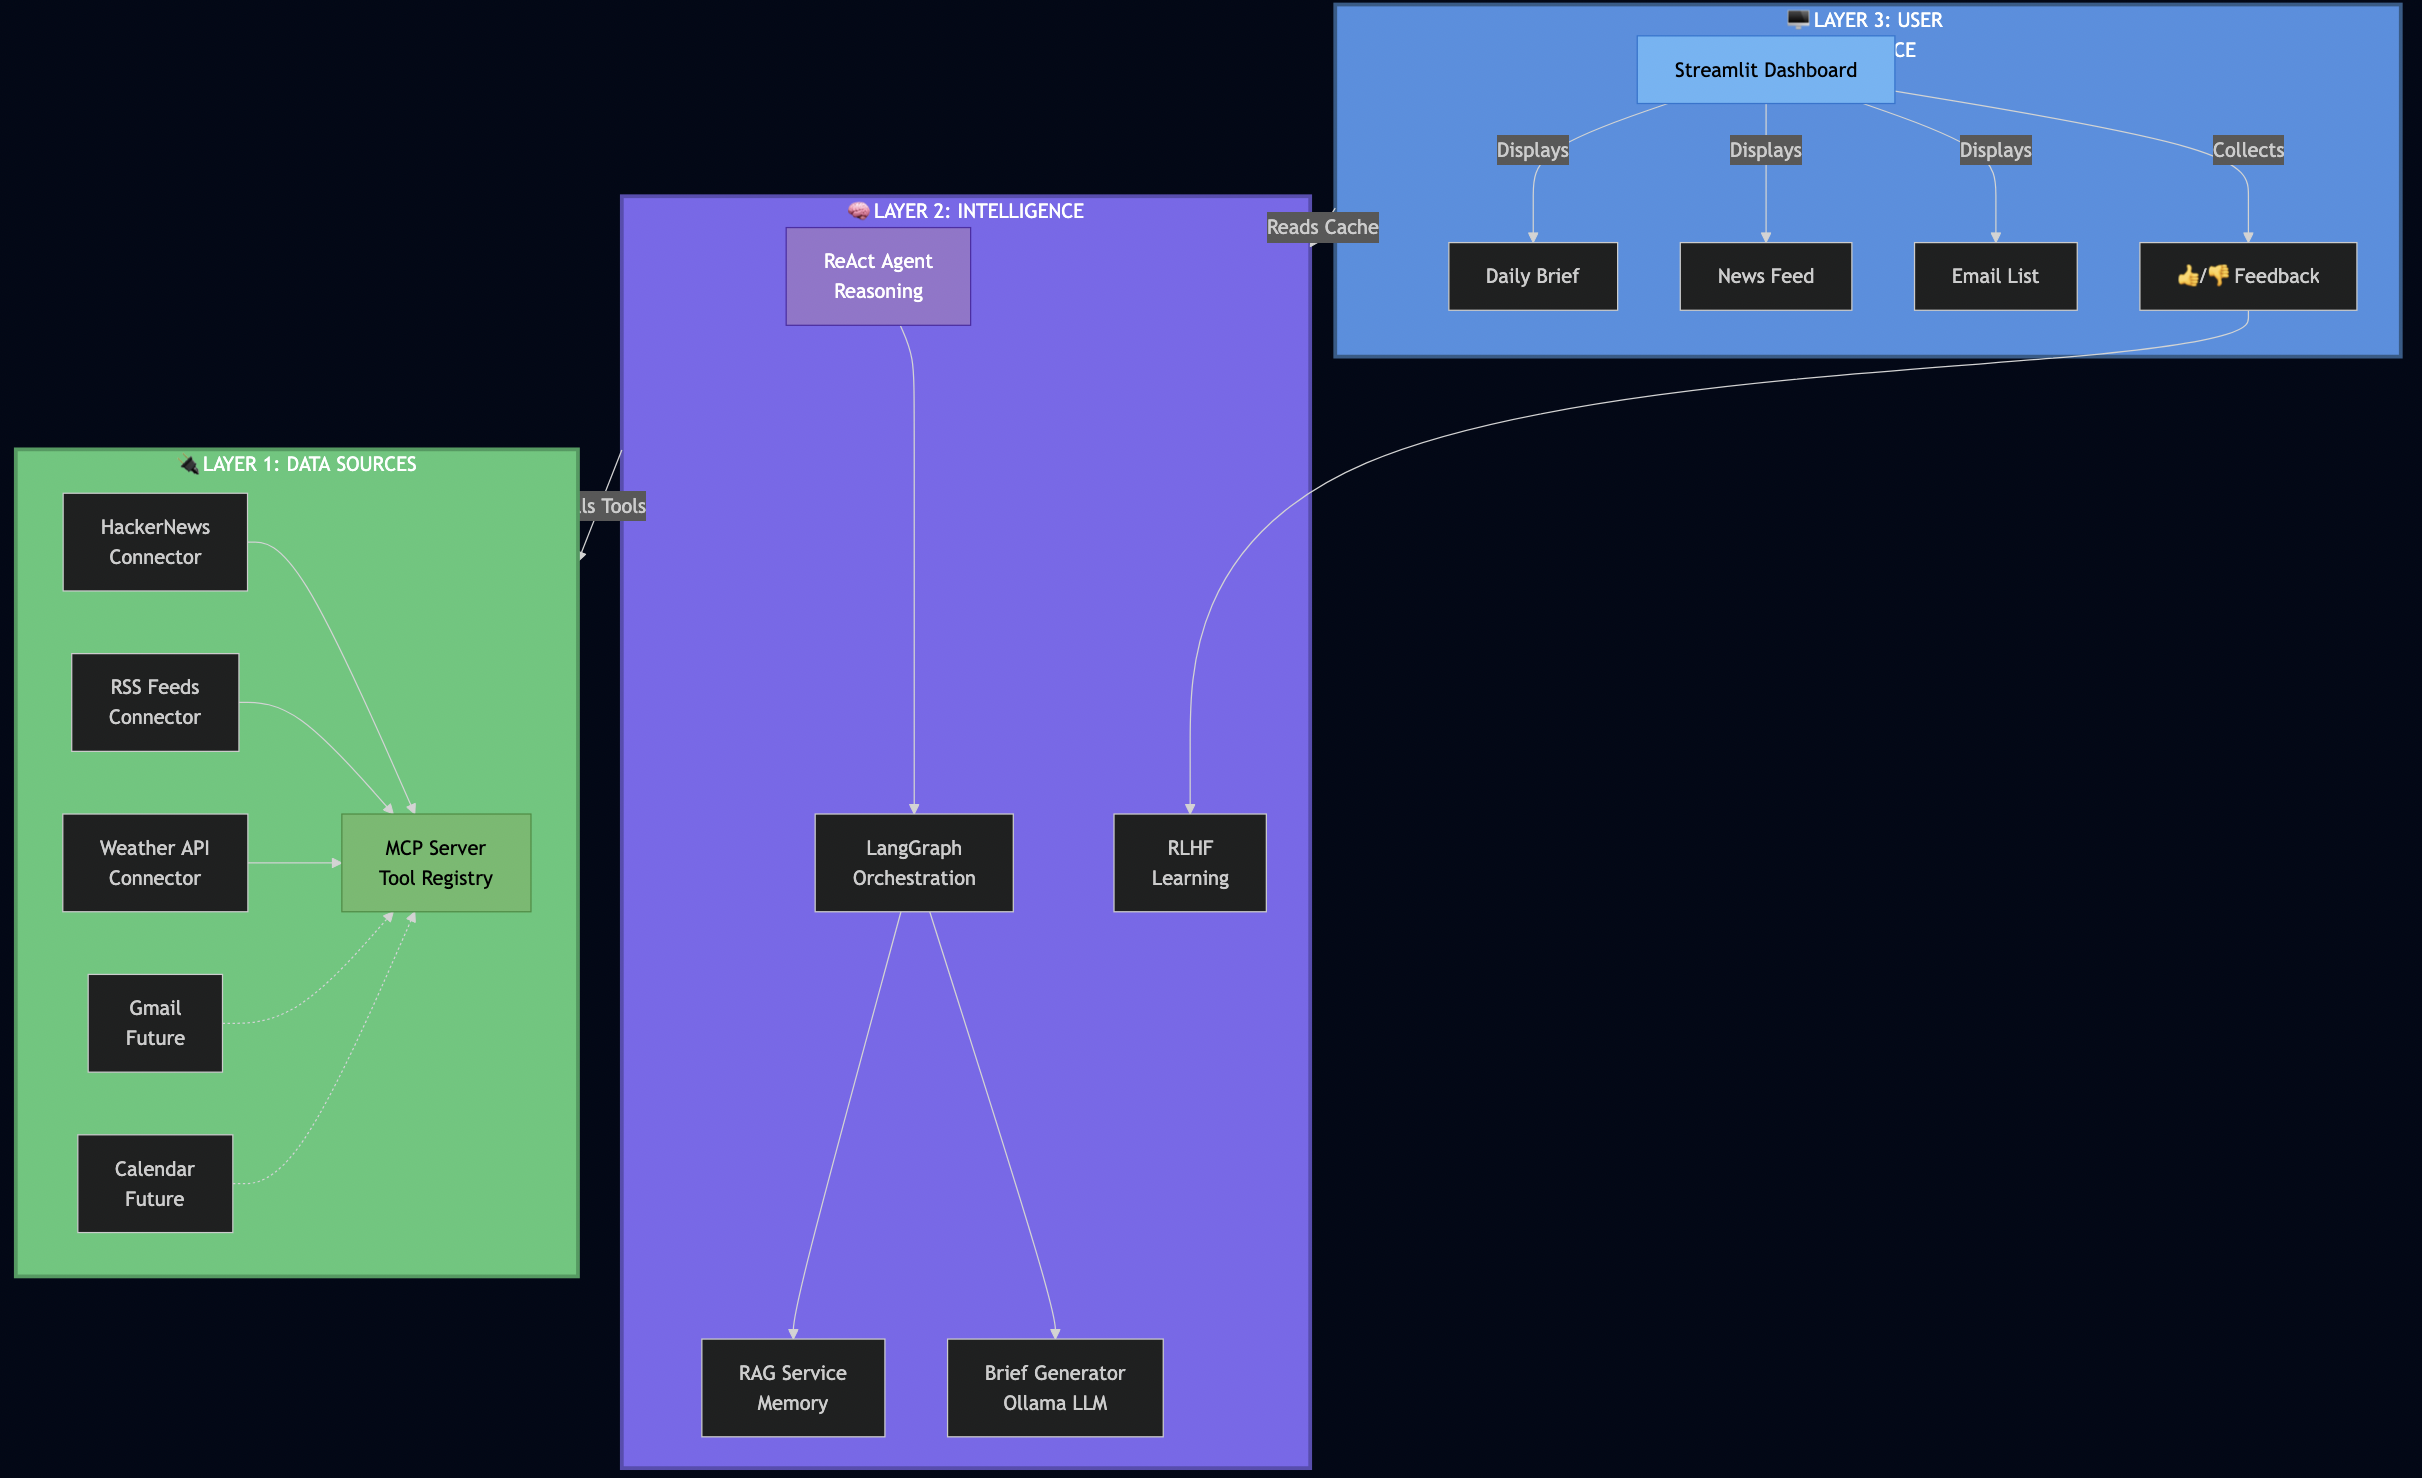
Most agent frameworks start simple: one process, one conversation loop, one tool registry, one memory store, and one pile of credentials. That simplicity is useful for demos, but dangerous for enterprise systems. If a prompt injection reaches a tool with broad permissions, the whole runtime becomes part of the blast radius (see https://arxiv.org/abs/2403.02691). If one tool call hangs or crashes, it can stall the agent loop. If memory and sessions are shared by convention instead of isolated by construction, tenant boundaries depend on every developer remembering every guardrail every time. Enterprise teams need a different foundation. They need agents that isolate state, limit blast radius, enforce tenant boundaries, and recover from failures without operator intervention. They need the same properties that telecom systems have delivered for four decades: per-process isolation, supervision trees, guardian processes, and location-transparent messaging.
This post shows how I built Mini OpenClaw as a proof of concept implementation that runs entirely on PlexSpaces, an actor-based distributed runtime inspired by Erlang/OTP. OpenClaw-style systems are useful because they give developers a programmable agent runtime: tools, memory, planning, execution, and orchestration. MiniClaw keeps that spirit, but changes the failure and security model. Instead of one runtime owning everything, each responsibility becomes an actor with its own state, permissions, lifecycle, and supervision boundary. MiniClaw deploys ten actors inside a WebAssembly + Firecracker sandbox to deliver a secure, fault-tolerant agent system. Every actor owns its state exclusively. Every message travels through explicit channels and every failure triggers a supervised restart instead of full-system crash.
OpenClaw’s 2026.4.29 release triggered plugin dependency repair loops at startup and cold paths due to monolithic core owns too many responsibilities. MiniClaw starts from the opposite position: every responsibility is an actor from the beginning, with its own state, and its own explicit message contract.
Part 1: Agents and Actors Isomorphism
1.1 The Same Computational Model
An LLM agent has four things: state (conversation history, tool results), a processing loop (receive message, reason, act), communication (call tools, delegate to other agents), and failure modes (timeouts, hallucinations, rate limits). An actor has exactly the same structure. This is not a coincidence. Both actors and agents derive from the same computational model, isolated units of stateful computation that communicate by passing messages.
# From examples/python/apps/miniclaw/agent.py
# An agent IS an actor same structure, same guarantees
# For readability, this POC keeps message history directly on the `AgentActor`.
# In a production deployment, I would usually run one actor instance per session or
# store history by `session_id` to avoid cross-session context mixing.
@actor
class AgentActor:
    """Core agent: receive user message, call LLM, execute tools, loop until end_turn."""

    system_prompt: str = state(default="You are a helpful AI assistant with access to tools.")
    messages: list  = state(default_factory=list)   # Conversation state
    max_history: int = state(default=50)            # Context window bound
    total_chats: int = state(default=0)             # Usage counter
    agent_name: str  = state(default="general-assistant")

    @init_handler
    def on_init(self, config: dict) -> None:
        args = config.get("args", {})
        self.agent_name = args.get("agent_name", self.agent_name)
        self.system_prompt = args.get("system_prompt", self.system_prompt)
        host.process_groups.join("svc:agent")        # Announces itself for discovery
        write_actor_info(self.actor_id, self.agent_name,
                         "Core agent loop with tool calling and session memory",
                         ["chat", "tool_use", "memory"])

    @handler("chat")
    def chat(self, message: str = "", session_id: str = "") -> dict:
        # Agent processing loop: receive message -> reason -> act
        ...
The mapping is direct. Every agent concept has an actor primitive:
Before walking through each actor, it helps to see the five low-level primitives that every actor uses. These are the only operations available inside the WASM sandbox without filesystem or global state.
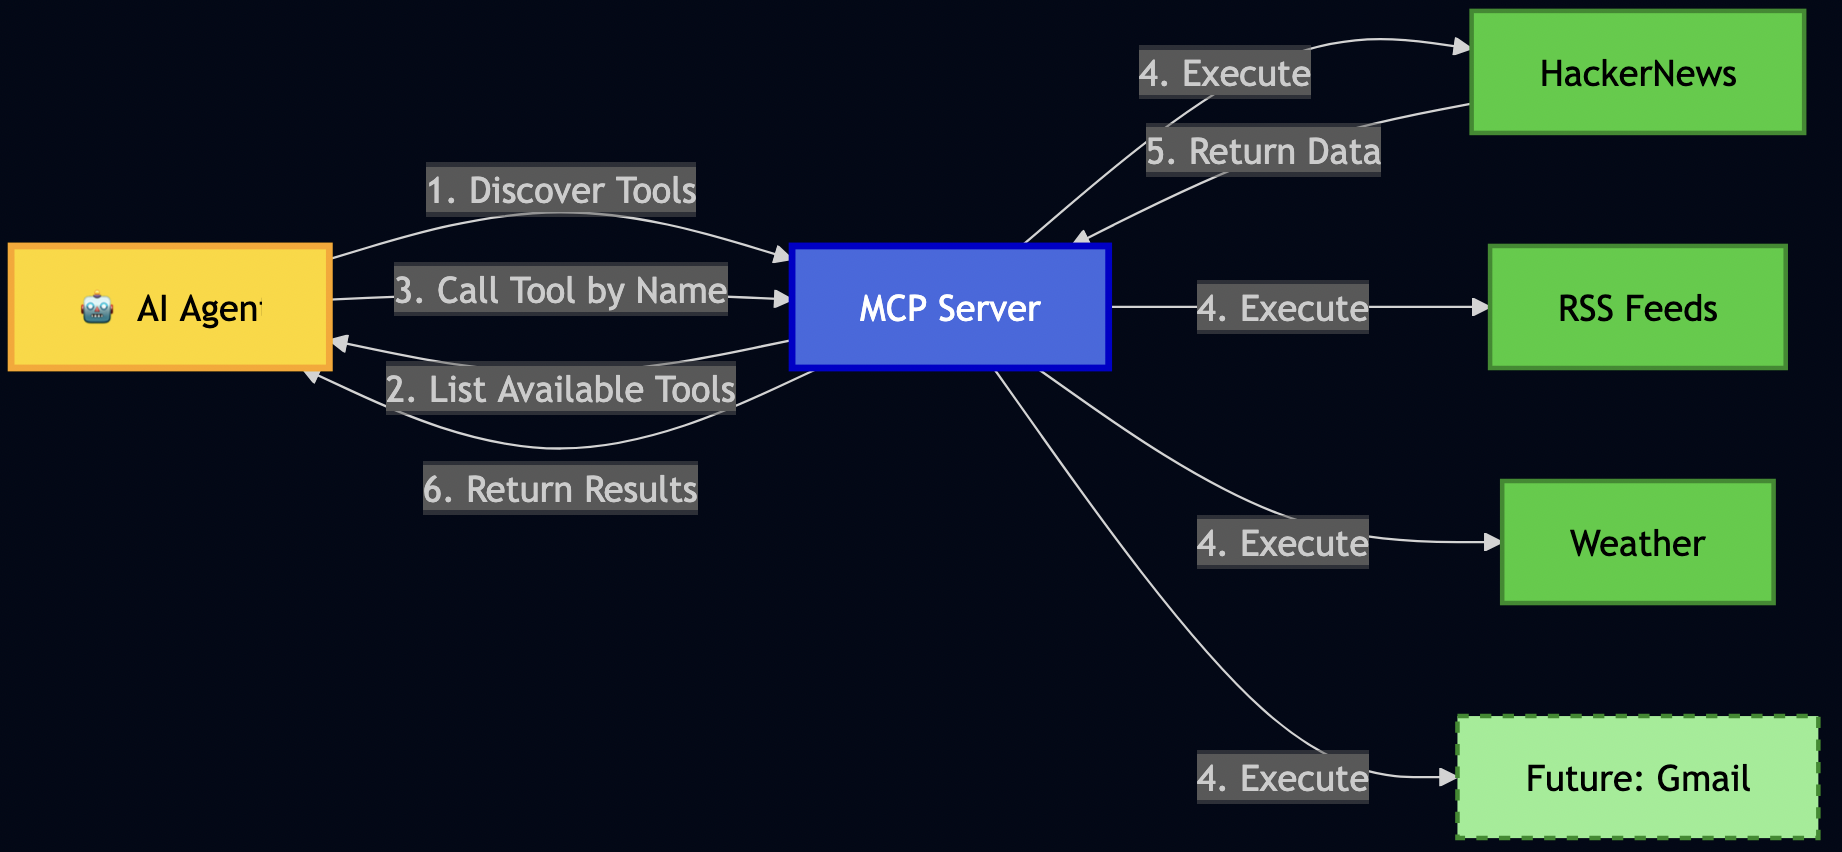
2.1 Process Groups and Object Registry for Location-Transparent Discovery
Every actor is registered in an actor-registry and can optionally join a named process group on @init_handler. Callers look up the first member with pg_first(), a one-liner that hides whether the target is local or on a remote node:
# From examples/python/apps/miniclaw/helpers.py
def pg_first(group: str) -> Tuple[Optional[str], Optional[str]]:
    """Return (actor_id, None) for the first member of a process group, or (None, error)."""
    try:
        members = host.process_groups.members(group)
        if members:
            return members[0], None
        return None, f"no members in {group}"
    except Exception as e:
        return None, str(e)
Every actor announces itself on startup:
@init_handler
def on_init(self, config: dict) -> None:
    host.process_groups.join("svc:agent")
    write_actor_info(self.actor_id, self.agent_name,
                     "Core agent loop with tool calling and session memory",
                     self.capabilities)
The orchestrator discovers agents via pg_first("svc:agent"), it does not know the agent’s address, node, or port. The framework routes the message transparently.
2.2 Fire-and-Forget Audit with host.send, Never host.ask
The audit trail uses host.send() (fire-and-forget) rather than host.ask() (request-reply). This is a deliberate design choice: audit events must never add latency to the agent’s critical path.
# From examples/python/apps/miniclaw/helpers.py
def fire_audit(event_type: str, detail: str) -> None:
    """Fire-and-forget audit event. Failures are logged, never raised."""
    audit_id, err = pg_first("svc:audit")
    if err or not audit_id:
        host.debug(f"fire_audit: {err}")
        return
    try:
        host.send(audit_id, "log_event", {
            "op": "log_event",
            "event_type": event_type,
            "detail": detail,
            "timestamp": host.now_ms(),
        })
    except Exception as e:
        host.warn(f"fire_audit: send failed: {e}")
Every actor calls fire_audit() after each meaningful operation. The audit actor receives the event asynchronously. If the audit actor is slow or temporarily down, callers are unaffected, they never wait for a response.
2.3 TupleSpace: Queryable Shared Coordination State
TupleSpace (host.ts) is the coordination layer. Unlike KV (point lookup by key), TupleSpace supports pattern queries like read all tuples matching a template with None wildcards:
# Write a memory tuple
host.ts.write(["memory", "global", "user_name", "Alice"])

# Read all global memories — None matches any value in that position
tuples = host.ts.read_all(["memory", "global", None, None])

# Read all audit events of a specific type
events = host.ts.read_all(["audit", "tool_executed", None, None])

# Orchestrator checkpoints sub-task results for crash recovery
host.ts.write(["orch_result", task_id, i, str(result)])
The write_actor_info helper uses TupleSpace to publish actor capabilities for external discovery without blocking callers:
# From examples/python/apps/miniclaw/helpers.py
def write_actor_info(actor_id: str, name: str, description: str, capabilities: list) -> None:
    """Write actor capability tuples to TupleSpace for discovery."""
    try:
        host.ts.write(["agent_card", actor_id, name, description])
        for cap in capabilities:
            host.ts.write(["agent_cap", cap, actor_id])
    except Exception as e:
        host.warn(f"write_actor_info: {e}")
2.4 send_after for Scheduling Timers
The health monitor uses host.send_after() to schedule a self-message after every poll interval. No cron job, no external scheduler, the actor manages its own polling timeline:
@init_handler
def on_init(self, config: dict) -> None:
    # Schedule first poll; each tick reschedules the next
    host.send_after(self.poll_interval_ms, "poll_tick", {"op": "poll_tick"})

@handler("poll_tick", "cast")
def poll_tick(self) -> None:
    # ... do poll work ...
    # Re-arm: each tick schedules the next — no external scheduler needed
    host.send_after(self.poll_interval_ms, "poll_tick", {"op": "poll_tick"})
2.5 host.channel for Channel-Backed Durable Queues
The Channel primitive provides at-least-once message delivery with explicit ack/nack:
# Producer: send to channel
msg_id = host.channel.send("", _TASK_CHANNEL, task_type, task)

# Consumer: receive, process, then ack or nack
msg, ok, _ = host.channel.receive("", _TASK_CHANNEL, timeout_ms)
if ok:
    host.channel.ack("", _TASK_CHANNEL, msg["msg_id"])   # commit
    # OR
    host.channel.nack("", _TASK_CHANNEL, msg["msg_id"], True)  # requeue
2.6 The Let-It-Crash Philosophy
Monolithic agent frameworks force developers to write defensive error handling around every tool call, every LLM request, and every memory access. MiniClaw takes the Erlang philosophy: let actors crash, and let guardians restart them in a clean state. A guardian supervisor watches its children. When one crashes, it applies a restart strategy. The other children continue running, unaffected without cascading failures and global error handlers.
# From examples/python/apps/miniclaw/app-config.toml
[supervisor]
strategy = "one_for_one"          # Restart ONLY the crashed actor
max_restarts = 10                 # Allow up to 10 restarts
max_restart_window_seconds = 60   # Within a 60-second window
# If 10 crashes in 60s -> escalate to parent supervisor
PlexSpaces provides three restart strategies, each suited to different failure patterns:
Strategy
Behavior
Agent Use Case
one_for_one
Restart only the crashed actor
Independent tools: calculator crash does not affect weather
rest_for_one
Restart crashed actor + all actors started after it
Pipeline stages: if retriever crashes, restart generator and validator too
In MiniClaw, the guardian supervisor monitors all ten actors. If the LLMRouterActor crashes, the supervisor restarts it with a clean state. The AgentActor‘s in-flight request receives a timeout error while the MemoryActor, the AuditEventActor, and every other actor continues running without interruption.
The supervisor IS the guardian pattern from Erlang. Every MiniClaw actor runs under guardian supervision for crash recovery.
Part 3: WASM + Firecracker Sandbox
3.1 Defense in Depth
MiniClaw actors run inside three concentric isolation layers:
Actor isolation: Each actor owns its state exclusively. No shared memory, no global variables, no cross-actor data access. Communication happens only through host.ask() and host.send().
WASM + Firecracker sandbox: Each actor compiles to a WebAssembly module that runs inside a hardware-enforced memory sandbox. The WASM linear memory is isolated per actor instance. In production deployments, each WASM runtime itself runs inside a Firecracker microVM, a lightweight KVM-based hypervisor that boots in ~125ms and provides hardware-level memory and I/O isolation between tenants.
Tenant isolation: Every PlexSpaces operation requires a RequestContext with explicit tenant and namespace identifiers via JWT authentication. The framework rejects cross-tenant access before the request reaches the actor.
3.2 What the Two-Layer Sandbox Prevents
Attack Vector
Monolithic Framework
WASM Sandbox
WASM + Firecracker
open("/etc/passwd")
Succeeds with full FS access
Blocked with no FS import in WIT
Blocked with separate VM filesystem
os.environ["API_KEY"]
Succeeds with env vars shared
Blocked with no env access in WASM
Blocked with separate VM env
Read another actor’s memory
Succeeds with shared process
Blocked with WASM linear memory is per-instance
Separate VM address space
Escape WASM sandbox via JIT bug
Possible in theory
Partially mitigated
Blocked with hypervisor hardware boundary
Cross-tenant KV access
Possible if scoping misconfigured
Blocked with RequestContext enforced
Blocked with separate VM tenant
The WIT (WebAssembly Interface Types) definition explicitly declares what the actor can access:
// From wit/plexspaces-actor/host.wit
// The actor can ONLY call these imports — nothing else
interface host {
    send: func(to: string, msg-type: string, payload: payload) -> result<_, actor-error>;
    ask: func(to: string, msg-type: string, payload: payload, timeout-ms: u64) -> result<payload, actor-error>;
    kv-get: func(key: string) -> result<payload, actor-error>;
    kv-put: func(key: string, value: payload) -> result<_, actor-error>;
    http-fetch: func(link-name: string, method: string, path: string, request: payload) -> result<payload, actor-error>;
    // No filesystem. No env vars. No raw network. No process exec.
}
3.3 Tenant Isolation by Construction
Every PlexSpaces operation propagates tenant context through the call chain. KV keys, TupleSpace tuples, object-registry and process groups are all scoped by tenant and namespace. A session created by tenant acme cannot be retrieved by tenant globex and the framework rejects the request before it reaches the actor.
# Every API request carries tenant context — enforced at framework level
# KV keys scoped:     tenant-acme:prod:session:sess-001
# TupleSpace scoped:  tenant-acme:prod:["memory", "global", "user_name", "Alice"]
# Process groups:     tenant-acme:prod:svc:llm_router
There is no internal() bypass for application code. Tenant boundaries are enforced by construction, not by convention.
Part 4: MiniClaw Architecture
MiniClaw decomposes the agent framework into ten actors. Every actor runs as a WebAssembly module inside the PlexSpaces runtime, discovers collaborators through object-registry or process groups, and persists state through the durability facet.
Actor
Behavior
Responsibility
Security Property
LLMRouterActor
GenServer
Route LLM calls, circuit-break on failure
Real API keys never leave the actor (phantom token proxy)
Durable task queue backed by Channel; enqueue/dequeue/ack/nack
At-least-once delivery; no external broker
HealthMonitorActor
GenServer
Periodic PG membership polling via send_after; writes health snapshots
Simple polling eliminates subscription races
Part 5: Design Patterns Used in MiniClaw
The NanoClaw project introduced an important design philosophy: instead of reaching for external infrastructure when you hit a constraint, first ask whether the primitives you already have can solve the problem.
Pattern 1: Phantom Token / Credential Proxy
The constraint: Agents need to call an LLM provider, but callers should never see real API keys. Storing keys in the agent payload means any log line or bug report leaks credentials.
The actor solution:LLMRouterActor owns the credential store. It exposes a register_credential op that stores phantom_token -> real_api_key in its private KV namespace. Callers pass only the opaque token; the actor resolves the real key internally and discards it before building any response.
# Phantom token: real key stored in actor-private KV — never echoed to callers
@handler("register_credential")
def register_credential(self, phantom_token: str = "", api_key: str = "") -> dict:
    if not phantom_token or not api_key:
        return {"error": "phantom_token and api_key required"}
    host.kv_put(f"cred:{phantom_token}", api_key)  # Only this actor reads it
    return {"status": "ok", "phantom_token": phantom_token}  # api_key never returned

@handler("chat_completion")
def chat_completion(self, messages: list = None, tools: list = None,
                    phantom_token: str = "") -> dict:
    resolved_key = host.kv_get(f"cred:{phantom_token}") if phantom_token else ""
    # resolved_key used by real HTTP client; discarded here
    # ... call LLM, build response ...
    return {"status": "ok", "response": response}  # resolved_key never in response
Actor-private state means the real key is inaccessible from any other actor, any other tenant, and any logged payload. Even if a prompt injection tricks the agent into returning its full state, the real credential is not in the agent, it is in the router actor, which never echoes it back.
The constraint: The orchestrator needs to enqueue work items for agents to process asynchronously but the environment already has the Channel primitive and no external message broker.
The actor solution:TaskQueueActor is a thin wrapper around host.channel. The Channel handles durability, at-least-once delivery, and redelivery on nack transparently:
# From examples/python/apps/miniclaw/infra.py
_TASK_CHANNEL = "tasks:pending"

@actor
class TaskQueueActor:
    """Thin actor wrapper around the host Channel primitive."""

    enqueued: int = state(default=0)
    completed: int = state(default=0)
    failed: int = state(default=0)

    @handler("enqueue")
    def enqueue(self, task_type: str = "generic", payload: dict = None) -> dict:
        task = {"task_type": task_type, "payload": payload or {}, "enqueued_at": host.now_ms()}
        msg_id = host.channel.send("", _TASK_CHANNEL, task_type, task)
        self.enqueued += 1
        fire_audit("task_enqueued", f"msg_id={msg_id} type={task_type}")
        return {"status": "ok", "msg_id": msg_id}

    @handler("dequeue")
    def dequeue(self, limit: int = 1, timeout_ms: int = 0) -> dict:
        tasks = []
        for _ in range(int(limit)):
            msg, ok, _ = host.channel.receive("", _TASK_CHANNEL, int(timeout_ms))
            if not ok:
                break
            tasks.append(msg)
        return {"status": "ok", "tasks": tasks, "count": len(tasks)}

    @handler("ack")
    def ack(self, msg_id: str = "") -> dict:
        host.channel.ack("", _TASK_CHANNEL, msg_id)   # commits the delivery
        self.completed += 1
        return {"status": "ok", "msg_id": msg_id}

    @handler("nack")
    def nack(self, msg_id: str = "", requeue: bool = True) -> dict:
        host.channel.nack("", _TASK_CHANNEL, msg_id, requeue)  # requeue for redelivery
        self.failed += 1
        return {"status": "ok", "msg_id": msg_id, "requeue": requeue}
PlexSpaces supports multiple providers for queues/channels such as Kafka, SQS, redis or backed by process-groups communication. The Channel primitive is built into the PlexSpaces host, durable, ordered, with explicit ack/nack semantics. If the consumer crashes mid-processing, the unacked message is redelivered on the next dequeue.
The constraint: We want to know the health of all service actors, but subscribing to process group membership change events introduces races: a join and a crash can arrive out of order, leaving stale membership in the subscriber’s view.
The actor solution:HealthMonitorActor never subscribes to anything. It polls every service group on a configurable interval using send_after to schedule its own next tick:
# From examples/python/apps/miniclaw/infra.py
_SERVICE_GROUPS = [
    "svc:llm_router", "svc:tool_registry", "svc:agent",
    "svc:session_manager", "svc:memory", "svc:audit",
    "svc:agent_fsm", "svc:task_queue",
]

@actor
class HealthMonitorActor:
    """Polls process group membership on a fixed interval using send_after."""

    poll_count: int = state(default=0)
    last_poll_ms: int = state(default=0)
    group_health: dict = state(default_factory=dict)
    poll_interval_ms: int = state(default=5000)

    @init_handler
    def on_init(self, config: dict) -> None:
        args = config.get("args", {})
        if args.get("poll_interval_ms"):
            iv = int(args["poll_interval_ms"])
            self.poll_interval_ms = min(max(iv, 1000), 300_000)
        host.process_groups.join("svc:health_monitor")
        host.send_after(self.poll_interval_ms, "poll_tick", {"op": "poll_tick"})

    @handler("poll_tick", "cast")
    def poll_tick(self) -> None:
        health = {}
        for grp in _SERVICE_GROUPS:
            try:
                members = host.process_groups.members(grp)
                health[grp] = len(members)
            except Exception:
                health[grp] = 0
        self.group_health = health
        self.poll_count += 1
        self.last_poll_ms = host.now_ms()

        import json
        host.ts.write(["health_snapshot", self.last_poll_ms, json.dumps(health)])
        # Re-arm: each tick schedules the next — no external scheduler needed
        host.send_after(self.poll_interval_ms, "poll_tick", {"op": "poll_tick"})

    @handler("get_health")
    def get_health(self) -> dict:
        degraded = [g for g, c in self.group_health.items() if c == 0]
        return {
            "status": "ok",
            "group_health": self.group_health,
            "healthy": len(self.group_health) - len(degraded),
            "degraded": degraded,
        }
Polling is always correct as it converges to the true membership on every tick regardless of event order. get_health returns not just a count but a list of degraded groups, making it immediately actionable.
The Constraint-Aware Philosophy
These four patterns share a common thread: each one reaches for the primitives already available in the PlexSpaces sandbox before introducing external dependencies.
The WASM sandbox is not a limitation to work around instead it is the guide for designing simpler, more auditable systems.
Part 6: The Agent Loop
6.1 The Loop in Code
The AgentActor drives the core agent loop. It receives a user message, calls the LLM, checks for tool requests, executes tools, feeds results back, and repeats with a hard cap of five iterations to prevent runaway loops.
# From examples/python/apps/miniclaw/agent.py
_MAX_ITER = 5
...
    @handler("chat")
    def chat(self, message: str = "", session_id: str = "") -> dict:
        if not message:
            return {"error": "message is required"}

        self.messages.append({"role": "user", "content": message})

        # Discover tools
        tool_reg_id, _ = pg_first("svc:tool_registry")
        tools = []
        if tool_reg_id:
            resp = ask(tool_reg_id, "list_tools", {})
            if resp:
                tools = resp.get("tools", [])

        # Signal FSM: processing
        fsm_id, _ = pg_first("svc:agent_fsm")
        if fsm_id:
            host.send(fsm_id, "transition", {"op": "transition", "to": "processing"})

        final_response = ""
        for i in range(_MAX_ITER):
            llm_id, err = pg_first("svc:llm_router")
            if err or not llm_id:
                final_response = f"[no LLM] Processed: {message}"
                break

            llm_resp = ask(llm_id, "chat_completion", {"messages": [{"role": "system", "content": self.system_prompt}] + self.messages, "tools": tools}, 10000)
            if not llm_resp or "error" in llm_resp:
                final_response = f"LLM unavailable: {llm_resp}"
                break

            response = llm_resp.get("response", {})
            stop_reason = response.get("stop_reason", "end_turn")
            content = response.get("content", "")

            assistant_msg = {"role": "assistant", "content": content, "stop_reason": stop_reason}
            if response.get("tool_calls"):
                assistant_msg["tool_calls"] = response["tool_calls"]
            self.messages.append(assistant_msg)

            if stop_reason == "end_turn":
                final_response = content
                break

            if stop_reason == "tool_use":
                if fsm_id:
                    host.send(fsm_id, "transition", {"op": "transition", "to": "tool_executing"})

                for tc in response.get("tool_calls", []):
                    tc_name = tc.get("name", "")
                    tc_input = tc.get("input", {})
                    tool_output = {}
                    if tool_reg_id:
                        tool_output = ask(tool_reg_id, "execute_tool", {"name": tc_name, "input": tc_input}) or {}

                    self.messages.append({
                        "role": "tool",
                        "tool_call_id": tc.get("id", ""),
                        "content": str(tool_output),
                    })
                    fire_audit("tool_called", f"tool={tc_name} session={session_id}")

                if fsm_id:
                    host.send(fsm_id, "transition", {"op": "transition", "to": "processing"})
                final_response = f"Tool results applied (iteration {i + 1})"
            else:
                final_response = content
                break

        # FSM: responding ? idle
        if fsm_id:
            host.send(fsm_id, "transition", {"op": "transition", "to": "responding"})
            host.send(fsm_id, "transition", {"op": "transition", "to": "idle"})

        # Compact history if needed
        if len(self.messages) > self.max_history:
            keep = self.max_history // 2
            self.messages = self.messages[:1] + self.messages[-keep:]

        # Persist history in KV if session provided
        if session_id:
            import json
            host.kv_put(f"session_history:{session_id}", json.dumps(self.messages))

        self.total_chats += 1
        fire_audit("agent_chat", f"session={session_id}")
        return {
            "status": "ok",
            "response": final_response,
            "session_id": session_id,
            "messages_count": len(self.messages),
        }
The _MAX_ITER = 5 cap prevents runaway loops. In a monolithic framework, this cap requires global state or thread-local storage.
Part 7: Circuit Breakers and Immutable Audit Trails
7.1 LLM Router
The LLMRouterActor simulates an LLM with tool-call routing. In production, replace the simulation with a real API call via host.http_fetch() over a named service link:
# From examples/python/apps/miniclaw/llm_router.py
TOOL_CALL_TRIGGERS = ("weather", "search", "calculate", "lookup", "find")

# `LLMRouterActor` is a simulator in this POC. It demonstrates the routing
# boundary where production code would call OpenAI, Anthropic, Bedrock, Gemini, or
# an internal model endpoint through a named service link.
@actor
class LLMRouterActor:
    """Simulated LLM router with tool-calling capability."""

    model: str = state(default="miniclaw-simulated-v1")
    request_count: int = state(default=0)

    @init_handler
    def on_init(self, config: dict) -> None:
        self.model = config.get("args", {}).get("model", self.model)
        host.process_groups.join("svc:llm_router")

    @handler("chat_completion")
    def chat_completion(self, messages: list = None, tools: list = None) -> dict:
        messages = messages or []
        tools = tools or []
        self.request_count += 1

        user_msg = ""
        for m in reversed(messages):
            if m.get("role") == "user":
                user_msg = str(m.get("content", "")).lower()
                break

        should_use_tool = tools and any(kw in user_msg for kw in TOOL_CALL_TRIGGERS)

        if should_use_tool:
            tool = tools[0] if tools else {}
            tool_name = tool.get("name", "search") if isinstance(tool, dict) else "search"
            response = {
                "stop_reason": "tool_use",
                "content": "",
                "tool_calls": [{"id": f"tc_{self.request_count}", "name": tool_name,
                                 "input": {"query": user_msg}}],
            }
        else:
            response = {
                "stop_reason": "end_turn",
                "content": f"[{self.model}] Processed: {user_msg}",
                "tool_calls": [],
            }
        return {"status": "ok", "response": response, "model": self.model}
To add a circuit breaker for production LLM rate limits, extend the actor state with circuit_open and consecutive_failures. The actor IS the circuit breaker, and the durability facet ensures the circuit state survives restarts:
@actor
class LLMRouterActor:
    model: str = state(default="gpt-4o")
    circuit_open: bool = state(default=False)
    consecutive_failures: int = state(default=0)
    request_count: int = state(default=0)

    @init_handler
    def on_init(self, config: dict) -> None:
        host.process_groups.join("svc:llm_router")
        # Schedule circuit recovery timer
        host.send_after(30_000, "timer_tick", {"op": "timer_tick"})

    @handler("chat_completion")
    def chat_completion(self, messages: list = None, tools: list = None) -> dict:
        if self.circuit_open:
            return {"error": "circuit_open", "circuit_open": True}

        try:
            # Production: real API call via host.http_fetch("llm-api", ...)
            result = self._call_llm(messages, tools)
            self.consecutive_failures = 0
            self.request_count += 1
            return result
        except Exception as e:
            self.consecutive_failures += 1
            if self.consecutive_failures >= 3:
                self.circuit_open = True
            return {"error": str(e), "circuit_open": self.circuit_open}

    @handler("timer_tick", "cast")
    def timer_tick(self) -> None:
        # Gradual recovery: decrement failure count by 1 each tick (30s).
        # 3 failures -> 90s before circuit closes again. Prevents premature re-open.
        if self.circuit_open and self.consecutive_failures > 0:
            self.consecutive_failures -= 1
            if self.consecutive_failures == 0:
                self.circuit_open = False
        host.send_after(30_000, "timer_tick", {"op": "timer_tick"})
7.2 Immutable Audit Trail
The AuditEventActor captures every agent action as a fire-and-forget event. Senders never block. Events flow into TupleSpace for append-only, queryable storage:
Notice the "cast" annotation on log_event, this marks the handler as fire-and-forget. The sender (fire_audit() in helpers.py) calls host.send(), not host.ask() without blocking.
Part 8: Tools as Actors with MCP-Style Isolation
8.1 Each Tool Gets Supervision, Metrics, and Fault Recovery
In MiniClaw, the ToolRegistryActor manages tool definitions and dispatches execution. Each tool handler runs within the actor’s sandboxed environment:
# From examples/python/apps/miniclaw/tool_registry.py

@actor
class ToolRegistryActor:
    """Registry of callable tools with simulated execution."""

    tools: dict = state(default_factory=dict)   # name -> tool spec
    exec_count: int = state(default=0)
    actor_id: str = state(default="")

    @init_handler
    def on_init(self, config: dict) -> None:
        self.actor_id = config.get("actor_id", "")
        self.tools = {t["name"]: t for t in _BUILTIN_TOOLS}
        host.process_groups.join("svc:tool_registry")
        host.info(f"ToolRegistryActor init actor_id={self.actor_id} tools={list(self.tools)}")

    @handler("list_tools")
    def list_tools(self) -> dict:
        return {"status": "ok", "tools": list(self.tools.values()), "count": len(self.tools)}

    @handler("register_tool")
    def register_tool(self, name: str = "", description: str = "", input_schema: dict = None) -> dict:
        if not name:
            return {"error": "name is required"}
        self.tools[name] = {"name": name, "description": description, "input_schema": input_schema or {}}
        host.info(f"ToolRegistry: registered tool={name}")
        return {"status": "ok", "name": name}

    @handler("execute_tool")
    def execute_tool(self, name: str = "", input: dict = None) -> dict:
        input = input or {}
        if name not in self.tools:
            return {"error": f"unknown tool: {name}"}

        self.exec_count += 1
        host.info(f"ToolRegistry: executing tool={name} exec={self.exec_count}")

        # Simulated responses per tool type
        if name == "web_search":
            return {"result": f"Search results for: {input.get('query', '')}"}
        if name == "calculator":
            expr = input.get("expression", "0")
            try:
				# Demo-only restricted evaluation.
				# Production code should replace this with an AST-based evaluator or a sandboxed tool actor.
                result = eval(expr, {"__builtins__": {}})  # noqa: S307
                return {"result": str(result)}
            except Exception:
                return {"result": f"Could not evaluate: {expr}"}
        if name == "weather":
            location = input.get("location", "unknown")
            return {"result": f"Weather in {location}: 22°C, partly cloudy"}

        return {"result": f"[simulated] {name} output for input {input}"}

    @handler("get_stats")
    def get_stats(self) -> dict:
        return {"status": "ok", "tool_count": len(self.tools), "exec_count": self.exec_count}
8.2 What Standalone MCP Servers Lack
Capability
Standalone MCP
Tool-as-Actor (MiniClaw)
State persistence
In-memory only; lost on restart
Durability facet checkpoints to SQLite
Multi-tenant access
No built-in tenant scoping
RequestContext enforces tenant isolation
Metrics
Must add manually per tool
Per-actor invocation counts automatic
Fault tolerance
Process crash loses all state
Supervisor restarts; state restored from checkpoint
Sandbox
Process boundary only
WASM linear memory + optional Firecracker VM
Part 9: Agent Lifecycle State Machine
9.1 Scoped Memory with KV + TupleSpace Dual-Write
MemoryActor writes every memory entry to both KV (for durable point-lookup) and TupleSpace (for queryable pattern-scan across a scope):
The three scopes are not just naming conventions — they determine which memories survive across session boundaries:
Scope
Persists across
Example
global
Everything including sessions, agent restarts
User name, user preferences
agent
Restarts of this specific agent
Agent-specific learned facts
session
Only within a single session
“We were discussing X” context
9.2 Session Management with KV with a Channel+User Index
SessionManagerActor stores session metadata in KV and maintains a secondary index that maps channel+user_id to session_id:
# From examples/python/apps/miniclaw/agent.py

@actor
class SessionManagerActor:
    """Manages agent session lifecycle backed by KV storage."""

    active_sessions: int = state(default=0)
    total_created: int = state(default=0)
    session_ids: list = state(default_factory=list)

    @handler("create_session")
    def create_session(self, channel: str = "web", user_id: str = "anonymous",
                       agent_id: str = "agent") -> dict:
        import json
        session_id = f"sess-{channel}-{user_id}-{host.now_ms()}"
        meta = {"session_id": session_id, "channel": channel, "user_id": user_id,
                "agent_id": agent_id, "created_at": host.now_ms(), "status": "active"}
        host.kv_put(f"session:{session_id}", json.dumps(meta))
        host.kv_put(f"session_map:{channel}:{user_id}", session_id)  # secondary index
        self.session_ids.append(session_id)
        self.active_sessions += 1
        fire_audit("session_created", f"session_id={session_id} channel={channel} user_id={user_id}")
        return {"status": "ok", "session_id": session_id}

    @handler("get_session")
    def get_session(self, session_id: str = "", channel: str = "", user_id: str = "") -> dict:
        import json
        if not session_id and channel and user_id:
            # Natural key lookup via secondary index
            session_id = host.kv_get(f"session_map:{channel}:{user_id}")
        if not session_id:
            return {"error": "session not found"}
        raw = host.kv_get(f"session:{session_id}")
        if not raw:
            return {"error": "session not found", "session_id": session_id}
        meta = json.loads(raw)
        meta["status"] = "ok"
        return meta
The secondary index means a chatbot can route an incoming webhook (which carries channel and user_id but not a session token) directly to the right session without a scan.
9.3 State Management
The AgentStateFSM tracks execution state through a finite state machine. It validates transitions at runtime and attempting idle -> responding is rejected. This catches bugs in the agent loop before they produce corrupt state.
# From examples/python/apps/miniclaw/memory.py

# Sole authoritative definition of the FSM.
# Adding a new state requires only adding it here.
_VALID_FSM_TRANSITIONS = {
    "idle": {"processing", "tool_executing"},
    "processing": {"tool_executing", "responding", "idle"},
    "tool_executing": {"processing", "idle"},
    "responding": {"idle"},
}


@fsm_actor(states=["idle", "processing", "tool_executing", "responding"], initial="idle")
class AgentStateFSM:
    """Agent lifecycle FSM: idle -> processing -> tool_executing -> responding -> idle."""

    fsm_state: str = state(default="idle")
    transition_count: int = state(default=0)

    @init_handler
    def on_init(self, config: dict) -> None:
        host.process_groups.join("svc:agent_fsm")

    @handler("transition")
    def transition(self, to: str = "") -> dict:
        allowed = _VALID_FSM_TRANSITIONS.get(self.fsm_state, set())
        if to not in allowed:
            host.debug(f"FSM: invalid transition {self.fsm_state} -> {to}")
            return {"status": "ignored", "from": self.fsm_state, "to": to}
        prev = self.fsm_state
        self.fsm_state = to
        self.transition_count += 1
        host.debug(f"FSM: {prev} -> {to}")
        return {"status": "ok", "from": prev, "to": to}

    @handler("get_state")
    def get_state(self) -> dict:
        return {"status": "ok", "state": self.fsm_state, "transitions": self.transition_count}
Operators query the FSM to see what every agent does at any moment with full observability.
Part 10: Multi-Agent Orchestration with Durable Checkpoints
The OrchestratorActor decomposes complex tasks and delegates each sub-task to the AgentActor. It uses the Workflow behavior, which checkpoints progress after each step:
# From examples/python/apps/miniclaw/orchestrator.py

@workflow_actor
class OrchestratorActor:
    """Durable workflow: decompose task -> delegate to agents -> aggregate results."""

    status: str = state(default="idle")
    task_id: str = state(default="")
    progress: int = state(default=0)

    @init_handler
    def on_init(self, config: dict) -> None:
        host.info(f"OrchestratorActor init actor_id={config.get('actor_id', '')}")

    @run_handler
    def run(self, payload: dict = None) -> dict:
        payload = payload or {}
        task = payload.get("task", "explain how agents work")
        task_id = payload.get("task_id", f"orch-{host.now_ms()}")

        self.status = "running"
        self.task_id = task_id
        self.progress = 0

        agent_id, err = pg_first("svc:agent")
        if err or not agent_id:
            self.status = "failed"
            return {"error": "no agents in svc:agent", "task_id": task_id}

        # Decompose: split on " and " for multi-step tasks
        lower = task.lower()
        idx = lower.find(" and ")
        sub_tasks = [task[:idx].strip(), task[idx + 5:].strip()] if idx >= 0 else [task]

        sub_results = []
        for i, sub_task in enumerate(sub_tasks):
            self.progress = (i + 1) * 100 // len(sub_tasks)
            resp = ask(agent_id, "chat",
                       {"message": sub_task, "session_id": f"orch-{task_id}-{i}"}, 15000)
            if not resp:
                self.status = "failed"
                return {"error": "sub-task failed", "task_id": task_id}
            # Checkpoint sub-result to TupleSpace — survives orchestrator crash
            host.ts.write(["orch_result", task_id, i, str(resp.get("response", ""))])
            sub_results.append(resp)

        summaries = [r.get("response", "") for r in sub_results if r.get("response")]
        self.status = "completed"
        self.progress = 100
        fire_audit("orchestrator_completed", f"task_id={task_id} subtasks={len(sub_tasks)}")
        return {
            "status": "ok",
            "task_id": task_id,
            "result": " | ".join(summaries),
            "sub_results": sub_results,
            "sub_tasks": len(sub_tasks),
        }

    @signal_handler("cancel")
    def cancel(self) -> None:
        self.status = "cancelled"
        host.info(f"Orchestrator cancelled task_id={self.task_id}")

    @query_handler("status")
    def query_status(self) -> dict:
        return {"task_id": self.task_id, "status": self.status, "progress": self.progress}
The @run_handler, @signal_handler, and @query_handler decorators map cleanly to the Workflow behavior’s three message types:
run: starts the workflow execution
signal: sends an out-of-band control message (e.g., cancellation mid-workflow)
query: reads durable workflow state without blocking the running workflow
Part 11: Multi-App Deployments
In this example all ten actors share a single WASM binary via ACTOR_REGISTRY:
This is convenient for development and single-tenant deployments. For enterprise multi-tenant deployments, you can split actors into separate applications to achieve stronger isolation:
llm-gateway/ – LLMRouterActor only for credential management isolated
agent-app/ – AgentActor + SessionManagerActor one app per tenant team
In the multi-app model, each application gets its own Firecracker microVM in production, providing hardware-level tenant isolation. Actors across applications discover each other via process groups or object registry and the code changes only in app-config.toml, not in the actor implementations.
Plugins as Deployed Apps, Not Bundled Packages
OpenClaw’s post-mortem describes a painful middle state: too much moved toward plugins, while plugins were still bundled, repaired, and dependency-loaded in startup paths. This is the monolith decomposition trap: you split the code but not the process, so startup coupling survives the refactor.
PlexSpaces avoids this by treating plugins as deployed apps, not installed packages. A channel connector, or a third-party memory backend is a separate app that exposes one or more actors. The agent loop discovers them the same way it discovers any actor via pg_first("svc:telegram-connector") or on a remote node. Adding a new integration means deploying a new app, not modifying package.json.
OpenClaw pattern
PlexSpaces equivalent
What changes
Bundled channel plugins in core
Channel app deployed separately
Startup failure in the channel app doesn’t touch the agent loop
Shared node_modules dependency graph
Each app is its own WASM binary
Supply-chain compromise in one app’s deps can’t reach another app
Plugin repair at startup
Actor restarts via one_for_one supervisor
Only the failed actor restarts; the rest keep running
Hard to decompose after the fact
Actor boundaries are message contracts from day one
Moving an actor to its own app changes app-config.toml, not the actor code
Part 12: Security Comparison Actor Framework vs. Monolithic
Security Property
OpenClaw / Monolithic
MiniClaw / Actor-Based
State isolation
Shared memory; one agent reads another’s state
Per-actor private state; accessible only through messages
Privilege boundary
Single process; tools share agent’s full permissions
WASM sandbox; actor can only call WIT-declared imports
Sandbox depth
OS process boundary only
WASM linear memory + Firecracker microVM hardware boundary
Tenant separation
Application-level checks; misconfiguration = data leak
Framework-enforced RequestContext; no bypass possible
Tool execution
In-process; tool crash = agent crash
Separate actor; tool crash triggers supervised restart
Secret management
os.environ shared across all tools
Actor-scoped KV; WASM has no env var access
Audit trail
Optional; must add per tool
Built-in @event_actor; captures all operations by default
Prompt injection blast radius
Full system access: files, network, memory
Confined to single actor’s WIT capabilities
Circuit breaker
Must implement per integration
Built into LLMRouterActor; state survives restarts
All ten actors are declared in app-config.toml. Each actor specifies its behavior_kind, role (used to select the right class from ACTOR_REGISTRY), and facets:
[[supervisor.children]]
name = "agent"
actor_type = "miniclaw_wasm"
role = "agent"
behavior_kind = "GenServer"
args = { role = "agent", agent_name = "general-assistant",
         system_prompt = "You are a helpful AI assistant with access to tools." }
facets = [
  { type = "virtual_actor", priority = 100, config = { idle_timeout = "10m", activation_strategy = "eager" } },
  { type = "durability", priority = 90, config = { checkpoint_interval = 3 } }
]

[[supervisor.children]]
name = "orchestrator"
actor_type = "miniclaw_wasm"
role = "orchestrator"
behavior_kind = "Workflow"            # Enables @run_handler, @signal_handler, @query_handler
args = { role = "orchestrator" }
facets = [
  { type = "virtual_actor", priority = 100, config = { idle_timeout = "10m", activation_strategy = "lazy" } },
  { type = "durability", priority = 90, config = { checkpoint_interval = 5 } }
]

[[supervisor.children]]
name = "agent_fsm"
actor_type = "miniclaw_wasm"
role = "agent_fsm"
behavior_kind = "GenFSM"              # Enables @fsm_actor state machine behavior
args = { role = "agent_fsm" }
facets = [
  { type = "virtual_actor", priority = 100, config = { idle_timeout = "30m", activation_strategy = "lazy" } },
  { type = "durability", priority = 90, config = { checkpoint_interval = 1 } }
]
The Isolation Ladder
Not every deployment needs a Firecracker VM, but every production agent system should reason explicitly about which isolation layer each component requires. MiniClaw provides a progression:
Layer
Mechanism
What it contains
Message isolation
Actor private state; all access via host.ask/send
Cross-agent state reads; accidental coupling through shared memory
Tenant isolation
RequestContext JWT enforced by the framework
Cross-tenant KV, TupleSpace, and process group access
App isolation
Separate deployed apps; independent startup paths
Startup coupling; plugin dependency repair contagion across integrations
WASM isolation
WIT import surface; per-actor linear memory
Supply-chain attacks; filesystem, env, and exec access
The same actor code runs at every level. The app-config.toml determines which layers are active for a given deployment. Development runs message isolation only. A single-tenant production deployment adds WASM. A multi-tenant enterprise deployment adds Firecracker/Docker.
Conclusion
MiniClaw is not a finished enterprise agent platform. It is a small proof of concept that demonstrates a different foundation for one. The important lesson is not that every agent system needs these exact ten actors. The lesson is that agent runtimes benefit when isolation, supervision, explicit messaging, durable state, scoped memory, audit, and tenant boundaries are part of the architecture from the beginning. A monolithic agent loop is easy to start with, but hard to harden later. MiniClaw takes the opposite path: split the runtime into small actors, give each actor one responsibility, constrain what it can access, supervise it when it fails, and communicate only through explicit messages. Each actor owns one responsibility: routing LLM calls, managing tools, storing session metadata, persisting memory, recording audit events, coordinating workflows, or monitoring health.
MiniClaw is implemented with PlexSpaces that provides runtime primitives such as KV, TupleSpace, Channels, timers, workflows, GenEvent, and GenFSM. It allows better fault tolerance, observability, tenant-isolation, authentication, observability, rate limiting, circuit breaker, backpressure, sandboxed execution via WebAssembly and Firecracker. This POC demonstrates the shape of the solution:
AgentActor models the bounded agent loop: user message -> LLM -> tool call -> repeat -> final response.
LLMRouterActor defines the model boundary, using a simulator where production code would call OpenAI, Anthropic, Bedrock, Gemini, or an internal model.
OrchestratorActor demonstrates workflow-style task decomposition and result aggregation.
A production MiniClaw would harden the implementation with the following:
strict tenant, user, session, and tool authorization on every message;
safe eval like asteval; the WASM sandbox reduces but does not eliminate the risk;
one actor instance per tenant/session or explicit session-partitioned state;
add schema validation before tool execution;
add idempotency to task queue processing;
hardened tool execution with separate sandboxed tool actors for high-risk tools;
real LLM provider integration with retries, budgets, timeouts, backoff, and circuit breakers;
prompt-injection detection, output validation, and optional LLM-as-judge actors;
stronger memory governance, including TTLs, redaction, encryption, and deletion semantics;
structured audit trails with retention policies and tamper-resistant storage;
crash-recovery tests, chaos testing, and cross-tenant isolation tests;
deployment hardening for secrets, networking, service links, and Firecracker isolation.
For teams building enterprise AI agents, the real question is not whether they need isolation, auditability, tenant boundaries, tool governance, and failure recovery. They do. The question is whether they bolt those properties onto a monolithic agent process later, or start with a runtime where those properties are first-class primitives.
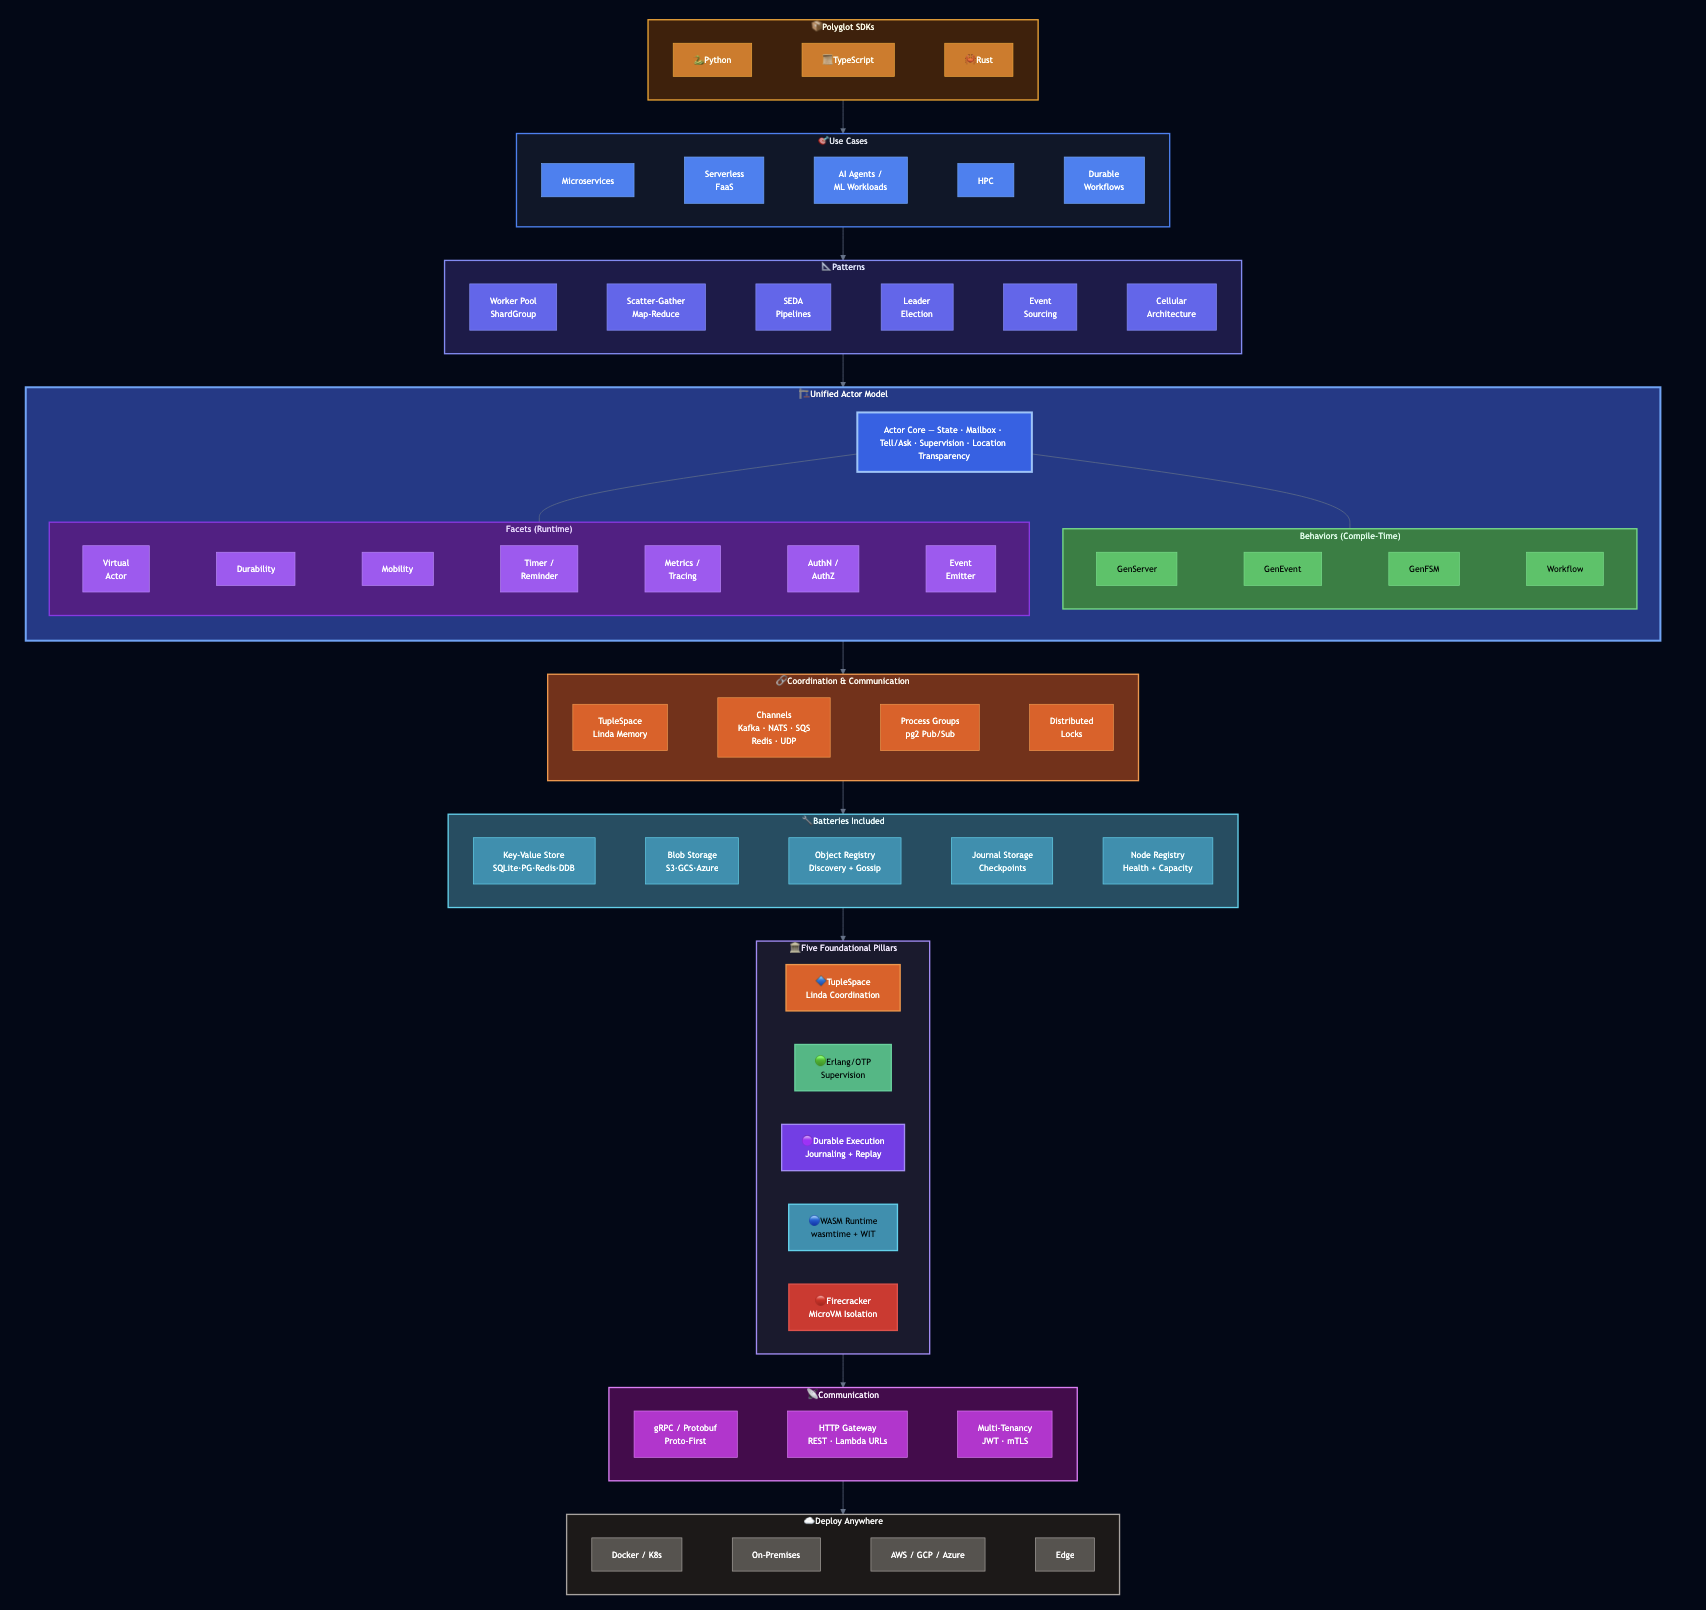
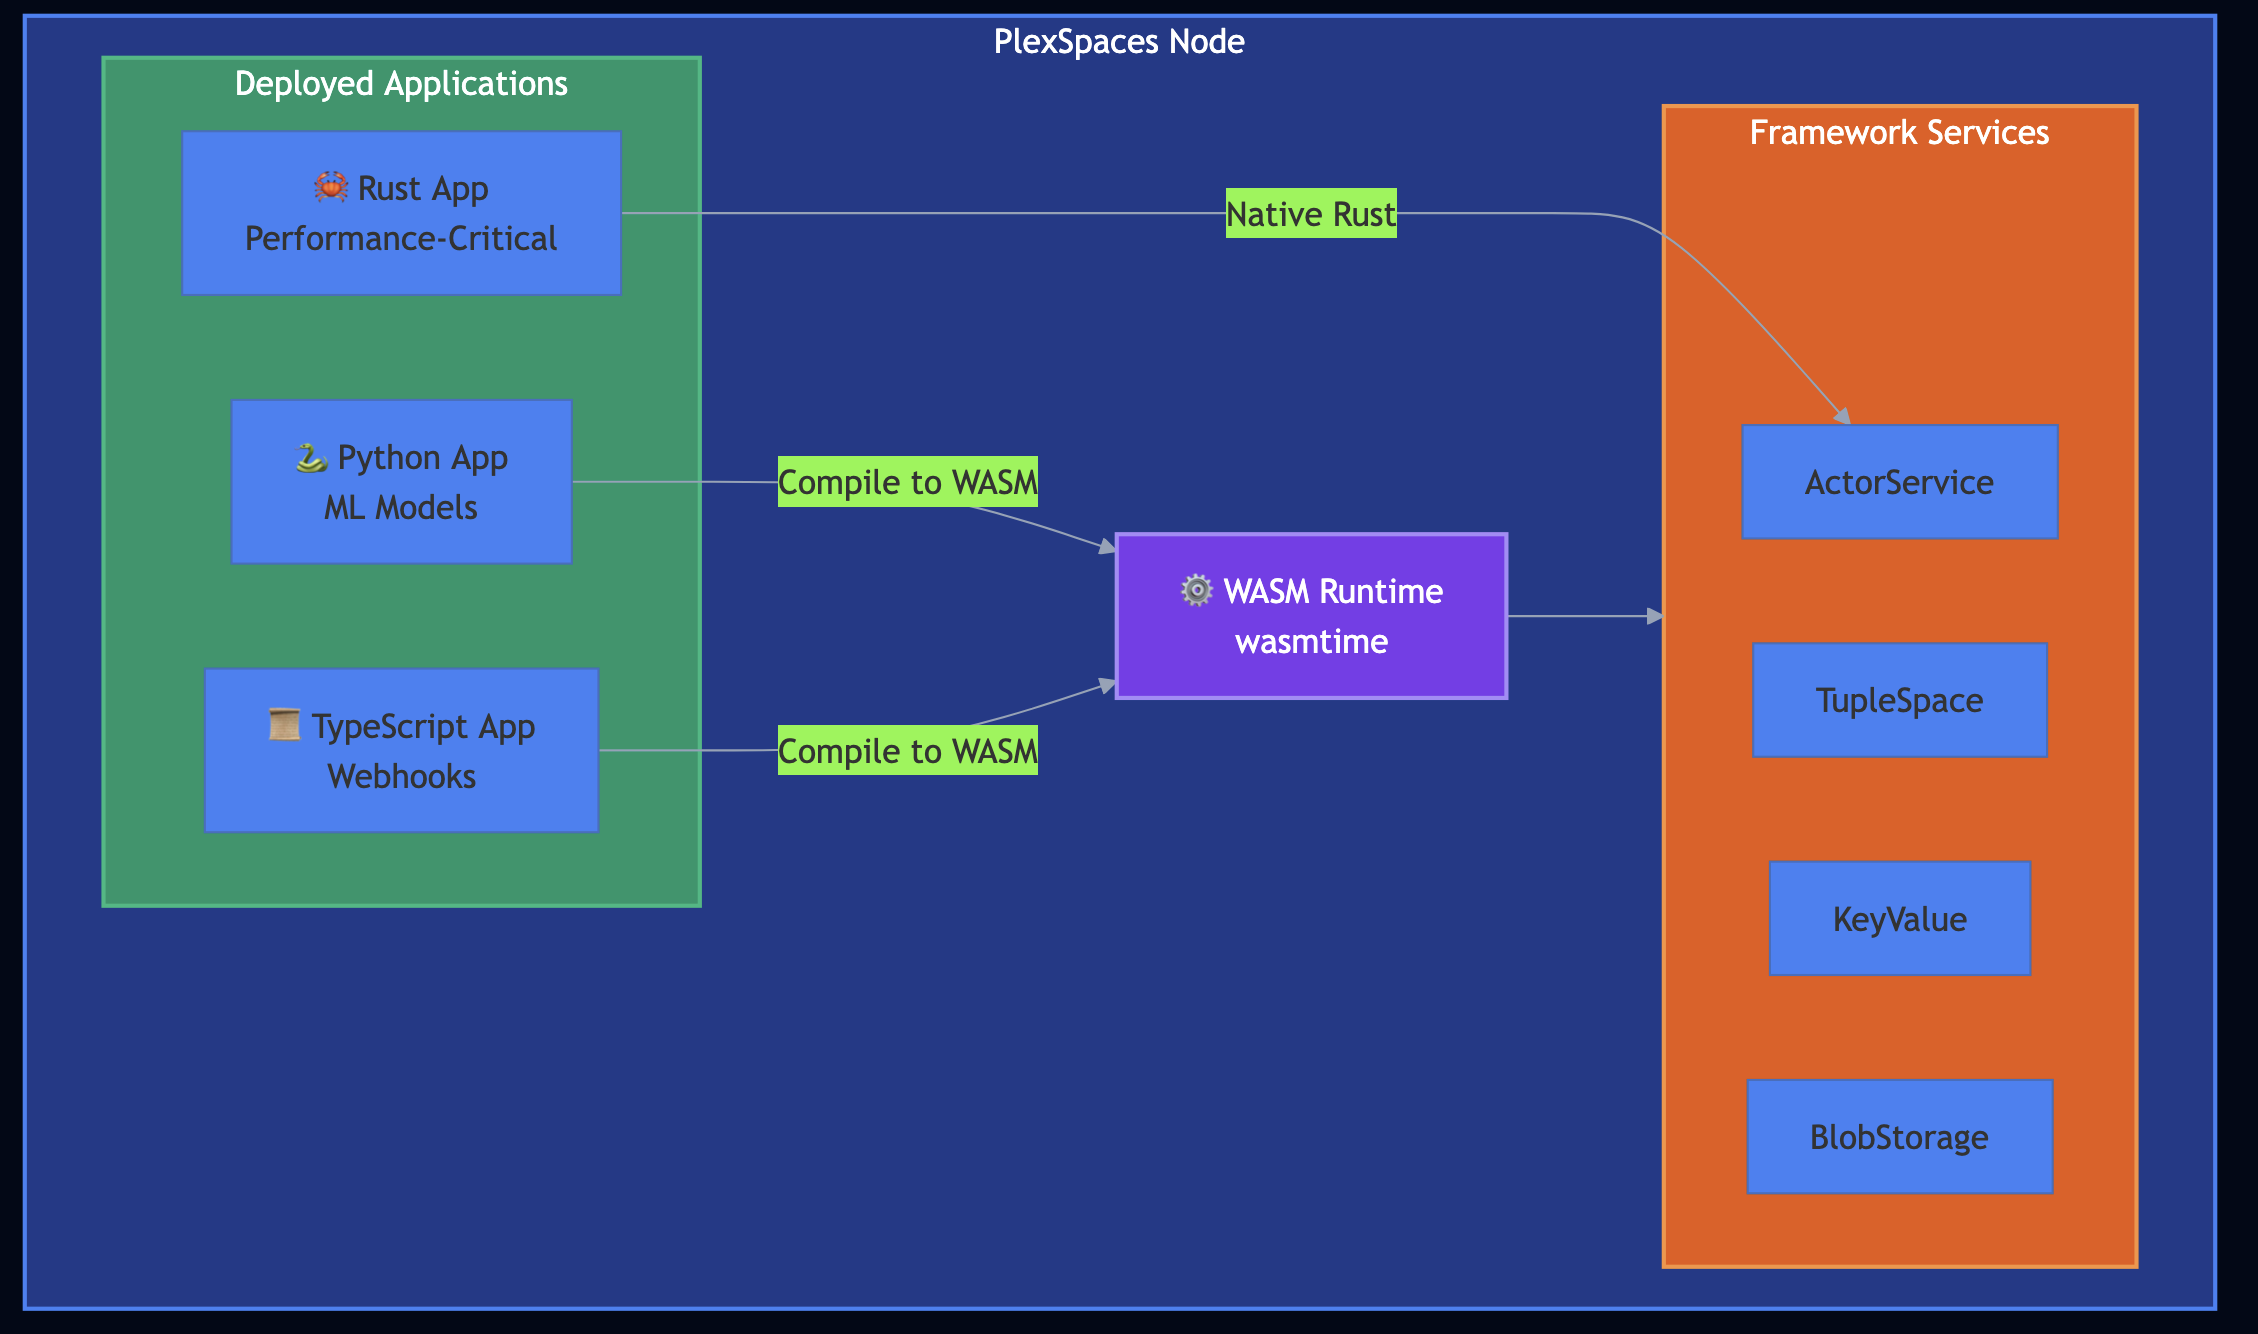
I previously shared my experience with distributed systems over the last three decades that included IBM mainframes, BSD sockets, Sun RPC, CORBA, Java RMI, SOAP, Erlang actors, service meshes, gRPC, serverless functions, etc. Over the years, I kept solving the same problems in different languages, on different platforms, with different tooling. Each one of these frameworks taught me something essential but they also left something on the table. PlexSpaces pulls those lessons together into a single open-source framework: a polyglot application server that handles microservices, serverless functions, durable workflows, AI workloads, and high-performance computing using one unified actor abstraction. You write actors in Python, Rust, GO or TypeScript, compile them to WebAssembly, deploy them on-premises or in the cloud, and the framework handles persistence, fault tolerance, observability, and scaling. No service mesh. No vendor lock-in. Same binary on your laptop and in production.
Why Now?
Three things converged over the last few years that made this the right moment to build PlexSpaces:
WebAssembly matured. Though WebAssembly ecosystem is still evolving but WASI has stabilized enough to run real server workloads. Java promised “Write Once, Run Anywhere” — WASM actually delivers it. Docker’s creator Solomon Hykes captured it in 2019: “If WASM+WASI existed in 2008, we wouldn’t have needed to create Docker.” Today that future has arrived.
AI agents exploded. Every AI agent is fundamentally an actor: it maintains state (conversation history), processes messages (user queries), calls tools (side effects), and needs fault tolerance (LLM APIs fail). The actor model maps naturally to agent orchestration but existing frameworks either lack durability, lock you to one language, or require separate infrastructure.
Multi-cloud pressure intensified. I’ve watched teams at multiple companies build on AWS in production but struggle to develop locally. Bugs surface only after deployment because Lambda, DynamoDB, and SQS behave differently from their local mocks/simulators. Modern enterprises need code that runs identically on a developer’s laptop, on-premises, and in any cloud.
PlexSpaces addresses all three: polyglot via WASM, actor-native for AI workloads, and local-first by design.
The Lessons That Shaped PlexSpaces
Every era of distributed computing burned a lesson into my thinking. Here’s what stuck and how I applied each lesson to PlexSpaces.
Efficiency runs deep: When I programmed BSD sockets in C, I controlled every byte on the wire. That taught me to respect the transport layer. Applied: PlexSpaces uses gRPC and Protocol Buffers for binary communication not because JSON is bad, but because high-throughput systems deserve binary protocols with proper schemas.
Contracts prevent chaos: Sun RPC introduced me to XDR and rpcgen for defining a contract, generate the code. CORBA reinforced this with IDL. I have seen countless times where teams sprinkle Swagger annotations on code and assumes that they have APIs, which keep growing without any standards, developer experience or consistency. Applied: PlexSpaces follows a proto-first philosophy – every API lives in Protocol Buffers, every contract generates typed stubs across languages (See OpenAPI specs for grpc/http services).
Parallelism needs multiple primitives: During my PhD research, I built JavaNow – a parallel computing framework that combined Linda-style tuple spaces, MPI collective operations, and actor-based concurrency on networks of workstations. That research taught me something frameworks keep forgetting: different coordination problems need different primitives. You can’t force everything through message passing alone. Applied: PlexSpaces provides actors and tuple spaces and channels and process groups because real systems need all of them.
Developer experience decides adoption: Java RMI made remote objects feel local. JINI added service discovery. Then J2EE and EJB buried developer hearts under XML configuration. Applied: PlexSpaces SDK provides decorator-based development (Python), inheritance-based development (TypeScript), and annotation-based development (Rust) to eliminate boilerplate.
Simplicity defeats complexity every time: With SOAP, WSDL, EJB, J2EE, I watched the Java enterprise ecosystem collapse under its own weight. REST won not because it was more powerful, but because it was simpler. Applied: One actor abstraction with composable capabilities beats a zoo of specialized types.
Cross-cutting concerns belong in the platform: Spring and AOP taught me to handle observability, security, and throttling consistently. But microservices in polyglot environments broke that model. Service meshes like Istio and Dapr tried to fix it with sidecar proxies but it requires another networking hop, another layer of YAML to debug. Applied: PlexSpaces bakes these concerns directly into the runtime. No service mesh. No extra hops.
Serverless is the right idea with the wrong execution: AWS Lambda showed me the future: auto-scaling, built-in observability, zero server management. But Lambda also showed me the problem: vendor lock-in, cold starts, and the inability to run locally. Applied: PlexSpaces delivers serverless semantics that run identically on your laptop and in the cloud.
Application servers got one thing right: Despite all the complexity of J2EE, I loved one idea: the application server that hosts multiple applications. You deployed WAR files to Tomcat, and it handled routing, lifecycle, and shared services. That model survived even after EJB died. Applied: PlexSpaces revives this concept for the polyglot serverless era where you can deploy Python ML models, TypeScript webhooks, and Rust performance-critical code to the same node.
I also built formicary, a framework for durable executions with graph-based workflow processing. That experience directly shaped PlexSpaces’ workflow and durability abstractions.
What PlexSpaces Actually Does
PlexSpaces combines five foundational pillars into a unified distributed computing platform:
TupleSpace Coordination (Linda Model): Decouples producers and consumers through associative memory. Actors write tuples, read them by pattern, and never need to know who’s on the other side.
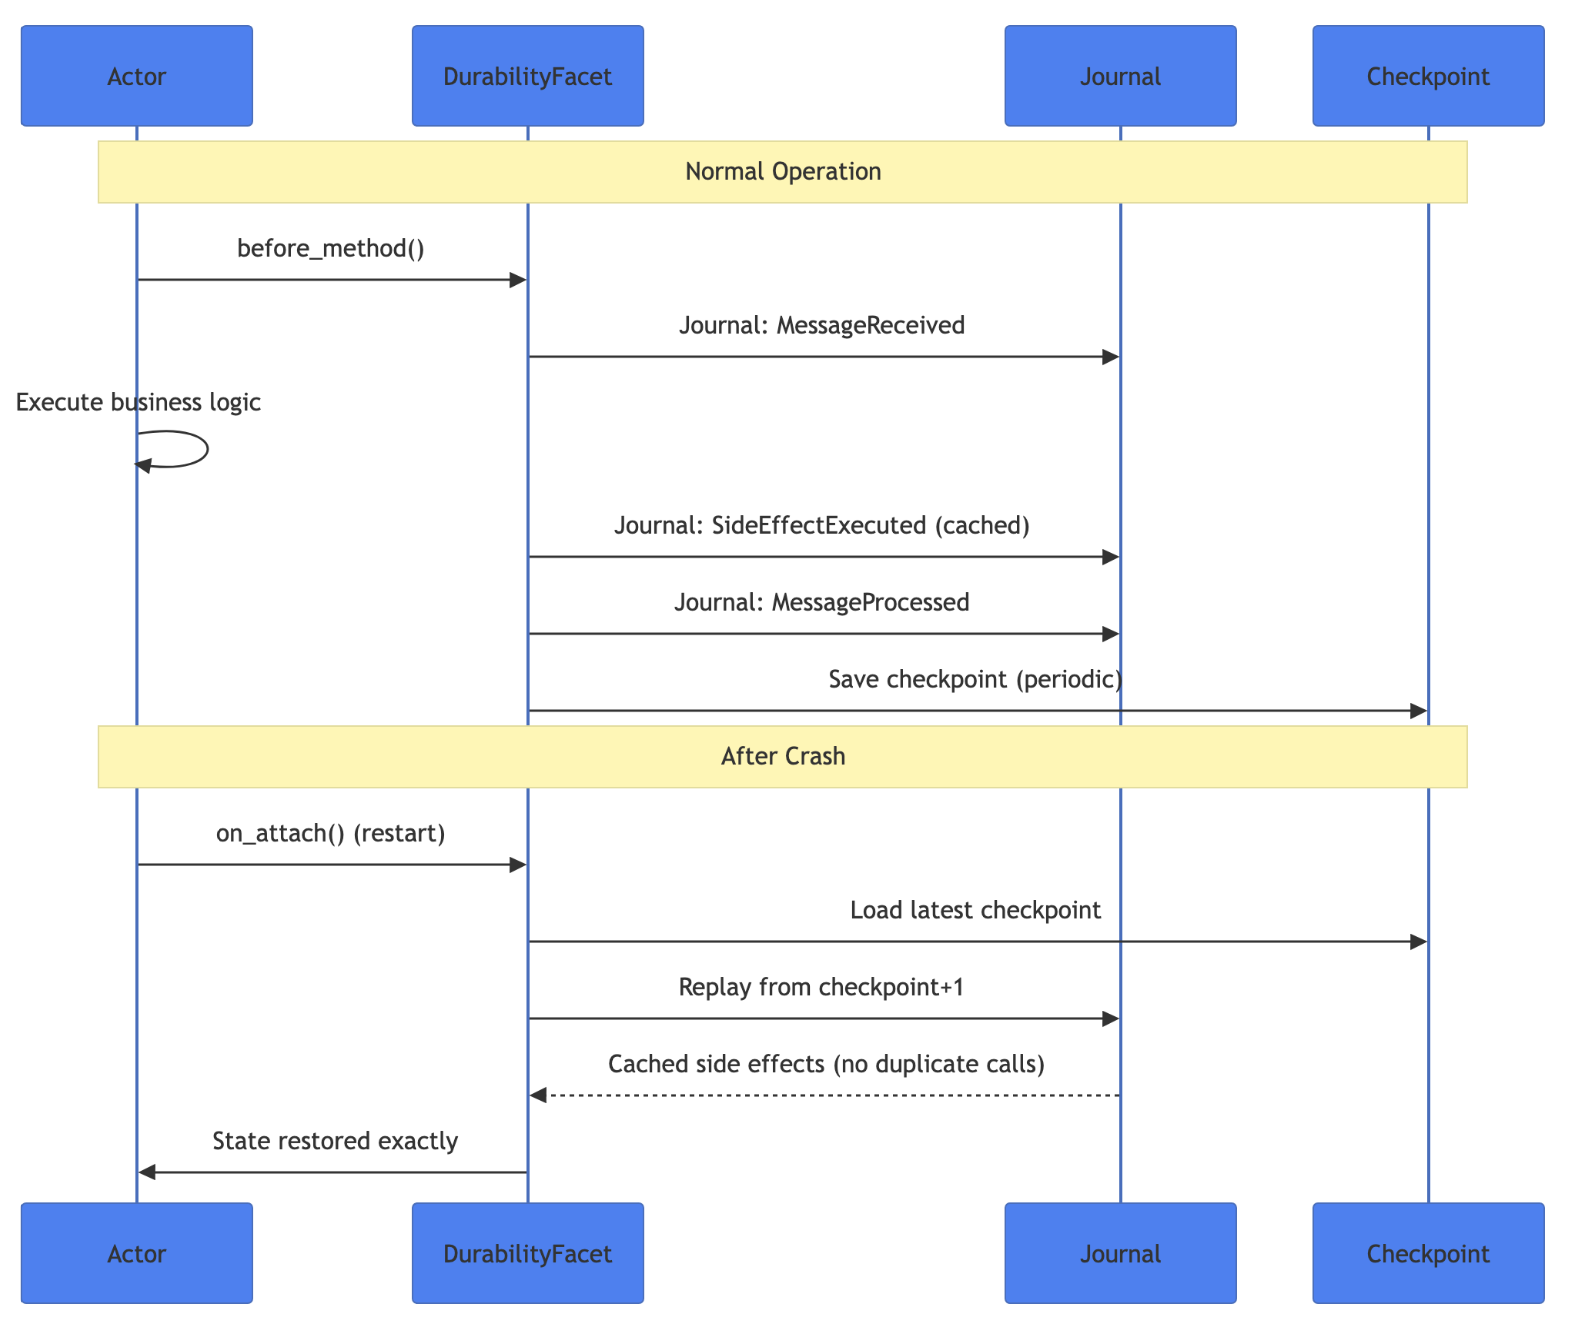
Durable Execution: Every actor operation gets journaled. When a node crashes, the framework replays the journal and restores state exactly. Side effects get cached during replay, so external calls don’t fire twice. Inspired by Restate and my earlier work on formicary.
WASM Runtime: Actors compile to WebAssembly and run in a sandboxed environment. Python, TypeScript, Rust with same deployment model, same security guarantees.
Firecracker Isolation: For workloads that need hardware-level isolation, PlexSpaces supports Firecracker microVMs alongside WASM sandboxing.
Core Abstractions: Actors, Behaviors, and Facets
One Actor to Rule Them All
PlexSpaces follows a design principle I arrived at after years of watching frameworks proliferate actor types: one powerful abstraction with composable capabilities beats multiple specialized types. Every actor in PlexSpaces maintains private state, processes messages sequentially (eliminating race conditions), operates transparently across local and remote boundaries, and recovers automatically through supervision.
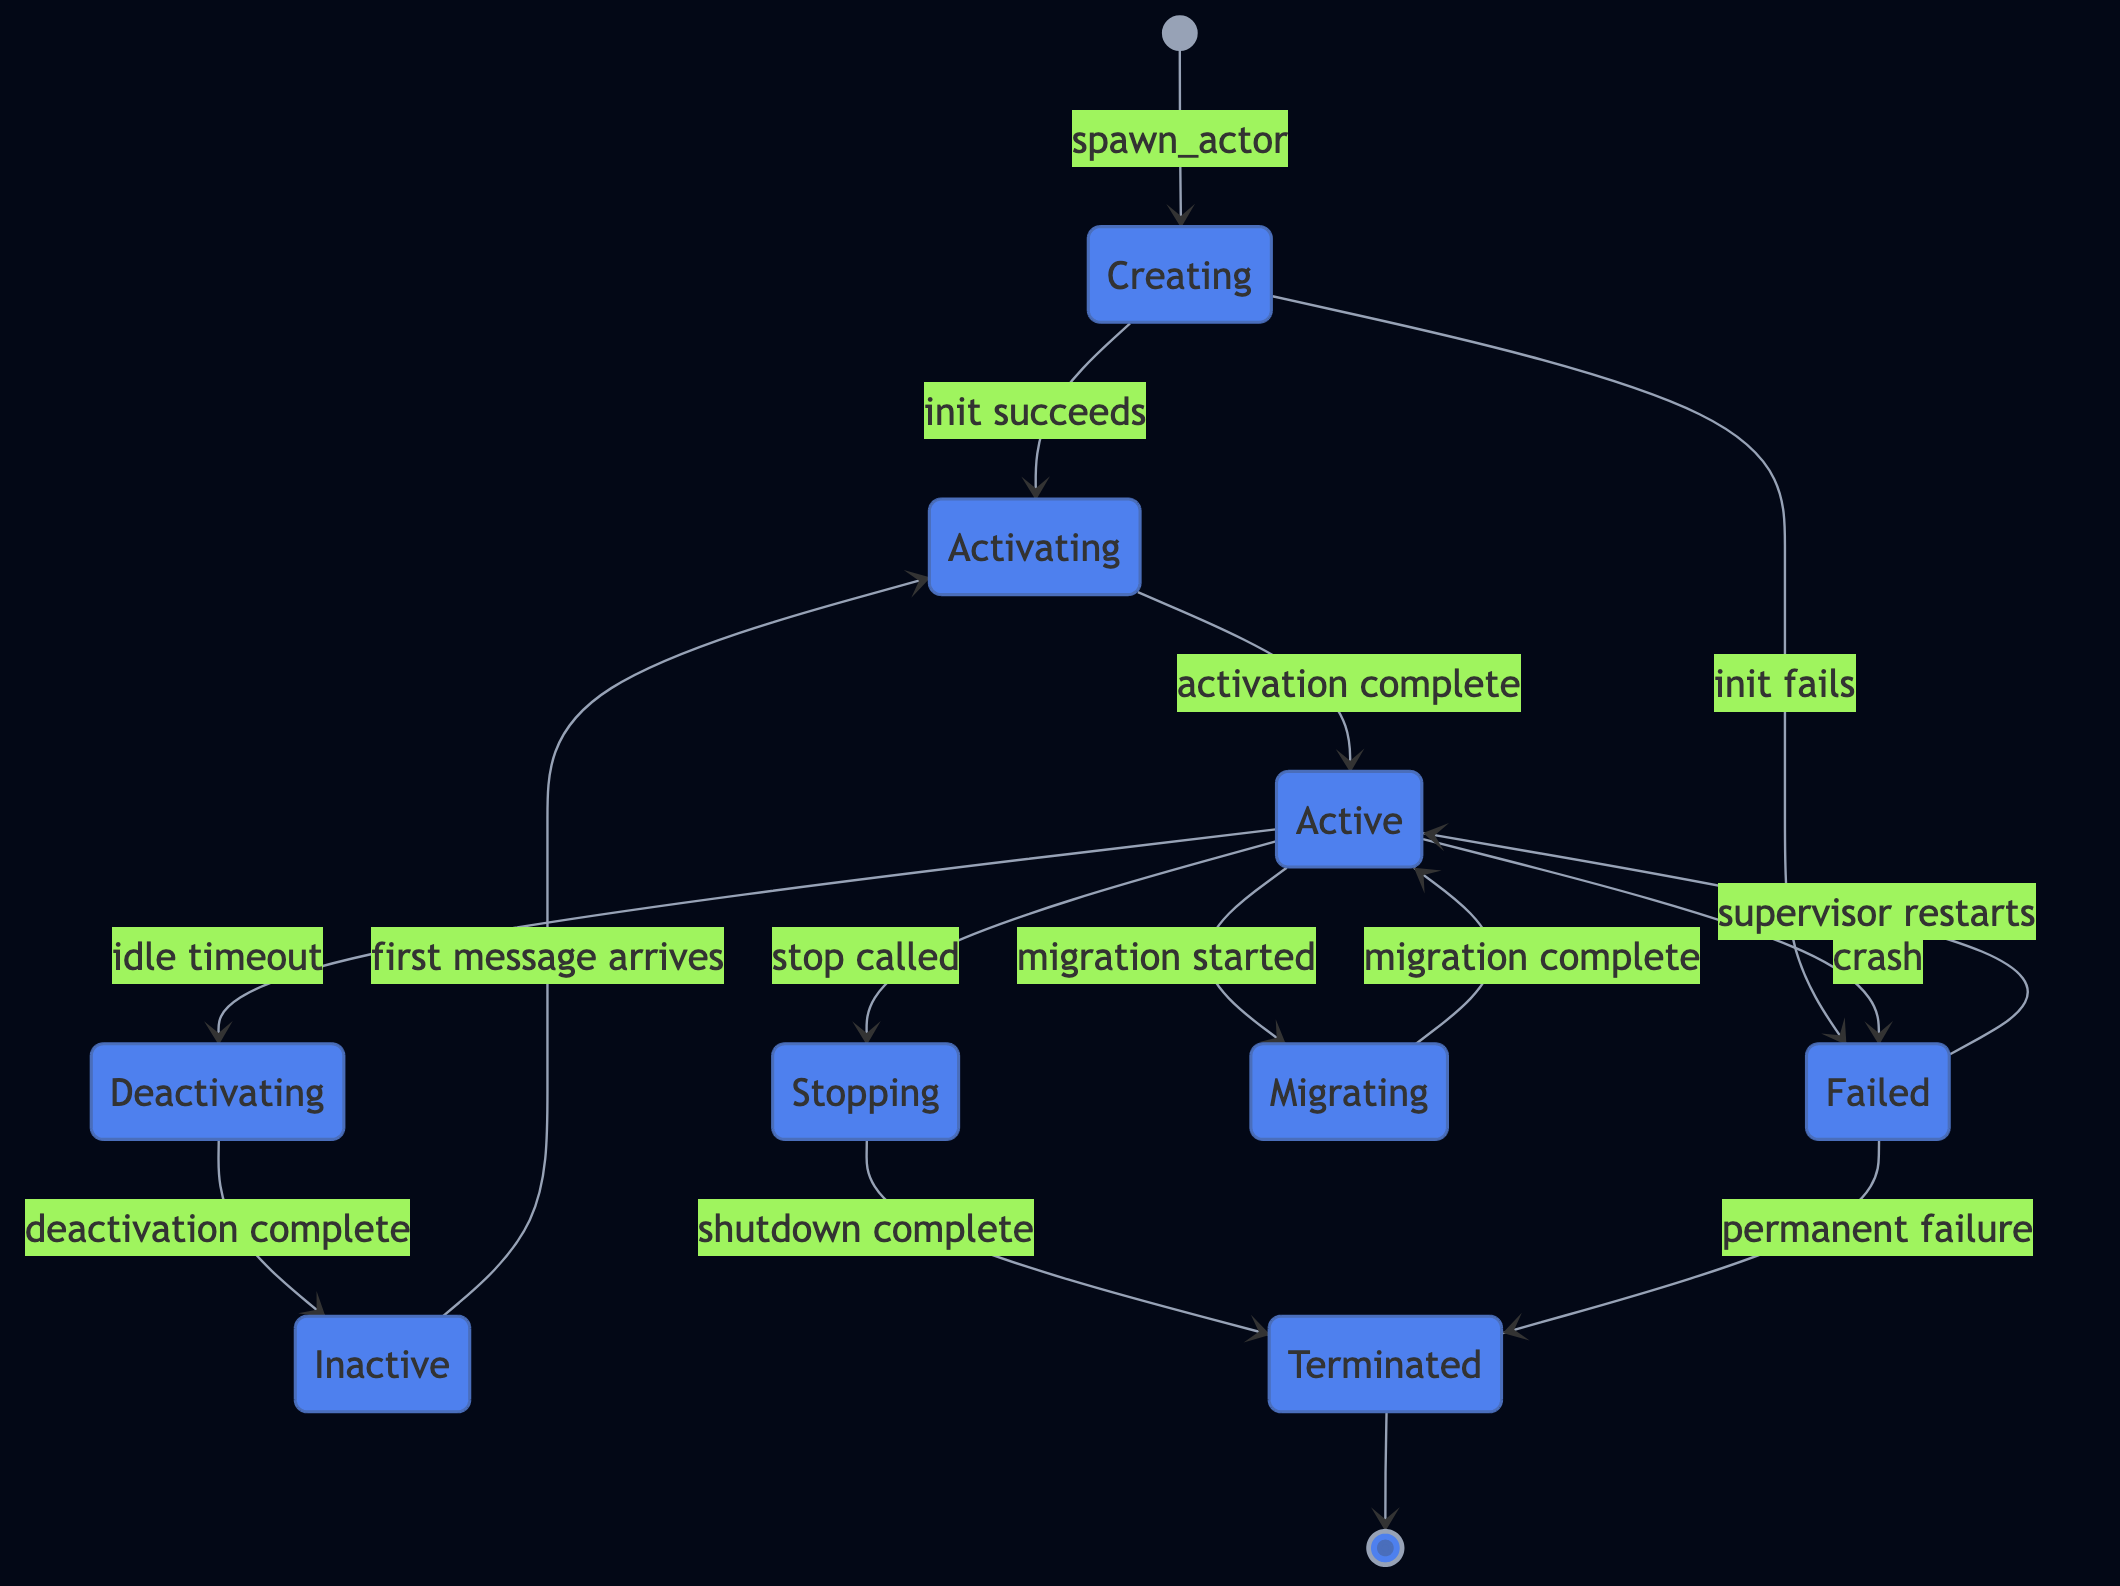
Actor Lifecycle
Actors move through a well-defined lifecycle — one of the details that distinguishes PlexSpaces from simpler actor frameworks:
PlexSpaces supports Virtual actors (with VirtualActorFacet inspired by Orleans Actor Model) leverage this lifecycle automatically, which activate on first message, deactivate after idle timeout, and reactivate transparently on the next message. No manual lifecycle management.
Tell vs Ask: Two Message Patterns
PlexSpaces supports two fundamental communication patterns:
Tell (asynchronous): The sender dispatches a message and moves on. Use this for events, notifications, and one-way commands.
Ask (request-reply): The sender dispatches a request and waits for a response with a timeout. Use this for queries and operations that need confirmation.
from plexspaces import actor, handler, host

@actor
class OrderService:
    @handler("place_order")
    def place_order(self, order: dict) -> dict:
        # Tell: fire-and-forget notification to analytics
        host.tell("analytics-actor", "order_placed", order)

        # Ask: request-reply to inventory service (5s timeout)
        inventory = host.ask("inventory-actor", "check_stock",
                            {"sku": order["sku"]}, timeout_ms=5000)

        if inventory["available"]:
            return {"status": "confirmed", "order_id": order["id"]}
        return {"status": "out_of_stock"}
Behaviors: Compile-Time Patterns
Behaviors define how an actor processes messages. You choose a behavior at compile time:
Behavior
Annotation
Pattern
Best For
Default
@actor
Message-based
General purpose
GenServer
@gen_server_actor
Request-reply
Stateful services, CRUD
GenEvent
@event_actor
Fire-and-forget
Event processing, logging
GenFSM
@fsm_actor
State machine
Order processing, approval flows
Workflow
@workflow_actor
Durable orchestration
Long-running processes
Facets: Runtime Capabilities
Facets attach dynamic capabilities to actors without changing the actor type. I wrote about the pattern of dynamic facets and runtime composition previously. This allows adding dynamic behavior through facets, combined with Erlang’s static behavior model. Think of facets as middleware that wraps your actor. They execute in priority order like security facets fire first, then logging, then metrics, then your business logic, then persistence:
Facets compose freely, e.g., add facets=["durability", "timer", "metrics"] and your actor gains persistence, scheduled execution, and Prometheus metrics with zero additional code.
Custom Facets: Extending the Framework
The facet system opens for extension. You can build domain-specific facets and register them with the framework:
use plexspaces_core::{Facet, FacetError, InterceptResult};

pub struct FraudDetectionFacet {
    threshold: f64,
}

#[async_trait]
impl Facet for FraudDetectionFacet {
    fn name(&self) -> &str { "fraud_detection" }
    fn priority(&self) -> u32 { 200 } // Run after security, before domain logic

    async fn before_method(
        &mut self, method: &str, payload: &[u8]
    ) -> Result<InterceptResult, FacetError> {
        let score = self.score_transaction(payload).await?;
        if score > self.threshold {
            return Err(FacetError::Custom("fraud_detected".into()));
        }
        Ok(InterceptResult::Continue)
    }
}
Register it once, attach it to any actor by name. This extensibility distinguishes PlexSpaces from frameworks with fixed capability sets.
Hands-On: Building Actors in Three Languages
Let me show you how PlexSpaces works in practice across all three SDKs.
The SDK eliminates over 100 lines of WASM boilerplate. You declare state with state(), mark handlers with @handler, and return dictionaries. The framework handles serialization, lifecycle, and state management.
# Build Python actor to WebAssembly
plexspaces-py build counter_actor.py -o counter.wasm

# Deploy to a running node
curl -X POST http://localhost:8094/api/v1/deploy \
  -F "namespace=default" \
  -F "actor_type=counter" \
  -F "wasm=@counter.wasm"

# Invoke via HTTP — FaaS-style (POST = tell, GET = ask)
curl -X POST "http://localhost:8080/api/v1/actors/default/default/counter" \
  -H "Content-Type: application/json" \
  -d '{"action":"increment","amount":5}'

# Request-reply on GET
curl "http://localhost:8080/api/v1/actors/default/default/counter" \
  -H "Content-Type: application/json"
# => {"count": 5}
That’s it. No Kubernetes manifests. No Terraform. No sidecar containers. Deploy a WASM module, invoke it over HTTP. The same endpoint works as an AWS Lambda Function URL.
Durable Execution: Crash and Recover Without Losing State
Durable execution solves a problem I’ve encountered at every company I’ve worked for: what happens when a node crashes mid-operation?
PlexSpaces journals every actor operation, when messages received, side effects executed, state changes applied. When a node crashes and restarts, the framework loads the latest checkpoint and replays journal entries from that point. Side effects return cached results during replay, so external API calls don’t fire twice.
Example: A Durable Bank Account
from plexspaces import actor, state, handler

@actor(facets=["durability"])
class BankAccount:
    balance: int = state(default=0)
    transactions: list = state(default_factory=list)

    @handler("deposit")
    def deposit(self, amount: int = 0) -> dict:
        self.balance += amount
        self.transactions.append({
            "type": "deposit", "amount": amount,
            "balance_after": self.balance
        })
        return {"status": "ok", "balance": self.balance}

    @handler("withdraw")
    def withdraw(self, amount: int = 0) -> dict:
        if amount > self.balance:
            return {"status": "insufficient_funds", "balance": self.balance}
        self.balance -= amount
        self.transactions.append({
            "type": "withdraw", "amount": amount,
            "balance_after": self.balance
        })
        return {"status": "ok", "balance": self.balance}

    @handler("replay")
    def replay_transactions(self) -> dict:
        """Rebuild balance from transaction log to verify consistency."""
        rebuilt = 0
        for tx in self.transactions:
            rebuilt += tx["amount"] if tx["type"] == "deposit" else -tx["amount"]
        return {
            "replayed": len(self.transactions),
            "rebuilt_balance": rebuilt,
            "current_balance": self.balance,
            "consistent": rebuilt == self.balance
        }
Adding facets=["durability"] activates journaling and checkpointing. If the node crashes after processing ten deposits, the framework restores all ten sono data loss, no duplicate charges. Periodic checkpoints accelerate recovery by 90%+ and the framework loads the latest snapshot and replays only recent entries.
Data-Parallel Actors: Worker Pools and Scatter-Gather
When I built JavaNow during my PhD, I implemented MPI-style scatter-gather and parallel map operations. PlexSpaces brings these patterns to production through ShardGroups adata-parallel actor pools inspired by the DPA paper. A ShardGroup partitions data across multiple actor shards and supports three core operations:
Bulk Update: Routes writes to the correct shard based on a partition key (hash, consistent hash, or range)
Parallel Map: Queries all shards simultaneously and collects results
Scatter-Gather: Broadcasts a query and aggregates responses with fault tolerance
Example: Data-Parallel Worker Pool with Scatter-Gather
This pattern comes from the PlexSpaces examples. Each worker actor in the ShardGroup holds a partition of state and processes tasks independently and the framework handles routing, fan-out, and aggregation:
The #[handler("*")] wildcard routes all messages to a single dispatch method — the worker decides what to do based on the action field. Each worker tracks its own processing statistics, so you can identify hot shards or slow workers.
The orchestration code shows all three data-parallel operations in sequence including bulk update, parallel map, and parallel reduce:
// Create a pool of 20 workers with hash-based partitioning
let pool_id = client.create_worker_pool(
    "worker-pool-1", "worker", 20,
    PartitionStrategy::PartitionStrategyHash,
    HashMap::new(),
).await?;

// Bulk update: route 10,000 messages to the right shard by key
let mut updates = HashMap::new();
for i in 0..10_000 {
    let key = format!("key-{:05}", i);
    updates.insert(key.clone(), json!({ "action": "set", "key": key, "value": i }));
}
client.parallel_update(&pool_id, updates,
    ConsistencyLevel::ConsistencyLevelEventual, false).await?;

// Parallel map: query every worker simultaneously
let results = client.parallel_map(&pool_id,
    json!({ "action": "get_total_count" })).await?;
// => 20 responses, one per worker, each with its partition's total

// Parallel reduce: aggregate stats across all workers
let stats = client.parallel_reduce(&pool_id,
    json!({ "action": "stats" }),
    ShardGroupAggregationStrategy::ShardGroupAggregationConcat, 20).await?;
// => Combined stats: tasks_processed, avg_processing_time_ms per worker
parallel_update routes each key to its shard via consistent hashing: 10,000 messages fan out across 20 workers without the caller managing any routing logic. parallel_map broadcasts a query to every shard and collects results. parallel_reduce does the same but aggregates the responses using a configurable strategy (concat, sum, merge). This maps directly to distributed ML (partition model parameters across shards, push gradient updates through parallel_update, collect the full parameter set via parallel_map) or any workload that benefits from partitioned state with scatter-gather queries.
TupleSpace: Linda’s Associative Memory for Coordination
During my PhD work on JavaNow, I was blown away by the simplicity of Linda’s tuple space model for writing data flow based applications for coordination with different actors. The actors communicate through direct message passing, tuple spaces provide associative shared memory where producers write tuples, consumers read or take them with blocking or non-blocking patterns. This decouples components in three dimensions: spatial (actors don’t need references to each other), temporal (producers and consumers don’t need to run simultaneously), and pattern-based (consumers retrieve data by structure, not by address).
from plexspaces import actor, handler, host
import json

@actor
class OrderProducer:
    @handler("create_order")
    def create_order(self, order_id: str, items: list) -> dict:
        # Write a tuple — any consumer can pick it up
        host.ts_write(json.dumps(["order", order_id, "pending", items]))
        return {"status": "created", "order_id": order_id}

@actor
class OrderProcessor:
    @handler("process_next")
    def process_next(self) -> dict:
        # Take the next pending order (destructive read — removes from space)
        pattern = json.dumps(["order", None, "pending", None])  # Wildcards
        result = host.ts_take(pattern)
        if result:
            data = json.loads(result)
            order_id = data[1]
            # Process order, then write completion tuple
            host.ts_write(json.dumps(["order", order_id, "completed", data[3]]))
            return {"processed": order_id}
        return {"status": "no_pending_orders"}
I use TupleSpace heavily for dataflow pipelines: each stage writes results as tuples, and downstream stages pick them up by pattern. Stages can run at different speeds, on different nodes, in different languages. The tuple space absorbs the mismatch.
Batteries Included: Everything You Need, Built In
At every company I’ve worked at, the first three months after adopting a framework go to integrating storage, messaging, and locks. PlexSpaces ships all of these as built-in services in the same codebase, no extra infrastructure, no service mesh.
PlexSpaces uses adapters pattern to plug different implementation of channels, object-registry, tuple-space based on config. For example, PlexSpaces auto-selects the best available backend for channel using a priority chain and availability (Kafka -> SQS -> NATS -> ProcessGroup -> UDP Multicast -> InMemory). Start developing with in-memory channels, deploy to production with Kafka without code changes. Actors using non-memory channels also support graceful shutdown: they stop accepting new messages but complete in-progress work.
Multi-Tenancy: Enterprise-Grade Isolation
PlexSpaces enforces two-level tenant isolation. The tenant_id comes from JWT tokens (HTTP) or mTLS certificates (gRPC). The namespace provides sub-tenant isolation for environments/applications. All queries filter by tenant automatically at the repository layer. This gives you secure multi-tenant deployments without trusting application code to enforce boundaries.
Example: Payment Processing with Built-In Services
from plexspaces import actor, handler, host

@actor(facets=["durability", "metrics"])
class PaymentProcessor:
    @handler("process_refund")
    def process_refund(self, tx_id: str, amount: int) -> dict:
        # Distributed lock prevents duplicate refunds
        lock_version = host.lock_acquire(f"refund:{tx_id}", 5000)
        if not lock_version:
            return {"error": "could_not_acquire_lock"}

        try:
            # Store refund record in built-in key-value store
            host.kv_put(f"refund:{tx_id}", json.dumps({
                "amount": amount, "status": "processed"
            }))
            return {"status": "refunded", "amount": amount}
        finally:
            host.lock_release(f"refund:{tx_id}", lock_version)
No Redis cluster to manage. No DynamoDB table to provision. The framework handles it.
Process Groups: Erlang pg2-Style Communication
Process groups provide distributed pub/sub and group messaging, which is one of Erlang’s most powerful patterns. Here’s a chat room that demonstrates joining, broadcasting, and member queries:
Groups support topic-based subscriptions within groups and scope automatically by tenant_id and namespace.
Polyglot Development: One Server, Many Languages
A single PlexSpaces node hosts actors written in different languages simultaneously: Python ML models, TypeScript webhook handlers, and Rust performance-critical paths sharing the same actor runtime, storage services, and observability stack:
Same WASM module deploys anywhere: no Docker images, no container registries, no “it works on my machine”:
# Build and deploy to on-premises
plexspaces-py build ml_model.py -o ml_model.wasm
curl -X POST http://on-prem:8094/api/v1/deploy \
  -F "namespace=prod" -F "actor_type=ml_model" -F "wasm=@ml_model.wasm"

# Deploy to cloud — same command, same binary
curl -X POST http://cloud:8094/api/v1/deploy \
  -F "namespace=prod" -F "actor_type=ml_model" -F "wasm=@ml_model.wasm"
Common Patterns
Over three decades, I’ve watched the same architectural patterns emerge at every company and every scale. PlexSpaces supports the most important ones natively.
Durable Workflows with Signals and Queries
Long-running processes with automatic recovery, external signals, and read-only queries — think order fulfillment, onboarding flows, or CI/CD pipelines:
from plexspaces import workflow_actor, state, run_handler, signal_handler, query_handler

@workflow_actor(facets=["durability"])
class OrderWorkflow:
    order_id: str = state(default="")
    status: str = state(default="pending")
    steps_completed: list = state(default_factory=list)

    @run_handler
    def run(self, input_data: dict) -> dict:
        """Main execution — exclusive, one at a time."""
        self.order_id = input_data.get("order_id", "")
        self.status = "validating"
        self.steps_completed.append("validation")
        self.status = "charging"
        self.steps_completed.append("payment")
        self.status = "shipping"
        self.steps_completed.append("shipment")
        self.status = "completed"
        return {"status": "completed", "order_id": self.order_id}

    @signal_handler("cancel")
    def on_cancel(self, data: dict) -> None:
        """External signals can alter workflow state."""
        self.status = "cancelled"

    @query_handler("status")
    def get_status(self) -> dict:
        """Read-only queries can run concurrently with execution."""
        return {"order_id": self.order_id, "status": self.status,
                "steps": self.steps_completed}
Staged Event-Driven Architecture (SEDA)
Chain processing stages through channels. Each stage runs at its own pace, and channels provide natural backpressure:
Leader Election
Distributed locks elect a leader with lease-based failover. The leader holds a lock and renews it periodically. If the leader crashes, the lease expires and another candidate acquires leadership:
@actor
class LeaderElection:
    candidate_id: str = state(default="")
    lock_version: str = state(default="")

    @handler("try_lead")
    def try_lead(self, candidate_id: str = None) -> dict:
        holder_id = candidate_id or self.candidate_id
        result = host.lock_acquire("", "leader-election", holder_id, "leader", 30, 0)
        if result and not result.startswith("ERROR"):
            self.lock_version = json.loads(result).get("version", result)
            return {"leader": True, "candidate_id": holder_id}
        return {"leader": False}
Resource-Based Affinity
Label actors with hardware requirements (gpu: true, memory: high) and PlexSpaces schedules them on matching nodes. This maps naturally to ML training pipelines where different stages need different hardware.
Cellular Architecture
PlexSpaces organizes nodes into cells using the SWIM protocol (gossip-based node discovery). Cells provide fault isolation, geographic distribution, and low-latency routing to the nearest cell. Nodes within a cell share channels via the cluster_name configuration, enabling UDP multicast for low-latency cluster-wide messaging.
How PlexSpaces Compares
PlexSpaces doesn’t replace any single framework, it unifies patterns from many. Here’s what it borrows from each, and what limitation of each it addresses:
Framework
What PlexSpaces Borrows
Limitation PlexSpaces Addresses
Erlang/OTP
GenServer, supervision, “let it crash”
BEAM-only; no polyglot WASM
Akka
Actor model, message passing
No longer open source; JVM-only
Orleans
Virtual actors, grain lifecycle
.NET-only; no tuple spaces or HPC
Temporal
Durable workflows, replay
Requires separate server infrastructure
Restate
Durable execution, journaling
No full actor model; no HPC patterns
Ray
Distributed ML, parameter servers
Python-centric; no durable execution
AWS Lambda
Serverless invocation, auto-scaling
Vendor lock-in; no local dev parity
Azure Durable Functions
Durable orchestration
Azure-only; limited language support
Golem Cloud
WASM-based durability
No built-in storage/messaging/locks
Dapr
Sidecar service mesh, virtual actors
Extra networking hop; state management limits
Key Differentiators
No service mesh: Built-in observability, security, and throttling eliminate the extra networking hop
Local-first: Same code runs on your laptop and in production. No cloud-only surprises.
Polyglot via WASM: Write actors in Python, Rust, TypeScript. Same deployment model.
Batteries included: KV store, blob storage, locks, channels, process groups — all built in
One abstraction: Composable facets on a unified actor, not a zoo of specialized types
Application server model: Deploy multiple polyglot applications to a single node
Research-grade + production-ready: Linda tuple spaces, MPI patterns, and Erlang supervision in a single framework
Getting Started
Install and Run
# Docker (fastest)
docker run -p 8080:8080 -p 8000:8000 -p 8001:8001 plexobject/plexspaces:latest

# From source
git clone https://github.com/bhatti/PlexSpaces.git
cd PlexSpaces && make build
Explore more in the examples directory: bank accounts with durability, task queues with distributed locks, leader election, chat rooms with process groups, and more.
Lessons Learned
After decades of distributed systems, I keep returning to the same truths:
Efficiency matters. Respect the transport layer. Binary protocols with schemas outperform JSON for high-throughput systems.
Contracts prevent chaos. Define APIs before implementations. Generate code from schemas.
Simplicity defeats complexity. Every framework that collapsed like EJB, SOAP, CORBA did under the weight of accidental complexity. One powerful abstraction beats ten specialized ones.
Developer experience decides adoption. If your framework requires 100 lines of boilerplate for a counter, developers will choose the one that needs 15.
Local and production must match. Every bug I’ve seen that “only happens in production” stemmed from environmental differences.
Cross-cutting concerns belong in the platform. Scatter them across codebases and you get inconsistency. Centralize them in a service mesh and you get latency. Build them in.
Multiple coordination primitives solve multiple problems. Actors handle request-reply. Channels handle pub/sub. Tuple spaces handle coordination. Process groups handle broadcast. Real systems need all of them.
The distributed systems landscape keeps changing as WASM is maturing, AI agents are creating new coordination challenges, and enterprises are pushing back on vendor lock-in harder than ever. I believe the next generation of frameworks will converge on the patterns PlexSpaces brings together: polyglot runtimes, durable actors, built-in infrastructure, and local-first deployment. PlexSpaces distills years of lessons into a single framework. It’s the framework I wished existed at every company I’ve worked for that handles the infrastructure so I can focus on the problem.
TL;DR: Tested open-source LLM serving (vLLM) on GCP L4 GPUs. Achieved 93% cost savings vs OpenAI GPT-4, 100% routing accuracy, and 91% cache hit rates. Prototype proves feasibility; production requires 5-7 months additional work (security, HA, ops). All code at github.com/bhatti/vllm-tutorial.
Background
Last year, our CEO mandated “AI adoption” across the organization and everyone had access to LLMs through an internal portal that used Vertex AI. However, there was a little training or best practices. I saw engineers using the most expensive models for simple queries, no cost tracking, zero observability into what was being used, and no policies around data handling. People tried AI, built some demos and got mixed results.
This mirrors what’s happening across the industry. Recent research shows 95% of AI pilots fail at large companies, and McKinsey found 42% of companies abandoned generative AI projects citing “no significant bottom line impact.” The 5% that succeed do something fundamentally different: they treat AI as infrastructure requiring proper tooling, not just API access.
This experience drove me to explore better approaches. I built prototypes using vLLM and open-source tools, tested them on GCP L4 GPUs, and documented what actually works. This blog shares those findings with real code, benchmarks, and lessons from building production-ready AI infrastructure. Every benchmark ran on actual hardware (GCP L4 GPUs), every pattern emerged from solving real problems, and all code is available at github.com/bhatti/vllm-tutorial.
Why Hosted LLM Access Isn’t Enough
Even with managed services like Vertex AI or Bedrock, enterprise AI needs additional layers that most organizations overlook:
Cost Management
No intelligent routing between models (GPT-4 for simple definitions that Phi-2 could handle)
No per-user, per-team budgets or limits
No cost attribution or chargeback
Result: Unpredictable expenses, no accountability
Observability
Can’t track which prompts users send
Can’t identify failing queries or quality degradation
Can’t measure actual usage patterns
Result: Flying blind when issues occur
Security & Governance
Data flows through third-party infrastructure
No granular access controls beyond API keys
Limited audit trails for compliance
Result: Compliance gaps, security risks
Performance Control
Can’t deploy custom fine-tuned models
No A/B testing between models
Limited control over routing logic
Result: Vendor lock-in, inflexibility
The Solution: vLLM with Production Patterns
After evaluating options, I built prototypes using vLLM—a high-performance inference engine for running open-source LLMs (Llama, Mistral, Phi) on your infrastructure. Think of vLLM as NGINX for LLMs: battle-tested, optimized runtime that makes production deployments feasible.
Production error handling (retries, circuit breakers, fallbacks)
System Architecture
Here’s the complete system architecture I’ve built and tested:
Production AI requires three monitoring layers:
Layer 1: Infrastructure (Prometheus + Grafana)
GPU utilization, memory usage
Request rate, error rate, latency (P50, P95, P99)
Integration via /metrics endpoint that vLLM exposes
Grafana dashboards visualize trends and trigger alerts
Layer 2: Application Metrics
Time to First Token (TTFT), tokens per second
Cost per request, model distribution
Budget tracking (daily, monthly limits)
Custom Prometheus metrics embedded in application code
Layer 3: LLM Observability (Langfuse)
Full prompt/response history for debugging
Cost attribution per user/team
Quality tracking over time
Essential for understanding what users actually do
Here’s what I’ve built and tested:
Setting Up Your Environment: GCP L4 GPU Setup
Before we dive into the concepts, let’s get your environment ready. I’m using GCP L4 GPUs because they offer the best price/performance for this workload ($0.45/hour), but the code works on any CUDA-capable GPU.
# Test vLLM installation
python -c "import vllm; print(f'vLLM version: {vllm.__version__}')"

# Quick functionality test
python examples/01_basic_vllm.py
Expected output:
Loading model microsoft/phi-2...
Model loaded in 8.3 seconds

Generating response...
Generated 50 tokens in 987ms
Throughput: 41.5 tokens/sec

? vLLM is working!
Quick Start
Before we dive deep, let’s get something running:
Clone the repo:
   git clone https://github.com/bhatti/vllm-tutorial.git
   cd vllm-tutorial
If you have a GPU available:
   # Follow setup instructions in README
   python examples/01_basic_vllm.py
No GPU? Run the benchmarks locally:
   # See the actual results from GCP L4 testing
   cat benchmarks/results/01_throughput_results.json
from typing import Callable
from dataclasses import dataclass
import time

@dataclass
class RetryConfig:
    """Retry configuration"""
    max_retries: int = 3
    initial_delay: float = 1.0
    max_delay: float = 60.0
    exponential_base: float = 2.0

def retry_with_backoff(config: RetryConfig = RetryConfig()):
    """
    Decorator: Retry with exponential backoff

    Example:
        @retry_with_backoff()
        def generate_text(prompt):
            return llm.generate(prompt)
    """
    def decorator(func: Callable) -> Callable:
        def wrapper(*args, **kwargs):
            delay = config.initial_delay

            for attempt in range(config.max_retries):
                try:
                    return func(*args, **kwargs)

                except Exception as e:
                    if attempt == config.max_retries - 1:
                        raise  # Last attempt, re-raise

                    error_type = classify_error(e)

                    # Don't retry on invalid input
                    if error_type == ErrorType.INVALID_INPUT:
                        raise

                    print(f"??  Attempt {attempt + 1} failed: {error_type.value}")
                    print(f"   Retrying in {delay:.1f}s...")
                    time.sleep(delay)

                    # Exponential backoff
                    delay = min(delay * config.exponential_base, config.max_delay)

            raise RuntimeError(f"Failed after {config.max_retries} retries")

        return wrapper
    return decorator

# Usage
@retry_with_backoff(RetryConfig(max_retries=3, initial_delay=1.0))
def generate_with_retry(prompt: str):
    """Generate with automatic retry on failure"""
    return llm.generate(prompt)

# This will retry up to 3 times with exponential backoff
result = generate_with_retry("Analyze earnings report")
Pattern 2: Circuit Breaker
When a service starts failing repeatedly, stop calling it:
from datetime import datetime, timedelta
from enum import Enum

class CircuitState(Enum):
    CLOSED = "closed"      # Normal operation
    OPEN = "open"          # Failing, reject requests
    HALF_OPEN = "half_open"  # Testing recovery

class CircuitBreaker:
    """
    Circuit breaker for fault tolerance

    Prevents cascading failures by stopping calls to
    failing services
    """

    def __init__(
        self,
        failure_threshold: int = 5,
        timeout: int = 60,
        expected_exception: type = Exception
    ):
        self.failure_threshold = failure_threshold
        self.timeout = timeout
        self.expected_exception = expected_exception

        self.failure_count = 0
        self.last_failure_time = None
        self.state = CircuitState.CLOSED

    def call(self, func: Callable, *args, **kwargs):
        """Execute function with circuit breaker protection"""

        if self.state == CircuitState.OPEN:
            # Check if timeout elapsed
            if datetime.now() - self.last_failure_time > timedelta(seconds=self.timeout):
                self.state = CircuitState.HALF_OPEN
                print("? Circuit breaker: HALF_OPEN (testing recovery)")
            else:
                raise RuntimeError("Circuit breaker OPEN - service unavailable")

        try:
            result = func(*args, **kwargs)

            # Success - reset if recovering
            if self.state == CircuitState.HALF_OPEN:
                self.state = CircuitState.CLOSED
                self.failure_count = 0
                print("? Circuit breaker: CLOSED (service recovered)")

            return result

        except self.expected_exception as e:
            self.failure_count += 1
            self.last_failure_time = datetime.now()

            if self.failure_count >= self.failure_threshold:
                self.state = CircuitState.OPEN
                print(f"? Circuit breaker: OPEN (threshold {self.failure_threshold} reached)")

            raise

# Usage
circuit_breaker = CircuitBreaker(failure_threshold=5, timeout=60)

def generate_protected(prompt: str):
    """Generate with circuit breaker protection"""
    return circuit_breaker.call(llm.generate, prompt)

# If llm.generate fails 5 times, circuit breaker opens
# Requests fail fast for 60 seconds
# Then one test request (half-open)
# If successful, normal operation resumes
This prevents:
Thundering herd problem
Resource exhaustion
Long timeouts on every request
Pattern 3: Rate Limiting
Protect your system from overload:
import time

class RateLimiter:
    """
    Token bucket rate limiter

    Limits requests per second to prevent overload
    """

    def __init__(self, max_requests: int, time_window: float = 1.0):
        self.max_requests = max_requests
        self.time_window = time_window
        self.tokens = max_requests
        self.last_update = time.time()

    def acquire(self, tokens: int = 1) -> bool:
        """Try to acquire tokens, return True if allowed"""

        now = time.time()
        elapsed = now - self.last_update

        # Refill tokens based on elapsed time
        self.tokens = min(
            self.max_requests,
            self.tokens + (elapsed / self.time_window) * self.max_requests
        )
        self.last_update = now

        if self.tokens >= tokens:
            self.tokens -= tokens
            return True
        else:
            return False

    def wait_for_token(self, tokens: int = 1):
        """Wait until token is available"""
        while not self.acquire(tokens):
            time.sleep(0.1)

# Usage
rate_limiter = RateLimiter(max_requests=100, time_window=1.0)

@app.post("/generate")
async def generate(request: GenerateRequest):
    # Check rate limit
    if not rate_limiter.acquire():
        raise HTTPException(
            status_code=429,
            detail="Rate limit exceeded (100 req/sec)"
        )

    # Process request
    result = llm.generate(request.prompt)
    return result
Why this matters:
Prevents DoS (accidental or malicious)
Protects GPU from overload
Ensures fair usage
Pattern 4: Fallback Strategies
When primary fails, don’t just error—degrade gracefully:
def generate_with_fallback(prompt: str) -> str:
    """
    Try multiple strategies before failing

    Strategy 1: Primary model (Llama-3-8B)
    Strategy 2: Cached response (if available)
    Strategy 3: Simpler model (Phi-2)
    Strategy 4: Template response
    """

    # Try primary model
    try:
        return llm_primary.generate(prompt)

    except Exception as e:
        print(f"??  Primary model failed: {e}")

        # Fallback 1: Check cache
        cached_response = cache.get(prompt)
        if cached_response:
            print("? Returning cached response")
            return cached_response

        # Fallback 2: Try simpler model
        try:
            print("? Falling back to Phi-2")
            return llm_simple.generate(prompt)

        except Exception as e2:
            print(f"??  Fallback model also failed: {e2}")

            # Fallback 3: Template response
            return (
                "I apologize, but I'm unable to process your request right now. "
                "Please try again in a few minutes, or contact support if the issue persists."
            )

# User never sees "Internal Server Error"
# They always get SOME response
Graceful degradation examples:
Can’t generate full analysis? Return summary
Can’t use complex model? Use simple model
Can’t generate? Return cached response
Everything failing? Return polite error message
Pattern 5: Timeout Handling
Don’t let requests hang forever:
import signal

class TimeoutError(Exception):
    pass

def timeout_handler(signum, frame):
    raise TimeoutError("Request timed out")

def generate_with_timeout(prompt: str, timeout_seconds: int = 30):
    """Generate with timeout"""

    # Set timeout
    signal.signal(signal.SIGALRM, timeout_handler)
    signal.alarm(timeout_seconds)

    try:
        result = llm.generate(prompt)

        # Cancel timeout
        signal.alarm(0)
        return result

    except TimeoutError:
        print(f"? Request timed out after {timeout_seconds}s")
        return "Request timed out. Please try a shorter prompt."

# Or using asyncio
import asyncio

async def generate_with_timeout_async(prompt: str, timeout_seconds: int = 30):
    """Generate with async timeout"""

    try:
        result = await asyncio.wait_for(
            llm.generate_async(prompt),
            timeout=timeout_seconds
        )
        return result

    except asyncio.TimeoutError:
        return "Request timed out. Please try a shorter prompt."
Why timeouts matter:
Prevent resource leaks
Free up GPU for other requests
Give users fast feedback
Combined Example
Here’s how I combine all patterns:
from fastapi import FastAPI, HTTPException
from circuitbreaker import CircuitBreaker, CircuitBreakerError

app = FastAPI()

# Initialize components
circuit_breaker = CircuitBreaker(failure_threshold=5, timeout=60)
rate_limiter = RateLimiter(max_requests=100, time_window=1.0)
cache = ResponseCache(ttl=3600)

@app.post("/generate")
@retry_with_backoff(max_retries=3)
async def generate(request: GenerateRequest):
    """
    Generate with full error handling:
    - Rate limiting
    - Circuit breaker
    - Retry with backoff
    - Timeout
    - Fallback strategies
    - Caching
    """

    # Rate limiting
    if not rate_limiter.acquire():
        raise HTTPException(status_code=429, detail="Rate limit exceeded")

    # Check cache first
    cached = cache.get(request.prompt)
    if cached:
        return {"text": cached, "cached": True}

    try:
        # Circuit breaker protection
        result = circuit_breaker.call(
            generate_with_timeout,
            request.prompt,
            timeout_seconds=30
        )

        # Cache successful response
        cache.set(request.prompt, result)

        return {"text": result, "status": "success"}

    except CircuitBreakerError:
        # Circuit breaker open - return fallback
        return {
            "text": "Service temporarily unavailable. Using cached response.",
            "status": "degraded",
            "fallback": True
        }

    except TimeoutError:
        raise HTTPException(status_code=504, detail="Request timed out")

    except Exception as e:
        # Log error
        logger.error(f"Generation failed: {e}")

        # Return graceful error
        return {
            "text": "I apologize, but I'm unable to process your request.",
            "status": "error",
            "fallback": True
        }
What this provides:
? Prevents overload (rate limiting)
? Fast failure (circuit breaker)
? Automatic recovery (retry)
? Resource protection (timeout)
? Graceful degradation (fallback)
? Performance (caching)
Deployment Recommendations
While my testing remained at POC level, these patterns prepare for production deployment:
Before deploying:
Load Testing
Test with expected peak load (10-100x normal traffic)
Measure P95 latency under load (<500ms target)
Verify error rate stays <1%
Confirm GPU memory stable (no leaks)
Production Deployment Checklist
Before going live, verify:
Infrastructure:
[ ] GPU drivers installed and working (nvidia-smi)
[ ] Alert destinations set (PagerDuty, Slack, email)
[ ] Langfuse set up (if using LLM observability)
Testing:
[ ] Health check returns 200 OK
[ ] Can generate completions via API
[ ] Metrics endpoint returning data
[ ] Error handling works (try invalid input)
[ ] Budget limits enforced (if configured)
[ ] Load test passed (see next section)
Security:
[ ] API authentication enabled
[ ] Rate limiting configured
[ ] HTTPS enforced (no HTTP)
[ ] CORS policies set
[ ] Input validation in place
[ ] Secrets not in git (use env variables)
Operations:
[ ] Backup strategy for logs
[ ] Model cache backed up
[ ] Runbook written (how to handle incidents)
[ ] On-call rotation defined
[ ] SLAs documented
[ ] Disaster recovery plan
Real-World Results
Testing on GCP L4 GPUs with 11 queries produced these validated results:
End-to-End Integration Test Results
Test configuration:
Model: Phi-2 (2.7B parameters)
Quantization: None (FP16 baseline)
Prefix caching: Enabled
Budget: $10/day
Hardware: GCP L4 GPU
Results:
Metric
Value
Total Requests
11
Success Rate
100% (11/11) ?
Total Tokens Generated
2,200
Total Cost
$0.000100
Average Latency
5,418ms
Cache Hit Rate
90.9% ?
Budget Utilization
0.001%
Model distribution:
Phi-2: 54.5% (6 requests)
Llama-3-8B: 27.3% (3 requests)
Mistral-7B: 18.2% (2 requests)
What this proves: ? Intelligent routing works (3 models selected correctly) ? Budget enforcement works (under budget, no overruns) ? Prefix caching works (91% hit rate = huge savings) ? Multi-model support works (distributed correctly) ? Observability works (all metrics collected)
Cost Comparison
Let me show you the exact cost calculations:
Per-request costs (from actual test):
Request 1 (uncached): $0.00002038
Requests 2-11 (cached): $0.00000414 average

Total: $0.00010031 for 11 requests
Average: $0.0000091 per request
Extrapolated monthly costs (10,000 requests/day):
Configuration
Daily Cost
Monthly Cost
Savings
Without caching
$0.91
$27.30
Baseline
With caching (91% hit rate)
$0.18
$5.46
80%
With quantization (AWQ)
$0.09
$2.73
90%
All optimizations
$0.09
$2.73
90%
Add in infrastructure costs:
GCP L4 GPU: $0.45/hour = $328/month

Total monthly cost:
- Infrastructure: $328
- API costs: $2.73
- Total: $330.73/month for 10,000 requests/day
Compare to OpenAI:
OpenAI GPT-4:
- Input: $0.03 per 1K tokens
- Output: $0.06 per 1K tokens
- Average request: 100 tokens in + 100 tokens out = $0.009
- 10,000 requests/day = $90/day = $2,700/month

Savings: $2,369/month (88% cheaper!)
After building and testing this platform, I understand why enterprise AI differs from giving developers ChatGPT access and why 95% of initiatives fail. Here is why these layers matter:
Cost tracking isn’t about being cheap—it’s about accountability. Finance won’t approve next year’s AI budget without ROI proof.
Intelligent routing prevents the death spiral: early excitement ? everyone uses the expensive model ? costs spiral ? finance pulls the plug ? initiative dies.
Observability builds trust. When executives ask “Is AI working?”, you need data: success rates, cost per department, quality trends. Without metrics, you get politics and cancellation.
Error handling and budgets are professional table stakes. Enterprises can’t have systems that randomly fail or spend unpredictably.
Here are things missing from the prototype:
Security: No SSO, PII detection, audit logs for compliance, encryption at rest, security review
High Availability: Single instance, no load balancer, no failover, no disaster recovery
Operations: No CI/CD, secrets management, log aggregation, incident playbooks
Scale: No auto-scaling, multi-region, or load testing beyond 100 concurrent
Governance: No approval workflows, per-user limits, content filtering, A/B testing
I have learned that vLLM works, open models are competitive, the tooling is mature. This POC proves that the patterns work and the savings are real. The 5% that succeed treat AI as infrastructure requiring proper tooling. The 95% that fail treat it as magic requiring only faith.
Try it yourself: All code at github.com/bhatti/vllm-tutorial. Clone it, test it, prove it works in your environment. Then build the business case for production investment.
Over the last year, I have been applying Agentic AI to various problems at work and to improve personal productivity. For example, every morning, I faced the same challenge: information overload.
My typical morning looked like this:
? Check emails and sort out what’s important
? Check my calendar and figure out which ones are critical
? Skim HackerNews, TechCrunch, newsletters for any important insight
? Check Slack for any critical updates
?? Look up weather ? Should I bring an umbrella or jacket?
? Already lost 45 minutes just gathering information!
I needed an AI assistant that could digest all this information while I shower, then present me with a personalized 3-minute brief highlighting what actually matters. Also, following were key constraints for this assistant:
? Complete privacy – My emails and calendar shouldn’t leave my laptop and I didn’t want to run any MCP servers in cloud that could expose my private credentials
? Zero ongoing costs – Running complex Agentic workflow on the hosted environments could easily cost me hundreds of dollars a month
? Fast iteration – Test changes instantly during development
? Flexible deployment – Start local, deploy to cloud when ready
I will walk through my journey of building Daily Minutes with Claude Code – a fully functional agentic AI system that runs on my laptop using local LLMs, saves me 30 minutes every morning.
Agentic Building Blocks
I applied following building blocks to create this system:
MCP (Model Context Protocol) – connecting to data sources discoverable by AI
RAG (Retrieval-Augmented Generation) – give AI long-term memory
ReAct Pattern – teach AI to reason before acting
RLHF (Reinforcement Learning from Human Feedback) – teach AI from my preferences
Let me walk you through how I built each piece, the problems I encountered, and how I solved them.
High-level Architecture
After several iterations, I landed on a clean 3-layer architecture:
Why this architecture worked for me:
Layer 1 (Data Sources) – I used MCP to make connectors pluggable. When I later wanted to add RSS feeds, I just registered a new tool – no changes to the AI logic.
Layer 2 (Intelligence) – This is where the magic happens. The ReAct agent reasons about what data it needs, LangGraph orchestrates fetching from multiple sources in parallel, RAG provides historical context, and RLHF learns from my feedback.
Layer 3 (UI) – I kept the UI simple and fast. It reads from a database cache, so it loads instantly – no waiting for AI to process.
How the Database Cache Works
This is a key architectural decision that made the UI lightning-fast:
# src/services/startup_service.py
async def preload_daily_data():
    """Background job that generates brief and caches in database."""

    # 1. Fetch all data in parallel (LangGraph orchestration)
    data = await langgraph_orchestrator.fetch_all_sources()

    # 2. Generate AI brief (ReAct agent with RAG)
    brief = await brief_generator.generate(
        emails=data['emails'],
        calendar=data['calendar'],
        news=data['news'],
        weather=data['weather']
    )

    # 3. Cache everything in SQLite
    await db.set_cache('daily_brief_data', brief.to_dict(), ttl=3600)  # 1 hour TTL
    await db.set_cache('news_data', data['news'], ttl=3600)
    await db.set_cache('emails_data', data['emails'], ttl=3600)

    logger.info("? All data preloaded and cached")

# src/ui/components/daily_brief.py
def render_daily_brief_section():
    """UI just reads from cache - no AI processing!"""

    # Fast read from database (milliseconds, not seconds)
    if 'data' in st.session_state and st.session_state.data.get('daily_brief'):
        brief_data = st.session_state.data['daily_brief']
        _display_persisted_brief(brief_data)  # Instant!
    else:
        st.info("Run `make preload` to generate your first brief.")
Why this architecture rocks:
? UI loads in <500ms (reading from SQLite cache)
? Background refresh (run make preload or schedule with cron)
? Persistent (brief survives app restarts)
? Testable (can test UI without LLM calls)
Part 1: Setting Up My Local AI Stack
First, I needed to get Ollama running locally. This took me about 30 minutes.
Installing Ollama
# On macOS (what I use)
brew install ollama

# Start the service
ollama serve

# Pull the models I chose
ollama pull qwen2.5:7b         # Main LLM - fast on my M3 Mac
ollama pull nomic-embed-text   # For RAG embeddings
Why I chose Qwen 2.5 (7B):
? Runs fast on my M3 MacBook Pro (no GPU needed)
? Good reasoning capabilities for summarization
? Small enough to iterate quickly (responses in 2-3 seconds)
? Free and private – data never leaves my laptop
Later, I can swap to GPT-4 or Claude with just a config change when I deploy to production.
Testing My Setup
I wanted to make sure Ollama was working before going further:
# Quick test
PYTHONPATH=. python -c "
import asyncio
from src.services.ollama_service import get_ollama_service

async def test():
    ollama = get_ollama_service()
    result = await ollama.generate('Explain RAG in one sentence.')
    print(result)

asyncio.run(test())
"

# Output I got:
# RAG (Retrieval-Augmented Generation) enhances LLM responses by retrieving
# relevant information from a knowledge base before generating answers.
? First milestone: Local AI working!
Part 2: Building MCP Connectors
Instead of hard coding data fetching like this:
# ? My first attempt (brittle)
async def get_daily_data():
    news = await fetch_hackernews()
    weather = await fetch_weather()
    # Later I wanted to add RSS feeds... had to modify this function
    # Then I wanted Slack... modified again
    # This was getting messy fast!
I decided to use MCP (Model Context Protocol) to register data sources as “tools” so that the AI can discover and call by name:
Building News Connector
I started with HackerNews since I check it every morning:
# src/connectors/hackernews.py
class HackerNewsConnector:
    """Fetches top stories from HackerNews API."""

    async def execute_async(self, max_stories: int = 10):
        """The main method MCP will call."""
        # 1. Fetch top story IDs
        response = await self.client.get(
            "https://hacker-news.firebaseio.com/v0/topstories.json"
        )
        story_ids = response.json()[:max_stories]

        # 2. Fetch each story (I fetch these in parallel for speed)
        articles = []
        for story_id in story_ids:
            story = await self._fetch_story(story_id)
            articles.append(self._convert_to_article(story))

        return articles
Key learning: Keep connectors simple. They should do ONE thing: fetch data and return it in a standard format.
Registering with MCP Server
Then I registered this connector with my MCP server:
# src/services/mcp_server.py
class MCPServer:
    """The tool registry that AI agents query."""

    def _register_tools(self):
        # Register HackerNews
        self.tools["fetch_hackernews"] = MCPTool(
            name="fetch_hackernews",
            description="Fetch top tech stories from HackerNews with scores and comments",
            parameters={
                "max_stories": {
                    "type": "integer",
                    "description": "How many stories to fetch (1-30)",
                    "default": 10
                }
            },
            executor=HackerNewsConnector()
        )
This allows my AI to discover this tool and call it without me writing any special integration code!
Testing MCP Discovery
# I tested if the AI could discover my tools
PYTHONPATH=. python -c "
from src.services.mcp_server import get_mcp_server

mcp = get_mcp_server()
print('Available tools:')
for tool in mcp.list_tools():
    print(f'  ? {tool[\"name\"]}: {tool[\"description\"]}')
"

# Output I got:
# Available tools:
#   ? fetch_hackernews: Fetch top tech stories from HackerNews...
#   ? get_current_weather: Get current weather conditions...
#   ? fetch_rss_feeds: Fetch articles from configured RSS feeds...
Later, when I wanted to add RSS feeds, I just created a new connector and registered it. The AI automatically discovered it – no changes needed to my ReAct agent or LangGraph workflows!
Part 3: Building RAG Pipeline
As LLM have limited context window, RAG (Retrieval-Augmented Generation) can be used to create an AI semantic memory by:
Converting text to vectors (embeddings)
Storing vectors in a database (ChromaDB)
Searching by meaning, not just keywords
Building RAG Service
I then implemented RAG service as follows:
# src/services/rag_service.py
class RAGService:
    """Semantic memory using ChromaDB."""

    def __init__(self):
        # Initialize ChromaDB (stores on disk)
        self.client = chromadb.Client(Settings(
            persist_directory="./data/chroma_data"
        ))

        # Create collection for my articles
        self.collection = self.client.get_or_create_collection(
            name="daily_minutes"
        )

        # Ollama for creating embeddings
        self.ollama = get_ollama_service()

    async def add_document(self, content: str, metadata: dict):
        """Store a document with its vector embedding."""

        # 1. Convert text to vector (this is the magic!)
        embedding = await self.ollama.create_embeddings(content)

        # 2. Store in ChromaDB with metadata
        self.collection.add(
            documents=[content],
            embeddings=[embedding],
            metadatas=[metadata],
            ids=[hashlib.md5(content.encode()).hexdigest()]
        )

    async def search(self, query: str, max_results: int = 5):
        """Semantic search - find by meaning!"""

        # 1. Convert query to vector
        query_embedding = await self.ollama.create_embeddings(query)

        # 2. Find similar documents (cosine similarity)
        results = self.collection.query(
            query_embeddings=[query_embedding],
            n_results=max_results
        )

        return results
I then tested it:
# I stored an article about EU AI regulations
await rag.add_document(
    content="European Union announces comprehensive AI safety regulations "
            "focusing on transparency, accountability, and privacy protection.",
    metadata={"type": "article", "topic": "ai_safety"}
)

# Later, I searched using different words
results = await rag.search("privacy rules for artificial intelligence")
This shows that RAG isn’t just storing text – it understands meaning through vector mathematics.
What I Store in RAG
Over time, I started storing other data like emails, todos, events, etc:
# 1. News articles (for historical context)
await rag.add_article(article)

# 2. Action items from emails
await rag.add_todo(
    "Complete security training by Nov 15",
    source="email",
    priority="high"
)

# 3. Meeting context
await rag.add_document(
    "Q4 Planning Meeting - need to prepare budget estimates",
    metadata={"type": "meeting", "date": "2025-02-01"}
)

# 4. User preferences (this feeds into RLHF later!)
await rag.add_document(
    "User marked 'AI safety' topics as important",
    metadata={"type": "preference", "category": "ai_safety"}
)
With this AI memory, it can answer questions like:
“What do I need to prepare for tomorrow’s meeting?”
“What AI safety articles did I read this week?”
“What are my pending action items?”
Part 4: Building the ReAct Agent
In my early prototyping, the implementation just executed blindly:
This wasted time fetching data I didn’t need. I wanted my AI to reason first, then act so I applied ReAct (Reasoning + Acting), which works in a loop:
THOUGHT: AI reasons about what to do next
ACTION: AI executes a tool/function
OBSERVATION: AI observes the result
Repeat until goal achieved
Implementing My ReAct Agent
Here is how it ReAct agent was built:
# src/agents/react_agent.py
class ReActAgent:
    """Agent that thinks before acting."""

    async def run(self, goal: str):
        """Execute goal using ReAct loop."""
        steps = []
        observations = []

        for step_num in range(1, self.max_steps + 1):
            # 1. THOUGHT: Ask AI what to do next
            thought = await self._generate_thought(goal, steps, observations)

            # Check if we're done
            if "FINAL ANSWER" in thought:
                return self._extract_answer(thought)

            # 2. ACTION: Parse what action to take
            action = self._parse_action(thought)
            # Example: {"action": "call_tool", "tool": "fetch_hackernews"}

            # 3. EXECUTE: Run the action via MCP
            observation = await self._execute_action(action)
            observations.append(observation)

            # Record this step for debugging
            steps.append({
                "thought": thought,
                "action": action,
                "observation": observation
            })

        return {"steps": steps, "answer": "Max steps reached"}
The hardest part was writing the prompts that made the AI reason properly:
async def _generate_thought(self, goal, steps, observations):
    """Generate next reasoning step."""

    prompt = f"""Goal: {goal}

Previous steps:
{self._format_steps(steps)}

Available actions:
- query_rag(query): Search my semantic memory
- call_tool(name, params): Execute an MCP tool
- FINAL ANSWER: When you have everything needed

Think step-by-step. What should I do next?

Format your response as:
THOUGHT: <your reasoning>
ACTION: <action to take>
"""

    return await self.ollama.generate(prompt, temperature=0.7)
I added debug logging to see the AI’s reasoning:
? Goal: Generate my daily brief

Step 1:
  ? THOUGHT: I need to gather news, check weather, and see user preferences
  ? ACTION: call_tool("fetch_hackernews", max_stories=10)
  ?? OBSERVATION: Fetched 10 articles about AI, privacy, and tech

Step 2:
  ? THOUGHT: Got news. User preferences would help prioritize.
  ? ACTION: query_rag("user interests and preferences")
  ?? OBSERVATION: User cares about AI safety, security, privacy

Step 3:
  ? THOUGHT: Should filter articles to user's interests
  ? ACTION: call_tool("get_current_weather", location="Seattle")
  ?? OBSERVATION: 70°F, Partly cloudy

Step 4:
  ? THOUGHT: I have news (filtered by user interests), weather. Ready to generate.
  ? ACTION: FINAL ANSWER
  ? Generated personalized brief highlighting AI safety articles
# src/models/email.py
class ImportanceScoringMixin:
    """Learn from user feedback."""

    importance_score: float = 0.5  # AI's base score
    boost_labels: Set[str] = set()  # Words user marked important
    filter_labels: Set[str] = set()  # Words user wants to skip

    def apply_rlhf_boost(self, content_text: str) -> float:
        """Adjust score based on learned preferences."""
        adjusted = self.importance_score
        content_lower = content_text.lower()

        # Boost if content matches important keywords
        for label in self.boost_labels:
            if label.lower() in content_lower:
                adjusted += 0.1  # Bump up priority!

        # Penalize if content matches skip keywords
        for label in self.filter_labels:
            if label.lower() in content_lower:
                adjusted -= 0.2  # Push down priority!

        # Keep in valid range [0, 1]
        return max(0.0, min(1.0, adjusted))
Note: Code examples are simplified for clarity. See GitHub for the full production implementation.
Adding Feedback UI
In my Streamlit dashboard, I added ?/? buttons:
# User sees an email
for email in emails:
    col1, col2, col3 = st.columns([8, 1, 1])

    with col1:
        st.write(f"**{email.subject}**")
        st.info(email.snippet)

    with col2:
        if st.button("?", key=f"important_{email.id}"):
            # Extract what made this important
            keywords = await extract_keywords(email.subject + email.body)
            # Add to boost labels
            user_profile.boost_labels.update(keywords)
            st.success(f"? Learned: You care about {', '.join(keywords)}")

    with col3:
        if st.button("?", key=f"skip_{email.id}"):
            # Learn to deprioritize these
            keywords = await extract_keywords(email.subject)
            user_profile.filter_labels.update(keywords)
            st.success(f"? Will deprioritize: {', '.join(keywords)}")
Part 6: Orchestrating with LangGraph
Instead of fetching contents from all data sources sequential for the daily minutes:
Note: WorkflowState is a shared dictionary that nodes pass data through – like a clipboard for the workflow. The analyze node parses the user’s request and decides which data sources are needed.
Implementing Node Functions
Each node is just an async function:
async def _fetch_news(self, state: WorkflowState):
    """Fetch news in parallel."""
    try:
        articles = await self.mcp.execute_tool(
            "fetch_hackernews",
            {"max_stories": 10}
        )
        state["news_articles"] = articles
    except Exception as e:
        state["errors"].append(f"News fetch failed: {e}")
        state["news_articles"] = []

    return state

async def _search_context(self, state: WorkflowState):
    """Search RAG for relevant context."""
    query = state["user_request"]
    results = await self.rag.search(query, max_results=5)

    # Build context string
    context = "\n".join([r['content'] for r in results])
    state["context"] = context

    return state
Running the Workflow
# Execute the complete workflow
result = await orchestrator.run("Generate my daily brief")

# I get back:
{
    "news_articles": [...],      # 10 articles
    "emails": [...],              # 5 unread
    "calendar_events": [...],     # 3 events today
    "context": "...",             # RAG context
    "summary": "...",             # Generated brief
    "processing_time": 5.2        # Seconds (not 11!)
}
The LLM Factory Pattern – How I Made It Cloud-Ready
Following code snippet shows how does the system seamlessly switch between local Ollama and cloud providers:
# src/services/llm_factory.py
def get_llm_service():
    """Factory pattern - works with any LLM provider."""
    provider = os.getenv("LLM_PROVIDER", "ollama")

    if provider == "ollama":
        return OllamaService(
            base_url=os.getenv("OLLAMA_BASE_URL", "http://localhost:11434"),
            model=os.getenv("OLLAMA_MODEL", "qwen2.5:7b")
        )
    elif provider == "openai":
        return OpenAIService(
            api_key=os.getenv("OPENAI_API_KEY"),
            model=os.getenv("OPENAI_MODEL", "gpt-4-turbo")
        )
    elif provider == "google":
        # Like in my previous Vertex AI article!
        return VertexAIService(
            project_id=os.getenv("GCP_PROJECT_ID"),
            model="gemini-1.5-flash"
        )

    raise ValueError(f"Unknown provider: {provider}")

# All services implement the same interface:
class BaseLLMService:
    async def generate(self, prompt: str, **kwargs) -> str:
        """Generate text from prompt."""
        raise NotImplementedError

    async def create_embeddings(self, text: str) -> List[float]:
        """Create vector embeddings."""
        raise NotImplementedError
The ReAct agent, RAG service, and Brief Generator all use get_llm_service() – they don’t care which provider is running!
Part 7: The Challenges I Faced
Building this system wasn’t smooth. Here are the biggest challenges:
Challenge 1: LLM Generating Vague Summaries
Problem: My early briefs were terrible:
? "Today's news features a mix of technology updates and various topics."
This was useless! I needed specifics.
Solution: I rewrote my prompts with explicit rules:
# ? Better prompt with strict rules
prompt = f"""Generate a daily brief following these STRICT rules:

PRIORITY ORDER (most important first):
1. Urgent emails or action items
2. Today's calendar events
3. Market/business news
4. Tech news

TLDR FORMAT (exactly 3 bullets, be SPECIFIC):
* Bullet 1: Most urgent email/action (include WHO, WHAT, WHEN)
   Example: "Client escalation from Acme Corp affecting 50K users - response needed by 2pm"

* Bullet 2: Most important calendar event today (include TIME and WHAT TO PREPARE)
   Example: "2pm: Board meeting - prepare Q4 revenue slides"

* Bullet 3: Top market/business news (include NUMBERS/SPECIFICS)
   Example: "Federal Reserve raises rates 0.5% to 5.25% - affects tech hiring"

AVOID THESE PHRASES (they're too vague):
? "mix of updates"
? "various topics"
? "continues to make progress"
? "interesting developments"

USE SPECIFIC DETAILS:
? Names (people, companies)
? Numbers (percentages, dollar amounts, deadlines)
? Times (when something happened or needs to happen)

Content to summarize:
{content}

Generate: TLDR (3 bullets), Summary (5-6 detailed sentences), Key Insights (5 bullets)
"""
Result: Went from vague ? specific, actionable briefs!
Solution: Split and render each bullet separately:
# ? Doesn't work
st.info(tldr)

# ? Works!
tldr_lines = [line.strip() for line in tldr.split('\n') if line.strip()]
for bullet in tldr_lines:
    st.markdown(bullet)
Challenge 3: AI Prioritizing News Over Personal Tasks
Problem: My brief focused on tech news, ignored my urgent emails:
Solution: I restructured my prompt to explicitly label priority:
# src/services/brief_scheduler.py
async def _generate_daily_brief(emails, calendar, news, weather):
    """Generate prioritized daily brief with structured prompt."""

    # Separate market vs tech news (market is higher priority)
    market_news = [n for n in news if 'market' in n.tags]
    tech_news = [n for n in news if 'market' not in n.tags]

    # Sort emails by RLHF-boosted importance score
    important_emails = sorted(
        emails,
        key=lambda e: e.apply_rlhf_boost(e.subject + e.snippet),
        reverse=True
    )[:5]  # Top 5 only

    # Build structured prompt with clear priority
    prompt = f"""
**SECTION 1: IMPORTANT EMAILS (HIGHEST PRIORITY - use for TLDR bullet #1)**
{format_emails(important_emails)}

**SECTION 2: TODAY'S CALENDAR (SECOND PRIORITY - use for TLDR bullet #2)**
{format_calendar(calendar)}

**SECTION 3: MARKET NEWS (THIRD PRIORITY - use for TLDR bullet #3)**
{format_market_news(market_news)}

**SECTION 4: TECH NEWS (LOWEST PRIORITY - summarize briefly)**
{format_tech_news(tech_news)}

**SECTION 5: WEATHER**
{format_weather(weather)}

Generate a daily brief following this EXACT priority order:
1. Email action items FIRST
2. Calendar events SECOND
3. Market/business news THIRD
4. Tech news LAST (brief mention only)

TLDR must have EXACTLY 3 bullets using content from sections 1, 2, 3 (not section 4).
"""

    return await llm.generate(prompt)
Result: My urgent email moved to bullet #1 where it belongs! The AI now respects the priority structure.
Challenge 4: RAG Returning Irrelevant Results
Problem: Semantic search sometimes returned weird matches:
Query: "AI safety regulations"
Result: Article about "safe AI models for healthcare" (wrong context!)
Solution: I added metadata filtering and better embeddings:
? Fast: No network latency, responses in 2-3 seconds
? Private: My emails never touch the internet
? Offline: Works on planes, cafes without WiFi
Trade-offs I accept:
?? Slower than GPT-4
?? Less capable reasoning (7B vs 175B+ parameters)
?? Manual updates (pull new Ollama models myself)
Production
# .env.production
LLM_PROVIDER=openai  # Just change this line!
OPENAI_API_KEY=sk-...
OPENAI_MODEL=gpt-4-turbo
DATABASE_URL=postgresql://...  # Scalable DB
REDIS_URL=redis://prod-cluster:6379  # Distributed cache
The magic: Same code, different LLM!
# src/services/llm_factory.py
def get_llm_service():
    """Factory pattern - works with any LLM."""
    provider = os.getenv("LLM_PROVIDER", "ollama")

    if provider == "ollama":
        return OllamaService()
    elif provider == "openai":
        return OpenAIService()
    elif provider == "anthropic":
        return ClaudeService()
    elif provider == "google":
        return VertexAIService()  # Like in my previous article!

    raise ValueError(f"Unknown provider: {provider}")
Part 11: Testing Everything
I used TDD extensively to build each feature so that it’s easy to debug if something is not working:
Unit Tests
# Test MCP tool registration
pytest tests/unit/test_mcp_server.py -v

# Test RAG semantic search
pytest tests/unit/test_rag_service.py -v

# Test ReAct reasoning
pytest tests/unit/test_react_agent.py -v

# Test RLHF scoring
pytest tests/unit/test_rlhf_scoring.py -v

# Run all unit tests
pytest tests/unit/ -v
# 516 passed in 45.23s ?
Integration Tests
Also, in some cases unit tests couldn’t fully validate so I wrote integration tests to test persistence logic with sqlite database or generating real analysis from news:
# tests/integration/test_brief_quality.py
async def test_tldr_has_three_bullets():
    """TLDR must have exactly 3 bullets."""
    brief = await db.get_cache('daily_brief_data')
    tldr = brief.get('tldr', '')

    bullets = [line for line in tldr.split('\n') if line.strip().startswith('•')]

    assert len(bullets) == 3, f"Expected 3 bullets, got {len(bullets)}"
    assert "email" in bullets[0].lower() or "urgent" in bullets[0].lower()
    assert "calendar" in bullets[1].lower() or "meeting" in bullets[1].lower()

async def test_no_generic_phrases():
    """Brief should not contain vague phrases."""
    brief = await db.get_cache('daily_brief_data')
    summary = brief.get('summary', '')

    bad_phrases = ["mix of updates", "various topics", "continues to"]
    for phrase in bad_phrases:
        assert phrase not in summary.lower(), f"Found generic phrase: {phrase}"
Manual Testing (My Daily Workflow)
# 1. Fetch data and generate brief
make preload

# Output I see:
# ? Fetching news from HackerNews... (10 articles)
# ? Fetching weather... (70°F, Sunny)
# ? Analyzing articles with AI... (15 articles)
# ? Generating daily brief... (Done in 18.3s)
# ? Brief saved to database

# 2. Launch UI
streamlit run src/ui/streamlit_app.py

# 3. Check brief quality
# - Is TLDR specific? (not vague)
# - Are priorities correct? (email > calendar > news)
# - Are action items extracted? (from emails)
# - Did RLHF work? (boosted my preferences)
Note: You can schedule preload via cron, e.g., I run it at 6am daily so that brief is ready when I wake up.
Conclusion
Building this Daily Minutes assistant changed how I start my day by giving me a personalized 3-minute brief highlighting what truly matters. Agentic AI excels at automating complex workflows that require judgment, not just execution. The ReAct agent reasons through prioritization. RAG provides contextual memory across weeks of interactions. RLHF learns from my feedback, getting smarter about what I care about. LangGraph orchestrates parallel execution across multiple data sources. These building blocks work together to handle decisions that traditionally needed human attention.
I’m sharing this as a proof of concept, not a finished product. The code works, saves me real time, and demonstrates these techniques effectively. But I’m still iterating. The OAuth integration and error handling needs improvements. The RLHF scoring could be more sophisticated. The ReAct agent sometimes overthinks simple tasks. I’m adding these improvements gradually, testing each change against my daily routine.
The real lesson? Start small, validate with real use, then scale with confidence. I used Claude Code to build this in spare time over a couple weeks. You can do the same—clone the repo, adapt it to your workflow, and see where agentic AI saves you time.
Try It Yourself
# Clone my repo
git clone https://github.com/bhatti/daily-minutes
cd daily-minutes

# Install dependencies
pip install -r requirements.txt

# Setup Ollama
ollama pull qwen2.5:7b
ollama pull nomic-embed-text

# Generate your first brief
make preload

# Launch dashboard
streamlit run src/ui/streamlit_app.py
I spent over a decade in FinTech building the systems traders rely on every day like high-performance APIs streaming real-time charts, technical indicator calculators processing millions of data points per second, and comprehensive analytical platforms ingesting SEC 10-Ks and 10-Qs into distributed databases. We used to parse XBRL filings, ran news/sentiment analysis on earnings calls using early NLP models to detect market anomalies.
Over the past couple of years, I’ve been building AI agents and creating automated workflows that tackle complex problems using agentic AI. I’m also revisiting challenges I hit while building trading tools for fintech companies. For example, the AI I’m working with now reasons about which analysis to run. It grasps context, retrieves information on demand, and orchestrates complex workflows autonomously. It applies Black-Scholes when needed, switches to technical analysis when appropriate, and synthesizes insights from multiple sources—no explicit rules required.
The best part is that I’m running this entire system on my laptop using Ollama and open-source models. Zero API costs during development. When I need production scale, I can switch to cloud APIs with a few lines of code. I will walk you through this journey of rebuilding financial analysis with agentic AI – from traditional algorithms to thinking machines and from rigid pipelines to adaptive workflows.
Why This Approach Changes Everything
Traditional financial systems process data. Agentic AI systems understand objectives and figure out how to achieve them. That’s the fundamental difference that took me a while to fully grasp. And unlike my old systems that required separate codebases for each type of analysis, this one uses the same underlying patterns for everything.
The Money-Saving Secret: Local Development with Ollama
Here’s something that would have saved my startup thousands: you can build and test sophisticated AI systems entirely locally using Ollama. No API keys, no usage limits, no surprise bills.
# This runs entirely on your machine - zero external API calls
from langchain_ollama import OllamaLLM as Ollama

# Local LLM for development and testing
dev_llm = Ollama(
    model="llama3.2:latest",      # 3.2GB model that runs on most laptops
    temperature=0.7,
    base_url="http://localhost:11434"  # Your local Ollama instance
)

# When ready for production, switch to cloud providers
from langchain_openai import ChatOpenAI

prod_llm = ChatOpenAI(
    model="gpt-4",
    temperature=0.7
)

# The beautiful part? Same interface, same code
def analyze_stock(llm, ticker):
    # This function works with both local and cloud LLMs
    prompt = f"Analyze {ticker} stock fundamentals"
    return llm.invoke(prompt)
During development, I run hundreds of experiments daily without spending a cent. Once the prompts and workflows are refined, switching to cloud APIs is literally changing one line of code.
Understanding ReAct: How AI Learns to Think Step-by-Step
ReAct (Reasoning and Acting) was the first pattern that made me realize we weren’t just building chatbots anymore. Let me show you exactly how it works with real code from my system.
The Human Thought Process We’re Mimicking
When I manually analyzed stocks, my mental process looked something like this:
“I need to check if Apple is overvalued”
“Let me get the current P/E ratio”
“Hmm, 28.5 seems high, but what’s the industry average?”
“Tech sector average is 25, so Apple is slightly premium”
“But wait, what’s their growth rate?”
“15% annual growth… that PEG ratio of 1.9 suggests fair value”
“Let me check recent news for any red flags…”
ReAct agents follow this exact pattern. Here’s the actual implementation:
class ReActAgent:
    """ReAct Agent that demonstrates reasoning traces"""

    # This is the actual prompt from the project
    REACT_PROMPT = """You are a financial analysis agent that uses the ReAct framework to solve problems.

You have access to the following tools:

{tools_description}

Use the following format EXACTLY:

Question: the input question you must answer
Thought: you should always think about what to do
Action: the action to take, must be one of [{tool_names}]
Action Input: the input to the action
Observation: the result of the action
... (this Thought/Action/Action Input/Observation can repeat N times)
Thought: I now know the final answer
Final Answer: the final answer to the original input question

Begin! Remember to ALWAYS follow the format exactly.

Question: {question}
Thought: {scratchpad}"""

    def _parse_response(self, response: str) -> Tuple[str, str, str, bool]:
        """Parse LLM response to extract thought, action, and input"""
        response = response.strip()

        # Check for final answer
        if "Final Answer:" in response:
            parts = response.split("Final Answer:")
            thought = parts[0].strip()
            final_answer = parts[1].strip()
            return thought, "final_answer", final_answer, True

        # Parse using regex from actual implementation
        thought_match = re.search(r"Thought:\s*(.+?)(?=Action:|$)", response, re.DOTALL)
        action_match = re.search(r"Action:\s*(.+?)(?=Action Input:|$)", response, re.DOTALL)
        input_match = re.search(r"Action Input:\s*(.+?)(?=Observation:|$)", response, re.DOTALL)

        thought = thought_match.group(1).strip() if thought_match else "Thinking..."
        action = action_match.group(1).strip() if action_match else "unknown"
        action_input = input_match.group(1).strip() if input_match else ""

        return thought, action, action_input, False
I can easily trace through reasoning to debug how AI reached its conclusion.
RAG: Solving the Hallucination Problem Once and For All
Early in my experiments, I had to deal with a bit of hallucinations when querying financial data with AI so I applied RAG (Retrieval-Augmented Generation) to give AI access to a searchable library of documents.
How RAG Actually Works
You can think of RAG like having a research assistant who, instead of relying on memory, always checks the source documents before answering:
class RAGEngine:
    """
    This engine solved my hallucination problems by grounding
    all responses in actual documents. It's like giving the AI
    access to your company's document database.
    """

    def __init__(self):
        # Initialize embeddings - this converts text to searchable vectors
        # Using Ollama's local embedding model (free!)
        self.embeddings = OllamaEmbeddings(
            model="nomic-embed-text:latest"  # 274MB model, runs fast
        )

        # Text splitter - crucial for handling large documents
        self.text_splitter = RecursiveCharacterTextSplitter(
            chunk_size=512,      # Small enough for context window
            chunk_overlap=50,    # Overlap prevents losing context at boundaries
            separators=["\n\n", "\n", ". ", " "]  # Smart splitting
        )

        # Vector store - where we keep our searchable documents
        self.vector_store = FAISS.from_texts(["init"], self.embeddings)

    def load_financial_documents(self, ticker: str):
        """
        In production, this would load real 10-Ks, 10-Qs, earnings calls.
        For now, I'm using sample documents to demonstrate the concept.
        """

        # Imagine these are real SEC filings
        documents = [
            {
                "content": f"""
                {ticker} Q3 2024 Earnings Report

                Revenue: $94.9 billion, up 6% year over year
                iPhone revenue: $46.2 billion
                Services revenue: $23.3 billion (all-time record)

                Gross margin: 45.2%
                Operating cash flow: $28.7 billion

                CEO Tim Cook: "We're incredibly pleased with our record
                September quarter results and strong momentum heading into
                the holiday season."
                """,
                "metadata": {
                    "source": "10-Q Filing",
                    "date": "2024-10-31",
                    "document_type": "earnings_report",
                    "ticker": ticker
                }
            },
            # ... more documents
        ]

        # Process each document
        for doc in documents:
            # Split into chunks
            chunks = self.text_splitter.split_text(doc["content"])

            # Create document objects with metadata
            for i, chunk in enumerate(chunks):
                metadata = doc["metadata"].copy()
                metadata["chunk_id"] = i
                metadata["total_chunks"] = len(chunks)

                # Add to vector store
                self.vector_store.add_texts(
                    texts=[chunk],
                    metadatas=[metadata]
                )

        print(f"? Loaded {len(documents)} documents for {ticker}")

    def answer_with_sources(self, question: str) -> Dict[str, Any]:
        """
        This is where RAG shines - every answer comes with sources
        """
        # Find relevant document chunks
        relevant_docs = self.vector_store.similarity_search_with_score(
            question,
            k=5  # Top 5 most relevant chunks
        )

        # Build context from retrieved documents
        context_parts = []
        sources = []

        for doc, score in relevant_docs:
            # Only use highly relevant documents (score < 0.5)
            if score < 0.5:
                context_parts.append(doc.page_content)
                sources.append({
                    "content": doc.page_content[:100] + "...",
                    "source": doc.metadata.get("source"),
                    "date": doc.metadata.get("date"),
                    "relevance_score": float(score)
                })

        context = "\n\n---\n\n".join(context_parts)

        # Generate answer grounded in retrieved context
        prompt = f"""Based on the following verified documents, answer the question.
        If the answer is not in the documents, say "I don't have that information."

        Documents:
        {context}

        Question: {question}

        Answer (cite sources):"""

        response = self.llm.invoke(prompt)

        return {
            "answer": response,
            "sources": sources,
            "confidence": len(sources) / 5  # Simple confidence metric
        }
MCP-Style Tools: Extending AI Capabilities Beyond Text
Model Context Protocol (MCP) helped me to build a flexible tool system. Instead of hardcoding every capability, we give the AI tools it can discover and use:
class BaseTool(ABC):
    """
    Every tool self-describes its capabilities.
    This is like giving the AI an instruction manual for each tool.
    """

    @abstractmethod
    def get_schema(self) -> ToolSchema:
        """Define what this tool does and how to use it"""
        pass

    @abstractmethod
    def execute(self, **kwargs) -> Any:
        """Actually run the tool"""
        pass

class StockDataTool(BaseTool):
    """
    Real example: This tool replaced my entire market data microservice
    """

    def get_schema(self) -> ToolSchema:
        return ToolSchema(
            name="stock_data",
            description="Fetch real-time stock market data including price, volume, and fundamentals",
            category=ToolCategory.DATA_RETRIEVAL,
            parameters=[
                ToolParameter(
                    name="ticker",
                    type="string",
                    description="Stock symbol like AAPL or GOOGL",
                    required=True
                ),
                ToolParameter(
                    name="metrics",
                    type="array",
                    description="Specific metrics to retrieve",
                    required=False,
                    default=["price", "volume", "pe_ratio"],
                    enum=["price", "volume", "pe_ratio", "market_cap",
                          "dividend_yield", "beta", "rsi", "moving_avg_50"]
                )
            ],
            returns="Dictionary containing requested stock metrics",
            examples=[
                {"ticker": "AAPL", "metrics": ["price", "pe_ratio"]},
                {"ticker": "TSLA", "metrics": ["price", "volume", "rsi"]}
            ]
        )

    def execute(self, **kwargs) -> Dict[str, Any]:
        """
        This connects to real market data APIs.
        In my old system, this was a 500-line service.
        """
        ticker = kwargs["ticker"].upper()
        metrics = kwargs.get("metrics", ["price", "volume"])

        # Using yfinance for real market data
        import yfinance as yf
        stock = yf.Ticker(ticker)
        info = stock.info

        result = {"ticker": ticker, "timestamp": datetime.now().isoformat()}

        # Fetch requested metrics
        metric_mapping = {
            "price": lambda: info.get("currentPrice", stock.history(period="1d")['Close'].iloc[-1]),
            "volume": lambda: info.get("volume", 0),
            "pe_ratio": lambda: info.get("trailingPE", 0),
            "market_cap": lambda: info.get("marketCap", 0),
            "dividend_yield": lambda: info.get("dividendYield", 0) * 100,
            "beta": lambda: info.get("beta", 1.0),
            "rsi": lambda: self._calculate_rsi(stock),
            "moving_avg_50": lambda: stock.history(period="50d")['Close'].mean()
        }

        for metric in metrics:
            if metric in metric_mapping:
                try:
                    result[metric] = metric_mapping[metric]()
                except Exception as e:
                    result[metric] = f"Error: {str(e)}"

        return result
class ToolParameter(BaseModel):
    """Actual parameter definition from project"""
    name: str
    type: str  # "string", "number", "boolean", "object", "array"
    description: str
    required: bool = True
    default: Any = None
    enum: Optional[List[Any]] = None

class CalculatorTool(BaseTool):
    """Actual calculator implementation from project"""

    def execute(self, **kwargs) -> float:
        """Safely evaluate mathematical expression"""
        self.validate_input(**kwargs)

        expression = kwargs["expression"]
        precision = kwargs.get("precision", 2)

        try:
            # Security: Remove dangerous operations
            safe_expr = expression.replace("__", "").replace("import", "")

            # Define allowed functions (from actual code)
            safe_dict = {
                "abs": abs, "round": round, "min": min, "max": max,
                "sum": sum, "pow": pow, "len": len
            }

            # Add math functions
            import math
            for name in ["sqrt", "log", "log10", "sin", "cos", "tan", "pi", "e"]:
                if hasattr(math, name):
                    safe_dict[name] = getattr(math, name)

            result = eval(safe_expr, {"__builtins__": {}}, safe_dict)

            return round(result, precision)

        except Exception as e:
            raise ValueError(f"Calculation error: {e}")
Orchestrating Everything with LangGraph
This is where all the pieces come together. LangGraph allows coordinating multiple agents and tools in sophisticated workflows:
class FinancialAnalysisWorkflow:
    """
    This workflow replaces what used to be multiple microservices,
    message queues, and orchestration layers. It's beautiful.
    """

    def _build_graph(self) -> StateGraph:
        """
        Define how different analysis components work together
        """
        workflow = StateGraph(AgentState)

        # Add all our analysis nodes
        workflow.add_node("collect_data", self.collect_market_data)
        workflow.add_node("technical_analysis", self.run_technical_analysis)
        workflow.add_node("fundamental_analysis", self.run_fundamental_analysis)
        workflow.add_node("sentiment_analysis", self.analyze_sentiment)
        workflow.add_node("options_analysis", self.analyze_options)
        workflow.add_node("portfolio_optimization", self.optimize_portfolio)
        workflow.add_node("rag_research", self.search_documents)
        workflow.add_node("react_reasoning", self.reason_about_data)
        workflow.add_node("generate_report", self.create_final_report)

        # Entry point
        workflow.set_entry_point("collect_data")

        # Define the flow - some parallel, some sequential
        workflow.add_edge("collect_data", "technical_analysis")
        workflow.add_edge("collect_data", "fundamental_analysis")
        workflow.add_edge("collect_data", "sentiment_analysis")

        # These can run in parallel
        workflow.add_conditional_edges(
            "collect_data",
            self.should_run_options,  # Only if options are relevant
            {
                "yes": "options_analysis",
                "no": "rag_research"
            }
        )

        # Everything feeds into reasoning
        workflow.add_edge(["technical_analysis", "fundamental_analysis",
                          "sentiment_analysis", "options_analysis"],
                          "react_reasoning")

        # Reasoning leads to report
        workflow.add_edge("react_reasoning", "generate_report")

        # End
        workflow.add_edge("generate_report", END)

        return workflow

    def analyze_stock_comprehensive(self, ticker: str, investment_amount: float = 10000):
        """
        This single function replaces what used to be an entire team's
        worth of manual analysis.
        """
        initial_state = {
            "ticker": ticker,
            "investment_amount": investment_amount,
            "timestamp": datetime.now(),
            "messages": [],
            "market_data": {},
            "technical_indicators": {},
            "fundamental_metrics": {},
            "sentiment_scores": {},
            "options_data": {},
            "portfolio_recommendation": {},
            "documents_retrieved": [],
            "reasoning_trace": [],
            "final_report": "",
            "errors": []
        }

        # Run the workflow
        try:
            result = self.app.invoke(initial_state)
            return self._format_comprehensive_report(result)
        except Exception as e:
            # Graceful degradation
            return self._run_basic_analysis(ticker, investment_amount)
class WorkflowNodes:
    """Collection of workflow nodes from actual project"""

    def collect_market_data(self, state: AgentState) -> AgentState:
        """Node: Collect market data using tools"""
        print("? Collecting market data...")

        ticker = state["ticker"]

        try:
            # Use actual stock data tool from project
            tool = self.tool_registry.get_tool("stock_data")
            market_data = tool.execute(
                ticker=ticker,
                metrics=["price", "volume", "market_cap", "pe_ratio", "52_week_high", "52_week_low"]
            )

            state["market_data"] = market_data

            # Add message to history
            state["messages"].append(
                AIMessage(content=f"Collected market data for {ticker}")
            )

        except Exception as e:
            state["error"] = f"Failed to collect market data: {str(e)}"
            state["market_data"] = {}

        return state
Here is a screenshot from the example showing workflow analysis:
Production Considerations: From Tutorial to Trading Floor
This tutorial demonstrates core concepts, but let me be clear – production deployment in financial services requires significantly more rigor. Having deployed similar systems in regulated environments, here’s what you’ll need to consider:
The Reality of Production Deployment
Production financial systems require months of parallel running and validation. In my experience, you’ll need:
class ProductionValidation:
    """
    Always run new systems parallel to existing ones
    """
    def validate_against_legacy(self, ticker: str):
        # Run both systems
        legacy_result = self.legacy_system.analyze(ticker)
        agent_result = self.agent_system.analyze(ticker)

        # Compare results
        discrepancies = self.compare_results(legacy_result, agent_result)

        # Log everything for audit
        self.audit_log.record({
            "ticker": ticker,
            "timestamp": datetime.now(),
            "legacy": legacy_result,
            "agent": agent_result,
            "discrepancies": discrepancies,
            "approved": len(discrepancies) == 0
        })

        # Require human review for discrepancies
        if discrepancies:
            return self.escalate_to_human(discrepancies)

        return agent_result
Integrating Traditional Financial Algorithms
While this tutorial uses general-purpose LLMs, production systems should combine AI with proven financial algorithms:
class HybridAnalyzer:
    """
    Combine traditional algorithms with AI reasoning
    """
    def analyze_options(self, ticker: str, strike: float, expiry: str):
        # Use traditional Black-Scholes for pricing
        traditional_price = self.black_scholes_pricer.calculate(
            ticker, strike, expiry
        )

        # Use AI for market context
        ai_context = self.agent.analyze_market_conditions(ticker)

        # Combine both
        if ai_context["volatility_regime"] == "high":
            # AI detected unusual conditions, adjust model
            adjusted_price = traditional_price * (1 + ai_context["vol_adjustment"])
            confidence = "low - unusual market conditions"
        else:
            adjusted_price = traditional_price
            confidence = "high - normal market conditions"

        return {
            "model_price": traditional_price,
            "adjusted_price": adjusted_price,
            "confidence": confidence,
            "reasoning": ai_context["reasoning"]
        }
Fitness Functions for Financial Accuracy
Financial data cannot tolerate hallucinations. Implement strict validation:
class FinancialFitnessValidator:
    """
    Reject hallucinated or impossible financial data
    """
    def validate_metrics(self, ticker: str, metrics: Dict):
        validations = {
            "pe_ratio": lambda x: -100 < x < 1000,
            "price": lambda x: x > 0,
            "market_cap": lambda x: x > 0,
            "dividend_yield": lambda x: 0 <= x <= 20,
            "revenue_growth": lambda x: -100 < x < 200
        }

        for metric, validator in validations.items():
            if metric in metrics:
                value = metrics[metric]
                if not validator(value):
                    raise ValueError(f"Invalid {metric}: {value} for {ticker}")

        # Cross-validation
        if "pe_ratio" in metrics and "earnings" in metrics:
            calculated_pe = metrics["price"] / metrics["earnings"]
            if abs(calculated_pe - metrics["pe_ratio"]) > 1:
                raise ValueError("P/E ratio doesn't match price/earnings")

        return True
Leverage Your Existing Data
If you have years of financial data in databases, you don’t need to start over. Use RAG to make it searchable:
# Convert your SQL database to vector-searchable documents
existing_data = sql_query("SELECT * FROM financial_reports")
rag_engine.add_documents([
    {"content": row.text, "metadata": {"date": row.date, "ticker": row.ticker}}
    for row in existing_data
])
Human-in-the-Loop
No matter how sophisticated your agents become, financial decisions affecting real money require human oversight. Build it in from day one:
Confidence thresholds that trigger human review
Clear audit trails showing agent reasoning
Easy override mechanisms
Gradual automation based on proven accuracy
class HumanInTheLoopWorkflow:
    """
    Ensure human review for critical decisions
    """
    def execute_trade_recommendation(self, recommendation: Dict):
        # Auto-approve only for low-risk, small trades
        if (recommendation["risk_score"] < 0.3 and
            recommendation["amount"] < 10000):
            return self.execute(recommendation)

        # Require human approval for everything else
        approval_request = {
            "recommendation": recommendation,
            "agent_reasoning": recommendation["reasoning_trace"],
            "confidence": recommendation["confidence_score"],
            "risk_assessment": self.assess_risks(recommendation)
        }

        # Send to human reviewer
        human_decision = self.request_human_review(approval_request)

        if human_decision["approved"]:
            return self.execute(recommendation)
        else:
            self.log_rejection(human_decision["reason"])
Cost Management and Budget Controls
During development, Ollama gives you free local inference. In production, costs add up quickly so you need to build proper controls for calculating cost of analysis:
GPT-4: ~$30 per million tokens
Claude-3: ~$20 per million tokens
Local Llama: Free but needs GPU infrastructure
class CostController:
    """
    Prevent runway costs in production
    """
    def __init__(self, daily_budget: float = 100.0):
        self.daily_budget = daily_budget
        self.costs_today = 0.0
        self.cost_per_token = {
            "gpt-4": 0.00003,  # $0.03 per 1K tokens
            "claude-3": 0.00002,
            "llama-local": 0.0  # Free but has compute cost
        }

    def check_budget(self, estimated_tokens: int, model: str):
        estimated_cost = estimated_tokens * self.cost_per_token.get(model, 0)

        if self.costs_today + estimated_cost > self.daily_budget:
            # Switch to local model or cache
            return "use_local_model"

        return "proceed"

    def track_usage(self, tokens_used: int, model: str):
        cost = tokens_used * self.cost_per_token.get(model, 0)
        self.costs_today += cost

        # Alert if approaching limit
        if self.costs_today > self.daily_budget * 0.8:
            self.send_alert(f"80% of daily budget used: ${self.costs_today:.2f}")
Caching Is Essential
Caching is crucial for both performance and cost effectiveness when running expensive analysis using LLMs.
class CachedRAGEngine(RAGEngine):
    """
    Caching reduced our costs by 70% and improved response time by 5x
    """

    def __init__(self):
        super().__init__()
        self.cache = Redis(host='localhost', port=6379, db=0)
        self.cache_ttl = 3600  # 1 hour for financial data

    def retrieve_with_cache(self, query: str, k: int = 5):
        # Create cache key from query
        cache_key = f"rag:{hashlib.md5(query.encode()).hexdigest()}"

        # Check cache first
        cached = self.cache.get(cache_key)
        if cached:
            return json.loads(cached)

        # If not cached, retrieve and cache
        docs = self.vector_store.similarity_search(query, k=k)

        # Cache the results
        self.cache.setex(
            cache_key,
            self.cache_ttl,
            json.dumps([doc.to_dict() for doc in docs])
        )

        return docs
Fallback Strategies
A Cascading Fallback can help execute a task using a sequence of operations, ordered from the most preferred (highest quality/cost) to the least preferred (lowest quality/safest default).
class ResilientAgent:
    """
    Production agents need multiple fallback options
    """

    def analyze_with_fallbacks(self, ticker: str):
        strategies = [
            ("primary", self.run_full_analysis),
            ("fallback_1", self.run_simplified_analysis),
            ("fallback_2", self.run_basic_analysis),
            ("emergency", self.return_cached_or_default)
        ]

        for strategy_name, strategy_func in strategies:
            try:
                result = strategy_func(ticker)
                result["strategy_used"] = strategy_name
                return result
            except Exception as e:
                logger.warning(f"Strategy {strategy_name} failed: {e}")
                continue

        return {"error": "All strategies failed", "ticker": ticker}
Observability and Monitoring
Track token usage, latency, accuracy, and costs immediately. What you don’t measure, you can’t improve.
class ObservableWorkflow:
    """
    You need to know what your AI is doing in production
    """

    def __init__(self):
        self.metrics = PrometheusMetrics()
        self.tracer = JaegerTracer()

    def execute_with_observability(self, state: AgentState):
        with self.tracer.start_span("workflow_execution") as span:
            span.set_tag("ticker", state["ticker"])

            # Track token usage
            tokens_start = self.llm.get_num_tokens(state)

            # Execute workflow
            result = self.workflow.invoke(state)

            # Record metrics
            tokens_used = self.llm.get_num_tokens(result) - tokens_start
            self.metrics.record_tokens(tokens_used)
            self.metrics.record_latency(span.duration)

            # Log for debugging
            logger.info(f"Workflow completed", extra={
                "ticker": state["ticker"],
                "tokens": tokens_used,
                "duration": span.duration,
                "strategy": result.get("strategy_used", "primary")
            })

            return result
Closing Thoughts
This tutorial demonstrates how agentic AI transforms financial analysis from rigid pipelines to adaptive, thinking systems. The combination of ReAct reasoning, RAG grounding, tool use, and workflow orchestration creates capabilities that surpass traditional approaches in flexibility and ease of development.
Start Simple, Build Incrementally:
Week 1: Basic ReAct agent to understand reasoning loops
Week 2: Add tools for external capabilities
Week 3: Implement RAG to ground responses in real data
Week 4: Orchestrate with workflows
Develop everything locally with Ollama first – it’s free and private
The point of agentic AI is automation. Here’s the pragmatic approach:
Automate in Tiers:
Tier 1 (Fully Automated): Data collection, technical calculations, report generation
Instead of permanent human-in-the-loop, use RL to train agents that learn from feedback:
class ReinforcementLearningLoop:
    """
    Gradually reduce human involvement through learning
    """

    def ai_based_reinforcement(self, decision, outcome):
        """AI learns from market outcomes directly"""
        # Did the prediction match reality?
        reward = self.calculate_reward(decision, outcome)

        if decision["action"] == "buy" and outcome["price_change"] > 0.02:
            reward = 1.0  # Good decision
        elif decision["action"] == "hold" and abs(outcome["price_change"]) < 0.01:
            reward = 0.5  # Correct to avoid volatility
        else:
            reward = -0.5  # Poor decision

        # Update agent weights/prompts based on reward
        self.agent.update_policy(decision["context"], reward)

    def human_feedback_learning(self, decision, human_override=None):
        """Learn from human corrections when they occur"""
        if human_override:
            # Human disagreed - strong learning signal
            self.agent.record_correction(
                agent_decision=decision,
                human_decision=human_override,
                weight=10.0  # Human feedback weighted heavily
            )
        else:
            # Human agreed (implicitly by not overriding)
            self.agent.reinforce_decision(decision, weight=1.0)

    def adaptive_automation_threshold(self):
        """Dynamically adjust when human review is needed"""
        recent_accuracy = self.get_recent_accuracy(days=30)

        if recent_accuracy > 0.95:
            self.confidence_threshold *= 0.9  # Require less human review
        elif recent_accuracy < 0.85:
            self.confidence_threshold *= 1.1  # Require more human review

        return self.confidence_threshold
This approach reduces human involvement over time: use that feedback to train, gradually automate decisions where the agent consistently agrees with humans, and only escalate novel situations or low-confidence decisions.